- WiFi Connected But No Internet on Windows 10 [Solved]
- If You Can’t browse the web on any devices
- Restart your modem, router and your devices
- Restart your PC
- Can browse the web on other devices but not on the laptop
- Delete Temp Files
- Reset DNS
- Run Commands in Command Prompt
- Update Device Drivers
- Update or uninstall McAfee
- Fix WiFi Missing from Network & Internet Settings in Windows 10
- Fix WiFi Missing from Network & Internet Settings in Windows 10
- 1. Troubleshoot Network
- 1. Network is in range but missing
- 2. Networks are visible but can’t Connect
- 3. If Both the Troubleshoots don’t work for you
- Reset Network to Fix WiFi Missing from Network & Internet Settings in Windows 10
WiFi Connected But No Internet on Windows 10 [Solved]
Last Updated: 4 years ago

If you’re having WiFi or wireless connection just fine, but the Internet isn’t working or you’re only with limited connectivity, you’re not alone. Many Windows 10 users are reporting this problem as well. But no worries, it’s possible to fix.
Here are some effective solutions for you to try. You don’t need to try them all, just work your way down until you find the one that works.
If You Can’t browse the web on any devices
If all your devices, laptops, mobile phones, tablets, are connected to the WiFi just fine, but have no Internet access, the problem might be your network hardware or the network itself. Try the solutions below to fix it:
Restart your modem, router and your devices
1) Remove the power cord and the batteries (if there are any) from your modem and router.
2) Wait for at least 30 seconds after the light goes out. Then plug the modem in.
3) Wait for another 60 seconds, then plug your router in.
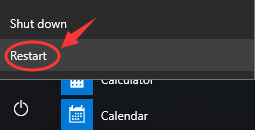
Restart your PC
1) On your keyboard, click the Start button and Restart.
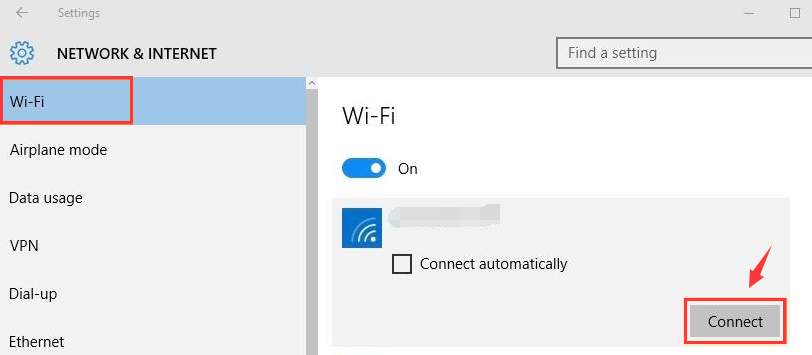
2) After your PC restarts, follow the path: click the Start button > Settings > Network & Internet > WiFi (on the left side of the pane). Select the network connection you have and click Connect.
If the problem persists, try contact your network provider or the manufacturer of your router.
Can browse the web on other devices but not on the laptop
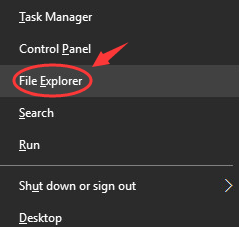
Delete Temp Files
1) On your keyboard, press the Windows key and X at the same time, then click File Explorer.
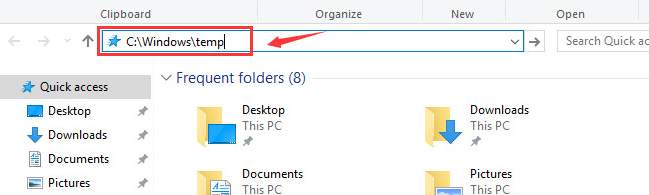
2) In the address box, type in C:\Windows\temp and press Enter.
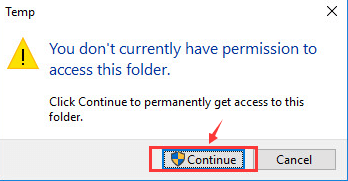
3) If you’re prompted about administrator permission, click Continue.
4) You’ll see many temp files here in this folder. Press Ctrl + A at the same time to select all the files, then right-click and click Delete.

5) Now, re-connect to the network. See if the problem persists.
Reset DNS
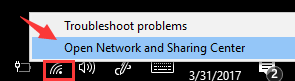
1) Right-click the network connection icon at the bottom right corner and click Open Network and Sharing Center.
2) Click Change adapter settings.
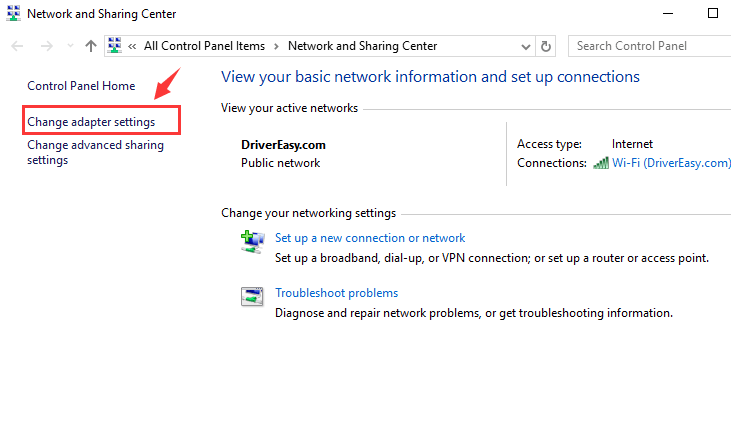
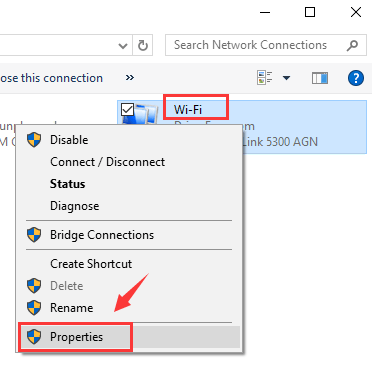
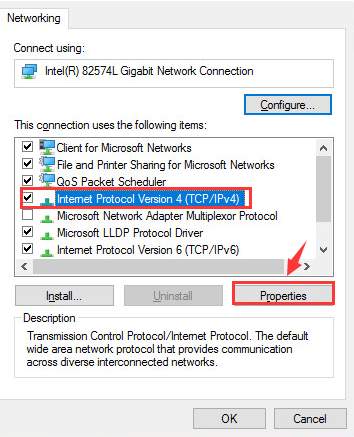
3) Right-click your WiFi adapter and click Properties.
4) Select Internet Protocol Version 4 (TCP/IPv4) and click Properties.
5) Click Obtain an IP address automatically.
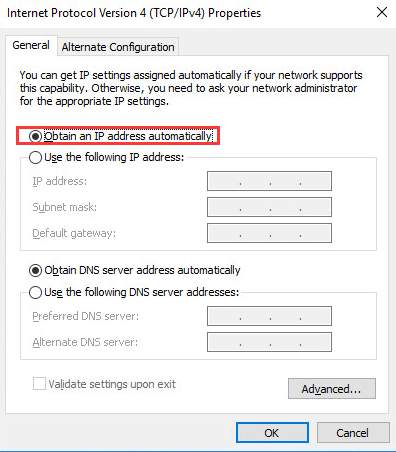
6) If you still can’t connect to the internet, select Use the following DNS server addresses and fill in the address like the screen shot below:
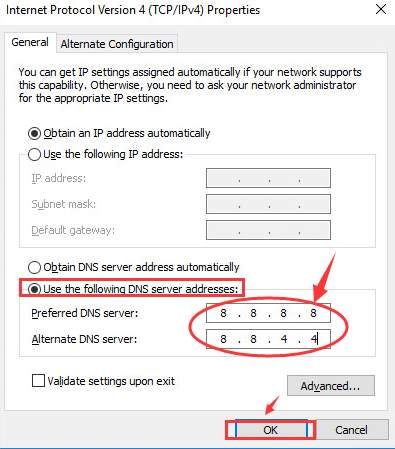
Click OK.
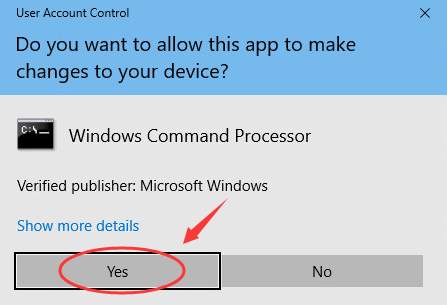
Run Commands in Command Prompt
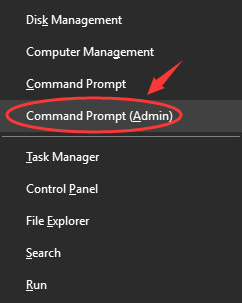
When prompted about the administrator permission, click Yes.
2) In the command prompt window, type in the following commands. Press Enter after each command.
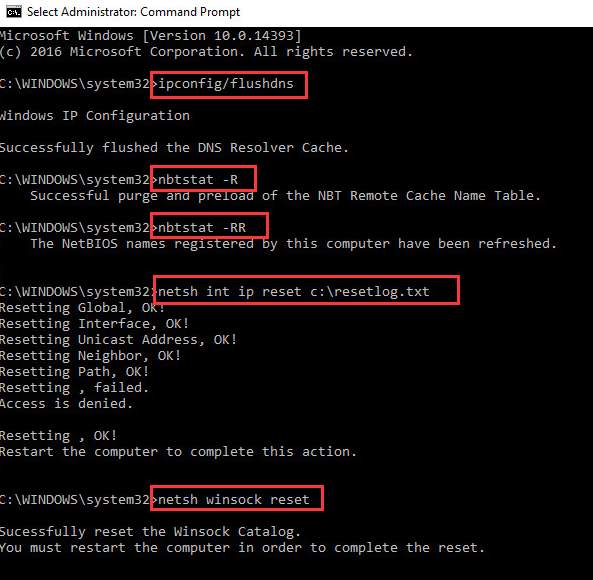
You may need to restart your computer for the changes to take effect.
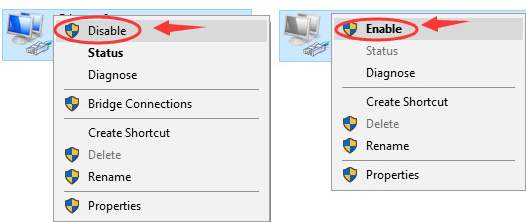
3) R ight-click the WiFi connection icon at the bottom right corner and click Open Network and Sharing Center.
4) Click Change adapter settings.
5) Right-click your WiFi adapter and click Disable. Wait for a while. Right-click your WiFi adapter and click Enable.
Update Device Drivers
If the above methods don’t help, we highly recommend you update your network adapters’ drivers.
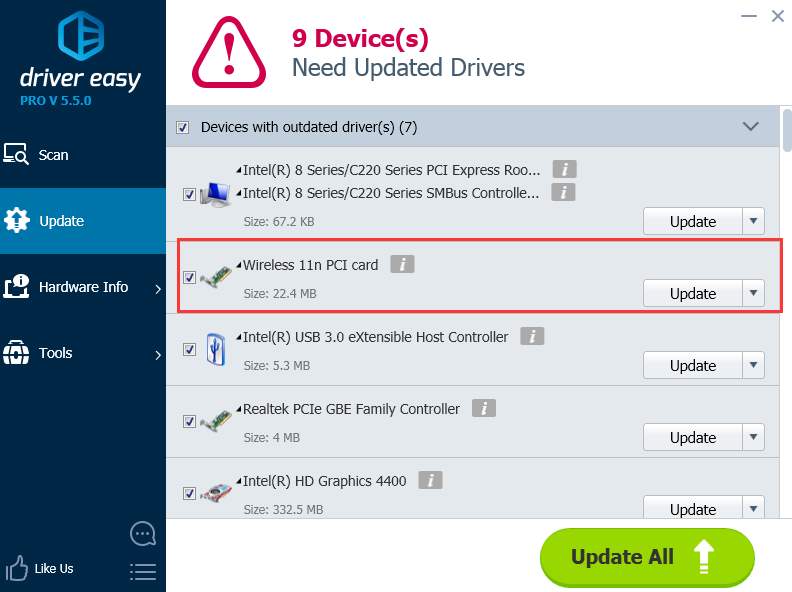
If you don’t have the time, patience or computer skills to update your drivers manually, you can do it automatically with Driver Easy.
Driver Easy will automatically recognize your system and find the correct drivers for it. You don’t need to know exactly what system your computer is running, you don’t need to risk downloading and installing the wrong driver, and you don’t need to worry about making a mistake when installing.
You can update your drivers automatically with either the FREE or the Pro version of Driver Easy. But with the Pro version it takes just 2 clicks (and you get full support and a 30-day money back guarantee):
2) Run Driver Easy and click the Scan Now button. Driver Easy will then scan your computer and detect any problem drivers.
3) Click the Update button next to the flagged network card driver to automatically download and install the correct version of this driver (you can do this with the FREE version).
Or click Update All to automatically download and install the correct version of all the drivers that are missing or out of date on your system (this requires the Pro version – you’ll be prompted to upgrade when you click Update All).
Update or uninstall McAfee
Quite a number of users found that this problem was gone once they replaced their McAfee with other antivirus programs.
It’s still unknown why McAfee would hinder you from connecting to the Internet. But if you’re using McAfee as your antivirus program and the problem just won’t go away, update your McAfee to the latest version to have a try.
- network adapter
- network issue
- WiFi
- Windows 10
Fix WiFi Missing from Network & Internet Settings in Windows 10
Here is how to fix WiFi missing from Network & Internet Settings on Windows 10.
In the newly added settings app on Windows 10, you find Network and Internet category which helps you to connect the adapter to your PC directly. Network & Internet category contains options and sections like WiFi, Cellular, Ethernet, etc. Sometimes you get the WiFi option is not showing on the Window. In this post, you will read Fix WiFi Missing from Network & Internet in Windows 10. Earlier we have written a fixing article for Cellular not found in network and internet tab on settings in Windows 10.
Actually, this situation arises when your WiFi connection is disabled in the network connection. So to fix this issue, you need to enable the same.
Note : At first, I recommend uninstalling Ccleaner before you start to fix. Maximum cases are solved by only removing Ccleaner.
Fix WiFi Missing from Network & Internet Settings in Windows 10
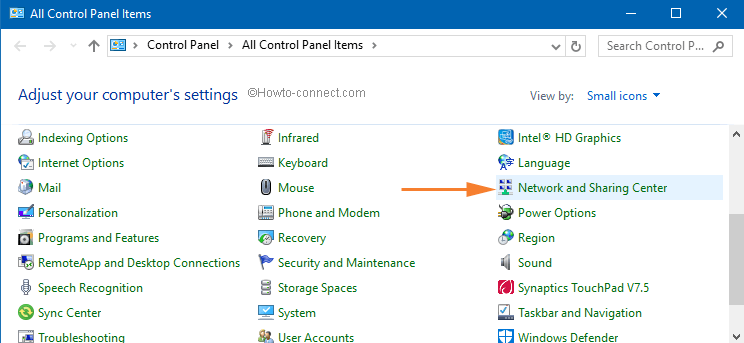
- Click on Start button, type control and then hit Enter.
- This action will launch the Control Panel on your screen.
- Select Network & Sharing Center.
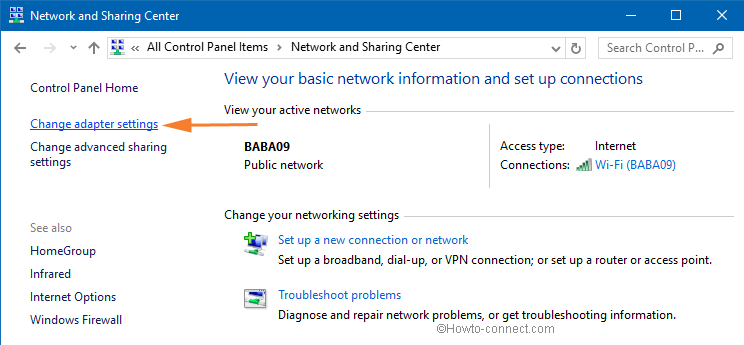
- Click on Change adapter settings link seen on the left column.
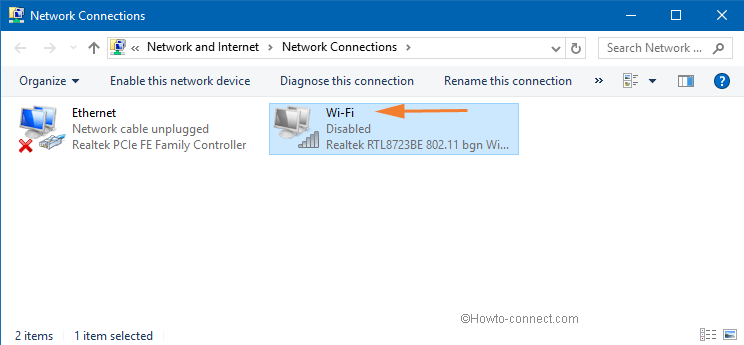
- Look for your Wi-Fi connection. It has been disabled and this is why you are unable to see the WiFi section in the Network & InternetSettings.
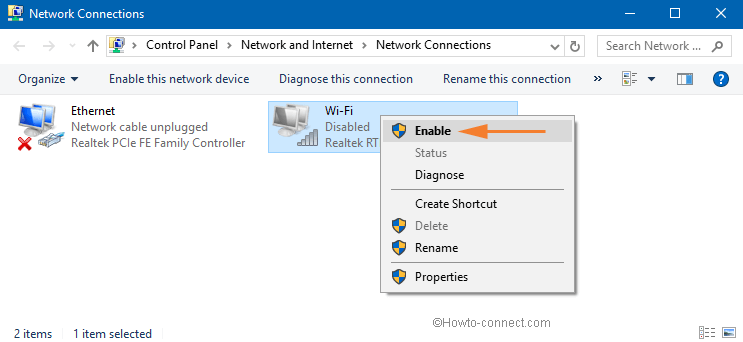
- So, perform a right click on your WiFi network and choose Enable.
- Now, open Windows Settings app from the Start Menu (alternatively, press Win+I).
- Click Network & Internet.
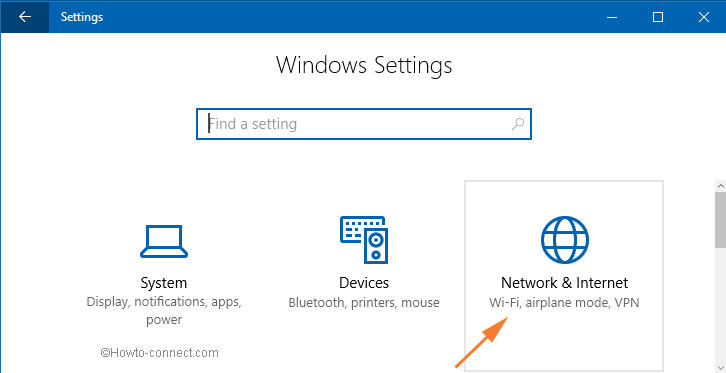
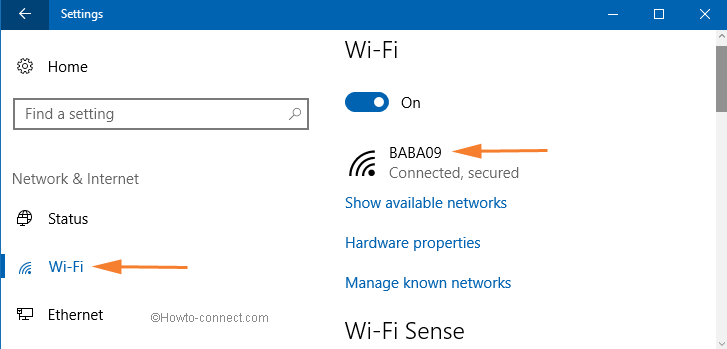
- You can see the WiFi section back. On the right pane of WiFi option and the available connections and other settings link as well.
If the above-given tips fail to eradicate the issue then follow the steps carefully and thoroughly to Fix WiFi Missing from Network & Internet Settings in Windows 10 for sure on your machine.
1. Troubleshoot Network
- Again open Control panel (Hit Windows logo key, type “Control” and then press Enter).
- Select Troubleshooting.

- Soon the list of “Troubleshoot problems – Network and Internet” appears before your eyes.
- Carefully check which problem occurs on your PC – 1. “Network is in range but missing” 2. Networks are showing but when you try to connect it writes the note “Can’t connect”.
1. Network is in range but missing
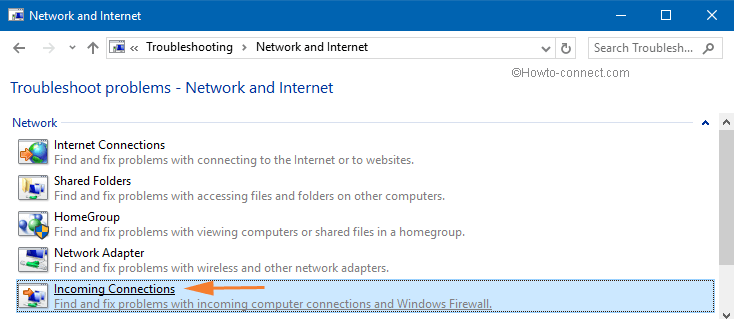
- If “Network is in range but missing” occurs then click on “Incoming Connections” located at the bottom.
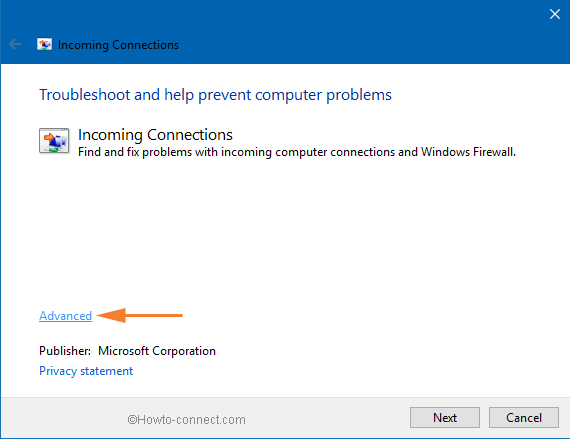
- “Incoming connections” Wizard becomes visible, Click “Advanced” placed at the lower right part and then on “Run as administrator” link. After you complete the above course actions, click “Next”.
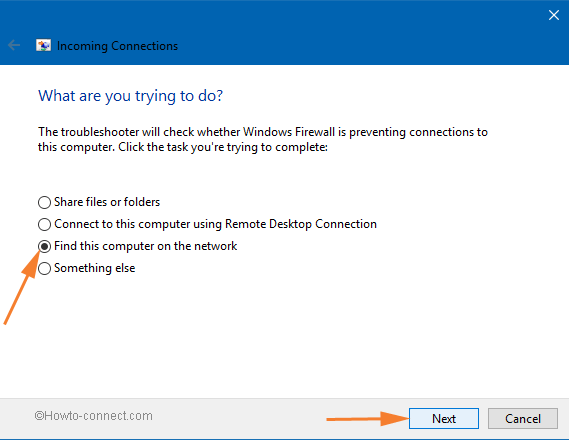
- Shortly the next wizard “What are you trying to do” appears, check the third round cell before “Find this computer on the network” and click “Next”
- In a little while “Detecting problem” starts showing on a wizard. As soon as detection work is completed, move to the network to check whether it is now visible or not.
- If the networks are visible then click “Skip this Step” and check whether the issue is fixed. Still, you are not successful in connecting, then try the next step –
2. Networks are visible but can’t Connect
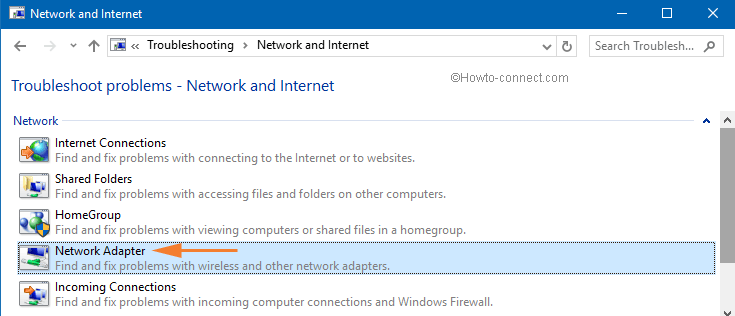
- If networks are visible, but when you try to connect it shows “cannot connect” then click on “Network Adapters” in “Troubleshoot” section.
- Again hit on tiny “Advanced” link followed by “Run as administrator” in the “Network Adapters” wizard. After the above selections are made, click “Next”
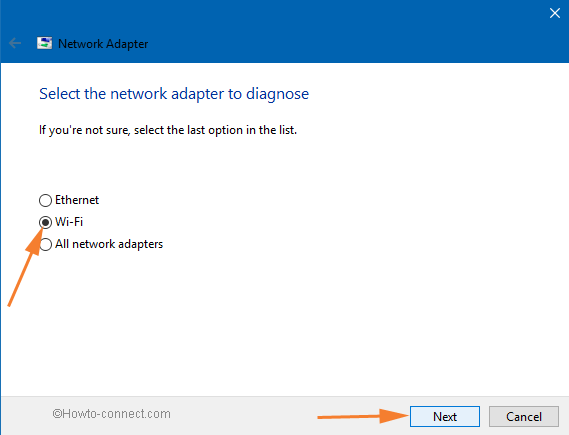
- In the “Select the network adapter to diagnose” wizard, check the round cell before “Wi-Fi” and click “Next”.
- Again the wizard will show “Detecting problem”. After detection work ends up trying to connect your “Network”.
3. If Both the Troubleshoots don’t work for you
After you attempted both the troubleshoots but remain unsuccessful to Fix WiFi Missing from Network & Internet Settings in Windows 10 and the affair exists in the same status, then follow certainly working steps.
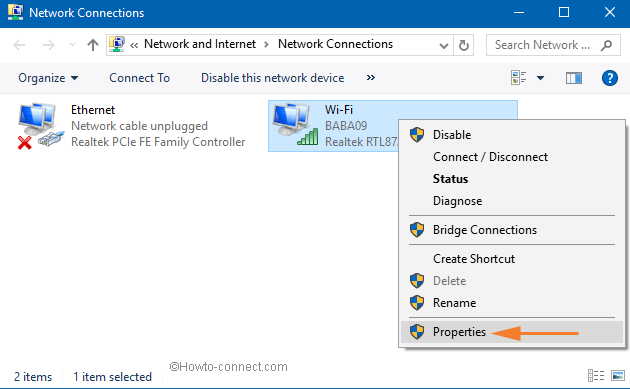
- Again Perform a right click on “Network icon” lying on the right end of the taskbar and choose “Open Network and Sharing center” the choice at the bottom.
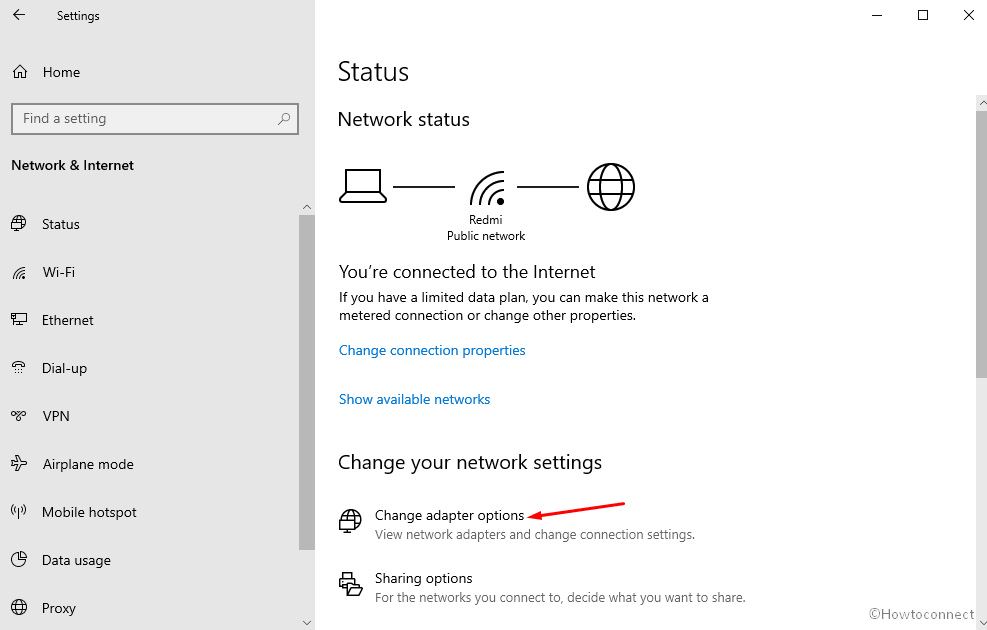
- Once the Network & Internet Status Settings” window expands on the screen, click “Change adapter options” from the right pane
- On the next visible window, perform a right click on the “Adapter” you are striving to Connect and choose “Properties”.
- Hit “Configure” button, below the adapter name you are using on “Wi-Fi Properties” wizard.
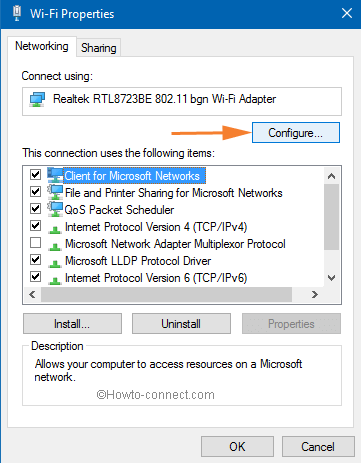
- In the new open Adapter Wizard switch to “Driver” tab and hit “Uninstall Device” button (Don’t be scared, driver settings will remain undamaged in System files )
- A “Confirmation pop up” will prompt, click “OK”
- Restart computer to restore a fresh “Driver settings”.
Move to Network facet connect to the desired network and cheer.
Update –
Reset Network to Fix WiFi Missing from Network & Internet Settings in Windows 10
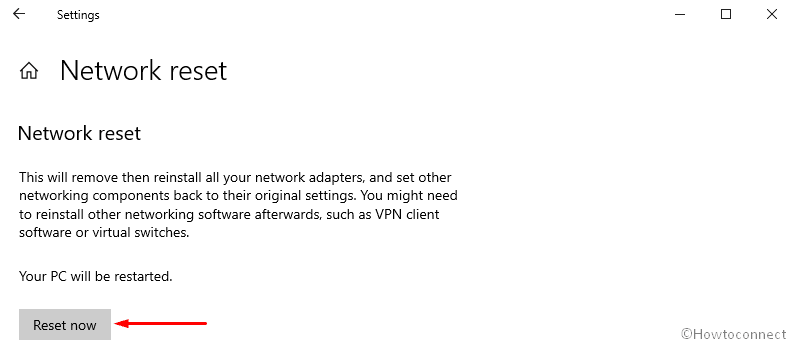
WiFi Missing from Network & Internet Settings in Windows 10 sometimes requires Network Reset as a solution. The tool removes and again install all the network adapters and set the components to the original settings. So if any devices affect the Settings then it will be settled by this workaround. Follow the instructions ahead –
- Press Windows logo + I keys, select Network & Internet after the Windows Settings comes into view.

- On the next screen go to the right of the Status tab and click on Network reset from the bottom section.

- Click Reset now button.
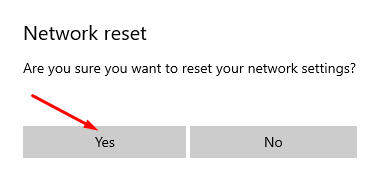
- A confirmation dialog prompts asking “Are you sure you want to reset your network settings”; select Yes.
- After a while, you will be sign out, so, save your running documents and work before this.
Wait for Windows 10 to restart and experience the solved WiFi Missing from Network & Internet Settings.


