- How to Hide Window Shadow in Windows 10
- April 2021 Update:
- Steps for to Hide Window Shadows on Windows 10
- Conclusion
- Как отключить отображение теней окнами в Windows 10
- Как отключить тени в окнах Windows 10
- Тени с эффектами в Windows 10
- Отключаем тени окон в Windows 10
- Disable and remove Shadow Effect in Windows 10 for Explorer windows
- Remove Shadow Effect in Windows 10
- Related Posts
- How to add Control Panel to File Explorer in Windows 10
- How to add User Profile folder to Navigation Pane of Windows 10 File Explorer
- How to Star Rate files in Windows 10?
- [email protected]
- Primary Sidebar
- Enable or Disable Shadows For Texts On Desktop In Windows 10/8/7
- Show or hide shadows for texts on desktop
- Enabling or disabling shadows for texts using Registry
How to Hide Window Shadow in Windows 10
When you install Windows 10 on your computer system and open certain program windows such as This PC, Trash, or the Run dialog box, you immediately notice the new drop shadow effect under the program windows.

Microsoft has added a huge shadow effect for the edges of the windows that may look good to some people, but personally I don’t like this new shadow effect. The new shadow is big and not nice to see on the edges of the windows.
In Windows 10, each window has a colored border and a shadow. You can change the color of the window borders and even disable the shadow if you wish.
Performance is very important on any computer. Older or cheap computers can struggle with low system resources and slow processors. This can cause performance problems in Windows – one way to reduce Windows performance requirements is to disable some of the graphics features that are enabled by default. This guide describes how to disable window shadows in Windows 10.
April 2021 Update:
We now recommend using this tool for your error. Additionally, this tool fixes common computer errors, protects you against file loss, malware, hardware failures and optimizes your PC for maximum performance. You can fix your PC problems quickly and prevent others from happening with this software:
- Step 1 : Download PC Repair & Optimizer Tool (Windows 10, 8, 7, XP, Vista – Microsoft Gold Certified).
- Step 2 : Click “Start Scan” to find Windows registry issues that could be causing PC problems.
- Step 3 : Click “Repair All” to fix all issues.

Steps for to Hide Window Shadows on Windows 10
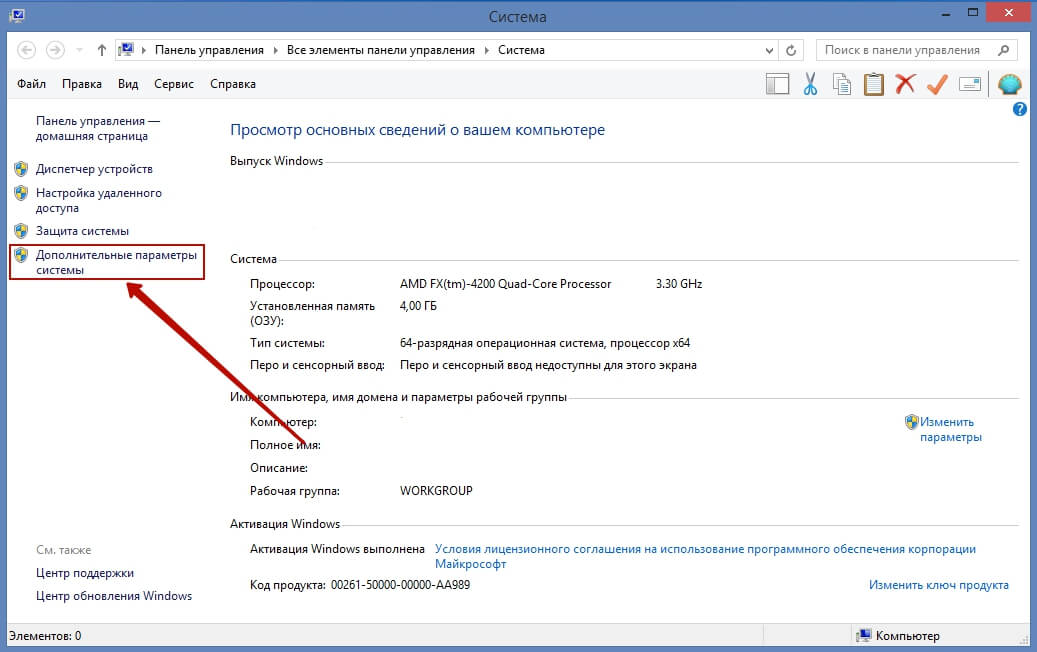
Step 1: Enter System in the search field and select System from the list to open the System window.
Step 2: Click Advanced System Settings to continue.
Step 3: In the Advanced Settings, under Performance, press the Settings button.
Step 4: Under Visual Effects, uncheck Show shadows under windows and click OK.
Once you do that, the shadows under the open windows will disappear immediately on your computer.

Conclusion
Shadows are a complex graphical calculation that must be performed in any graphics software. The fundamental nature of window shadows in Windows 10 means that the processing power required to implement them is low. However, it can be further reduced by disabling shadows completely. This can free up some extra power for the day-to-day operation of your computer.

CCNA, Web Developer, PC Troubleshooter
I am a computer enthusiast and a practicing IT Professional. I have years of experience behind me in computer programming, hardware troubleshooting and repair. I specialise in Web Development and Database Design. I also have a CCNA certification for Network Design and Troubleshooting.
Как отключить отображение теней окнами в Windows 10

В интерфейсе операционной системы Windows 10 помимо других особенностей, наиболее заметной является внушительная тень вокруг стандартных и диалоговых окон. Если вам не нравится этот эффект, то его можно легко отключить следуя инструкции представленной в этой статье.
Пример отображения тени показан на скриншоте.

Для того чтобы отключить отображение тени у окон, нажмите сочетание клавиш  + R и в открывшемся окне Выполнить введите команду, или скопируйте и вставьте команду:
Нажмите клавишу Enter ↵.
Также эту команду можно выполнить и в командной строке.

В открывшемся окне Параметры быстродействия (Performance Options) нужно снять флажок возле пункта Отображение теней, отбрасываемых окнами (Show shadows under windows) и нажать кнопку OK .

Теперь тени окон не будут отображаться, также при желании можно отключить тень у указателя мыши, анимацию окон при свертывании и развертывании, и другие графические эффекты интерфейса.
Ниже на скриншоте представлен пример окна без отображения тени.
Как отключить тени в окнах Windows 10
С выходом предварительной, тестовой версии Windows 10, многим удалось оценить возможности данной операционной системы. И как часто это бывает, в первую очередь, под детальный анализ попало оформление. В сегодняшней статье, будет рассказано как отключить эффект теней окон, в новой ОС. В целом, Windows 10 не значительно отличается от своих предшественников. Заметно, что разработчики решили учесть многие замечания пользователей в предыдущих операционных системах. Что в целом, высоко оценили многие критики.
Тени с эффектами в Windows 10
Но все-таки, в новой Windows появился целый ряд решений, касательно интерфейса и его внешнего вида. Одним из таких новшеств, являются тени окон приложений. Это довольно приятное дополнение, которое имеет свои плюсы и минусы.
Сразу можно и не обратить внимание, на такой эффект. Но они хорошо выделяются на светлом фоне. Такая фишка может послужить хорошим элементом, который будет украшать внешний вид системы, придавать некий объемный вид. Но с другой стороны, есть много любителей скромного минималистского оформления, которых это нововведение будет скорее раздражать и утомлять. Само собой, когда выйдет финальный релиз Windows 10, этот элемент оформления может значительно видоизмениться. Но скорее всего, потребность его отключения, все равно останется. Если вам не нравится такая фишка, как тени окон в Windows 10, то этот элемент довольно просто отключить. Все это делается через настройки системы «System Properties».
Отключаем тени окон в Windows 10
Что бы это сделать, нужно зайти в меню «Пуск» и набрать «advanced system settings». После этого вы попадете в свойства системы.
 Находим раздел быстродействия «Perfomance» и переходим в него. В открывшемся окне выбираем вкладку с визуальными эффектами «Visual Effects». Теперь отключаем отображение теней, убрав галочку возле соответствующего пункта «Show Shadows under windows».
 Вот и все, теперь тени не отображаются. Неизвестно, как именно будет реализован данный визуальный эффект в стабильной версии Windows 10, и будет ли он вообще иметь там место. Ведь разработка новой ОС все еще идет полным ходом и все пожелания пользователей, которые ее тестируют, буду в конечном итоге учтены. В любом случае, отключить, или обратно активировать, эффект теней, не составит большого труда.
Disable and remove Shadow Effect in Windows 10 for Explorer windows
Those, having Windows 10 installed on their machines might noticed a shadow effect under Explorer windows. This is nothing new, and has been there in earlier versions of Windows too. But to some, the shadow may appear to be a bit large in size and. If you want to remove the shadow effect, then this post will help you.
Remove Shadow Effect in Windows 10
To begin with, open the WinX Menu and click on Control Panel. Click on System applet and then on the Advanced System properties link on the left side. The following box will open.
Under the Advanced tab, under Performance, click on Settings to open the following panel.
Next, under the Visual Effect tab, uncheck Show shadows under windows option. Click Apply and exit.
This will immediately remove the shadow effect from the window borders in Windows 10 and you’ll see a clean interface minus the drop shadow effect. If you do not like the effect, you can always revert back.
Need more Visual Effects Tweaks? This post will show you optimize Windows 10 performance by tweaking Visual Effects. There are several other ways you can customize Windows 10, using the built-in settings. You can customize the Windows 10 Start Menu an you can even use the Personalization Settings to customize your computing experience.
Related Posts
How to add Control Panel to File Explorer in Windows 10
How to add User Profile folder to Navigation Pane of Windows 10 File Explorer
How to Star Rate files in Windows 10?
[email protected]
Anand Khanse is the Admin of TheWindowsClub.com, a 10-year Microsoft MVP (2006-16) & a Windows Insider MVP. Please read the entire post & the comments first, create a System Restore Point before making any changes to your system & be careful about any 3rd-party offers while installing freeware.
Primary Sidebar
 report this ad
Enable or Disable Shadows For Texts On Desktop In Windows 10/8/7
Last Updated on August 30, 2016 by admin 9 Comments
The other day, after configuring Windows to show all icons on the desktop by right-clicking on the desktop, clicking View and then clicking Show desktop icons option, I noticed that Windows wasn’t using drop shadows for icon labels on the desktop.
As you know, with default settings, shadows appear under texts on the desktop. The shadows not only make texts on the desktop look beautiful but also make the texts easier to use. No matter what picture you are using as desktop background, enabling shadows for texts make them easier to read.

If for some reason, you want to enable or disable shadows for texts on the desktop, you can follow the instructions mentioned in one of the following two methods.
Note that both methods are applicable for Windows 10, Windows 8 and Windows 7.
Show or hide shadows for texts on desktop
Method 1
Step 1: Open System Properties dialog box. To do so, first open Run command by simultaneously pressing Windows and R keys, type Sysdm.cpl in the Run box, and then press Enter key.

Step 2: Once System Properties dialog is launched, switch to the Advanced tab, and then click Settings buttons that appears under Performance section (see picture). This action will open Performance Options dialog.

Step 3: Under Visual Effects tab, look for the option labelled Use drop shadows for icon labels on the desktop and check the same to enable shadows or uncheck the same option to disable shadows.

Step 4: Click Apply button to enable or disable shadows. If you can’t see the change, please restart your PC.
Method 2
Enabling or disabling shadows for texts using Registry
Step 1: Open Registry Editor. To open Registry Editor, open Run command with the help of Windows + R hotkey, type Regedit.exe in the box and then press Enter.
Step 2: In the Registry Editor, navigate to the following key:

Step 3: On the right-side, look for the entry labelled ListViewShadow. Double-click on the same and change its value from 1 to 0 (zero) to disable shadows for texts. And enter 1 (one) as value data to enable the same.

Finally, click OK button. If you can’t see the change, please restart Windows Explorer or restart your PC. That’s it!


