- How to pause Windows 10 updates for 35 days
- How do I pause my Windows 10 updates?
- How to Pause Windows 10 Updates for Up to 35 Days
- Pause Windows 10 Updates Easily From the Command Line
- Share This Story
- Get our `newsletter`
- DISCUSSION
- How to Delay, Defer or Pause Windows Update in Windows 10 up to 365 days
- Defer Feature Updates in Windows 10
- Pause Windows 10 Updates
- How to disable the ‘Pause updates’ feature on Windows 10 May 2019 Update
- More on the May Update
- Windows 10 May 2019 Update
- How to disable Pause updates option using Group Policy
- How to disable Pause updates option using Registry
- More Windows 10 resources
- Mauro recommends all these affordable accessories
- Logitech MX Master Wireless Mouse ($72 at Amazon)
- Ktrio Extended Gaming Mouse Pad ($12 at Amazon)
- Supernight LED light strip ($20 at Amazon)
- Microsoft’s Surface Duo is not ‘failing up’
- Here’s what you can do if Windows 10 update KB5001330 is causing issues
- Review: NZXT made its first AMD motherboard and it’s brilliant
- These are the best PC sticks when you’re on the move
How to pause Windows 10 updates for 35 days

- Windows 10 updates are always good if they don’t cause trouble, but not everyone likes them.
- Thankfully enough, Microsoft introduced a way for you to postpone Windows 10 updates.
- To learn more about using hidden Windows 10 features, visit our Windows 10 Hub.
- If you like our tutorials, you can find the rest of them on our How-To page as well.
- Download Restoro PC Repair Tool that comes with Patented Technologies (patent available here).
- Click Start Scan to find Windows issues that could be causing PC problems.
- Click Repair All to fix issues affecting your computer’s security and performance
- Restoro has been downloaded by 0 readers this month.
Forced updates have been annoying Windows 10 users since the launch of Microsoft’s latest desktop operating system.
Therefore, the ability to defer updates has been one of the most in-demand features for the Windows 10 OS, which takes its cue from user feedback.
Thankfully enough, there is already an option hidden within the OS that lets you pause updates for 35 days.
The feature allows you to have wider control over the type of updates to install and when to do so. Although some users have spotted the feature, it is not exactly very visible unless you navigate to the right place.
That is precisely why we’ve decided to create this step-by-step guide to help you pause your Windows 10 updates, and get better control over your PC.
How do I pause my Windows 10 updates?
- Press Start
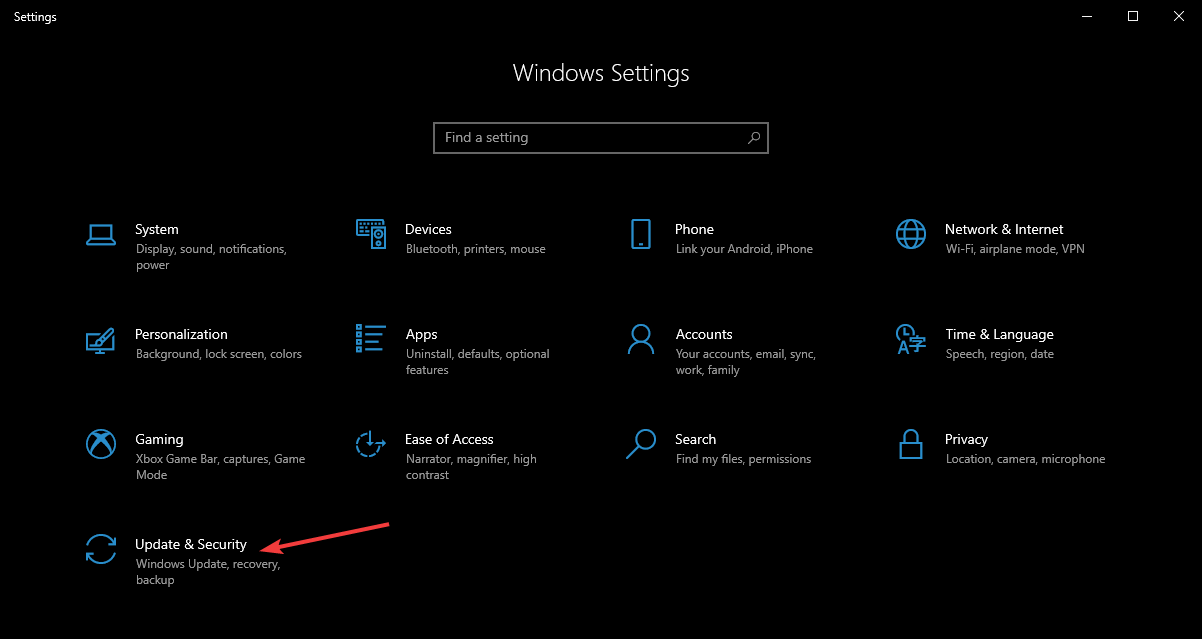
- Go to Settings

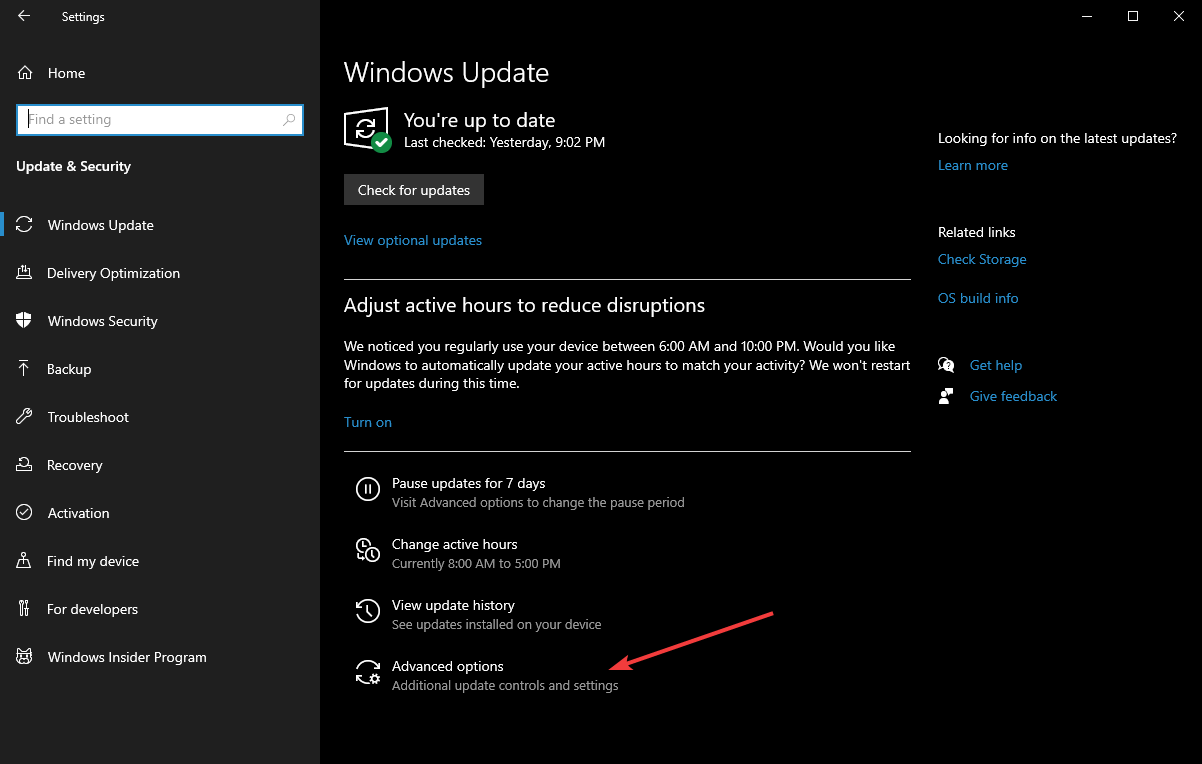
- Open Update & security and click on Advanced options
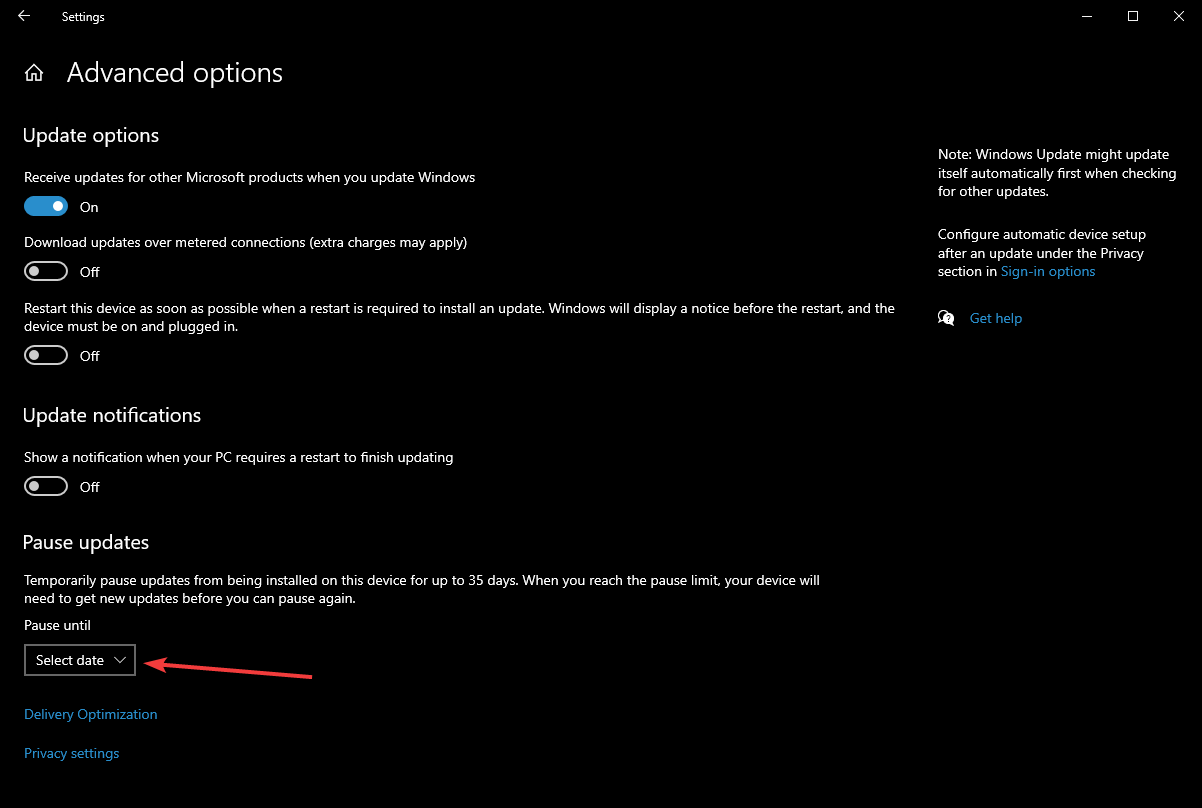
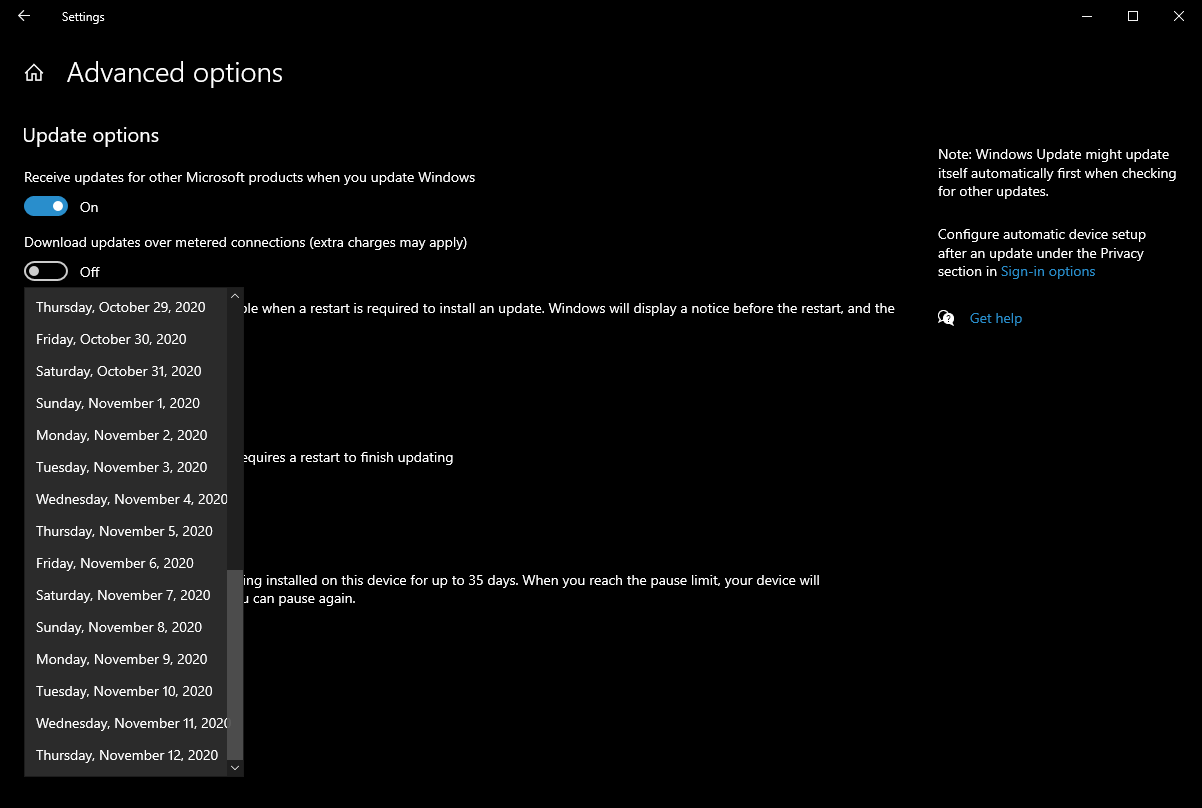
- Go to where it says Pause updates
- Right under Pause until, press on the Select date drop-down menu
- Select any date between the next day and whatever date is up to 35 days away.
The feature also allows users to postpone feature updates or quality updates for a certain number of days. For starters, feature updates bring fresh capabilities and improvements.
Users can defer these updates for up to one year. On the other hand, quality updates meant to introduce security fixes can be put off for only a month.
However, remember that updates also come with security improvements as well, such as the Patch Tuesday updates.
That being said, unless you are using a very good third-party antivirus to keep you safe, you are also putting yourself at risk by postponing updates.
This is especially the case since within a 35-day Windows you can miss out on two rounds of Patch Tuesday updates, so you are exposing yourself to threats like Exploit Wednesday and Uninstall Thursday.
By following these steps, you should now be able to postpone Windows 10 updates with ease.
Let us know if you found this feature useful by leaving your opinions in the comments section below.
How to Pause Windows 10 Updates for Up to 35 Days
By Bryan Clark 07 June 2019
Newer Windows 10 builds allow users to press pause updates for up to 35 days. Of course, that’s not to say you should actually use it. Most updates are security fixes that patch holes and remove vulnerabilities from your system. Pausing the updates means you’re running vulnerable software, which obviously isn’t ideal. So generally, you should either allow automatic update or update Windows 10 manually. There are occasions, however, (like vacations), that you don’t really have the time to update, and pausing makes sense.

Here’s how to pause Windows 10 updates; use the information wisely.
1. Open the Start Menu.
2. Select Settings.
3. Click Update & Security.
4. Choose Advanced options under Windows Update.
5. Toggle the Pause button to On.
Pause Windows 10 Updates Easily From the Command Line
Windows 10 automatically downloads updates in the background, which can be rough on slow or capped internet. Fortunately, there’s a way to pause downloads from the command line.
As Into Windows points out, Windows 10 doesn’t give you an easy way to pause downloads in the Settings app directly. Instead, follow these steps:
- Right-click the Start Menu and select Command Prompt (Admin).
- Enter net stop wuauserv
- Enter net stop bits
- Enter net stop dosvc
- Close the Command Prompt window.
Each command may take a few seconds to complete. If you want to reverse the process and resume downloads, follow these steps:
- Right-click the Start Menu and select Command Prompt (Admin).
- Enter net start wuauserv
- Enter net start bits
- Enter net start dosvc
- Close the Command Prompt window.
You can also enabled the Metered Connection feature in Windows 10 to try to dissuade Microsoft from pushing large updates to your computer. However, this command line method is the most direct way to stop all the downloads.
Eric creates video essays as Lord Ravenscraft on YouTube. He’s also a freelance writer with bylines in The Inventory, Wired, The New York Times, and a former Senior Writer for Lifehacker.
Share This Story
Get our `newsletter`
DISCUSSION
Step one: Insert Linux boot USB and blow away the Windows10 install. Problem permanently solved.
How to Delay, Defer or Pause Windows Update in Windows 10 up to 365 days
Windows 10 feature updates always ship with some real changes made to the operating system. Windows 10 now gives users more control over Windows Updates. This was one of the most requested features in the upcoming edition of Windows and Microsoft finally obliged by offering a setting that lets users can delay or defer Windows Updates for up to 365 days on Windows 10 Pro, Windows 10 Enterprise, and Windows 10 Education. You can even Pause Windows 10 Updates for up to 35 days now.
Defer Feature Updates in Windows 10
Earlier, when an update was available, a notification would appear, prompting you to either,
- Install the updates immediately
- Schedule an update for a specific time
- Put it off by clicking Snooze.
The last option – Snooze allowed delaying the install of the update for three days. Following that, you were given another notification about the update, and you could click the Snooze button again. This way, one of the ways of delaying the install of the update.
Windows 10 offers a simple solution for the same. Here’s how to delay or defer feature updates up to 365 days in Windows 10. To postpone Feature updates on Windows 10, do the following:
Open Windows 10 Settings and choose ‘Update & Security’ section. Find ‘Advanced Options’ entry under ‘Update Settings’ and click on it.
Scroll down a bit, and you will see a section that allows you to choose a Branch readiness level to determine when feature updates are installed and informed about the capabilities and improvements in feature updates.
You will see two options under Branch Readiness:
- Current Branch
- Current Branch for Business.
This section is of our interest as it will allow deferring the updates. Feature updates can be deferred by 0 to 365 days. You can choose any number between 1 and 365 from the drop-down box.
The last option is for Quality Updates. Quality updates, including security improvements, can be deferred by 0 to 30 days.
Pause Windows 10 Updates
Windows 10 v1903 changes the Settings a bit.
Windows Update Settings now offer an easy 1-click link to Pause updates for 7 days. It is available in Windows 10 Home edition too.
Once paused, the icon changes. The button text too changes – and it now allows you to pause for 7 more days.
If you click on Advanced Options you can choose the data and pause Windows Updates.
- Feature updates can be deferred by 0 to 365 days. You can choose any number between 1 and 365 from the drop-down box.
- Quality Updates, including security improvements, can be deferred by 0 to 30 days.
Once you have configured all the desired options, your PC will continue to receive WindowsDefender antivirus updates, but the Feature or Quality updates will be delayed or deferred – or pause – for a definite period of time.
Please note that the options to configure these settings are only available on Windows 10 Pro, Enterprise, and Education. Windows 10 Home v1903 and later however allow users to pause Windows Updates up to 35 days as mentioned above.
Date: April 15, 2019 Tags: Windows Updates
How to disable the ‘Pause updates’ feature on Windows 10 May 2019 Update

Starting with the Windows 10 May 2019 Update (version 1903), Microsoft is doing a lot of things right with updates. In this release and moving forward, Windows Update will stop forcing feature updates on devices, and it’ll let you choose when to install new versions. Also, the option to pause updates will be easier to find in the Settings app, and the feature will be available for Windows 10 Home users.
Alongside these new changes, the May Update will also allow you to take full control and decide if users can pause updates, which is an option that can come in handy in many scenarios. For instance, it’ll be useful when sharing a computer with multiple users when you’re already managing deadlines for automatic updates and restarts. Or when you’re working in a network environment and you need to comply with the policies of your organization.
More on the May Update
![]()
Windows 10 May 2019 Update
Whatever the reason, if you must remove (or re-enable) access to the feature to pause updates on Windows 10, you can accomplish this task using the Group Policy Editor and Registry.
In this Windows 10 guide, we walk you through the steps to disable the option to pause updates with the settings available with the May 2019 Update.
How to disable Pause updates option using Group Policy
If you’re running Windows 10 Pro, the easiest way to remove access to the «Pause updates» feature is using the Local Group Policy Editor with these steps:
- Open Start.
- Search for gpedit.msc and click OK to open the Local Group Policy Editor.
Browse the following path:
Computer Configuration > Administrative Templates > Windows Components > Windows Update
On the right side, double-click the Remove access to «Pause updates» feature policy.

Select the Enabled option.
![]()
Once you complete these steps, the «Pause updates» option will no longer be available in the Windows Update settings page, or in the Advanced options page in the Settings app.
If you want to revert the changes, or the «Pause updates» is grayed out even though you didn’t change the settings, you can use the instructions outlined above, but on step No. 5, make sure to select the Not Configured option.
How to disable Pause updates option using Registry
Alternatively, if you’re running Windows 10 Home, or you don’t have access to the Group Policy Editor, you can modify the Registry to disable the option to pause updates on the May 2019 with these updates:
Warning: This is a friendly reminder that editing the Registry is risky, and it can cause irreversible damage to your installation if you don’t do it correctly. We recommend making a temporary full backup of your PC before proceeding.
- Open Start.
- Search for regedit and click the top result to open the Registry.
Browse the following path:
Quick tip: On Windows 10, you can now copy and paste the path in the Registry’s address bar to quickly jump to the key destination.
Right-click the WindowsUpdate (folder) key, select New, and click on DWORD (32-bit) Value.

Double-click the newly created DWORD and set the value from 0 to 1.
After you complete the steps, users will no longer have access to pause updates using the Settings app.
At any time, you can undo the changes using the same instructions, but on step No. 6, make sure to set the value from 1 to 0, or right-click the SetDisablePauseUXAccess key and select the Delete option.
While we’re focusing this guide on disabling the update feature, you can also refer to these instructions if for some reason the option becomes disabled without warnings, and you need to re-enable the setting again.
More Windows 10 resources
For more helpful articles, coverage, and answers to common questions about Windows 10, visit the following resources:
Mauro recommends all these affordable accessories
Hi, I’m Mauro Huculak, Windows Central’s help and how-to guru. I wrote the post you’re reading now, and I know the Windows OS inside and out. But I’m also a bit of a hardware geek. These are some of the affordable gadgets on my desk today.
![]()
Logitech MX Master Wireless Mouse ($72 at Amazon)
I know mice, and this is the one I use every day. The MX Master is a wireless high-precision mouse that’s very comfortable to use and has many great features, including the ability to connect with multiple devices, an infinite scroll wheel, back and forward buttons, all of which you can customize.
![]()
Ktrio Extended Gaming Mouse Pad ($12 at Amazon)
If you spend a lot of time typing, your palms and mouse will leave tracks on your desk. My solution was to start using gaming mouse pads, which are big enough for you to use the keyboard and the mouse comfortably. This is the one I use and recommend.
![]()
Supernight LED light strip ($20 at Amazon)
You could just use a regular light bulb in your office, but if you want to add some ambient lighting with different colors, an RGB LED strip is the way to go. This one is Mauro-approved.
We may earn a commission for purchases using our links. Learn more.
![]()
Microsoft’s Surface Duo is not ‘failing up’
Microsoft announced this week that it was expanding Surface Duo availability to nine new commercial markets. While Surface Duo is undoubtedly a work in progress, this is not a sign of a disaster. It’s also doesn’t mean that Surface Duo is selling a ton either. Instead, the reason for the expansion is a lot more straightforward.
![]()
Here’s what you can do if Windows 10 update KB5001330 is causing issues
In this guide, we’ll show you the steps to get rid of the update KB5001330 to fix profile, gaming, and BSoD problems with the Windows 10 October 2020 Update and May 2020 Update.
![]()
Review: NZXT made its first AMD motherboard and it’s brilliant
NZXT made its first motherboard with an AMD chipset. The N7 B550 supports the latest AMD Ryzen processors and there’s plenty to love about this platform. To differentiate the N7 B550, NZXT made notable changes to the layout of the motherboard to make it easy to create a clean PC build.
![]()
These are the best PC sticks when you’re on the move
Instant computer — just add a screen. That’s the general idea behind the ultra-portable PC, but it can be hard to know which one you want. Relax, we have you covered!


