- Get started with eye control in Windows 10
- Set up an eye tracking device
- What you need to get started
- Eye tracking device
- Windows 10 Fall Creator’s Update (or later version)
- Someone to assist you
- Set up the device
- Connect the device
- Install the software
- Calibrate the device
- Test the Tobii app
- Use Windows 10 eye control
- Troubleshooting
- Device not working after restarting your PC
- Your position has changed
- Возможность включить Aero в Windows 10
- Используя программу Aero Glass
- Видео
- Вывод
- Как вернуть прозрачность окон из Windows 7 в Windows 10
- Подготовка к активации режима прозрачности окон
- Установка и использование программы Aero Glass
- Видео: возвращение прозрачных окон в Windows 10
Get started with eye control in Windows 10
This article will guide you through all the steps of setting up an eye tracker. If you’ve already got one set up, see Eye control basics in Windows 10, and for troubleshooting help, go to Eye control troubleshooting guide.
Set up an eye tracking device
This guide helps you to set up and calibrate your eye tracking device for use with Windows 10 eye control. We have tested it with the Tobii Eye Tracker 4C device; your experience with other devices may vary.
What you need to get started
Eye tracking device
Eye control supports the following eye tracking devices:
Tobii
• Tobii Eye Tracker 4C
• Tobii EyeX
• Tobii Dynavox PCEye Plus
• Tobii Dynavox EyeMobile Mini
• Tobii Dynavox EyeMobile Plus
• Tobii Dynavox PCEye Mini
• Tobii Dynavox PCEye Explore
• Tobii Dynavox I-Series+
• Selected laptops and monitors that include eye tracking integrations
EyeTech
• TM5 Mini
Windows 10 Fall Creator’s Update (or later version)
Eye control is not available in earlier versions of Windows 10, but if your PC is up-to-date, you’re good to go. To check which version you have, go to Settings > System > About and under Windows specifications confirm that the version is 1709 or higher.
Open About settings
To update your PC, go to Settings > Update & Security > Windows Update and select Check for updates.
Check for updates
Eye control is available in all regions. However, the eye control keyboard only supports the EN-US keyboard layout, and some eye control settings are only available in English. The Region and Language settings of your PC don’t need to be changed; they don’t affect eye control use.
Someone to assist you
You may need the help of a friend, family member, or caregiver to complete the set-up and to change eye control settings.
Set up the device
Connect the device
Open the box and take out the Tobii Eye Tracker 4C device, one of the supplied magnets, and the illustrated installation guide. If your PC’s USB ports are located far from your screen, you might also need the USB extension cable.
Peel off the sticker protecting the glue and attach the magnet under your screen as shown in the illustrated guide.
Attach the device to the magnet and connect it to your PC’s USB port as shown in the illustrated guide.
Note: The glue behind the magnet is quite strong, so be careful to attach it to the right place. You might not be able to remove the magnet without breaking it.
Note: The device can easily come loose when you move or bend the USB cable, so you should plan the position of the device in relation to your USB port in advance, and bend the cable to roughly the right shape before attaching the device.
Install the software
Open a web browser on your PC and go to www.tobii.com/getstarted. A pop-up for accepting the website cookie policy opens. In the pop-up, select I accept to view the policy, and LEARN MORE to close the popup.
Under 1. Select the hardware, select Tobii EYETRACKING. The page content below the selection changes to show the details of the software package you need to install. Scroll down and select Download. The Your download will start in a few seconds pane opens. If the download does not start automatically, select the link at the bottom of the pane.
When asked what to do with the downloaded file, select Run. The installation wizard opens. Read the end-user license and use agreement, select the Agree check box and select Next.
Select Yes to allow the app to make changes to your device.
When the installation has completed successfully, select Continue to set up the eye tracker. Some red lights should now be visible on your device, meaning it has activated.
Calibrate the device
Select Get Started!. Your screen shows two vertical lines. Use the mouse to move these lines to align them with the white markers on top of the device and select Done.
The screen shows your eyes as two dots inside a rectangle. Move your eyes and head a little to confirm that the device can track your eyes.
After a moment, the screen shows a series of blue dots. Look at each dot (one at a time) until it explodes. After you have done this a few times, a Calibration successful! message is displayed. If you take too long to move your eyes to the next dot after one explodes, the calibration sequence starts from the beginning.
Type a name for your user profile and select Save. A separate user profile is needed for each user. A single user may require multiple profiles if they use the computer with and without glasses, for example. You can create additional user profiles later.
Test the Tobii app
The full screen mode of the Tobii Eye Tracking app activates after you save your profile, and the intro starts with background music. You are a pilot in a spaceship, and the screen gives you instructions on how to control the cursor and screen with your eyes and the Spacebar key.
Look around by looking at the edges of the screen.
Look at an asteroid for a moment to have a targeting icon appear around it. Press Spacebar to shoot the asteroid.
If you want to stop piloting your ship before the intro ends automatically, look to your right for the exit button, look at the button for a moment to activate it, and press Spacebar to exit the intro.
The Tobii app presents an overview of various eye control features. Follow the instructions and look at various points on the screen to interact with them.
After you finish watching the overview, the full screen mode deactivates and the Tobii app opens on the right side of the screen. You can use the app to manage your user profiles, test your eye control, and modify eye tracker settings. For more information, go to Use the Tobii Eye Tracking app (add link here).
To close the app, press Esc or click anywhere outside the app window.
Use Windows 10 eye control
To turn on eye control, go to Settings > Ease of Access > Eye control and turn on the toggle.
Open Eye control settings
When you switch on eye control, the launchpad appears on the screen. For information on how to use the launchpad, go to Eye Control Basic Use Guide (add link here).
Use the Tobii Eye Tracking app
When your device is activated, eye tracking works inside the Tobii app even if Windows eye control is not switched on. You can look at menu items to move the focus to them and press Spacebar to select them.
1. To open the Tobii app, select the Tobii icon on the taskbar. If it’s not showing, select the Show hidden icons icon. You can also type «eye» in the taskbar search field and select Tobii Eye Tracking.
2. Inside the app you can select the following options, starting from the top:
• A link to tobiigaming.com, where you can explore games that use eye tracking.
• Games and Experiences, where you can download Tobii applications and experience the eye tracker intro and overview again (as you did during the initial set-up).
• Interactions lets you change various settings related to touchpad, mouse, and general Windows use, as well as power usage. Here you can also update the Tobii software and reset all settings to their defaults.
• Display setup lets you realign the device if its position under your screen has changed.
• Gaze Trace enables a bubble which shows how your gaze moves on the screen. To disable the bubble, select Gaze Trace again.
• At the bottom, you can see your user profile name and two dots representing your eyes. As you move your head, you can see whether both your eyes are still within the eye tracker’s field of vision. The larger and brighter the dots are, the better your device is tracking your eyes. Select the bottom area to create new user profiles, or test and improve the calibration for the current user profile.
3. To close the app, press Esc or click anywhere outside the app window.
Troubleshooting
If you’re having problems with eye control, here are some tips that may help. Check out the Eye control troubleshooting guide for more comprehensive troubleshooting help.
Device not working after restarting your PC
After you restart your PC, the eye tracking device might not activate properly. To solve this, try these steps:
• Disconnect the device from the USB port and reconnect it.
• Press Control + Alt + Delete, select Task Manager, select the Services tab (select More details if the tab is not showing), right-click on Tobii Service, and select Start or Restart. Keep Task Manager running until the service is running.
• Restart your PC.
• If the above do not help, uninstall and reinstall the Tobii Eye Tracking app.
Reflections are confusing the device
You might encounter issues with light reflecting from windows or your glasses. Try closing all curtains or blinds in the room. If you can see the screen without glasses, you can also try creating a new user profile for using eye control without glasses.
Your position has changed
Using the eye tracker with a laptop (where the position of your eyes in relation to the screen can easily change) can cause problems. Ideally, calibrate the eye tracker and then do not move the computer and try to keep your position stable. If you need to move the computer and change your position drastically, recalibrate the eye tracker if you run into problems.
Возможность включить Aero в Windows 10
Прозрачное оформление окон, приглянувшееся многим пользователям в Windows 7, пропало еще при выходе «восьмерки». До релиза Windows 10 был шанс, что технология Aero снова появится среди визуальных эффектов(ведь вернули разработчики долгожданную кнопку «Пуск»), однако этого не произошло.
Компания Microsoft в Windows 10 решила не возвращаться к старым методам оформления, благополучно забыв о технологии Aero. Но мириться с таким порядком необязательно: вы можете самостоятельно добавить в систему эффект прозрачных окон. 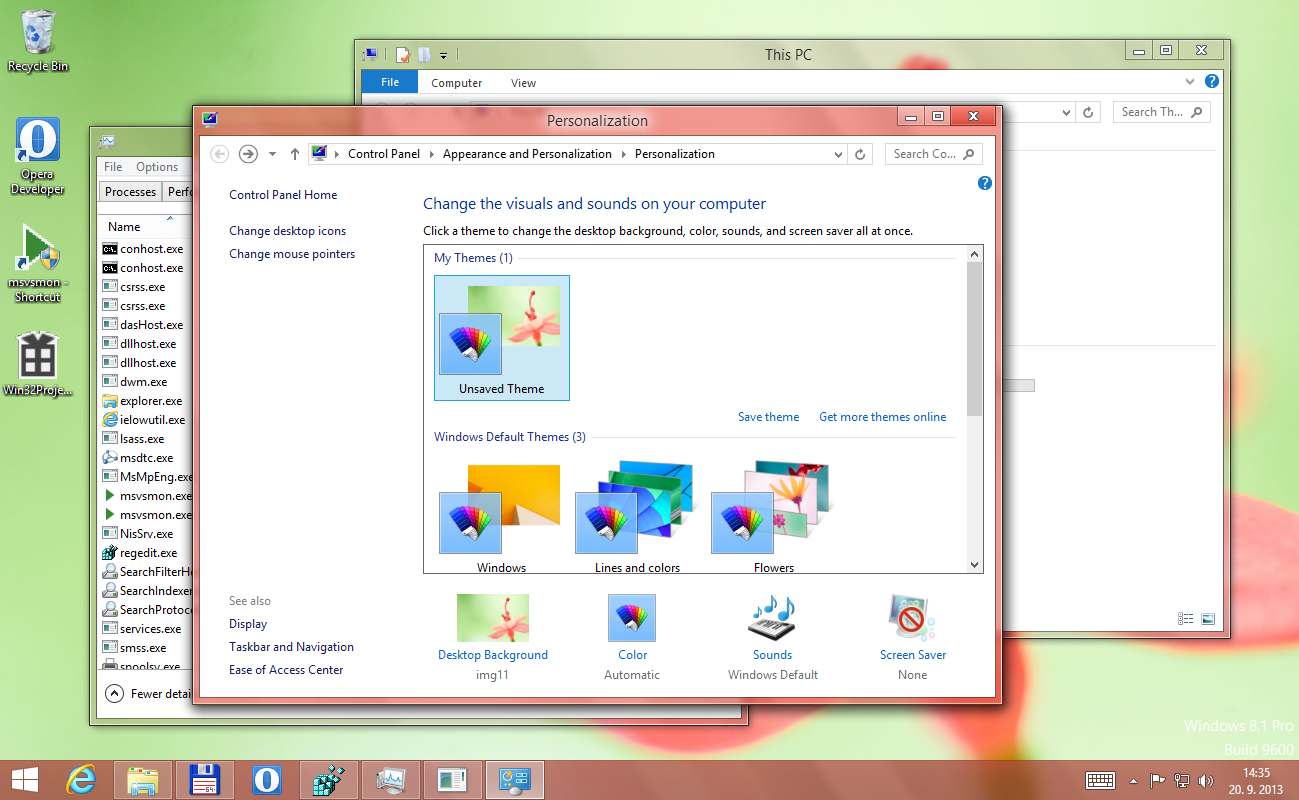
Используя программу Aero Glass
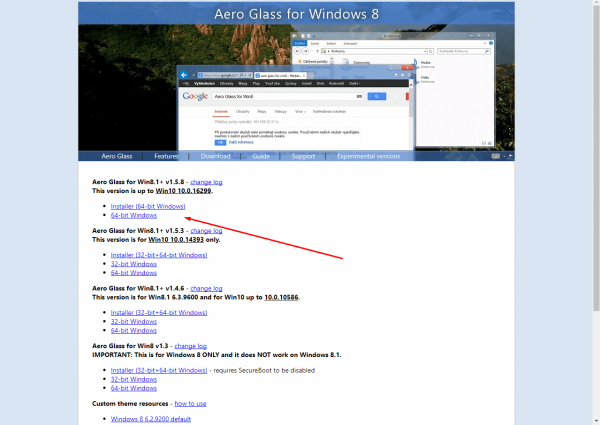
Раз нет встроенных инструментов, позволяющих решить вопрос, как включить Aero в Windows 10, то придется прибегнуть к возможностям сторонней программы. Знакомьтесь – Aero Glass, приложение, позволяющее реализовать эффект стекла для классического интерфейса Windows 10.
Aero Glass разработана для Windows 8.1, но её последняя версия корректно работает и на «десятке».
Совет! Перед установкой Aero Glass и изменением интерфейса рекомендуется создать дополнительную точку восстановления.
Давайте посмотрим, как активировать Aero в Windows 10 с помощью указанной утилиты:
- На официальном сайте в разделе «Download» скачайте последнюю версию программы.
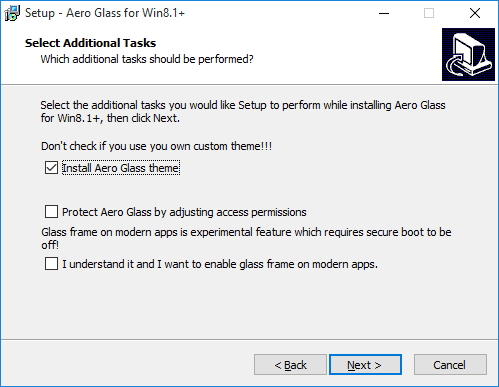
- Запустите инсталлятор, примите условия лицензионного соглашения и выберите место для установки.
- Проверьте, чтобы была отмечена только инсталляция Aero Glass theme. Ниже расположено еще два пункта, генерирующие прозрачные заголовки для универсальных приложений, однако они требуют внесения потенциально опасных изменений, поэтому лучше не отмечать эти опции.

- Нажмите «Next» и дождитесь окончания установки.
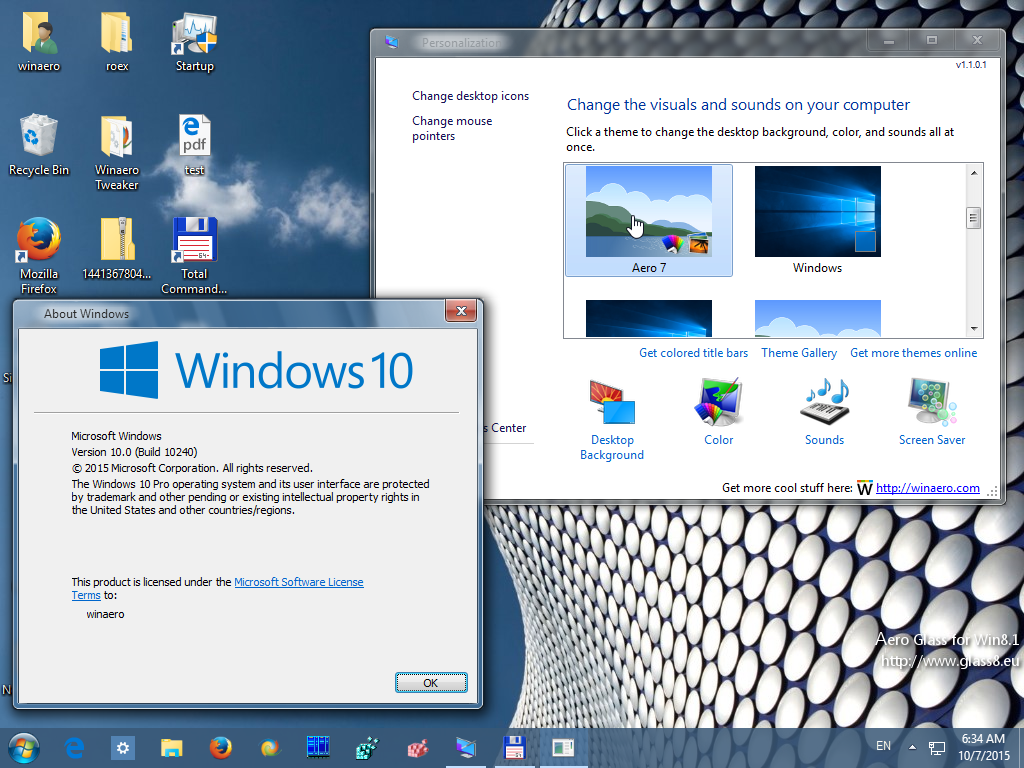
После завершения работы мастера установки вы увидите, что окна стали прозрачными. Изменения будут внесены автоматически, вам не нужно менять тему, чтобы включить Aero.
Для того, чтобы поменять степень прозрачности, нажмите Win+R и введите команду «rundll32.exe shell32.dll,Control_RunDLL desk.cpl,Advanced,@Advanced». Появится окно изменения цвета, где меняя уровень интенсивности, меняется и уровень прозрачности. 
Видео
Для наглядности предлагаем посмотреть видео инструкцию, с подробным описанием включения эффекта прозрачности окон.
Вывод
Решая проблему, как активировать Windows 10 Aero, не забывайте о стабильной работе компьютера. Использование твиков и внесение потенциально опасных изменений может привести к потере данных. Поэтому при установке Aero Glass не активируйте распространение эффекта на универсальные приложения и не забывайте о создании точки восстановления для быстрого отката системы.
Как вернуть прозрачность окон из Windows 7 в Windows 10
В Windows 10 кардинально изменился дизайн. В том числе поменялся вид всех окон: их рамка стала прямоугольной и непрозрачной, хотя в предыдущих версиях операционной системы она была закруглена на углах и имела эффект прозрачности. Если вы хотите вернуть привычный старый внешний облик из Windows 7, вам придётся включить режим Aero.
Подготовка к активации режима прозрачности окон
Включение режима Aera приведёт к тому, что дизайн системы изменится, соответственно, в процессе его включения и настройки будут затронуты системные файлы. Так как они будут редактироваться, имеется вероятность их повреждения. Поэтому рекомендуется создать резервную копию системы, чтобы в будущем иметь возможность откатить все параметры Windows, тем самым восстановив её и не потеряв данные, хранящиеся в памяти компьютера.
В Windows 10 есть встроенное средство для создания копий. Можно воспользоваться им и не тратить время на загрузку сторонних программ:
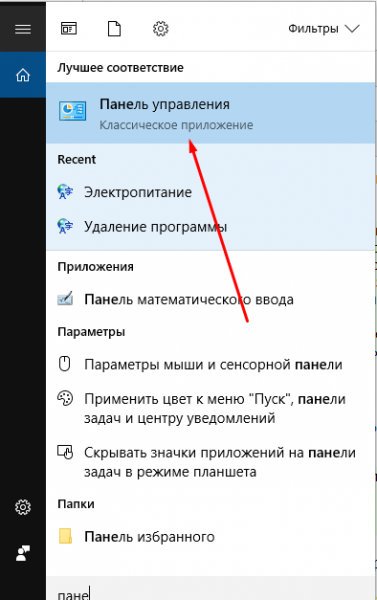
- Разверните панель управления. Найти её можно при помощи системной поисковой строки. Запускаем панель управления
- Введите в поисковой строке запрос «История файлов». Откройте найденный раздел. Открываем раздел «История файлов»
- Кликните по строке «Резервная копия образа системы», находящейся в левом нижнем углу окна. Учтите, дальнейшие действия потребуют от вас прав администратора. Открываем раздел «Резервная копия образа системы»
- Нажмите на функцию «Создание образа системы». Нажимаем на строчку «Создание образа системы»
- Выберите место для хранения создаваемого образа: он может быть записан на используемый или сторонний жёсткий диск или флешку. Указываем, куда сохранить копию
- Запустите архивирование. Процедура может продлиться от 1 минуты до нескольких часов — её длительность зависит от производительности компьютера и загруженности системы. Нажимаем кнопку «Архивировать»
 Запускаем панель управления
 Открываем раздел «История файлов»
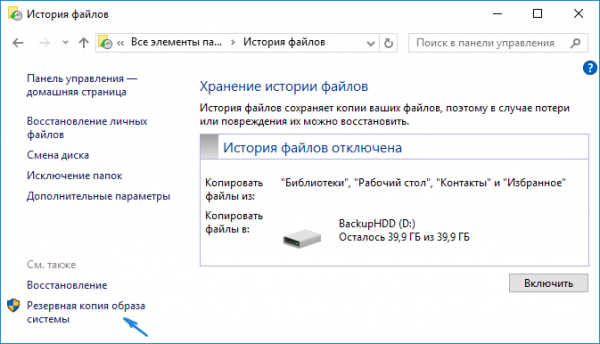 Открываем раздел «Резервная копия образа системы»
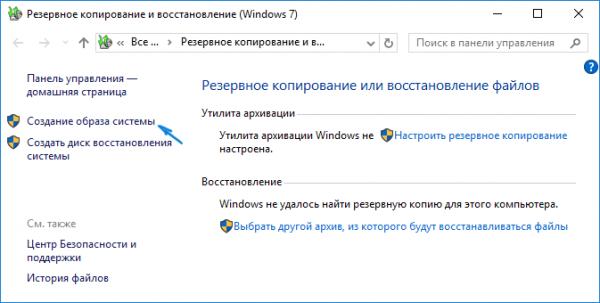 Нажимаем на строчку «Создание образа системы»
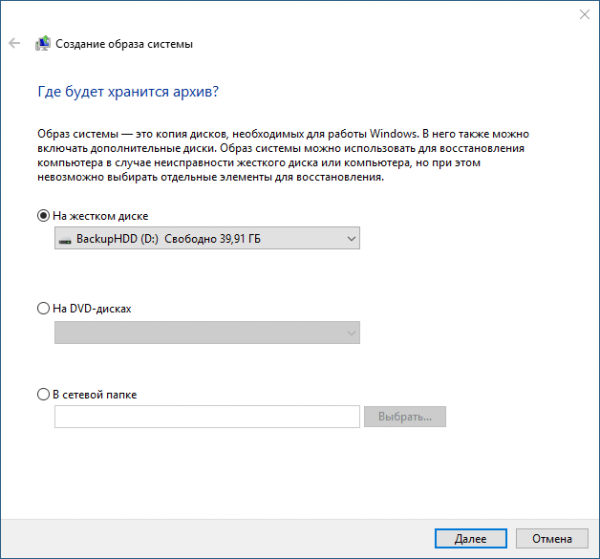 Указываем, куда сохранить копию
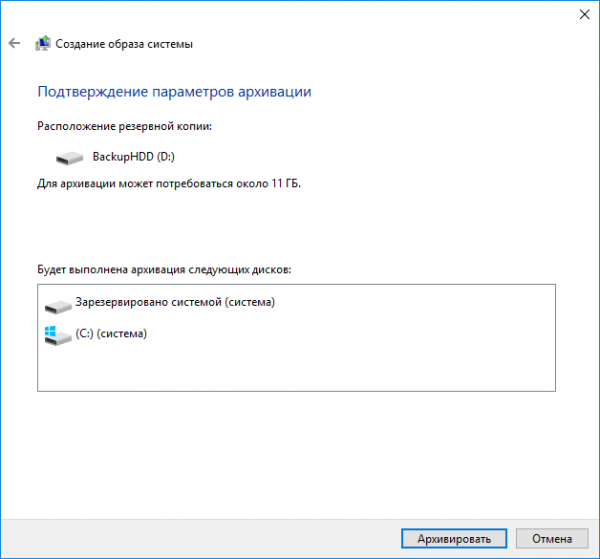 Нажимаем кнопку «Архивировать»
Когда процесс завершится, вы получите резервную копию системы. После этого можно переходить к активации режима Aero, не боясь повредить что-либо в Windows.
Установка и использование программы Aero Glass
В Windows 10 режим Aero был полностью вырезан, поэтому включить его без сторонних программ не получится. Но используя приложения от различных разработчиков, сделать это можно. Например, достаточно простой, но многофункциональной утилиты Aero Glass, позволяющей не только активировать прозрачные окна, но и детально настроить их внешний вид:
- Перейдите на официальный сайт программы — http://glass8.eu/download. Загрузите её последнюю на данный момент версию. Обратите внимание на разрядность: выбирайте 32 или 64-битную версию в соответствии с разрядностью используемой системы. На сайте присутствуют только редакции для Windows 8, но они отлично работают и на Windows 10. Приложение имеет бесплатную пробную версию. Загружаем подходящую версию программы
- Скачается установочный exe-файл, откройте его. Начнётся установка программы: укажите папку, в которую её стоит разместить, и примите лицензионное соглашение. Когда вас попросят выбрать, какие компоненты стоит установить, установите галочку только напротив Install Glass theme, тем самым разрешив загрузку только основной программы. Остальные компоненты — дополнительные, они вносят более глубокие изменения в файлы системы, поэтому их лучше не трогать без особой надобности. Ставим галочку только напротив Install Glass theme
- После завершения установки все окна автоматически обретут прозрачность. Если полученный результат вас устраивает, можете закрыть все окна, связанные с программой Aero Glass, и начать наслаждаться результатом. Если вам хочется настроить цвет или степень прозрачности, зажмите комбинацию клавиш Win+R на клавиатуре, чтобы открыть окошко «Выполнить», пропишите в нём запрос «rundll32.exe shell32.dll,Control_RunDLL desk.cpl,Advanced,@Advanced» и нажмите кнопку «ОК». Выполняем команду rundll32.exe shell32.dll,Control_RunDLL desk.cpl,Advanced,@Advanced
- Развернётся окно приложения Aero Glass. В нём вы сможете выбрать наиболее приятный цвет и настроить его: установить интенсивность, оттенок, насыщенность и яркость. При изменении параметров цвета редактируется степень прозрачности. Выбираем наиболее подходящий цвет
 Загружаем подходящую версию программы
 Ставим галочку только напротив Install Glass theme
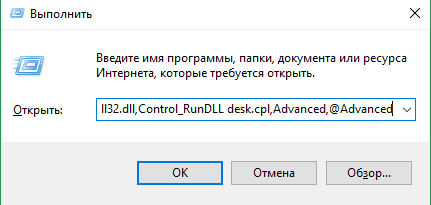 Выполняем команду rundll32.exe shell32.dll,Control_RunDLL desk.cpl,Advanced,@Advanced
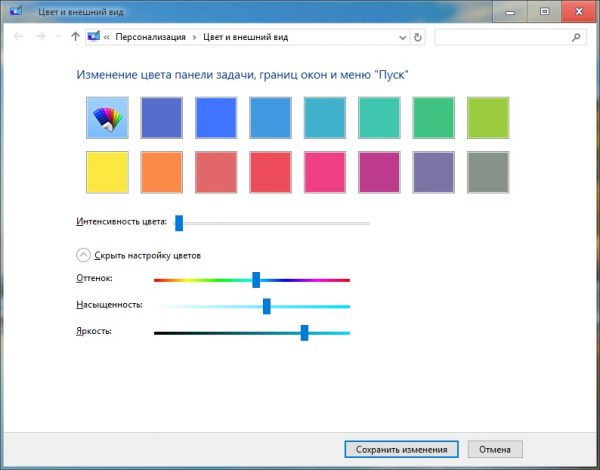 Выбираем наиболее подходящий цвет
Видео: возвращение прозрачных окон в Windows 10
Перед тем как изменять интерфейс окон в Windows 10, стоит вручную создать точку восстановления. Включить режим Aero можно при помощи приложения Aero Glass. В процессе его установки разрешайте загрузку только основного компонента — Install Glass theme. Для детальной настройки цвета и степени прозрачности выполните вышеописанную команду в окне «Пуск».


