- Установка терминального сервера и активация терминального сервера на windows 2003
- Установка Terminal Server
- Настройка терминального сервера
- Блог IT для Windows
- Подключение к удалённому рабочему столу
- Включение удаленного рабочего стола в Windows 2003
- Remote Desktop Protocol settings in Windows Server 2003 and in Windows XP
- Introduction
- More information
- Settings that are stored in the Default.rdp file
- desktopwidth: i
- desktopheight: i
- session bpp: i
- winposstr: s
- auto connect: i
- full address: s
- compression: i
- keyboardhook: i
- audiomode: i
- redirectdrives: i
- redirectprinters: i
- redirectcomports: i
- redirectsmartcards: i
- displayconnectionbar: i
- username: s
- domain: s
- alternate shell: s
- shell working directory: s
- disable wallpaper: i
- disable full window drag: i
- disable menu anims: i
- disable themes: i
- bitmapcachepersistenable: i
- autoreconnection enabled: i
Установка терминального сервера и активация терминального сервера на windows 2003
Сейчас я опишу подробную инструкцию по Лицензированию терминального сервера и активации терминального сервера windows 2003 (сразу прошу прощения что без фотографий т.к. на любую фотку у меня уходит больше времени чем на написание инструкции, поэтому буду писать очень подробно что бы не возникали лишние вопросы.) Итак поехали, поехали устанавливать и настраивать терминальный сервер 🙂 кстати забыл сказать что терминальный сервер я настраиваю под 1с для бухов 🙂
Процедура активации службы лицензирования терминалов (Terminal Server Licensing) и добавления клиентских лицензий достаточно проста, но требует аккуратного подхода. Настройку терминального клиента я буду рассматривать на windows 2003 sp2 RUS
Установка Terminal Server
- Пуск -> Программы -> Администрирование ->Мастер настройки сервера
- Появится окно на нем нажимаем два раза кнопку далее. В появившемся списке выделяем пункт Сервер терминалов и нажимаем еще два раз далее и перегружаем компьютер.
- После перезагрузке идем Пуск ->Настройка->Панель управления ->Установка удаление программ->Установка компонентов Windows В списке отмечаем галочкой пункт Лицензирование сервера терминалов и нажимаем кнопку далее и устанавливаем компонент. (при установке этого компонента мне потребовался диск с windows)
Настройка терминального сервера
- Пуск -> Программы -> Администрирование -> Лицензирование Сервера Терминалов
- В появившемся окне у Вас будет сервер(с красным крестиком это) нажимаем на нем правой кнопкой мыши и выбираем свойство. На вкладке Метод установке выбираем метод установки «В обозреватель веб-страниц»
- Далее переходим на вкладку «Требуемые сведения», заполняем поля и запоминаем что туда вводили(т.к. это будем делать еще 2 раза и лучше что бы все сведения совпадали) и нажимаем ОК
- Теперь снова нажимаем на значке правой кнопкой мыши и нажимаем активировать сервер и в появившемся окне нажимаем Далее
- Выбираем метод активации «В обозреватель веб-страниц» жмем далее и появится окно «Мастер активации сервера лицензий сервера терминалов» и это окно ни в коем случае не закрываем.
- Теперь заходим на сайт https://activate.microsoft.com/ для получения license server ID.
- На веб-сайте выбираем опцию Активация сервера лицензий (Activate a license server) и жмем далее
- На открытой странице выбираем страну Россия и в поле Код продукта вводим данные из 5 пункта(у нас в том окне есть код продукта) и заполняем все поля со * и вводим те данные которые вводили в пункте 3 и нажимаем далее, проверяем введенную информацию и опять жмем далее.
- Если все правильно сделали, то в подарок получим от Бил Гейтца 🙂 необходимый license server ID (код сервера лицензий) который как раз введем в пустые строки окна который открыли в пункте 5
- Нажимаем далее и у нас произойдет активация и появится окно в котором нажимаем два раза Далее и переходим в окно в которое теперь надо ввести код клиента.
- Открываем наш браузер в котором мы проводили активацию сервера лицензий и там где у нас он выдал код в нижу есть кнопка ДА
- В этом окне проверьте license server ID (по умолчанию он автоматически подставится) и Ваши данные (ФИО, компниф и т.д.) и тут обязательно в пункте Программа лицензирования (License Programm) выбирате Enterprise agreement и нажимайте Далее
- На следующей странице в пункте Product Type выбирите Windows Server 2003 Terminal Server Per Device Client Access License и введите то количество лицензий которое Вам нужно , а в поле Agreement Number введите любой из кодов (6565792, 5296992, 3325596, 4965437, 4526017) и нажимайте два раза Далее
- В следующем окне нам выдадут код который надо будет ввести в окне которые мы открыли в пункте 10.
Все на этом активация терминального клиента закончена. Вот таким не хитрым способом за 10 минут мы установили терминальный сервак . 🙂 У кого будут траблы пишите, будем разбираться.
Блог IT для Windows
Все про Windows, программное обеспечение, информационную безопасность, программирование
Подключение к удалённому рабочему столу
Рассмотрим простейшее подключение к удалённому рабочему столу в локальной сети.
Подключение компьютера с Windows ХР к Windows Server 2003 (доступ по имени компьютера).
1. Создайте пароль к учетной записи под которой будет подключаться пользователь.
2. Необходимо разрешить удалённый доступ к обоим компьютерам.
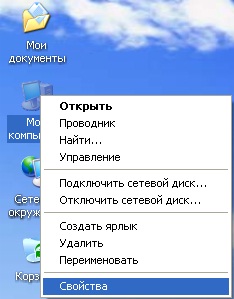
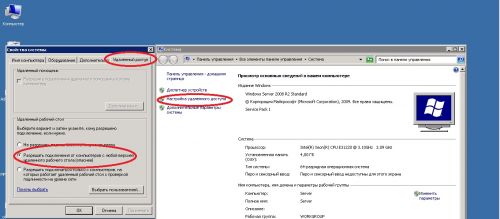
В Windows ХР — правой кнопкой мыши кликаем по значку «Мой компьютер» и в выпадающем меню выбираем последний пункт «Свойства«.
Можно так же использовать сочетания клавиш win + Pause.
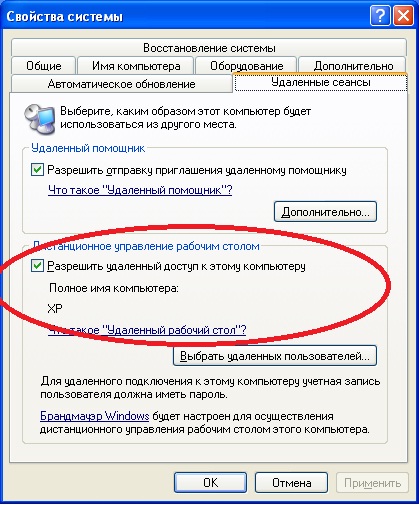
Далее выбираем вкладку «Удалённые сеансы«, затем устанавливаем галочку напротив пункта «Разрешить удалённый доступ к этому компьютеру«.
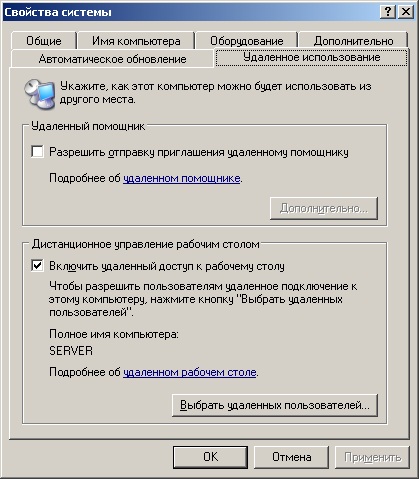
В Windows Server 2003 — правой кнопкой мыши кликаем по значку «Мой компьютер» и в выпадающем меню выбираем последний пункт «Свойства«, далее выбираем вкладку «Удалённое использование«, затем устанавливаем галочку, напротив пункта «Включить удалённый доступ к рабочему столу«.
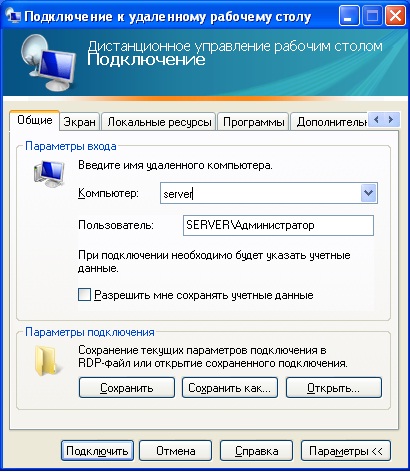
3. В Windows ХР — Пуск — Все программы — Стандартные — Подключение к удалённому рабочему столу, далее в поле компьютер указываем имя компьютера, к которому необходимо подключиться и пользователя.
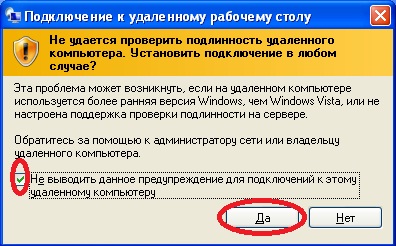
4. Далее, если появляется данное окно «Проверка подлинности удаленного компьютера» нажмите кнопку ОК (если не хотите, что бы данное окно появлялось каждый раз, необходимо установить галочку).
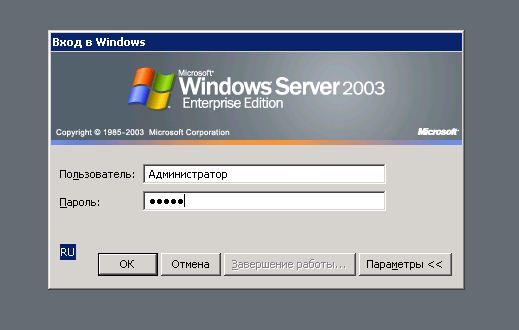
5. Если подключение произошло, появится соответствующее окно, в котором необходимо ввести пароль учетной записи пользователя, который создан на компьютере к которому подключаемся.
Подключение компьютера с Windows 7 к Windows Server 2008 (доступ по ip).
1. Создайте пароль к учетной записи под которой будет подключаться пользователь.
2. Необходимо разрешить удалённый доступ к обоим компьютерам.
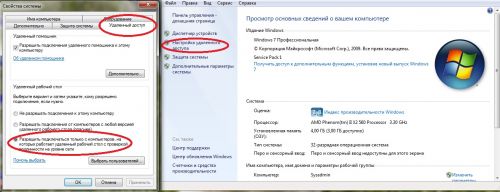
В Windows 7 — правой кнопкой мыши кликаем по значку «Компьютер» и в выпадающем меню выбираем последний пункт «Свойства«, затем необходимо выбрать пункт «Настройка удалённого доступа» и в появившемся окне вкладку «Удалённый доступ«.
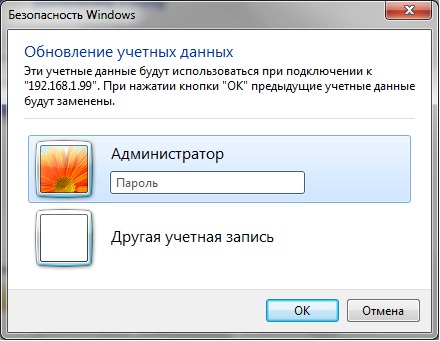
3. Пуск — Все программы — Стандартные — Подключение к удалённому рабочему столу, далее в поле компьютер указываем ip-адрес компьютера, к которому необходимо подключиться, для того, чтобы выбрать пользователя, необходимо выбрать пункт «изменить«.

В появившемся окне вводим пароль или выбираем другую учетную запись.
В Windows server 2008 — правой кнопкой мыши кликаем по значку «Компьютер» и в выпадающем меню выбираем последний пункт «Свойства«, затем необходимо выбрать пункт «Настройка удалённого доступа» и в появившемся окне вкладку «Удалённый доступ«.
Важно. Некоторые ОС не поддерживают функцию подключение к удалённому рабочему столу, в этом случае можно воспользоваться сторонним ПО.
Включение удаленного рабочего стола в Windows 2003
Вы можете включить удаленный рабочий стол, выполнив следующие действия:
Подключиться к VPS через VNC клиент (Для этого перейдите в панели управления VMmanager на страницу «Виртуальные машины» (категория «Управления» левого меню), выберите необходимую вам VPS и нажмите кнопку «VNC» в центральном верхнем меню).
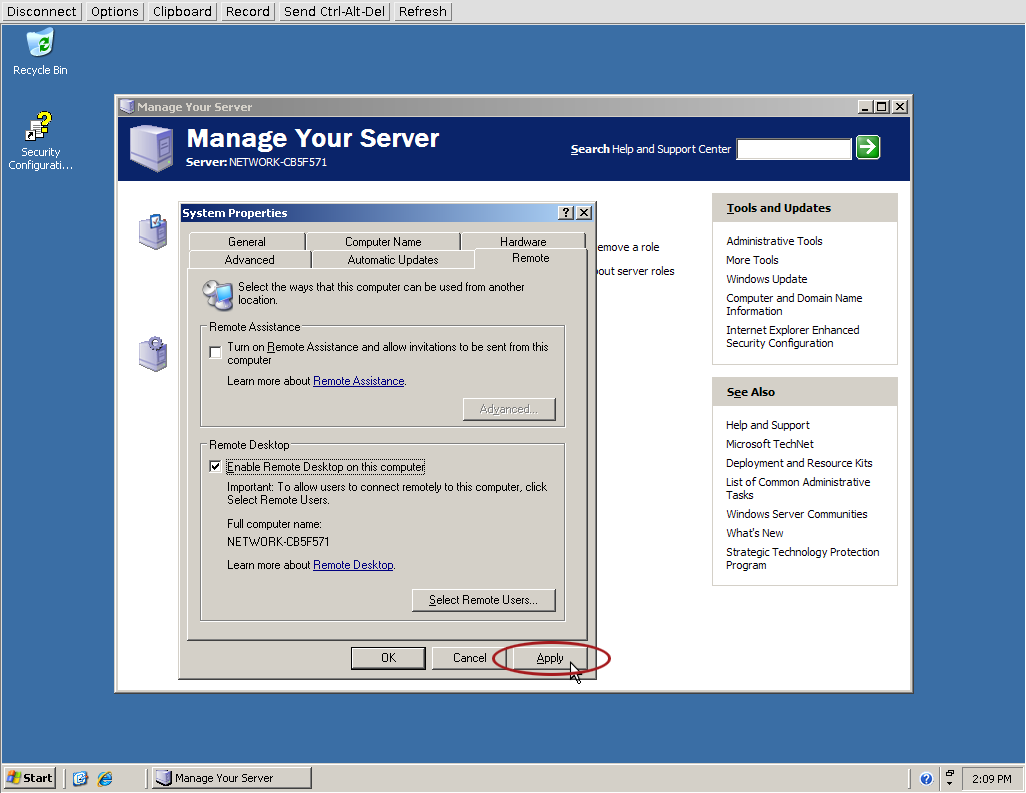
Нажать Start (Пуск), щелкнуть правой кнопкой по My Computer (Мой компьютер) и в выпадающем меню выбрать Properties (Свойства):

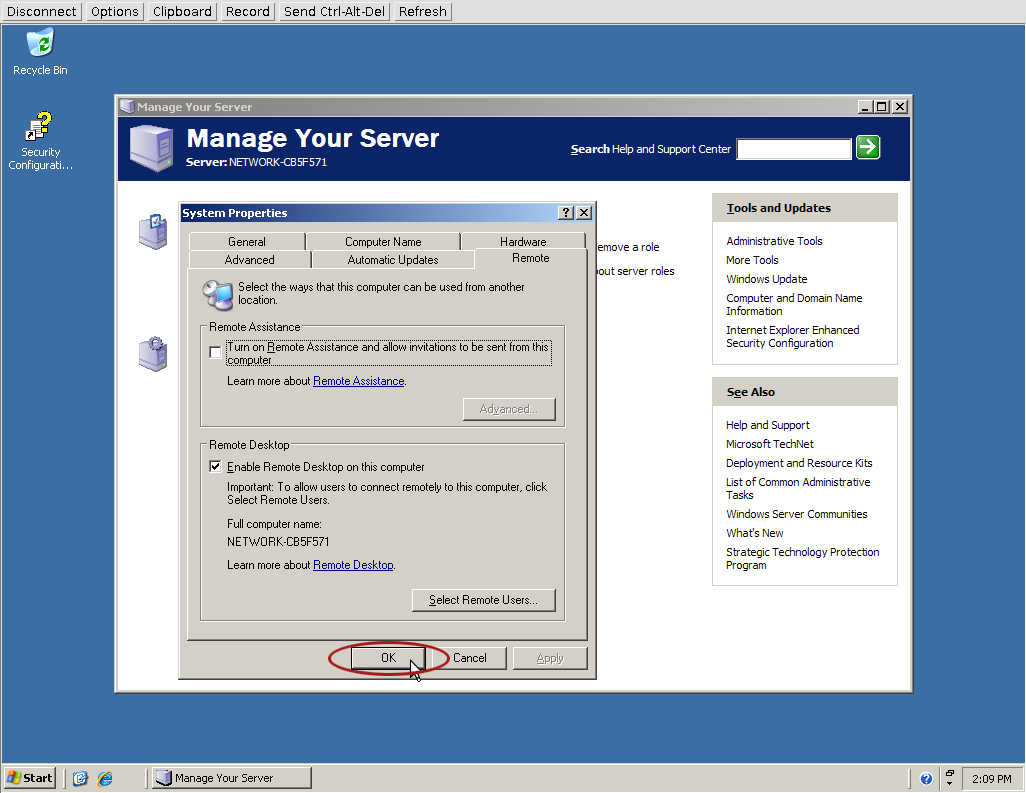
- В появившемся окне выбрать вкладку Remote и поставить галочку напротив строчки Enable Remote Desktop on this computer:

- Нажать «OK» в информационном окне, которое предупреждает, что аккаунты пользователей, использующие удаленное соединение, должны иметь пароль, и что необходимо добавить исключение в firewall:

- Нажать «Appaly» для применения настроек, затем «OK» для закрытия окна:
- Добавить исключение в Firewall. Для этого необходимо нажать Start (Пуск), в Control Panel (Панель управления) выбрать пункт Windows Firewall:

- Выбрать в появившемся окне вкладку «Exceptions» (Исключения):
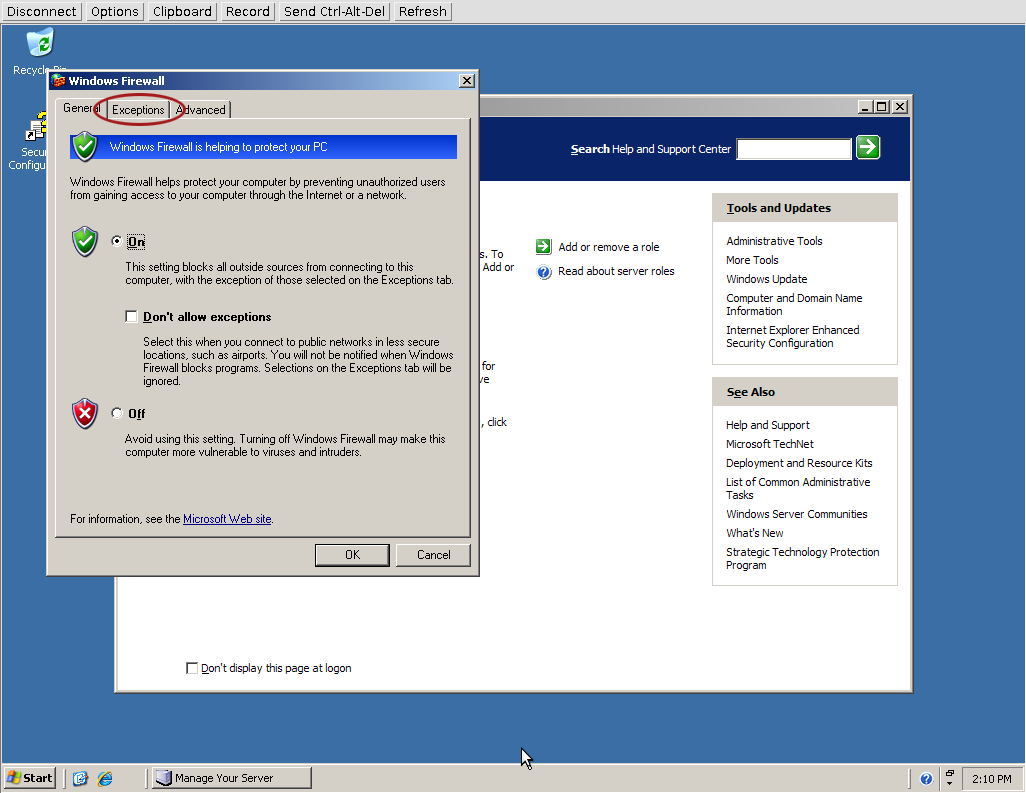
- Поставить галочку напротив «Remote Desktop» и нажать «OK»:

Теперь вы можете подключиться к VPS через удаленный рабочий стол.
Remote Desktop Protocol settings in Windows Server 2003 and in Windows XP
This article discusses the connection settings that are stored in the Default.rdp file on Windows Server 2003-based and Windows XP-based computers.
Support for Windows Vista Service Pack 1 (SP1) ends on July 12, 2011. To continue receiving security updates for Windows, make sure you’re running Windows Vista with Service Pack 2 (SP2). For more information, see this Microsoft web page: Support is ending for some versions of Windows.
Original product version:  Windows 10 – all editions, Windows Server 2012 R2
Original KB number: В 885187
Introduction
When you use the Remote Desktop Protocol (RDP) to connect to a remote computer, the Default.rdp file is created on the client computer. This article discusses the connection settings that are stored in the Default.rdp file.
More information
When you use RDP to connect to a remote computer, you can use the Remote Desktop Connection Options dialog box to configure many of the connection settings. To configure these settings, follow these steps:
- Click Start, click Run, type mstsc.exe, and then click OK.
- In the Remote Desktop Connection dialog box, click Options.
You can save *.rdp files with different settings if you connect to multiple remote computers. To save a new configuration, click Save As on the General tab in Options.
Settings that are stored in the Default.rdp file
By default, the Default.rdp file is created in your My Documents folder. The following RDP settings are stored in the Desktop.rdp file:
desktopwidth: i
This setting corresponds to the desktop width that you select on the Display tab in Remote Desktop Connection Options.
Microsoft Windows CE-based devices support only full-screen mode.
desktopheight: i
This setting corresponds to the desktop height that you select on the Display tab in Remote Desktop Connection Options.
Microsoft Windows CE-based devices support only full-screen mode.
session bpp: i
This setting corresponds to the color depth that you select in Colors on the Display tab in Remote Desktop Connection Options.
Microsoft Windows CE-based devices support only full-screen mode.
winposstr: s
This setting corresponds to the window position that you select on the Display tab in Remote Desktop Connection Options.
On desktop computers, this setting determines the Remote Desktop Connection dialog box position on the screen. The six numbers represent a string form of the WINDOWPOS structure. For more information about the WINDOWPOS function, visit the following Microsoft Web site:
Microsoft Windows CE-based devices support only full-screen mode.
auto connect: i
This setting isn’t used by desktop computers or by Windows CE-based clients.
full address: s
This setting determines the computer that you connect to. The setting corresponds to the entry in the Computer box on the General tab of Remote Desktop Connection Options.
compression: i
This setting determines whether data is compressed when it’s transmitted to the client computer.
| Value | Setting |
|---|---|
| 0 | Compression is off. |
| 1 | Compression is on. |
keyboardhook: i
This setting determines where Windows key combinations are applied. This setting corresponds to the selection in the Keyboard box on the Local Resources tab of Remote Desktop Connection Options.
| Value | Setting |
|---|---|
| 0 | Applied on the local computer. |
| 1 | Applied on the remote computer. |
| 2 | Applied in full-screen mode only. |
audiomode: i
This setting determines where sounds are played. This setting corresponds to the selection in the Remote computer sound box on the Local Resources tab of Remote Desktop Connection Options.
| Value | Setting |
|---|---|
| 0 | Play sound on the client computer. |
| 1 | Play sound on the host computer. |
| 2 | Don’t play sounds. |
redirectdrives: i
This setting determines whether disk drives are automatically connected when you log on to the remote computer. This setting corresponds to the selection in the Disk Drives box on the Local Resources tab of Remote Desktop Connection Options.
| Value | Setting |
|---|---|
| 0 | Drives aren’t automatically reconnected. |
| 1 | Drives are automatically reconnected. |
redirectprinters: i
This setting determines whether printers are automatically connected when you log on to the remote computer. This setting corresponds to the selection in the Printers check box on the Local Resources tab of Remote Desktop Connection Options.
| Value | Setting |
|---|---|
| 0 | Printers aren’t automatically reconnected. |
| 1 | Printers are automatically reconnected. |
redirectcomports: i
This setting determines whether COM ports are automatically connected when you log on to the remote computer. This setting corresponds to the selection in the Serial Ports box on the Local Resources tab of Remote Desktop Connection Options.
| Value | Setting |
|---|---|
| 0 | COM ports aren’t automatically reconnected. |
| 1 | COM ports are automatically reconnected. |
redirectsmartcards: i
This setting determines whether smart cards are automatically connected when you log on to the remote computer. This setting corresponds to the selection in the Smart cards box on the Local Resources tab of Remote Desktop Connection Options.
| Value | Setting |
|---|---|
| 0 | Smart cards aren’t automatically reconnected. |
| 1 | Smart cards are automatically reconnected. |
displayconnectionbar: i
This setting determines whether the connection bar is displayed when you log on to the remote computer in full-screen mode. This setting corresponds to the selection in the Display the connection bar when in full screen mode check box on the Display tab of Remote Desktop Connection Options.
| Value | Setting |
|---|---|
| 0 | Connection bar doesn’t appear. |
| 1 | Connection bar appears. |
username: s
This setting determines the user name that is displayed in RDP. The setting corresponds to the entry in the User name box on the General tab of Remote Desktop Connection Options.
domain: s
This setting determines the user name that is displayed in the Remote Desktop Connection dialog box. It corresponds to the entry in the Domain box on the General tab of Remote Desktop Connection Options.
alternate shell: s
This setting determines whether a program is started automatically when you connect with RDP. The setting corresponds to the entry in the Program path and file name box on the Programs tab of Remote Desktop Connection Options.
shell working directory: s
This setting is the folder location for the application that is started automatically when you connect with RDP. The setting corresponds to the entry in the Program path and file name box on the Programs tab of Remote Desktop Connection Options.
disable wallpaper: i
This setting determines whether the desktop background appears when you log on to the remote computer. This setting corresponds to the selection in the Desktop background check box on the Experience tab of Remote Desktop Connection Options.
| Value | Setting |
|---|---|
| 0 | Wallpaper appears. |
| 1 | Wallpaper doesn’t appear. |
disable full window drag: i
This setting determines whether folder contents appear when you drag the folder to a new location. This setting corresponds to the selection in the Show contents of window while dragging check box on the Experience tab of Remote Desktop Connection Options.
| Value | Setting |
|---|---|
| 0 | Folder contents appear while dragging. |
| 1 | Folder contents don’t appear while dragging. |
disable menu anims: i
This setting determines how menus and windows appear when you log on to the remote computer. This setting corresponds to the selection in the Menu and window animation check box on the Experience tab of Remote Desktop Connection Options.
| Value | Setting |
|---|---|
| 0 | Menu and window animations are permitted. |
| 1 | Menu and window animations aren’t permitted. |
disable themes: i
This setting determines whether themes are permitted when you log on to the remote computer. This setting corresponds to the selection in the Themes check box on the Experience tab of Remote Desktop Connection Options.
| Value | Setting |
|---|---|
| 0 | Themes are permitted. |
| 1 | Themes aren’t permitted. |
bitmapcachepersistenable: i
This setting determines whether bitmaps are cached on the local computer. This setting corresponds to the selection in the Bitmap caching check box on the Experience tab of Remote Desktop Connection Options.
| Value | Setting |
|---|---|
| 0 | Caching isn’t enabled. |
| 1 | Caching is enabled. |
autoreconnection enabled: i
This setting determines whether a client computer automatically tries to reconnect after being disconnected.


