- Установка DNS сервера на Windows Server 2012 R2 Datacenter и создание зоны прямого просмотра
- Что такое DNS и DNS сервер?
- Установка DNS сервера на Windows Server 2012 R2
- Шаг 1
- Шаг 2
- Шаг 3
- Шаг 4
- Шаг 5
- Шаг 6
- Шаг 7
- Шаг 8
- Создание зоны прямого просмотра на DNS сервере 2012 R2
- Как найти и отредактировать файл Hosts
- Редактирование:
- Бесплатный DNS-хостинг
- Расположение hosts-файла в различных ОС:
- Windows
- DNS Servers
- In this section
- DNSSEC support in Windows Server
- DNSSEC mixed-mode deployment
- WINS lookup for signed zones
- DNSSEC in Windows Server 2012
- Online signing and dynamic updates
- Read-only domain controllers (RODCs)
- DNSSEC in DNS Manager
- The Key Master
- Transferring the Key Master role
- Seizing the Key Master role
- DNSSEC standards
- Zone transfers
Установка DNS сервера на Windows Server 2012 R2 Datacenter и создание зоны прямого просмотра
Сейчас мы установим роль сервера DNS-сервер на операционной системе Microsoft Windows Server 2012 R2 Datacenter, затем создадим зону прямого просмотра, а также вспомним, что такое вообще DNS и для чего он нужен.
И прежде чем устанавливать и настраивать DNS сервер, давайте вспомним, что такое DNS и DNS сервер. Так как подобной информации в Интернете полно мы рассмотрим это кратко и перейдем сразу к делу. Напомню, что в прошлых статьях мы рассматривали установку Windows Server 2012 R2 и установка и настройку DHCP сервера на этой же операционной системе, теперь продолжаем и на очереди у нас DNS сервер.
Что такое DNS и DNS сервер?
DNS (Domain Name System) – это система доменных имён, которая позволяет по доменному имени узнать IP адрес хоста и наоборот. Так как у каждого компьютера или сетевого устройства есть свой IP адрес и для того чтобы обратиться к тому или иному компьютеру или устройству соответственно нужно знать этот IP адрес, но так как запоминать определенную последовательность цифр не удобно, да и как если, например Вы обращаетесь ко многим компьютерам (запомнить просто не реально) поэтому чтобы не запоминать эти цифры, и существует система доменных имен, например, что лучше для восприятия 192.168.1.1 или mycomp. Вот такое простое определение, но так как материал для начинающих администраторов, этого вполне достаточно.
DNS сервер – это сетевая служба или по-простому программное обеспечение которое обеспечивает и поддерживает работу DNS. DNS сервер может отвечать за определенную зону, в которой располагаются соответствующие компьютеры. И так как система DNS иерархическая то DNS сервер может перенаправить запрос вышестоящему серверу, в случае если он не может определить ip адрес хоста по доменному имени.
Хватит теории, и так как материал посвящен именно установки роли DNS сервер, давайте переходить непосредственно к этому.
Примечание! Как видно из названия, DNS сервер мы будем устанавливать на ОС Windows Server 2012 R2 Datacenter, только мы будем использовать, как и в прошлых статьях, ознакомительную версию.
Установка DNS сервера на Windows Server 2012 R2
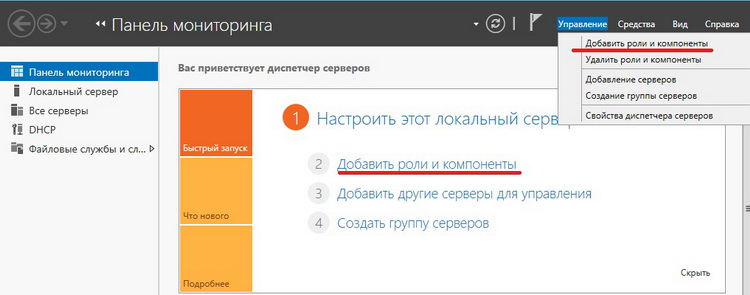
Шаг 1
Открываем диспетчер серверов и выбираем «Добавить роли и компоненты»
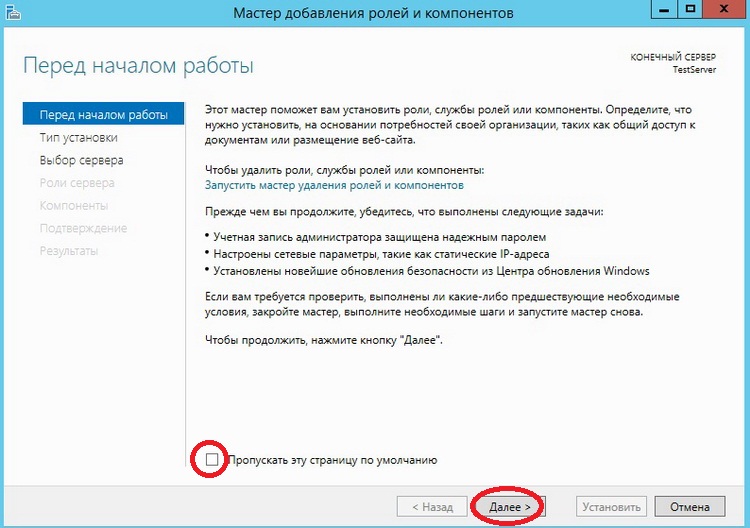
Шаг 2
На следующем окне ничего не нужно делать, это окно простое напоминание администратору о том, что учетная запись администратора должна быть защищена надежным паролем, о том, что необходимо устанавливать все последние обновления, кстати, можно сделать так чтобы это окно не появлялось в следующий раз, для этого поставьте соответствующую галочку. И жмем «Далее»
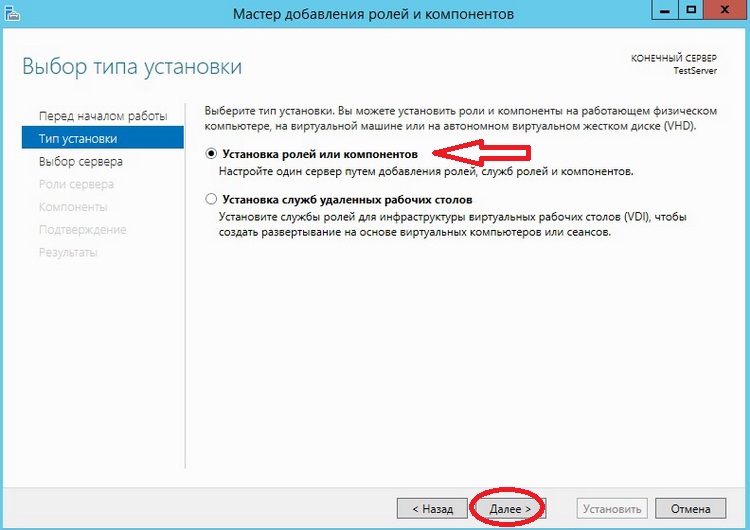
Шаг 3
На этом шаге, также ничего не нужно делать, все по умолчанию выбрано правильно именно так как нам и нужно, жмем «Далее»
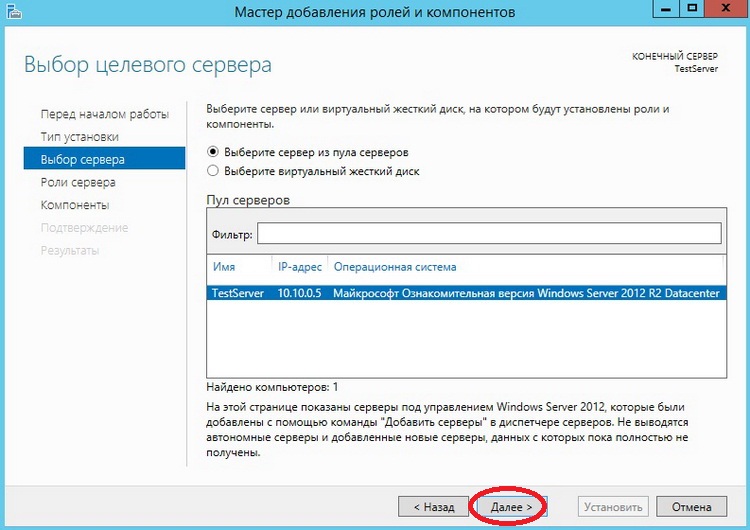
Шаг 4
Затем предстоит выбрать сервер, на который будет производиться установка роли DNS сервера, так как у меня сервер один я его и выбираю, жму «Далее»
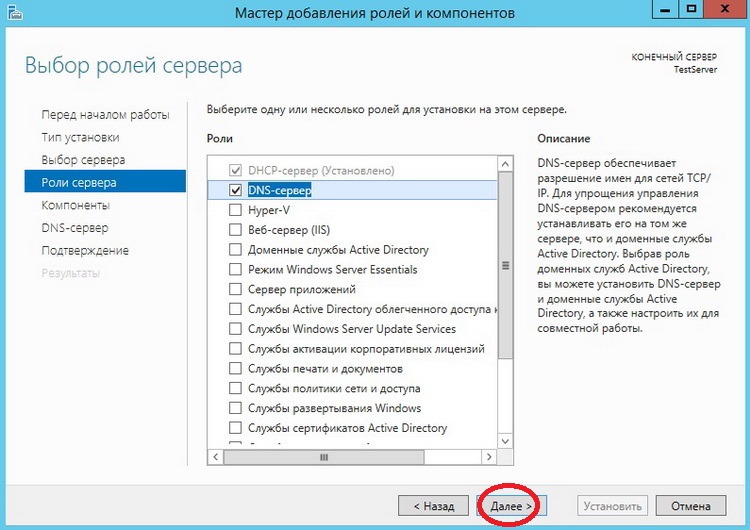
Шаг 5
Вот как раз на этом шаге и нужно выбрать, какие роли мы будем устанавливать, а мы соответственно будем устанавливать роль DNS сервер, поэтому выбираем его

Затем нам сразу предложат установить средства администрирования DNS сервера, и так как я буду администрировать его на этом же сервере, я жму «Добавить компоненты», чтобы на следующем шаге их не искать и принудительно не выбирать. А если Вы будете администрировать DNS сервер с другого сервера, то можете и не добавлять эти средства, а добавить их соответственно на том сервере, с которого будет осуществляться настройка и управление.
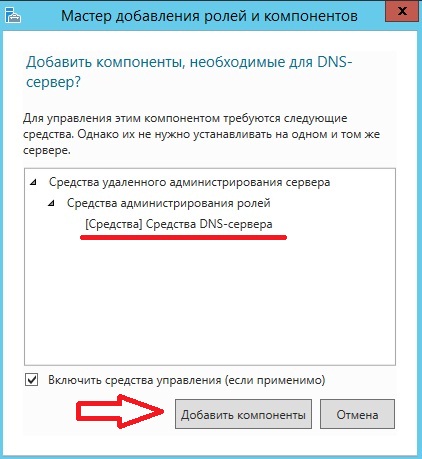
Затем жмем «Далее»
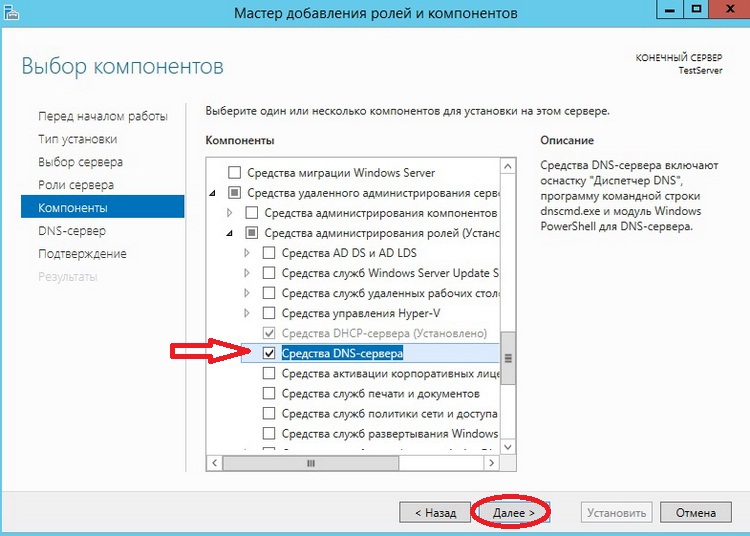
Шаг 6
И так как компоненты мы уже добавили нам искать их здесь не нужно, но для примера я покажу, где они находятся и что они уже выбраны, жмем «Далее»
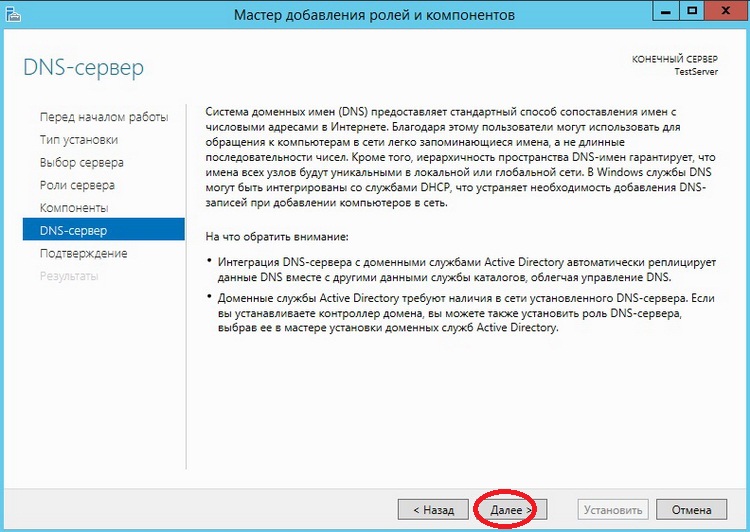
Шаг 7
На следующем окне нам говорят, на что обратить внимание при установке роли DNS сервер, жмем «Далее»
Шаг 8
Все подтверждаем установку нажатием кнопку «Установить», ставить галочку «Автоматический перезапуск сервера» в данном случае не нужно.
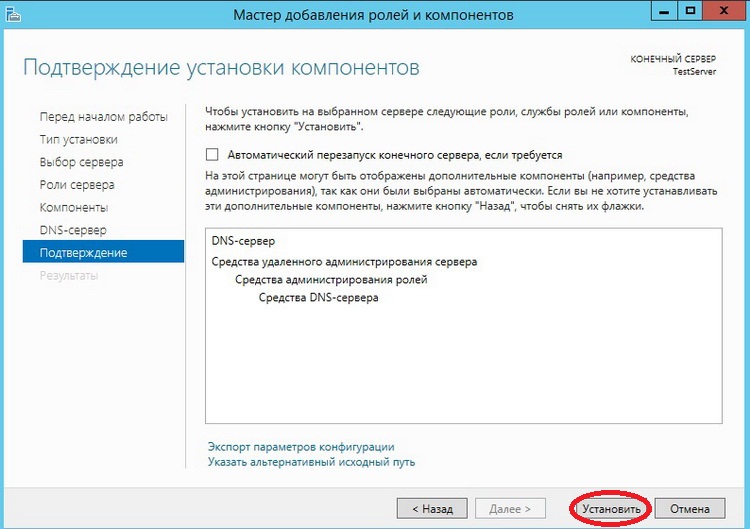
Вот и все началась установка
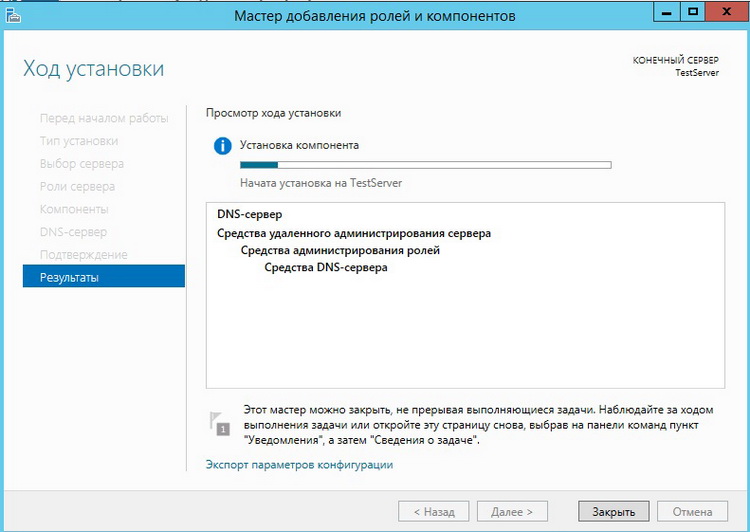
Продлится она не долго минуты 3, и появится следующее сообщение, жмем «Закрыть»
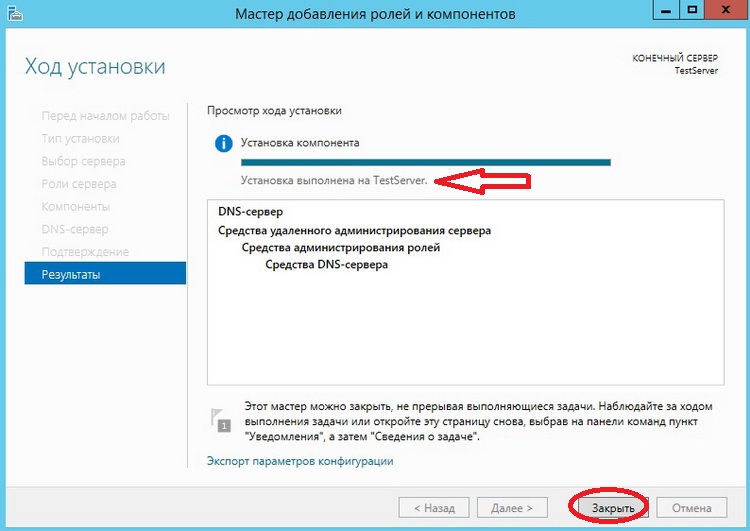
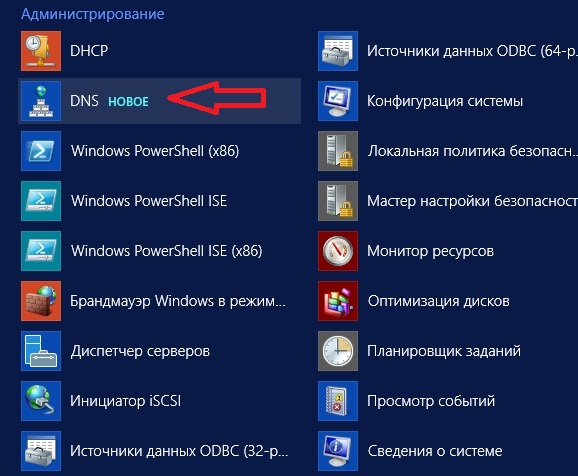
Все, роль сервера DNS-сервер установлена. Для запуска средств управления DNS сервером используйте Диспетчер серверов->Средства ->DNS
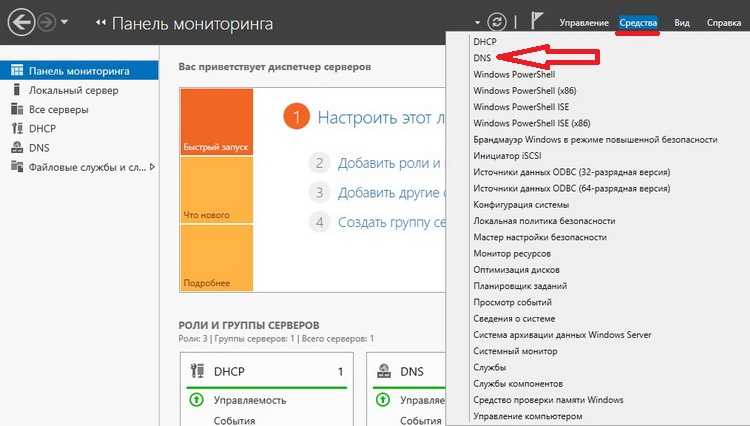
Или через меню Пуск
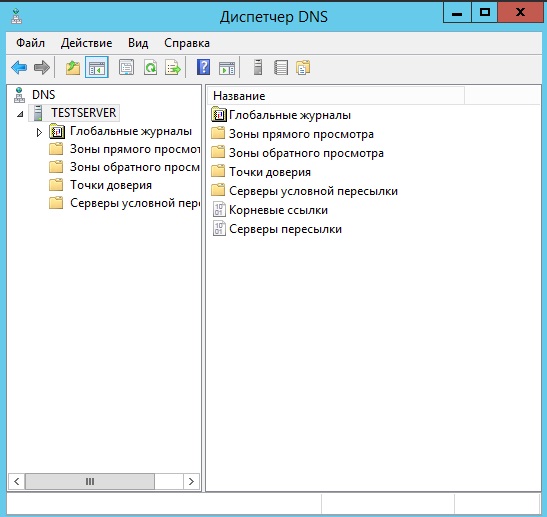
Само средство управления выглядит следующим образом
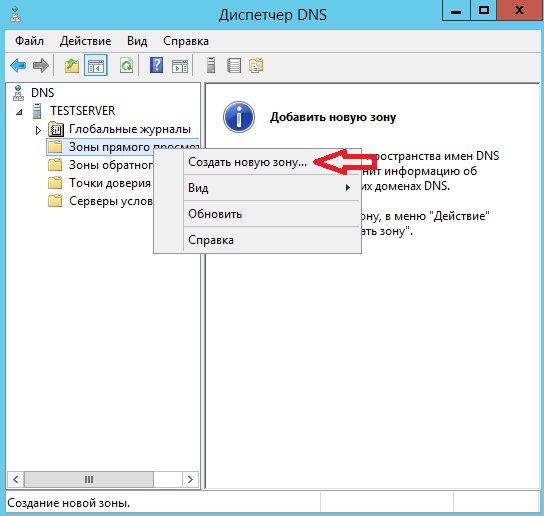
Создание зоны прямого просмотра на DNS сервере 2012 R2
На группе «Зоны прямого просмотра» щелкаем правой кнопкой мыши и выбираем «Создать новую зону»
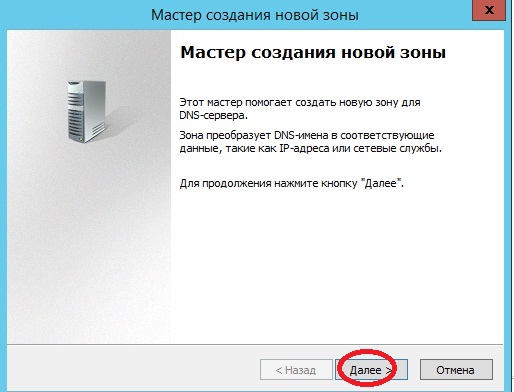
После у нас запустится мастер создания новой зоны, жмем «Далее»
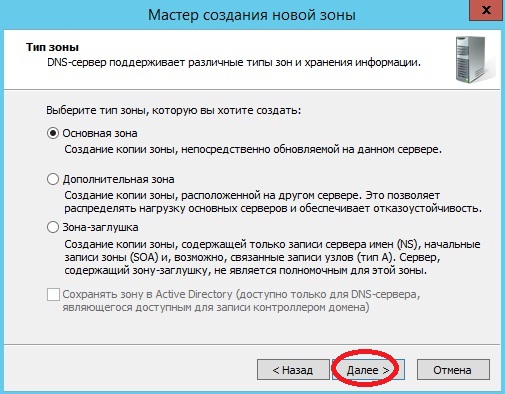
В следующем окне выбираем тип наше зоны, описание можете посмотреть непосредственно под каждым типов, я выбираю «Основную» жму «Далее»
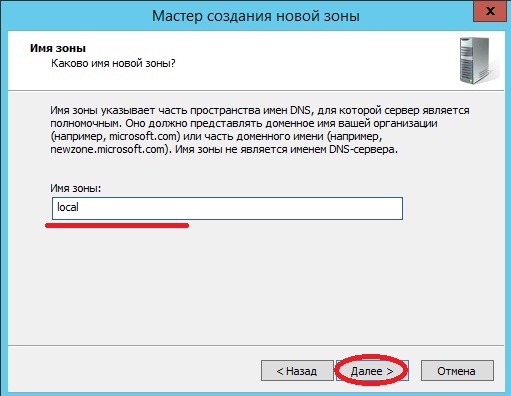
Затем нам предстоит написать имя нашей зоны, в моем случае, так как сервер тестовый я выберу имя local, Вы в свою очередь пишете, название вашего домена, или если Ваш домен не будет иметь выхода в Интернет другими словами локальный (чисто в Вашей сети), то в принципе можете писать все что угодно.
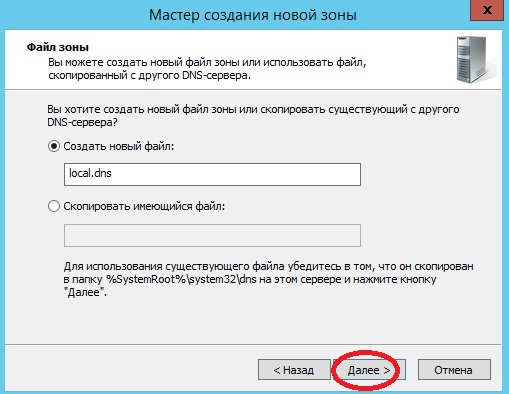
Далее я выбираю «Создать новый файл», так как у меня другого DNS сервера нет, жму «Далее»
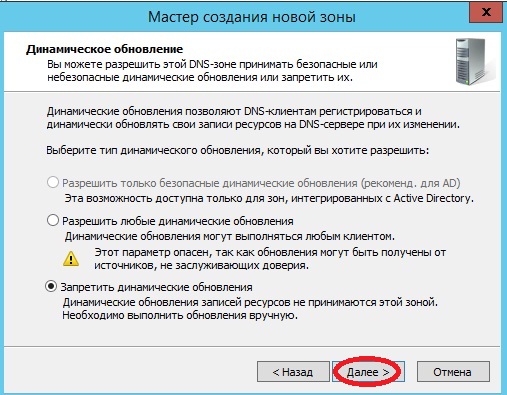
Затем предстоит выбрать «Тип динамического обновления» я пока такой функционал запрещу, но в последствии я всегда могу его включить, а Вы можете включить его, если, например, у Вас DNS сервер только для Вашей локальной сети, жму «Далее»
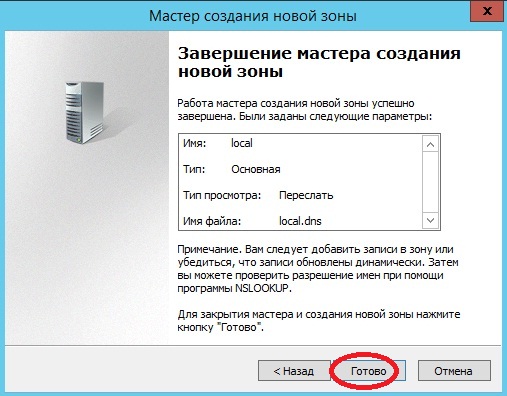
Заключительное окно, которое говорит нам, что все готово, мы соответственно и жмем «Готово»
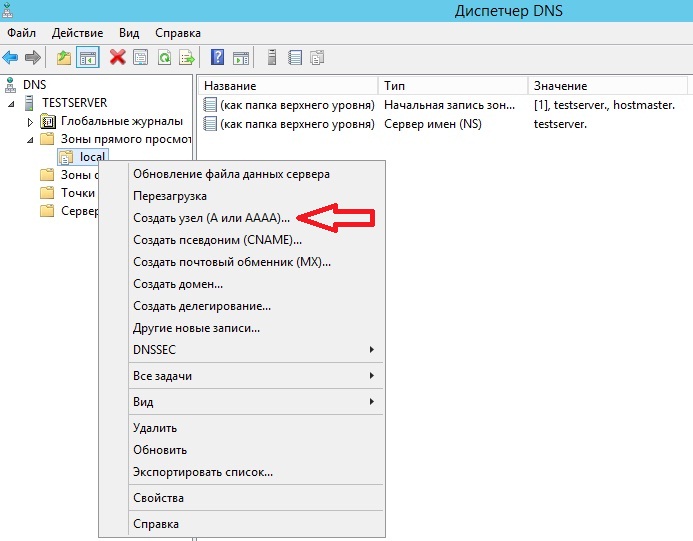
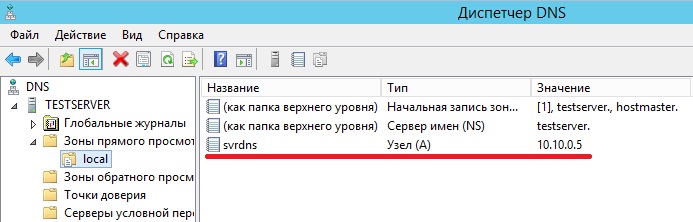
Вот и все зона создана, давайте создадим запись типа A, например для нашего же сервера. Для этого по зоне щелкаем правой кнопкой мыши и жмем «Создать узел A или AAAA»
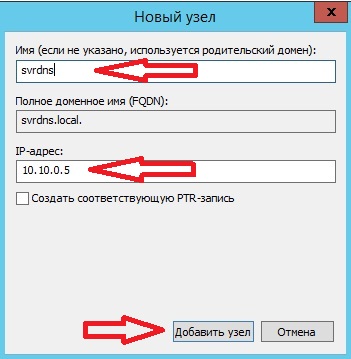
Затем вводим имя нашего узла, которое мы хотим, чтобы у него было, и соответственно какой у него IP адрес, это уже по факту. Жмем «Добавить узел»
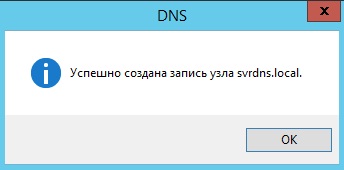
Появится сообщение о том, что узел создан
И появится соответствующая запись
Затем не забываем проверить, какой днс сервер установлен у нас в настройках сетевого интерфейса (он должен быть соответственно наш, т.е. ip адрес этого сервера). Потом соответственно мы можем проверить работу только что установленного DNS сервера, например, запустить командную строку и попробовать пропинговать узел который мы создали чуть ранее
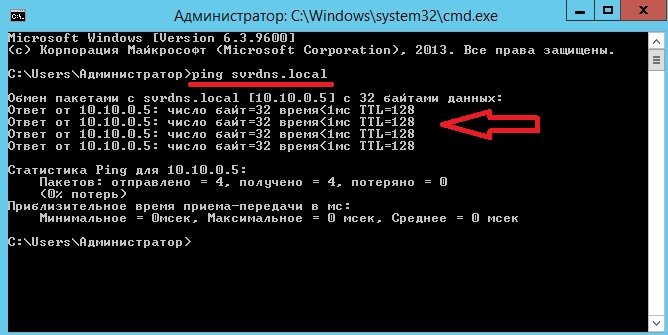
Как видите, система распознала по доменному имени его IP адрес. И на этом предлагаю заканчивать. Удачи!
Как найти и отредактировать файл Hosts
В некоторых случаях бывает необходимо отредактировать файл hosts на локальном ПК или удаленном сервере. С помощью этого файла вы можете управлять маршрутизацией трафика и разрешением IP-адресов в имена DNS. Приоритет данного файла позволяет обрабатывать сетевые запросы до их передачи публичным или частным DNS-серверам. Таким образом, реализуется возможность создания своеобразной локальной системы DNS на самой машине.
Сегодня данный файл практически не используется, его функции выполняет служба DNS, преобразующая «имя в адрес» и «адрес в имя». Тем не менее, его использование возможно и сегодня.
Редактирование:
Синтаксис остается одинаковым для всех операционных систем. У большинства файлов hosts несколько записей для loopback (обратной петли). Мы используем это для примера.
Бесплатный DNS-хостинг
- Надёжные DNS-сервера
- Автоматическая миграция
- API
Часть 1: адрес, куда перенаправить;
Часть 2: адрес, который вы хотите перенаправить;
Часть 3: комментарий.
Они могут быть разделены пробелом, но для удобства чтения, как правило, разделены одним или двумя горизонтальными табуляциями.
127.0.0.1 localhosts #loopback
Используйте любой текстовый редактор в привилегированном режиме для внесения изменений.
Расположение hosts-файла в различных ОС:
Windows
В данном примере будет запрещен доступ машины к сайту Facebook и его поддоменам. Это реализуется за счет разрешения запросов DNS на имя facebook.com в несуществующий IP-адрес 0.0.0.0:

При попытке перейти по заблокированному адресу после добавления строки выше в файл hosts вы увидите ошибку, подтверждающую корректность конфигурации:
DNS Servers
Applies To: Windows Server 2012 R2, Windows Server 2012
If a zone is signed with DNSSEC and validation is required, DNSSEC must be supported by each DNS server that is involved in the process of a DNS query and response. This support creates a chain of trust that enables DNSSEC data to be passed from the authoritative DNS server that hosts a signed zone to other DNS servers that can verify this data and thus validate that DNS responses are genuine. DNS clients are protected against spoofing attacks when they receive this validated response.
.jpeg)
To enable DNSSEC and the chain of trust:
Primary authoritative DNS servers must support zone signing.
Primary and secondary authoritative DNS servers must support hosting of signed zones.
Recursive or forwarding DNS servers must support DNSSEC validation of DNS responses.
DNS clients that are security-aware can also be configured to require that DNSSEC validation be performed. Clients that are not security-aware or that do not require validation can still be protected with DNSSEC. For more information, see DNS Clients.
DNSSEC requires Extension Mechanisms for DNS (EDNS0), a DNS extension that permits large UDP packets to be used in DNS responses. Some network infrastructure devices such as routers and firewalls can interfere with transmission of large UDP packets and cause DNS queries to fail when EDNS0 is enabled. For more information, see Knowledge Base article 2028240: Windows client and server operating system compatibility with DNSSEC enabled root servers” (https://support.microsoft.com/kb/2028240).
In this section
DNSSEC support in Windows Server
DNSSEC support in Windows Server is greatly improved in Windows Server 2012 and Windows Server 2012 R2.
The following table provides a summary of DNSSEC support in Windows Server operating systems.
Operating system version
Windows Server 2003В and Windows ServerВ 2008
DNSSEC is implemented on secondary zones as described in RFC 2535.
RFC 2535 has been made obsolete by RFCs 4033, 4034, and 4035; therefore, this DNSSEC implementation is not interoperable with Windows ServerВ 2008В R2В or any later operating systems.
Windows ServerВ 2008В R2
Limited DNSSEC support was added in Windows ServerВ 2008В R2 to enable offline signing for static zones.
DNSSEC in Windows ServerВ 2008В R2 is not intended to be used with dynamic, Active Directory-integrated DNS zones. If a zone is DNSSEC-signed on a DNS server running Windows ServerВ 2008В R2, all types of dynamic updates, secure and non-secure, are disabled on that zone.
To support staged migration, you can deploy DNSSEC in a mixed environment withВ Windows ServerВ 2008В R2 and Windows Server 2012 DNS servers. For more information, see the DNSSEC mixed-mode deployment topic in this section.
Windows Server 2012 and Windows Server 2012 R2
DNSSEC support is significantly enhanced in Windows Server 2012 and Windows Server 2012 R2.
Enhancements include online signing, DNS dynamic update support for signed zones, Windows PowerShell support, automated trust anchor distribution and rollover, support for NSEC3 and RSA/SHA-2 standards, and updated user interface deployment and management wizards.
Note: The DNS client in WindowsВ 7, Windows ServerВ 2008В R2 and later versions of Windows is a non-validating DNSSEC-aware stub resolver. Earlier versions of the Windows DNS Client were not DNSSEC-aware. For more information about DNSSEC and DNS clients, see the DNS Clients topic in this guide.
For detailed information about DNSSEC in Windows ServerВ 2008В R2, see Deploying DNS Security Extensions (DNSSEC) in the Secure DNS Deployment Guide for Windows ServerВ 2008В R2.
DNSSEC mixed-mode deployment
To support staged migration, you can deploy DNSSEC in a mixed environment with some DNS servers running Windows ServerВ 2008В R2 and other DNS servers running Windows Server 2012 or a later operating system.
The following specifications apply to mixed-mode deployments:
Updated DNSSEC standards (ex: NSEC3) that are available in Windows Server 2012 and Windows Server 2012 R2 are incompatible with DNS servers running Windows ServerВ 2008В R2. As a result, servers running Windows ServerВ 2008В R2 will load zones that are signed on Windows Server 2012 as unsigned zones.
Zones that are signed on (legacy) DNS servers running Windows ServerВ 2008В R2 are compatible with some DNSSEC operations on (current) DNS servers running Windows Server 2012В or a later operating system. DNSSEC-related resource records (ex: RRSIG, DNSKEY) in these zones will be loaded on current DNS servers and the zones will be capable of DNSSEC validation. However, the zone will not appearВ to be signed in DNS Manager or using current Windows PowerShell cmdlets.
A zone that is signed on Windows ServerВ 2008В R2 cannot be unsigned on a server running Windows Server 2012В or a later operating system using the Invoke-DnsServerZoneUnsign cmdlet or the DNS Manager console. To unsign a zone that was signed on a legacy DNS server, you must use legacy procedures. These procedures can be performed on a current DNS server or a legacy DNS server.
Trust anchors that are created on legacy DNS servers can be imported and will be displayed on current DNS servers using the DNS Manager console or Windows PowerShell. The format of trust anchors is the same in both legacy and current operating systems.
DNSSEC-related Name Resolution Policy Table (NRPT) rules are forward and backward compatible. Rules that are created on computers running Windows Server 2008 R2 are displayed and can be modified on computers running Windows Server 2012 or Windows Server 2012 R2, and vice-versa.
An issue has been identified where DNSSEC validation can fail on computers running Windows 7 when you distribute trust anchors in Active Directory. To repair this issue, import trust anchors manually to validating DNS servers.
WINS lookup for signed zones
You can configure a DNS server to use Windows Internet Name Service (WINS) to look up names that are not found in DNS by checking the NetBIOS namespace.
To use WINS lookup integration, two special resource record types—the WINS and WINS-R resource records—are enabled and added to a zone. When the WINS resource record is used, DNS queries that fail to find a matched host (A) resource record in the zone are forwarded to WINS servers that are configured in the WINS resource record. For reverse lookup zones, the WINS-R resource record can be enabled and used to provide a similar benefit for further resolving a reverse DNS query that is not found.
In Windows ServerВ 2008В R2, WINS lookup was disabled for DNSSEC-signed zones. For unsigned zones, the WINS tab is displayed in DNS Manager when you view properties of the zone. See the following example.
.jpeg)
If a zone was signed, WINS lookup was disabled, and the WINS tab was not displayed.
In Windows Server 2012 and later operating systems, WINS forwarding is enabled for signed zones. If you select the Use WINS forward lookup check box to enable WINS lookup on a signed zone, a warning message appears. See the following example.
.jpeg)
A similar message is displayed if you attempt to sign a zone that previously has had WINS lookup enabled. Warning messages are also displayed when you attempt to sign a zone with Windows PowerShell that has WINS lookup enabled.
In summary, WINS lookups are available for both signed and unsigned zones on Windows Server 2012 or later, but WINS lookup is not tamper-proof and constitutes a security risk if it is enabled for a DNSSEC-signed zone.
DNSSEC in Windows Server 2012
Windows Server 2012 and Windows Server 2012 R2 provide many enhancements over Windows ServerВ 2008В R2 that simplify DNSSEC deployment and administration, including online signing of dynamic, Active Directory-integrated DNS zones, Windows PowerShell support, and wizards that are integrated into the DNS Manager console. These key DNSSEC-related features are described in this topic and summarized in the table below.
The following table provides a summary of new DNSSEC features in Windows Server 2012.
Dynamic online signing
Online signing of dynamic, Active Directory-integrated zones is supported.
DNSSEC and read-only domain controllers (RODCs)
RODCs load signed zones as file-backed secondary zones.
DNSSEC deployment wizards
Zone signing and unsigning is greatly simplified.
The Key Master is a DNS server that generates and manages signing keys for a zone. DNSSEC key management is greatly enhanced with automatic key rollover and trust anchor distribution.
Updated standards like NSEC3 and RSA/SHA-2 are supported.
Windows PowerShell support
Windows PowerShell has parity with dnscmd for management of DNSSEC-signed zones.
Online signing and dynamic updates
Support for DNSSEC zone signing was added with Windows Server® 2008 R2, and subsequently extended in Windows Server 2012 to support online signing.
DNSSEC in Windows ServerВ 2008В R2
In Windows ServerВ 2008В R2, DNSSEC-signed zones could only be signed offline, over a file-based copy of the zone. It was not possible to generate or update signatures on a zone while the zone was online. Nearly all configuration required manual administration, which included the following operations:
You could only generate the keys required to sign a zone manually by using the dnscmd tool. Although it is recommended that a zone be signed with both a KSK and a ZSK, the keys had to be generated one at a time.
There was no built-in provision to generate additional keys automatically for rollovers. You were required to plan the type of rollover that you wanted in advance, and then generate keys manually.
Dnscmd required several inputs to generate keys and assumed no defaults. In some cases, you had to specify the option even though there was only one available – such as algorithm (the only supported algorithm was RSA/SHA-1).
Zone signing was also a manual operation through dnscmd and was performed over a file copy of the zone offline. You then had to manually import this signed file copy of the zone to the server.
Windows ServerВ 2008В R2 supported signing Active Directory-integrated zones, but a signed zone could not have dynamic updates enabled. You were required to manually re-sign a zone whenever an update was made to the zone.
There was no provision to replicate or distribute private keys. Keys were stored in the machine certificate store on the computer where they were generated. They could not be easily exported to other DNS servers.
DNSSEC in Windows Server 2012 and Windows Server 2012 R2
In Windows Server 2012В and later operating systems, DNSSEC support is enhanced to include online signing of dynamic zones. In addition, multiple zone management tasks are automated:
Signing keys are generated automatically by DNS Manager or Windows PowerShell when parameters have been specified. You can also choose a default parameter set.
For each signing key, the administrator can enable or disable automatic key rollover at a specified frequency.
DNS Manager or Windows PowerShell can be used to sign a zone using default values or using custom values. If the zone was previously signed, you can also choose to re-use these parameter values. DNS Manager also provides the option of signing a zone using the same values that were used to sign another zone.
Zone signing is now performed on active, online zones. There is no need to take a zone offline for signing, and then import a signed copy of the zone after signing is complete.
If a zone is updated, it is automatically re-signed. Updates to signed zones can be performed manually or dynamically. Dynamic updates are no longer disabled for DNSSEC-signed zones.
For Active Directory-integrated zones, signing keys are automatically replicated to all primary authoritative DNS servers.
DNS in Windows Server 2012 and Windows Server 2012 R2 also includes a DNSSEC wizard in DNS Manager, which walks an administrator through the signing and unsigning process. The wizard generates all keys that are necessary to sign a zone automatically. For more information, see DNSSEC in DNS Manager.
For Active Directory-integrated zones, private zone signing keys replicate automatically to all primary DNS servers through Active Directory replication. Each authoritative server signs its own copy of the zone when it receives the key. For optimal performance, and to prevent increasing the size of the Active Directory database file, the signed copy of the zone remains in memory for Active Directory-integrated zones. A DNSSEC-signed zone is only committed to disk for file-backed zones. Secondary DNS servers pull a full copy of the zone, including signatures, from the primary DNS server.
In general, cryptographic operations are computationally expensive. For large zones, the DNS server can take several minutes to sign the zone depending on the key length and size of the zone. To prevent performance degradation from occurring when all DNS servers start to sign the zone at the same time, signing is staggered. When a replica domain controller sees the DNSSEC keys and configuration, it waits for a random period between 5 minutes and 30 minutes before it begins signing the zone.
Read-only domain controllers (RODCs)
In Windows ServerВ 2008 and Windows ServerВ 2008В R2, DNS servers running on read-only domain controllers (RODCs) host Active Directory-integrated copies of all zones. However, because the zone is read-only, the DNS server cannot make any updates to the zones that it hosts. Instead, updates occur on other DNS servers and are transferred to the RODC through Active Directory replication.
When an Active Directory-integrated zone is signed with DNSSEC, private keys are also replicated to all DNS servers running on domain controllers, with an exception: Private keys are not replicated to an RODC because RODCs are intended to operate in insecure environments.
In Windows Server 2012 and Windows Server 2012 R2, an RODC loads unsigned zones from Active Directory with no change in functionality from Windows ServerВ 2008В R2. However, if the RODC finds a DNSSEC-signed zone in Active Directory, it does not load the zone as Active Directory-integrated. Instead, it creates a secondary copy of the zone, and then configures the closest writeable domain controller for the domain as the primary server. The RODC then attempts to perform a zone transfer. Zone transfers must be enabled on the primary DNS server for this transfer to succeed. If zone transfers are not enabled, the RODC logs an error event and takes no further action. In this scenario, you must manually enable zone transfers on the primary server that is selected by the RODC. Alternately, you can choose to reconfigure the RODC to point to a different primary DNS server that has zone transfers enabled.
DNSSEC in DNS Manager
DNS Manager in Windows Server 2012 and Windows Server 2012 R2 includes wizards to help you sign zones with DNSSEC, to view and edit DNSSEC parameters, and to easily unsign a zone.
The DNSSEC status of a zone is displayed in the console tree with a lock icon displayed next to the name of the zone if it is signed with DNSSEC. A signed zone also displays a status of Signed in the right-hand pane in the DNSSEC Status column and the name of the The Key Master is shown in the corresponding column. See the following example.
.jpeg)
If you recently signed the zone, you might have to refresh the DNS Manager console view to see the DNSSEC-signed status of a zone.
You can also right-click the zone in DNS Manager and point to DNSSEC. If the zone is not yet signed, the only choice available is Sign the Zone. See the following example.
.jpeg)
For information about signing and unsigning a zone, see DNS Zones.
The Key Master
The DNSSEC Key Master is a new concept and component of a Windows DNSSEC deployment that was introduced in Windows Server 2012.
In Windows DNSSEC, the Key Master is the DNS server that is responsible for key generation and key management for a DNSSEC-signed zone. When you use default settings to sign a zone, the local server is selected as Key Master. You also have the option of choosing a different DNS server from a list of servers that support online DNSSEC signing. Only one DNS server can be the Key Master for a given zone at a given time.
The Key Master must be a primary, authoritative server for the zone and must be capable of online zone signing. However, in a Microsoft multi-master DNS deployment environment, the following is possible:
The Key Master role can be transferred to a different authoritative name server after zone signing. This transfer can be performed gracefully if the current Key Master is online, or it can be performed as part of a disaster recovery scenario if the current Key Master is offline. For more information, see Transferring the Key Master role and Seizing the Key Master roleВ later in this topic.
One authoritative server can be the Key Master for multiple zones.
Different authoritative servers can be Key Masters for different zones.
You cannot transfer the Key Master role if a zone is file-backed, because these zones have only one primary, authoritative DNS server.
If a zone is Active Directory-integrated, the Key Master is a domain controller and can benefit by enhanced security considerations that are used with domain controllers. If the zone is file-backed, the Key Master might not be also a domain controller. In this scenario, it is recommended to take additional security precautions to protect the Key Master from attack and to protect private key material from becoming compromised. For security reasons, a Key Master that is not a domain controller should only have the DNS Server role installed in order to limit its attack surface.
The name of the Key Master is displayed in DNS Manager when you click Forward Lookup Zones or Reverse Lookup Zones, and it is displayed on the Key Master tab of the DNSSEC properties page. You can also use the Get-DnsServerDnsSecZoneSetting Windows PowerShell cmdlet to view the Key Master. See the following example:
The Key Master generates all keys for the zone, and is responsible for distribution of private keys and zone signing information. The Key Master is also responsible for performing all zone signing key (ZSK) and key signing key (KSK) rollovers and for polling child zones to keep signed delegations up-to-date.
An unsigned zone can also be assigned a Key Master. All zones that have been signed have a Key Master setting, whether they are currently signed or not. A zone that has never been signed typically does not have a Key Master, but can be configured with a Key Master in preparation for zone signing with Windows PowerShell.
Transferring the Key Master role
If the Key Master is online, you can perform a graceful transfer the Key Master role to another DNS server. Another qualifying DNS server must be available on the network.
To transfer the Key Master role using DNS Manager, view the DNSSEC properties of the zone, click the Key Master tab, and then choose Use the following DNS server as the Key Master. When you click the drop-down list, a pop-up alert asks if you want the local server to build a list of available, qualifying DNS servers that can be the Key Master. Click OK, choose a server from the list, and then click OK. See the following examples:
.jpeg)
.jpeg)
The signed-in user must have Domain Admins group rights, or equivalent, on a DNS server in order for it to be displayed in the list.
You can also perform this operation using Windows PowerShell with the Reset-DnsServerZoneKeyMasterRole cmdlet. See the following example.
In this example, the Get-DnsServerDnsSecZoneSetting cmdlet is also used to verify that the Key Master role was transferred successfully.
Seizing the Key Master role
The server that is designated as the Key Master should be online and highly available to ensure uninterrupted service for key signing operations. However, if the Key Master becomes offline and cannot easily be restored to online status, it is possible to forcibly transfer the Key Master role to another qualifying DNS server, using a process called seizing. Do not seize the Key Master role unless it is unavoidable. A graceful online transfer of the Key Master role is always preferred.
Private key material
The Key Master must have access to private key material for a DNSSEC-signed zone. If the current Key Master is offline, other DNS servers might have access to private key material if it is stored in a shared location such as Active Directory. If private key material is not stored in Active Directory, and the new Key Master cannot access the private keys for a zone through other means, then new keys must be generated, and the zone must be re-signed with these new keys. After re-signing with new keys, all trust anchors that exist on other DNS servers will be invalid and must be updated.
To store private key material in Active Directory, select the Replicate this private key to all DNS servers authoritative for this zone check box in KSK settings for all KSKs that are used. See the following example.
.jpeg)
If you do not want to store private key material in Active Directory, you might also be able to provide access to private key material using a certificate or hardware storage module (HSM) device. This storage media must be accessible to the DNS server that is selected as the new Key Master.
If private key material is not stored in Active Directory or an external device, you can use the following command to store this material in a certificate on the local computer.
To use the MakeCert command, you must first download and install the Windows SDK from https://go.microsoft.com/fwlink/p/?linkid=84091.
If the new Key Master cannot access private key material for the zone, a notification is displayed that indicates that private key material is not accessible and that new keys must be generated. See the following example.
.jpeg)
If you click Yes and continue seizing the Key Master role, new ZSKs and KSKs are not automatically generated. You must re-sign the zone so that private key material is available. If trust anchors were distributed for the zone, these trust anchors must also be replaced. If the original Key Master becomes available before the zone is re-signed, you can transfer the Key Master role back to this server without the requirement to re-sign the zone and redistribute trust anchors.
If private key material is stored in Active Directory, you can seize the Key Master role on another primary, authoritative Active Directory-integrated DNS server and have full access to private key material. In this case, the signing keys (ZSKs and KSKs) do not have to be replaced.
If you use DNS Manager to access an Active Directory-integrated authoritative DNS server with a primary copy of the zone when the Key Master is offline, a notification is displayed when you view DNSSEC properties of the zone, which indicates that DNSSEC settings could not be loaded. See the following example.
.jpeg)
Click OK to load DNSSEC settings using the local server. These settings will be the settings that were configured during the last successful replication.
On the Key Master tab, you can choose a new Key Master from a list of available DNS servers, similar to the procedure that is used for a graceful transfer of the Key Master role, described earlier in this topic.
After choosing a new Key Master and clicking OK, a notification is displayed with information about the changes to be made. Click OK again to proceed with the seizing operation. Another notification is displayed with the status of the role transfer. See the following examples:
.jpeg)
.jpeg)
Information about the new Key Master replicates in Active Directory to all primary DNS servers. After seizing the Key Master role on another server, if the old Key Master comes online, it detects that it is no longer the Key Master. You do not have to modify settings further.
DNSSEC standards
In addition to online signing and unsigning of dynamic Active-Directory-integrated zones, DNSSEC in Windows Server 2012 and Windows Server 2012 R2 includes support for:
Automated key rollover
Automated updates of DNS security trust anchors (RFC 5011)
NSEC3 zone signing and validation
NSEC3 random salt and user-defined salt
RSA/SHA-2 zone signing and validation
For more information about DNSSEC settings that are used in zone signing, see Parameter values.
Zone transfers
Zone transfers can be secured using IPsec. Windows Server 2012 and Windows Server 2012 R2 do not support Transaction Signature (TSIG) for zone transfers.
Certificate-based authentication can be used to establish an IPsec session between DNS servers. Each endpoint must present a certificate to prove its identity. This method requires that certificates are created and configured on all DNS servers that participate in zone transfers for DNSSEC-signed zones.
To configure certificate-based IPsec policies on DNS servers, see the following topics:
A bug has been identified in Windows Server 2012 and Windows Server 2012 R2 whereby multiple RRSIG records in a DNSSEC-signed zone can accumulate on a secondary DNS server, particularly for resource records at the zone root, such as DNSKEY signatures. These additional resource records do not cause DNS resolution problems. These extra RRSIG records accumulate because incremental zone transfers (IXFR) from the primary DNS server add new RRSIG records but do not automatically remove older RRSIG records. To remove these records, initiate a full zone transfer. It is also possible for RRSIG records on a secondary DNS server to expire. To prevent expiration, you can periodically initiate a full zone transfer from the primary to the secondary DNS server. DNS-Server-Service event ID 1525 (warning) and event ID 1524 (error) are recorded in Event Viewer when signatures are about to expire, and have expired, respectively. This bug is pending a hotfix.


