- How to Install and Configure SMTP Server on Windows Server 2016/2012 R2?
- How to Install SMTP Service on Windows Server 2016 / 2012 R2?
- Configuring SMTP Server on Windows Server
- SMTPSVC Service Auto-Start
- Testing the SMTP Server on Windows
- System Report
- Ресурс про IT
- Настройка SMTP Relay (Windows Server 2012 R2 )
- Установка службы SMTP на Windows Server 2012 R2
- Настройка SMTP сервера
- Настройка SMTP Relay сервера
- Тестирование SMTP сервера
- One thought on “ Настройка SMTP Relay (Windows Server 2012 R2 ) ”
- Добавить комментарий Отменить ответ
- IT Blog
- written by Zeljko Medic
- How to: Setup SMTP service on Windows Server 2012 R2
How to Install and Configure SMTP Server on Windows Server 2016/2012 R2?
You can install an SMTP server using built-in tools in all versions of Windows Server. This SMTP server can work as a mail relay service that should receive and send SMTP emails from various devices in the organization (for example, senders, scanners, access control devices, etc.) and applications (web apps, SQL Reporting Services, SharePoint), which should be able to send mail using the SMTP protocol. Such a relay can send messages to your Exchange servers or to public email services such as Gmail, Yahoo, Office 365 (outlook.com), etc. (since it is not always advisable to deploy a full-featured internal email infrastructure based on Microsoft Exchange Server or other email services).
In this article we’ll show how to install, configure and test the SMTP server on Windows Server 2012 R2, 2016 and 2019 serving as a mail relay. This SMTP server can only send or forward emails, and there are no user mailboxes on it.
How to Install SMTP Service on Windows Server 2016 / 2012 R2?
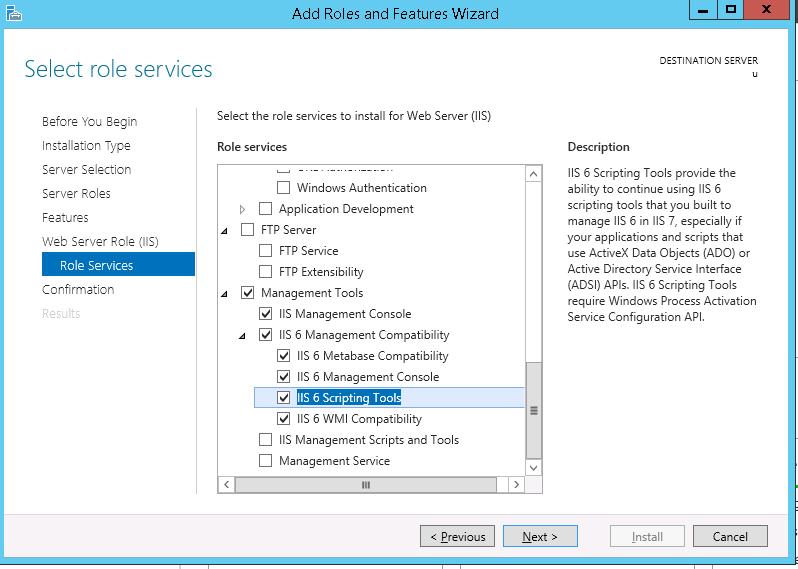
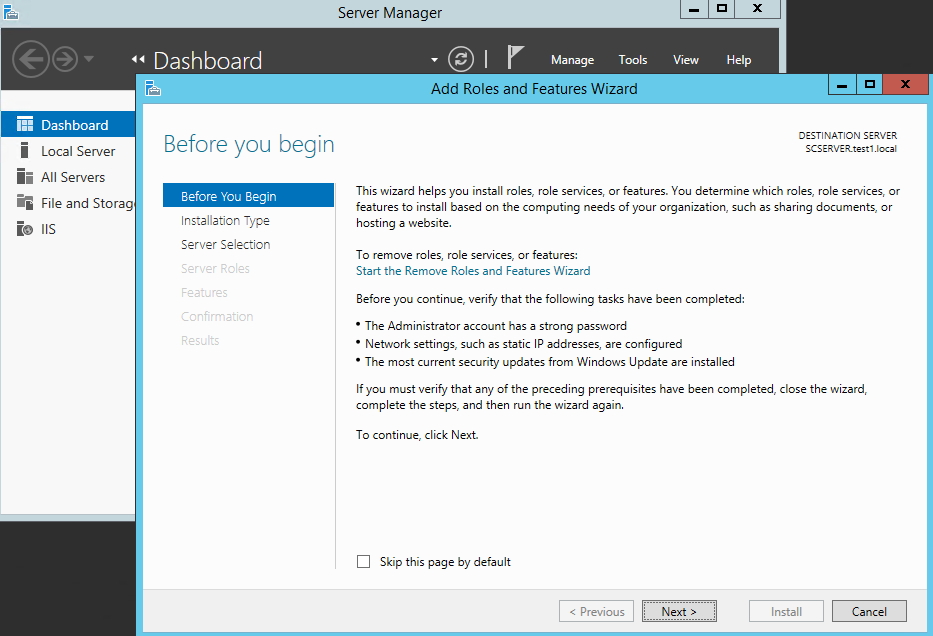
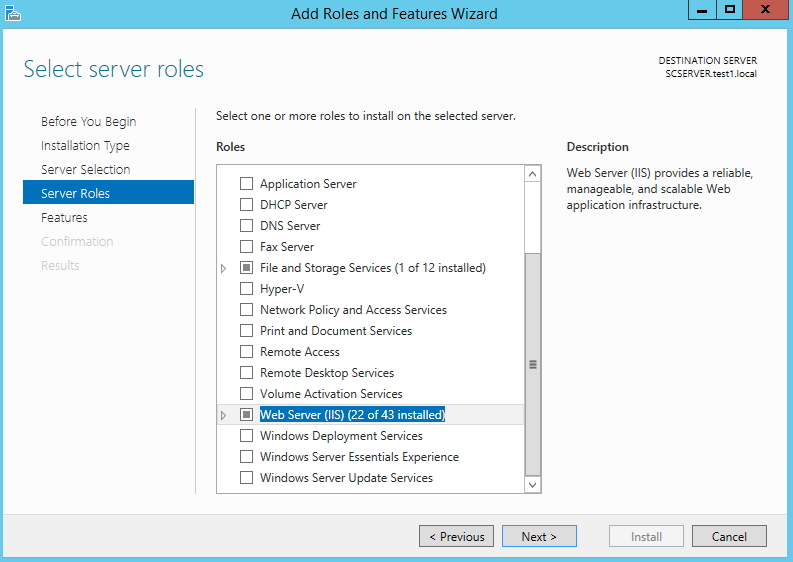
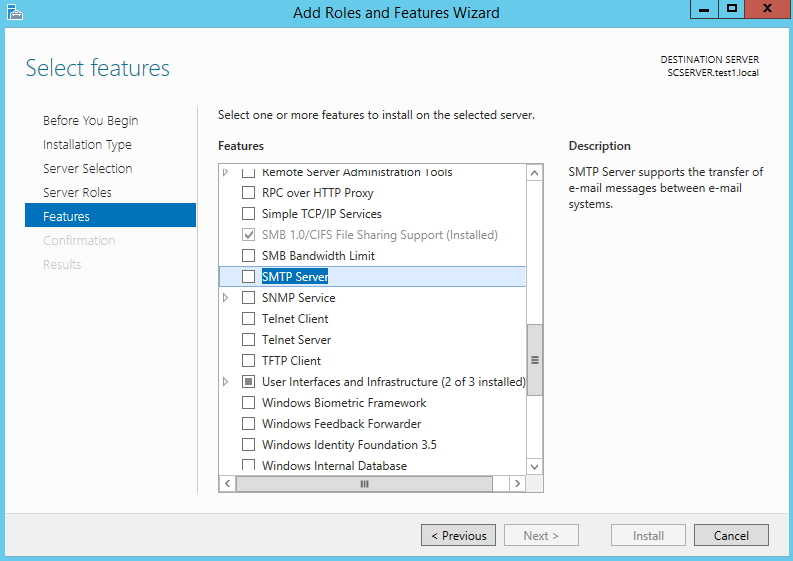
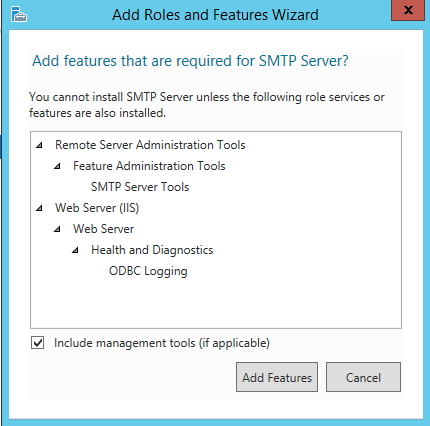
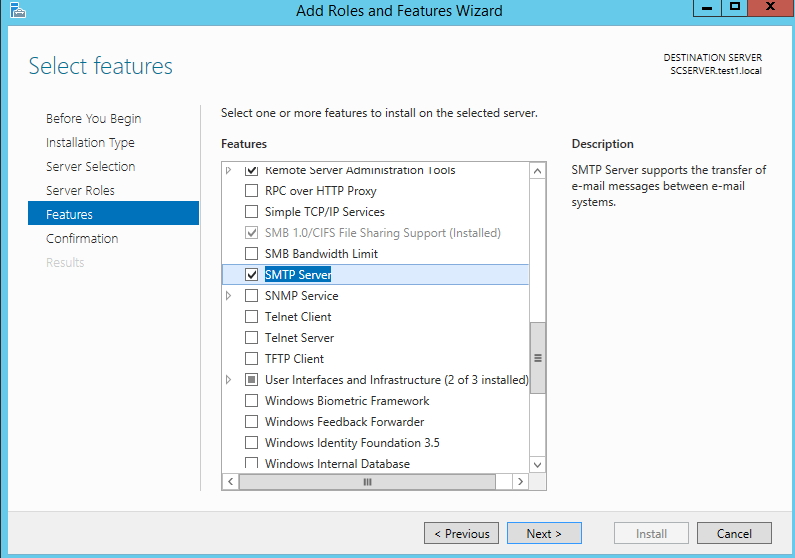
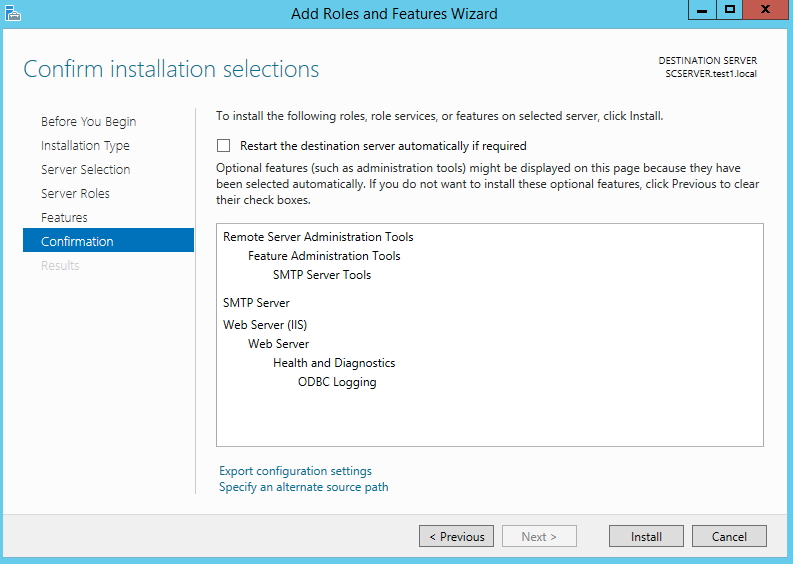
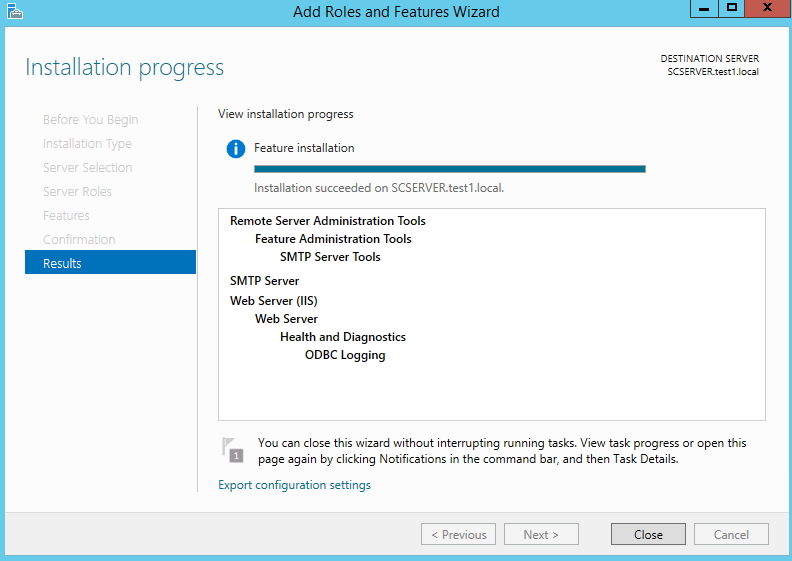
SMTP service is one of the built-in features of Windows Server that can be installed through Server Manager. To do it, open the Server Manager Dashboard (servermanager.exe), go to Add roles and features and check SMTP Server when selecting the features to install. To manage the SMTP service, install the management consoles, being a part of Web Server (IIS) role, so you will be prompted to install some IIS components.
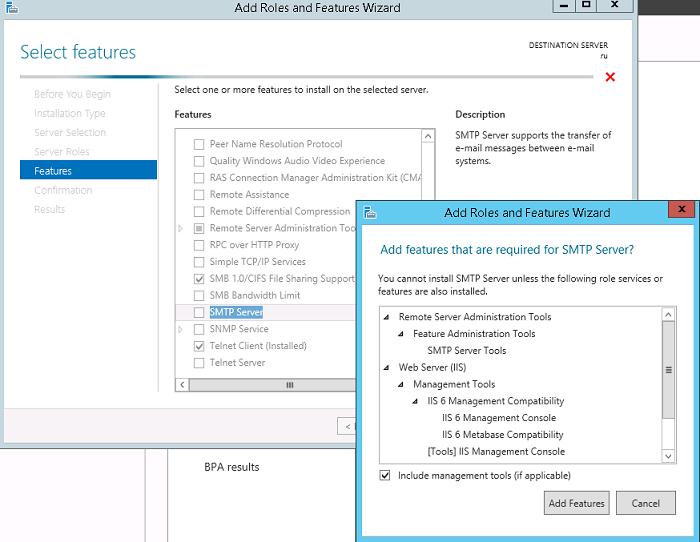
Leave all the suggested options of the Web Server (IIS) role and run installation.
You can also install the SMTP server role using the PowerShell command:
After the components are installed, you may need to restart your server.
Configuring SMTP Server on Windows Server
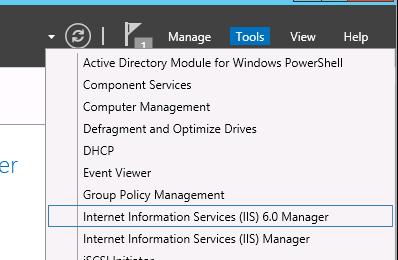
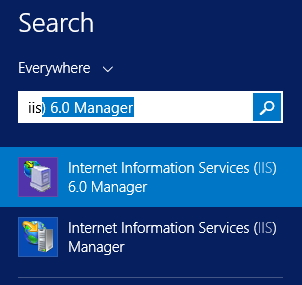
The SMTP server is still managed using the old school management console Internet Information Services (IIS) Manager 6. You can open this console from the Server Manager: Tools-> Internet Information Services (IIS) 6.0 Manager or with the command inetmgr6.exe.
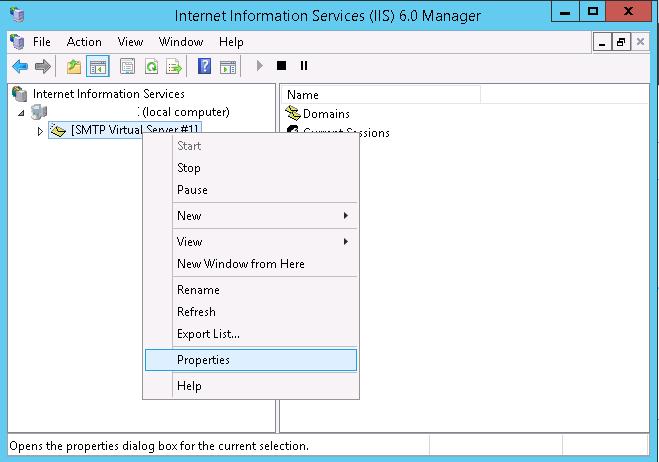
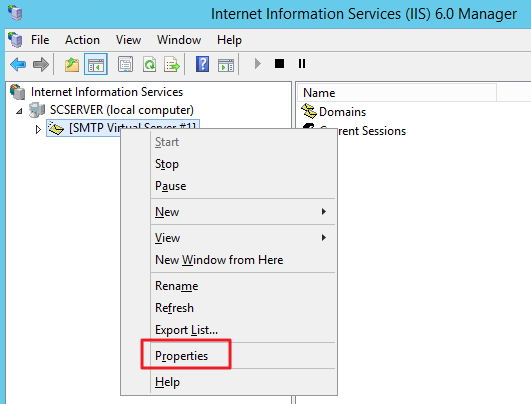
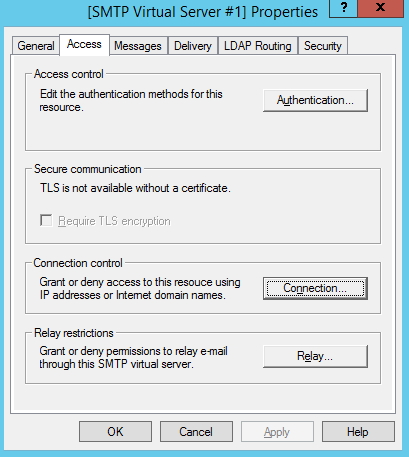
Expand the branch with your server name in the IIS 6 Manager, right-click SMTP Virtual Server and open its properties.
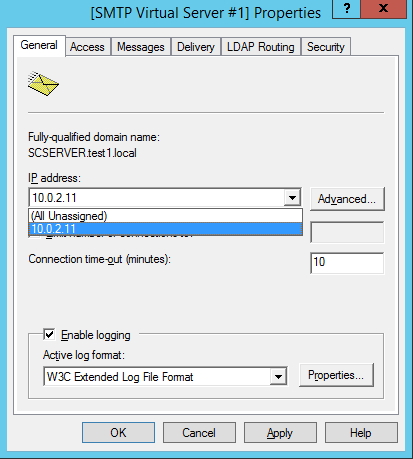
On the General tab, if necessary, select the IP address on which the SMTP server should respond (if the server has multiple IP addresses), and check the option Enable logging (in order to save information about all received emails to text log files).
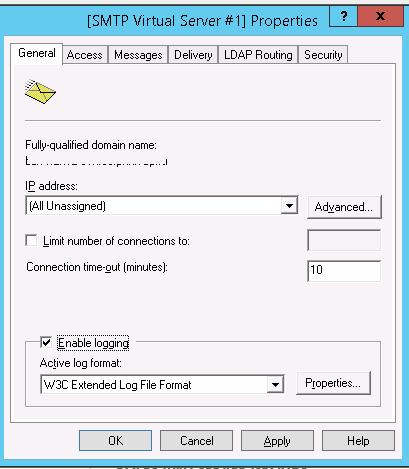
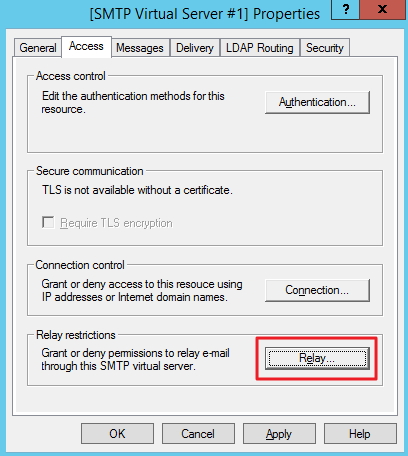
Then go to the Access tab.

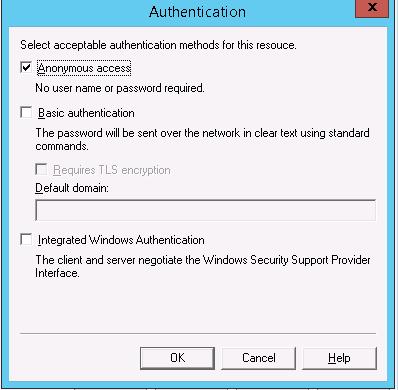
Here click the Authentication button and make sure that the Anonymous access is enabled.
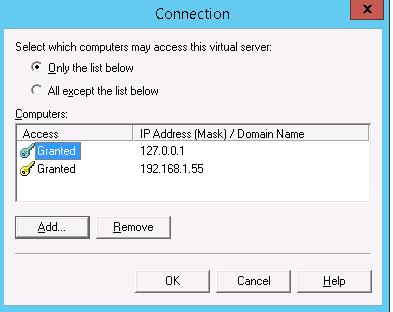
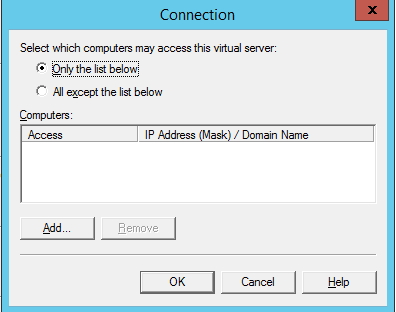
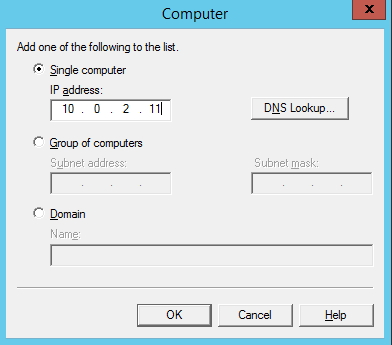
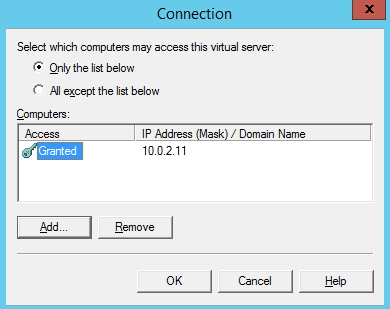
Go back to the Access tab and click the Connection button. Here you can specify the IP addresses of devices that are allowed to send emails through your SMTP relay. To do it, check the Only the list below and specify the list of IP addresses (subnets), don’t forget about yourself (127.0.0.1).
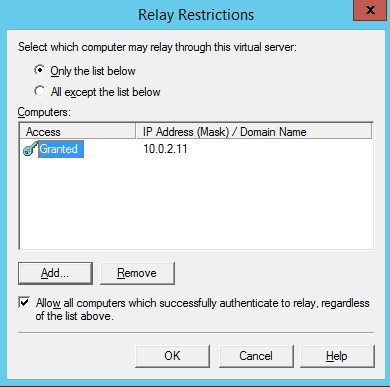
Configure the same way the list of allowed IPs in the Relay settings (click the corresponding button). This section indicates which IP addresses (or subnets) can relay email through your SMTP server.
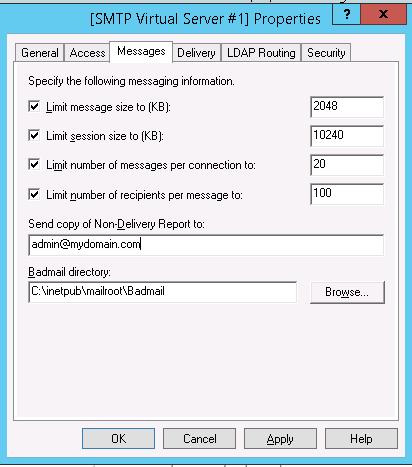
Go to the Messages tab. Here the administrative e-mail address is specified, to which the copies of all NDR messages will be send (Send copy of Non-Delivery Report to:). Also here you can specify the restrictions on the maximum message size (Limit message size KB) and the maximum number of recipients (Limit number of recipients per message).
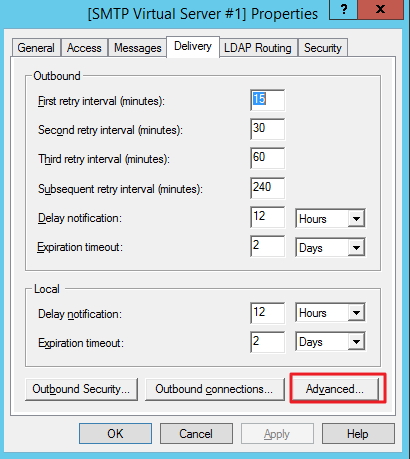
Go to the Delivery tab.
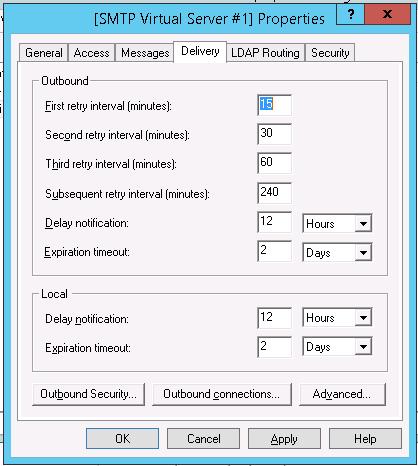
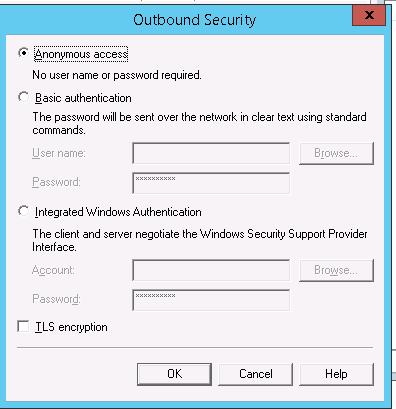
Then click Outbound Security. Here you specify the way of authentication on the external mail server to which your SMTP server will send (relay) all email messages. For example, if all emails will be forward to Gmail mail server and then sent to the recipients, you need to check the Basic authentication and specify your Gmail mailbox credentials (you must allow to send email via Gmail SMTP in the Google account settings).
Then click Advanced.
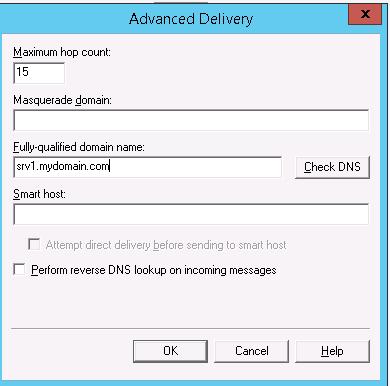
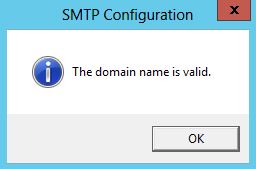
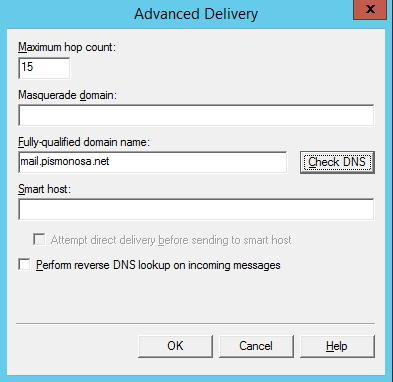
Here you specify the FQDN name of your SMTP server. Click the Check DNS button to make sure that the DNS record is valid.
If your server sends mail to an external SMTP server, specify its name in the Smart host field (for example, smtp.gmail.com or smtp.office365.com).
Save the SMTP server settings and restart your SMTP virtual service to apply the changes.
- The DNS settings are critical from the point of view of email system health. If your SMTP server cannot correctly resolve DNS names of domains to which it is trying to send email, the delivery will fail.
- If your server sends mail to other domains, it is important that the correct PTR record is created for your IP address in order to resolve reverse DNS lookups. The PTR record for your public IP address should point to your server FQDN name. Otherwise, most external SMTP servers won’t accept email from you, considering your server a spammer one.
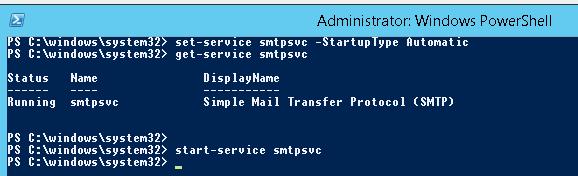
SMTPSVC Service Auto-Start
It remains to configure the automatic startup of SMTP service on your Windows Server. You can do it quickly using the PowerShell command prompt:
set-service smtpsvc -StartupType Automatic
Start the service:
Make sure that the SMTPSVC service is running:
Status Name DisplayName
—— —- ————
Running smtpsvc Simple Mail Transfer Protocol (SMTP)
Testing the SMTP Server on Windows
The last thing you have to do is to make sure that your SMTP server is working. It is easier to do it by creating a plain-text file smtp-test-email.txt on your desktop and copying the following text to it. Don’t forget to change the sender and recipient names to yours.
From: server@localdomain.com
To: admin@localdomain.com
Subject: Email test
This is the test email
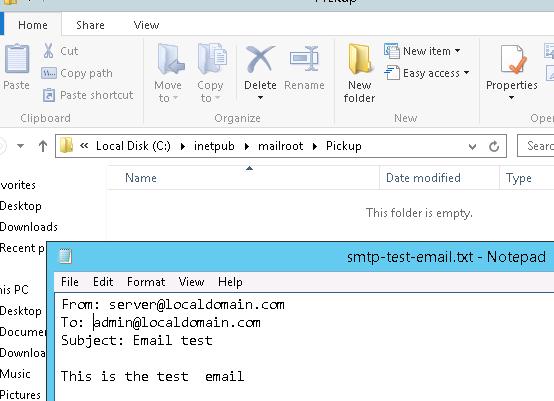
Copy the file smtp-test-email.txt to the C:\inetpub\mailroot\Pickup folder. The Windows SMTP server monitors new files appearing in this folder, and if a file is found it will read it contents and try to send an email with the given subject and body to the recipient specified in the To: line.
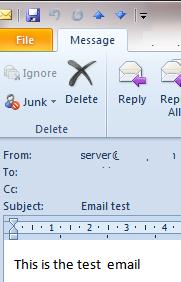
Check the recipient mailbox, and you will see this e-mail.
Send-MailMessage -SMTPServer localhost -To manager@localdomain.com -From server@localdomain.com -Subject «Email test» -Body «This is the test email from PowerShell»
If you have enabled Basic Authentication to authenticate all your SMTP clients (instead of anonymous authentication), you can send an email with the smtp authentication via telnet as follows.
Also, make sure that TCP 25 port is not blocked on your SMTP server by the local firewall or anti-virus software. The easiest way to do this is from a Windows-based computer whose IP address has been added to the allowed connection list. Check availability of port 25 using the Test-NetConnection cmdlet:
Test-NetConnection smtprelay.woshub.com –port 25
If port 25 is blocked, check the settings of Windows Firewall, antivirus and hardware firewalls.
So, you have configured your own SMTP mail relay on Windows Server 2016 / 2012 R2 and tested sending emails through it.
System Report
Ресурс про IT

Настройка SMTP Relay (Windows Server 2012 R2 )
SMTP Relay — это почтовый сервер, который позволяет перенаправлять через себя почту.
На всех версиях Windows Server возможно с помощью встроенных средств поднять собственный SMTP сервер. Данный SMTP сервер внутри организации может работать в качестве почтового реле, принимая и пересылая наружу SMTP сообщения от различных устройств и приложений, которым необходимо иметь возможность отправлять почту через SMTP сервер.
Установка службы SMTP на Windows Server 2012 R2
SMTP сервер можно установить через Server Manager:
- Выполнить servermanager.exe, для открытия консоли Server Manager Dashboard.
- Перейти в режим Add roles and features.
- Выбрать функцию SMTP Server.
- Выполнить установку функций, так же с предлагаемыми компонентами Web Server (IIS).
Настройка SMTP сервера
Управляется SMTP сервер через консоль управления Internet Information Services (IIS) Manager 6. Открыть эту консоль можно через Server Manager: Tools-> Internet Information Services (IIS) 6.0 Manager или командой inetmgr6.exe
Инструкция по настройке:
- В консоли IIS 6 Manager развернуть ветку с именем сервера, щёлкнуть ПКМ по SMTPVirtual Server и открыть его свойства.
- В свойствах SMTP relay на вкладке «General» выбрать «Enable logging», это позволит активировать запись журнала событий работы виртуального сервера.
- В свойствах SMTP relay на вкладке «Access» нужно настроить несколько параметров: «Relay» и «Authentication».
- Функция «Relay» осуществляет настройку IP адресов, на которые будет разрешена отправка писем. Если не требуется дополнительных ограничений, необходимо выбрать «All except the list below». Это позволит производить отправку писем на все адреса.
- Функция «Authentication» позволяет настроить аутентификацию к данному виртуальному серверу. В окне «Authentication» можно выбрать использование анонимного доступа к серверу, либо настроить базовую базовую аутентификацию с TLS шифрованием, при необходимости. Настройка анонимного доступа ограничивается выбором «Anonymous access».
Настройка SMTP Relay сервера
Для настройки SMTP Relay следует выполнить следующие настройки:
- В консоли IIS 6 Manager развернуть ветку с именем сервера, щёлкнуть ПКМ по Domain и выполнить «New» — «Domain» .
- После чего ввести доменное имя, почта которого планируется пересылаться.
- Адрес куда будет перенаправляться почта, следует записывать в следующем виде: [IP Exchange]
- Перезапустить службы SMTP.
Тестирование SMTP сервера
Инструкция по тестированию SMTP сервера:
- Следует создать текстовый файл smtp-test-email.txt и скопировать в него следующий текст, заменив имя отправителя и получателя:
One thought on “ Настройка SMTP Relay (Windows Server 2012 R2 ) ”
Добавить комментарий Отменить ответ
Для отправки комментария вам необходимо авторизоваться.
IT Blog
written by Zeljko Medic
How to: Setup SMTP service on Windows Server 2012 R2
Many services and apps require some kind of email server in order to send you email notifications, warnings, errors. Windows Server 2012 doesn`t pack Exchange Server with it, but there is simple solution for sending emails from Windows Server 2012 and here is the tutorial for setting it up.
Prerequisite for this tutorial is installed IIS with IIS 6.0 Management Tools
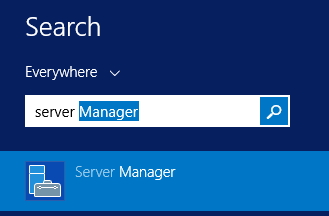
Search | Server Manager | click on Server Manager
Click on Manage | Add Roles and Features |Next
Role-based of feature-based installation | Next
Select server | Next
Next | (Select Web Server and all under Management tools if you don`t already have IIS installed)
Select SMTP Server under Features
New Window will pop-up |Add Features
Back to search – enter IIS and then click on Internet Information Services (IIS) 6.0 Manager
Expand your local server and right click on SMTP | click on Properties
General tab |IP address – select local machine IP address and enable logging |Apply
Access Tab | click on Connection button
Click on Only the list below |Add
Enter IP of the computer you want to be able to access to SMTP service (you will define all local IPs here that you want to access your SMTP)
Now, back to Access tab | click on Relay button
Same procedure as for Connection |OK |Apply
Delivery tab |click on Advanced button
Under fully-qualified domain name enter name of external mail server. If you have the need – you`ll also enter smart host name. After you’re done – OK |Apply |OK
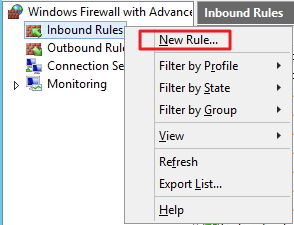
Last stop is the firewall
Enter Firewall in search |select Windows Firewall with Advanced Security

!In some scenarios, you`ll also have to define Outbound Firewall Rule (same procedure as described here for inbound rule)
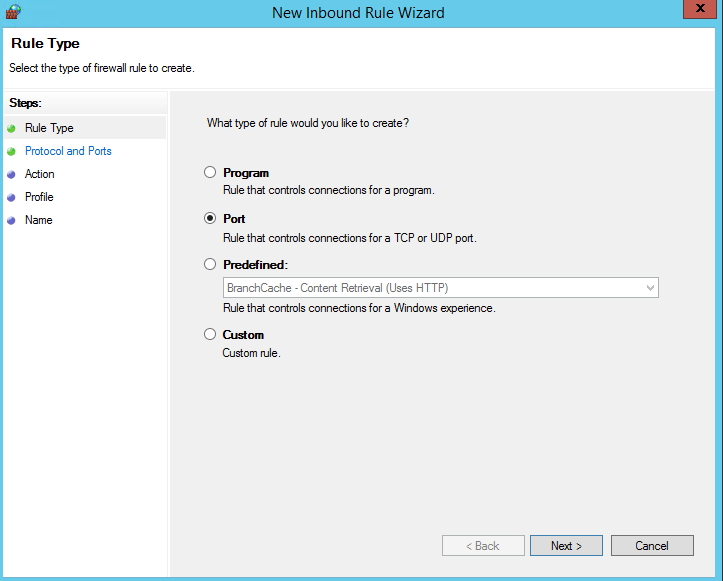
Right click on Inbound Rules | New Rule
Select Port | Next
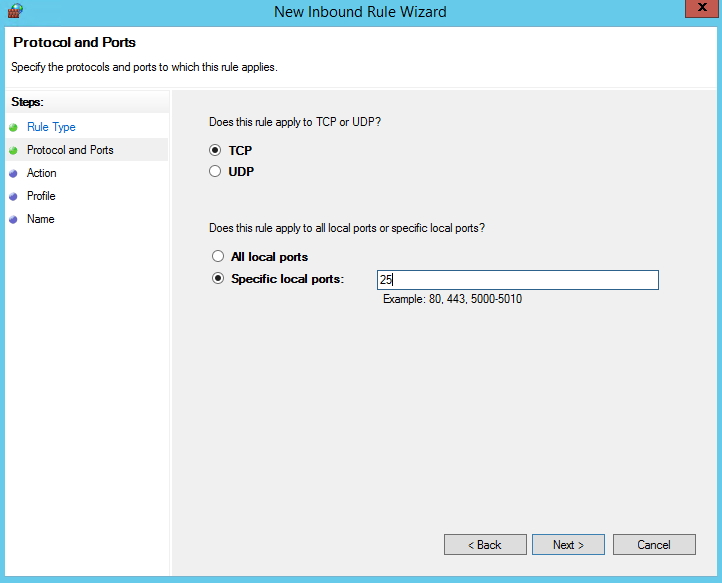
TCP | Specific Local ports: enter 25 | Next
Allow the connection | Next
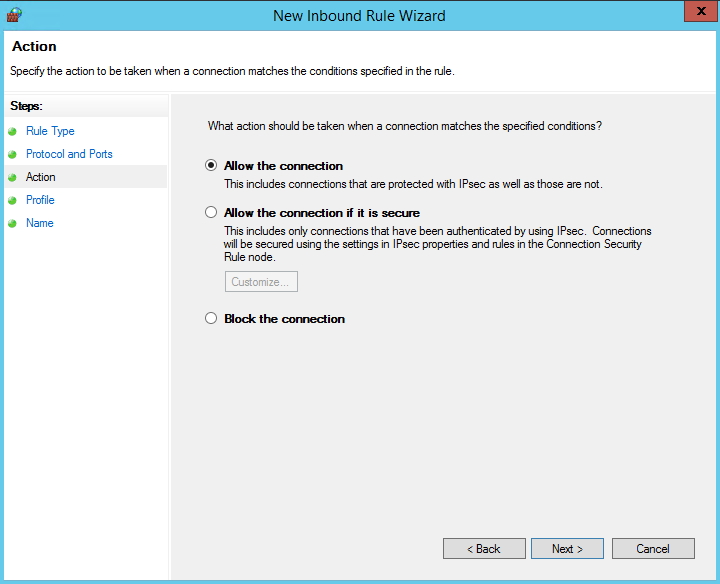
I`ll open my SMTP port to all instances, Public interface is not recommended , so choose wisely and think about what you want to achieve. This is my test lab, so I don`t have any security issues with it and want to test some scenarios. Next
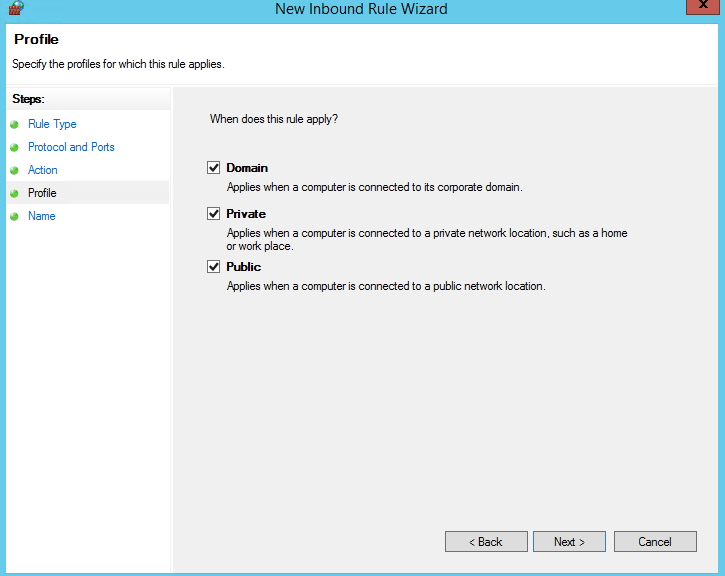
Write the Name and description for your rule | Finish
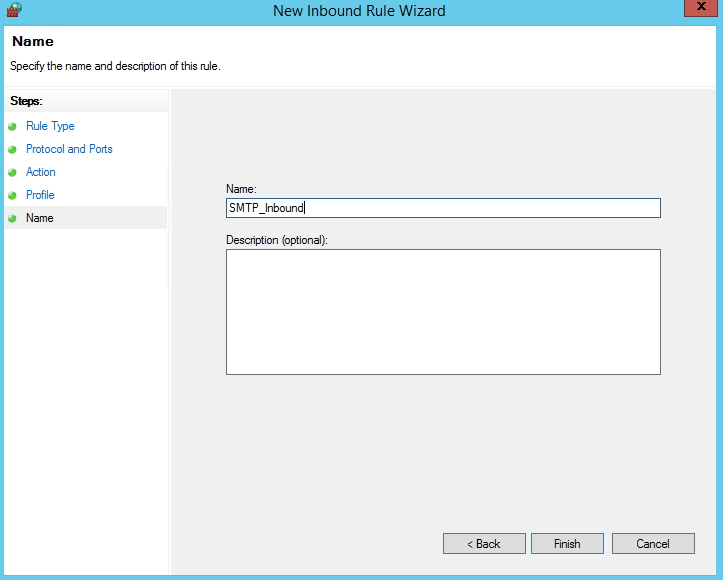
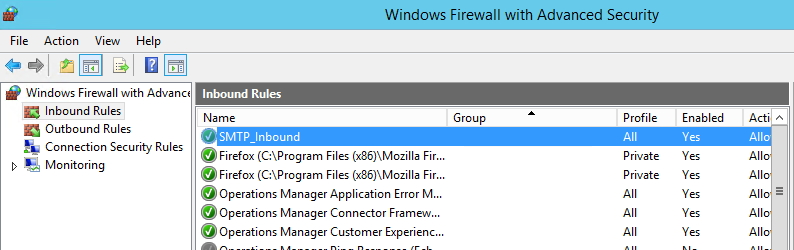
Rule is created
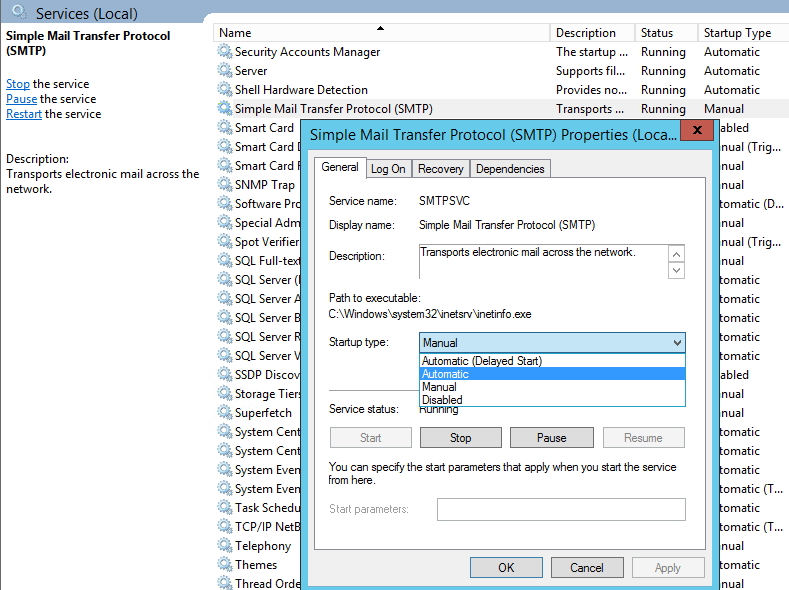
Go to Control Panel | Administrative Tools | Services | find Simple Mail Transfer Protocol (SMTP) and set startup to Automatic (right click on it – Properties – Startup Type – Automatic)
Restart service (or even better – server is you can) and test your SMTP with application or service you want notifications from.


