- Энциклопедия Windows
- Утилиты Support Tools в Windows
- Intel® Driver & Support Assistant
- Automatically update your drivers
- Available Downloads
- Intel-Driver-and-Support-Assistant-Installer.exe
- Detailed Description
- This download is valid for the product(s) listed below.
- Intel Software License Agreement
- Windows USB/DVD Download Tool
- Overview
- Installation
- Using the Windows USB/DVD Download Tool
- Frequently Asked Questions
- Troubleshooting
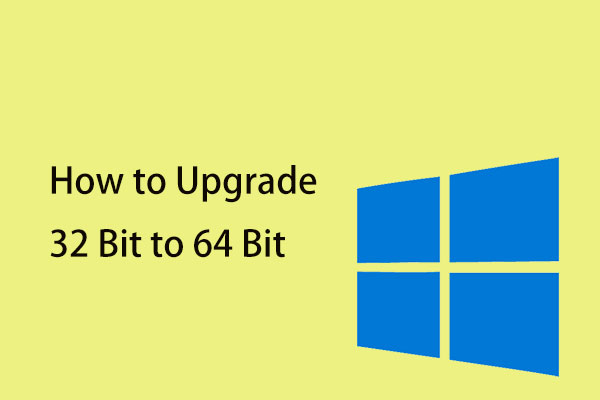
- How to Upgrade 32 Bit to 64 Bit in Win10/8/7 without Data Loss [MiniTool Tips]
- Summary :
- Quick Navigation :
- Why Upgrade 32 Bit to 64 Bit in Windows 10/8/7
- How to Convert 32 Bit to 64 Bit Windows 7/8/10 without Data Loss
- Move 1: Make Sure Your Processor Is 64-Bit Capable
- Move 2: Ensure Your PC Hardware Has 64-Bit Drivers Available
- Move 3: Back up Your PC
- Move 4: Upgrade Windows to 64 Bit
- Bottom Line
- Upgrade Windows 10 32 Bit to 64 Bit FAQ
- ABOUT THE AUTHOR
Энциклопедия Windows
Все об использовании и настройке Windows
- Windata
- »
- Windows XP
- »
- FAQ [XP]
- » Утилиты Support Tools в Windows
Утилиты Support Tools в Windows
Множество полезных инструментов в составе операционной системы Windows оказываются незамеченными, так как они не устанавливаются по умолчанию. Хотя установка операционной системы предоставляет большое количество утилит, много расширенных утилит находятся в каталоге Support Tools на установочном компакт-диске операционной системы Windows, а остальные входят в набор Resource Kit операционной системы Windows.
Утилиты, находящиеся в папке Support Tools обозначаются (ST) после названия утилиты. Утилиты Resource Kit обозначаются (RK) после имени утилиты.
Для установки утилит поддержки на сервер или рабочую станцию, выполните такую последовательность операций:
1. Зарегистрируйтесь в системе с помощью учетной записи с локальными административными привилегиями и вставьте в привод установочный компакт-диск операционной системы Windows.
2. Выберите Пуск > Выполнить (Start > Run) и кликните на кнопке Обзор (Browse).
3. Перейдите в каталог \Support\Tools.
4. В выпадающем списке Файлы типа (Files of Type) выберите команду Все файлы (All Files).
5. Кликните на файле SUPTOOLS.msi в диалоговом окне Обзор (Browse) и кликните на кнопке Открыть (Open).
6. Проверьте наличие пути к файлу SUPTOOLS.msi в диалоговом окне Выполнить (Run) и кликните на кнопке OK.
7. Как только откроется приветственное окно мастера, кликните на кнопке Далее (Next).
8. Выберите I Agree для принятия условия лицензионного соглашения и кликните на кнопке Далее (Next).
9. Введите имя и название организации в соответствующие поля. Кликните на кнопке Далее (Next).
10. Выберите Полная (Complete) для установки всех утилит поддержки и кликните на кнопке Далее (Next).
11. Введите путь к каталогу, в который необходимо установить утилиты поддержки и кликните на кнопке Установить (Install Now).
12. Как только процесс установки завершится, кликните на кнопке Готово (Finish).
Можно рассмотреть вариант публикации пакета Support Tools в групповой политике домена или в подразделения, которая применяется только к администраторам или персоналу службы поддержки.
Таким образом, если возникнет необходимость в проведении дополнительной проверки на рабочей станции пользователя, у администратора будет возможность установить Support Tools на этой рабочей станции.
Intel® Driver & Support Assistant
Automatically update your drivers
Identify your products and get driver and software updates for your Intel hardware.
Available Downloads
Intel-Driver-and-Support-Assistant-Installer.exe
Windows 10, 32-bit*
Windows 10, 64-bit*
Windows 8.1*
Windows 8.1, 32-bit*
Windows 8.1, 64-bit*
Windows 8*
Windows 8, 32-bit*
Windows 8, 64-bit*
Windows 7*
Windows 7, 32-bit*
Windows 7, 64-bit*
Language: Multi language
Detailed Description
Purpose
The Intel® Driver & Support Assistant enables you to scan computing devices for the latest drivers available from Intel. This tool has the main interface hosted on Intel’s support website and provides a more integrated support experience to users. It has an enhanced detection engine to ensure that customers are given complete and accurate information and a scan frequency option to change from a “run-once” tool to a persistent experience that can provide customers with driver updates more quickly.
Products supported: Graphics drivers, wireless networking, Intel® SSDs, Intel® NUCs, and Intel® Compute Sticks
Issues with upgrading Intel® Driver & Support Assistant to a newer version? Please try our Uninstaller.
Required to install and use utility
A broadband Internet connection is required to use this utility.
Operating system requirements for installation: This application installs on Windows 7*, Windows 8*, Windows 8.1*, and Windows® 10.
We recommend performing a Windows* update to bring your operating system up to date with the latest .NET.
This application does not support Internet Explorer* browser. We recommend using Chrome*, Firefox*, or Edge* (version 44.17763/18.17763 or newer) browsers.
Instructions for launching
Uninstall any previous versions (optional).
Download and save locally on your device.
Double-click Intel® Driver & Support Assistant Installer.exe file.
Read and agree to the license terms and conditions
Click Launch button; the tray icon will start and automatically opens default browser
What’s new in version 21.2.13.9?
Improved support for Thunderbolt™ controllers and devices
General bug fixes and improvements
What’s in previous version 21.1.5.2?
Bug fixes for endless scanning issues
Improved screen reader compatibility of Installer
Improved network resiliency
General bug fixes and improvements
Languages supported: Chinese, English, French, German, Japanese, Italian, Korean, Portuguese (Brazilian), Russian, Spanish, Thai, Vietnamese, Indonesian, Polish and Turkish.
Related topic
This download is valid for the product(s) listed below.
Intel Software License Agreement
The terms of the software license agreement included with any software you download will control your use of the software.
Your file download has started. If your download did not start, please click here to initiate again.
Windows USB/DVD Download Tool
Overview
When you download Windows from Microsoft Store, you have two options: You can download a collection of compressed files, or you can download an ISO file. An ISO file combines all the Windows installation files into a single uncompressed file.
If you choose to download an ISO file so you can create a bootable file from a DVD or USB drive, copy the Windows ISO file onto your drive and then run the Windows USB/DVD Download Tool. Then simply install Windows onto your computer directly from your USB or DVD drive.
When you download the ISO file, you must copy it onto a USB or DVD. When you’re ready to install Windows, insert the USB drive or DVD with the ISO file on it and then run Setup.exe from the root folder on the drive.
This allows you to install Windows onto your machine without having to first run an existing operating system. If you change the boot order of drives in your computer’s BIOS, you can run the Windows installation directly from your USB drive or DVD when you first turn on your computer. Please see the documentation for your computer for information about how to change the BIOS boot order of drives.
Making copies
To install the software, you can make one copy of the ISO file on a disc, USB flash drive, or other media.
After you’ve installed the software and accepted the license terms that accompany the software, those license terms apply to your use of the software. The license terms for Windows permit you to make one copy of the software as a back-up copy for re-installation on the licensed computer. If you do not delete your copy of the ISO file after installing the Windows software, the copy of the ISO file counts as your one back-up copy.
If you need to download the software again, you can go to your Download Purchase History in your Microsoft Store account and access the download there.
Installation
To install the Windows USB/DVD Download Tool:
2. Click Download then Run.
3. Follow the steps in the setup dialogs. You’ll have the option to specify where to install the Windows USB/DVD Download Tool.
You must be an administrator on the computer on which you are installing the Windows USB/DVD Download tool. It requires the Microsoft .NET Framework version 2.0 or higher.
System requirements
Windows XP SP2, Windows Vista, or Windows 7 (32-bit or 64-bit)
Pentium 233-megahertz (MHz) processor or faster (300MHz is recommended)
50MB of free space on your hard drive
DVD-R drive or 4GB removable USB drive
For Windows XP users
The following applications must be installed prior to installing the tool:
Microsoft .NET Framework 2.0 must be installed. It can be downloaded here.
Microsoft Image Mastering API v2 must be installed. It can be downloaded here.
Using the Windows USB/DVD Download Tool
Before you run the Download Tool, make sure you have purchased the Windows ISO download from Microsoft Store and downloaded the Windows ISO file to your drive. If you have purchased Windows but have not yet downloaded the ISO file, you can download the ISO file from your Microsoft Store Account.
To make a copy of your Windows ISO file:
1. Click the Windows START button, and click WINDOWS USB/DVD DOWNLOAD TOOL in the ALL PROGRAMS list to open the Windows USB/DVD Download Tool.
2. In the SOURCE FILE box, type the name and path of your Windows ISO file, or click BROWSE and select the file from the OPEN dialog box. Click NEXT.
3. Select USB DEVICE to create a copy on a USB flash drive or select DVD disk to create a copy on a DVD disk.
4. If you are copying the file to a USB flash drive, select your USB device in the drop-down list and click BEGIN COPYING. If you are copying the file up to a DVD, click BEGIN BURNING.
When your Windows ISO file is copied to your drive, install Windows by moving to the root folder of your DVD or USB drive, and then double-click Setup.exe.
Frequently Asked Questions
Where can I download .NET framework 2.0?
The .NET framework can be downloaded here.
Where can I download Image Mastering API 2.0?
The Image Mastering API can be downloaded here.
What size USB drive is required?
You need a USB drive with a minimum of 4GB of free space.
Can I use my newly created USB drive to install Windows on someone else’s computer?
No. The Windows ISO file on the USB drive is only intended to be used to install Windows on the licensed user’s own computer.
Can I back up to a CD-ROM?
No. The Windows ISO file is too large to fit on a CD.
Can I back up to a Blu-ray Disc?
Yes, as long as your DVD drive can write to a Blu-ray Disc.
IfI have other files on the USB drive will the Windows USB/DVD download tool delete them?
This tool requires the USB drive to be completely blank before the Windows files are copied. This helps ensure that the device is bootable after the copying has completed.
Can I backup to an external hard drive or other device with enough free disk space?
Yes, but this is not recommended. The device must be formatted in order for the device to be bootable. A dedicated USB flash drive would be a better option.
Can I use the Windows USB/DVD Download Tool to back up other files?
No. This tool is only for use with the Windows ISO file purchased from Microsoft Store.
Does the tool support dual-layer DVD discs for burning?
No. Currently, the tool does not support dual-layer DVD discs.
Troubleshooting
The tool is asking me to install the .NET framework and Image Mastering API before I install the tool
If you’re running Windows XP, you must install the .NET Framework 2.0 and the Image Mastering API 2.0 before installing the tool. You can download .NET framework here and you can download the Image Mastering API here.
A restart may be required after installing the .NET framework and the Image Mastering API.
When creating a bootable USB device, I am getting an error about bootsect
To make the USB drive bootable, you need to run a tool named bootsect.exe. In some cases, this tool needs to be downloaded from your Microsoft Store account. This may happen if you’re trying to create a 64-bit bootable USB device from a 32-bit version of Windows. To download bootsect:
1. Login to your Microsoft Store account to view your purchase history.
2. Look for your Windows purchase.
3. Next to Windows, there is an Additional download options drop-down menu.
4. In the drop-down menu, select 32-bit ISO.
5. Right-click the link, and then save the bootsect.exe file to the location where you installed the Windows USB/DVD Download Tool (e.g. C:\Users\username\AppData\Local\Apps\Windows USB DVD Download Tool).
6. Once the file has been saved, go back to the Windows USB/DVD Download Tool to create your bootable USB device.
My USB drive is not in the list of available devices
If you don’t see your USB drive in the list of available devices, please make sure the drive is inserted in the USB port, and then click the Refresh button beside the list of available drives.
I inserted a blank DVD in my DVD-ROM drive, but the Windows USB/DVD Download Tool doesn’t recognize it
If there are multiple drives on the system, the tool will select the first one that is capable of burning DVDs. If you have multiple DVD-R drives, try inserting the blank DVD into another DVD-R drive. If that doesn’t help, please make sure that your disc isn’t damaged and that your DVD-R drive is operational. Contact Product Support if issues continue to arise.
I inserted a blank DVD in my DVD-ROM drive, but the tool won’t let me burn it
Make sure the disc isn’t a dual-layer DVD disc. Currently, dual-layer discs are not supported within the tool.
How to Upgrade 32 Bit to 64 Bit in Win10/8/7 without Data Loss [MiniTool Tips]
By Vera | Follow | Last Updated March 03, 2021
Summary :
Have a need to upgrade Windows to 64 bit from 32 bit in Windows 10/8/7 since your memory is not used? How to upgrade 32 bit to 64 bit? This post shows you some things that you should check out, as well as the way to perform Windows 64 bit upgrade.
Quick Navigation :
Why Upgrade 32 Bit to 64 Bit in Windows 10/8/7
Microsoft offers both 32-bit and 64-bit versions of Windows 10/8/7. The 32-bit version is also known as the x86 version while the 64-bit version is known as the x64 version.
When installing Windows 7, 8 or Windows 10, you can choose to install 32-bit or 64-bit version of Windows. But most of you may choose to install the 64-bit version instead of the 32-bit version. If you have installed a 32-bit operating system, you may change it to a 64-bit system.
Why change 32 bit to 64 bit of Windows OS? This is because the 32-bit version is limited to 4GB of RAM (Ramdon Access Memory), which is a small amount these days when PCs usually have 8GB or more. If you installed many applications at the same time, “your computer is low on memory” error message may appear.
If you want to actually use more than 4GB of RAM resources, probably you need a 64-bit version of Windows. With the additional access to memory, you can run more apps simultaneously and improve performance. And the system improves productivity with memory-intensive tasks, such as virtual machines, video editing, Office-working, and web browsing when dealing with a lot of open tabs.
What’s more, 64-CPU may have backward compatibility, allowing it to run 32-bit programs and may also support running 32-bit operating systems. In this aspects, 64-bit version of Windows may have more benefits than 32-bit.
Besides, it’s not surprising that many applications now require a 64-bit operating system due to that limitation. Moreover, you can run x64 and x86 applications on a 64-bit OS, but that is not possible on a 32-bit OS.
How to Convert 32 Bit to 64 Bit Windows 7/8/10 without Data Loss
In the following paragraphs, we will walk you through four steps to upgrade Windows to 64 bit.
- Make Sure Your Processor Is 64-Bit Capable
- Ensure Your PC Hardware Has 64-Bit Drivers Available
- Back up Your PC
- Upgrade 32 Bit to 64 Bit
Move 1: Make Sure Your Processor Is 64-Bit Capable
To do this work, go to Settings > Systems > About. On the right-hand side of the interface, navigate to the System type entry.
Then, you will see one of the following system type:
- 64-bit operating system, x64-based processor: Your CPU support 64-bit and you have already installed the 64-bit edition of Windows 10. So, you don’t need to upgrade to 64 bit.
- 32-bit operating system, x64-based processor: Your CPU supports 64-bit, but you have installed the 32-bit version of Windows.
- 32-bit operating system, x86-based processor: Your CPU supports 32-bit and you have installed the 32-bit version of Windows.
To be specific, if you see the second entry, you are in luck and you can move on to the next section to continue Windows 10 64 bit upgrade since your 64-bit Central Processing Unit can run a 64-bit version. But if you see the third entry, you cannot install a 64-bit OS since your CPU doesn’t support 64-bit.
Move 2: Ensure Your PC Hardware Has 64-Bit Drivers Available
In addition, you should check whether other components, for example, video and sound cards, can work properly with a 64-bit version of Windows 10. Simply speaking, 64-bit OS requires 64-bit hardware drivers and the 32-bit drivers won’t work.
Modern hardware should certainly offer 64-bit drivers but some old hardware may no longer support and manufacturers may haven’t offered 64-bit drivers. To check for this, please go to your manufacturer support website to see if 64-bit drivers are available for download.
Move 3: Back up Your PC
Since you are making major changes to your operating system, it is indispensable to make a full backup of Windows 10. When you upgrade 32 bit to 64 bit in Windows 10/8/7, your personal files, settings, and applications will be deleted. And the best thing is to back up all the affected files to your external storage devices or USB drive to avoid data loss.
To back up your important files, you need a free backup program to help you. Which one is worth recommending? MiniTool ShadowMaker, a piece of professional file backup software, will be a good option, coming with many powerful features.
With the help of this freeware, you can create an image file for files & folders, Windows operating system, disk or partition. Besides, it can help you to sync files to other locations for backup. Above all, automatic file backup, differential & incremental backup can be created.
Right now, before you free change 32 bit to 64 bit of Windows 10/8/7, get MiniTool ShadowMaker Trial Edition from the following button to back up your crucial files. Note that this edition only allows you to free use for 30 days. If you want to keep this software all the time, get its Pro Edition.
Step 1: Double-click on this program to open it.
Step 2: Which feature should you use to back up files, Backup or Sync? Both are available. And here, you take the first feature as an example.
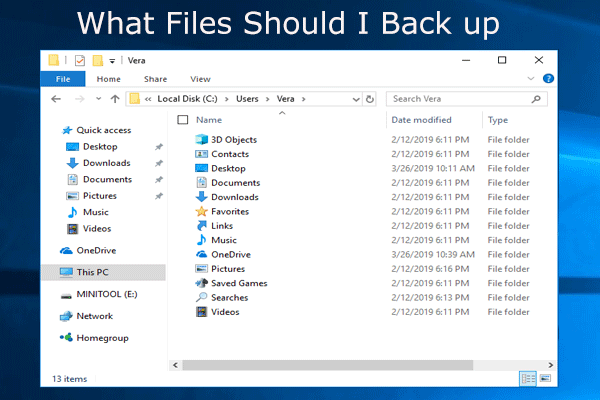
What do I need to back up my computer? What files should I back up? Now, get the answers to these two questions in this post.
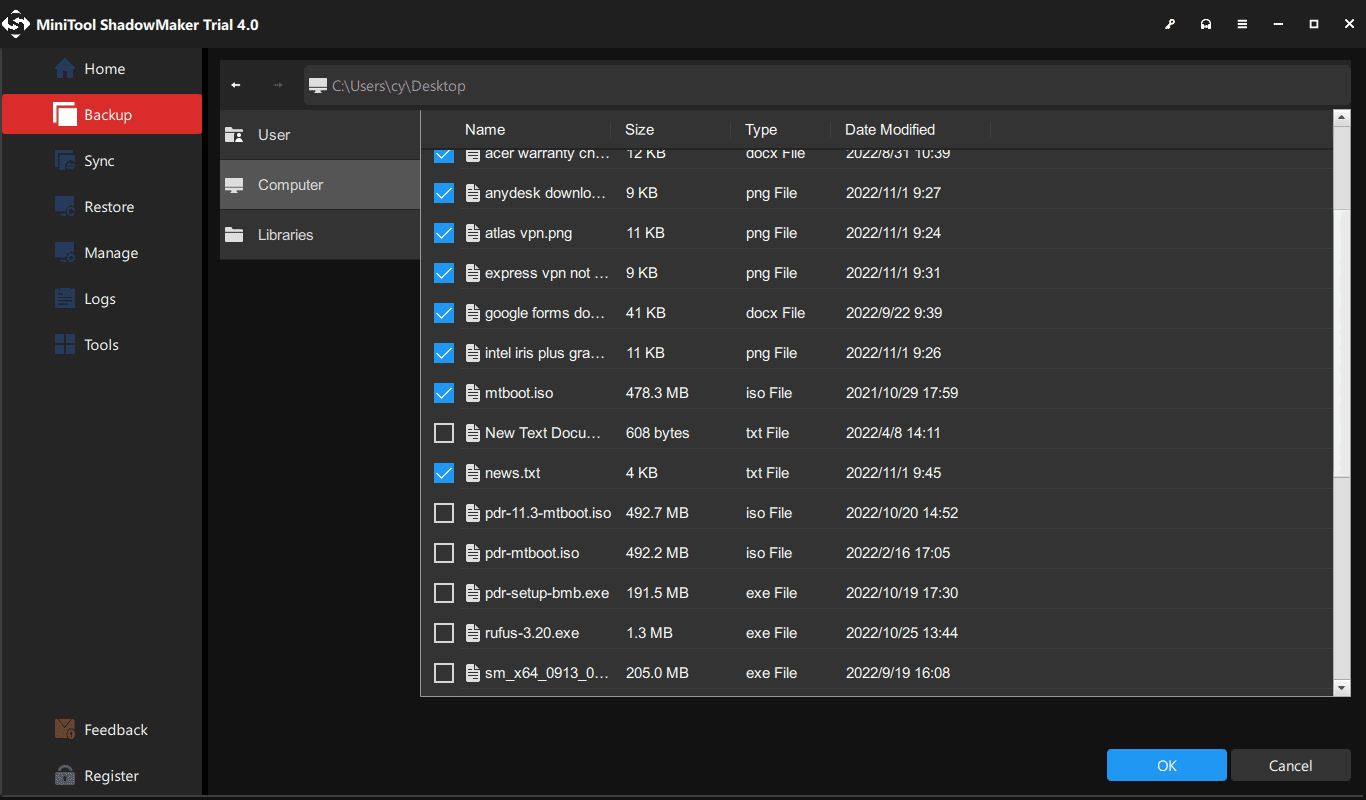
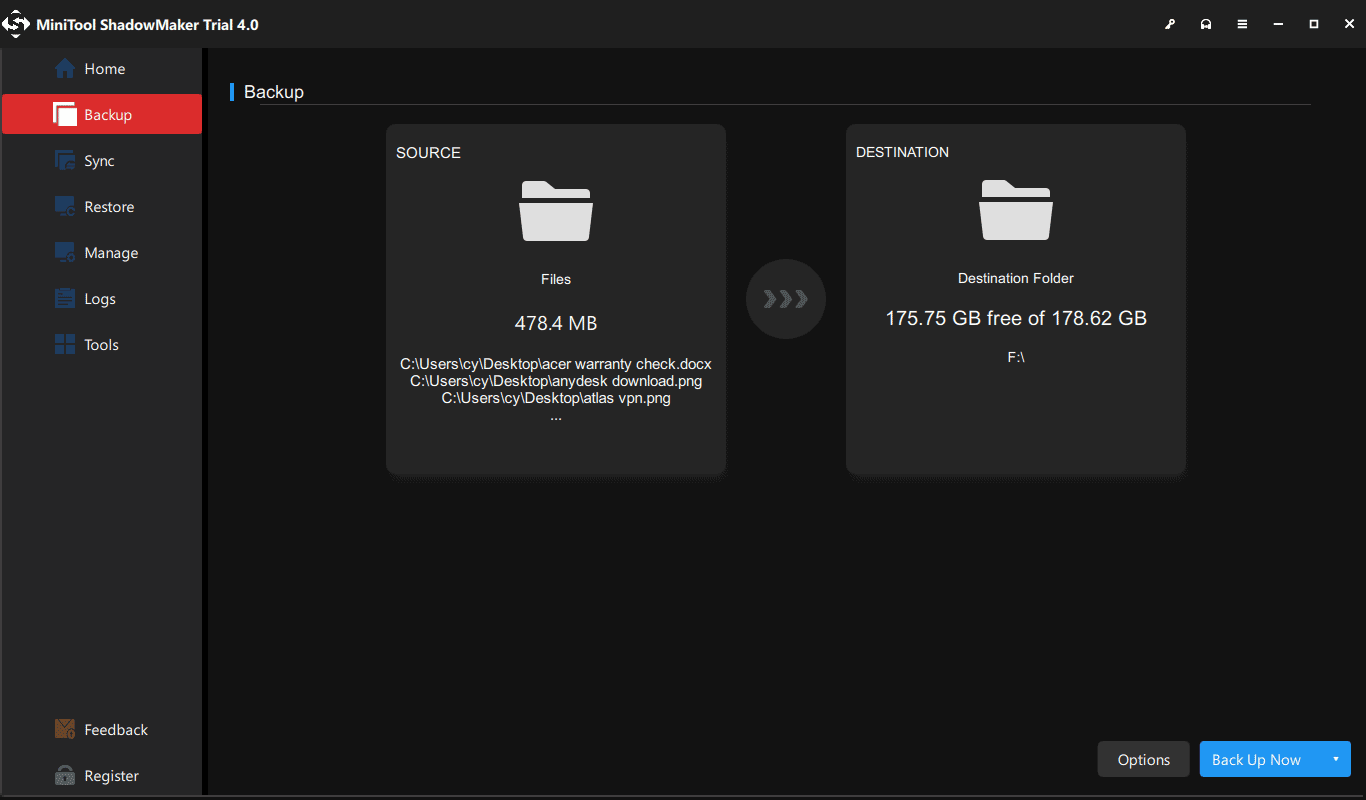
In the Backup window, you need to decide which files to back up and where to save the backup image file. Just go to the Source section and choose personal files you want to back up.
Then, go to the Destination section and choose an external hard drive, USB flash drive, or NAS as the storage path.
Step 3: Finally, start the full backup process of your important files by hitting the Back up Now button.
Now, all operations to back up files are told to you. If you are planning to convert 32 bit to 64 bit of Windows 10/8/7 operating system, don’t hesitate to free download this backup software to prevent your data from losing after upgrading to the 64-bit version of Windows.
Right now, the previous three steps are told to you. Reading here, it is time for you to take action to upgrade Windows 10 32 bit to 64 bit. Just go to the next move to follow the corresponding steps for Windows 10 64-bit version upgrade.
Move 4: Upgrade Windows to 64 Bit
How to convert 32 bit to 64 bit Windows 7/8/10? As mentioned above, performing an upgrade from 32-bit to 64-bit version of Windows is actually clean install. Now, follow the steps below to make a reinstallation.
Create a Bootable USB Drive
How can you create bootable USB from ISO in Windows 10 for a clean install? This post will show you the Windows 10 USB tool for ISO to USB.
Here, take Windows 10 64 bit upgrade as an example and we will show you the step-by-step instructions. Right now, insert your USB flash drive with at least 4GB of storage space to your device and to create the 64-bit Windows 10 installation media.
Step 1: Open the official web page to download Windows 10 Media CreationTool.
Step 2: Click Download tool now under Create Windows 10 installation media.
Step 3: Double-click on the MediaCreationTool.exe to run this utility and then accept the Microsoft terms.
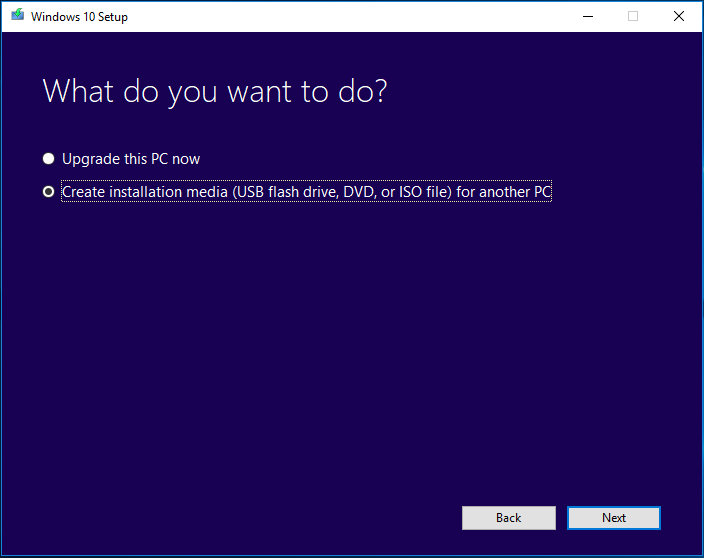
Step 4: There are two options. Check the option Create installation media (USB flash drive, DVD or ISO file) for another PC.
Step 5: Please choose language and edition. To upgrade Windows 10 to 64 bit, here please specify the 64-bit (x64) option for 64-bit Architecture.

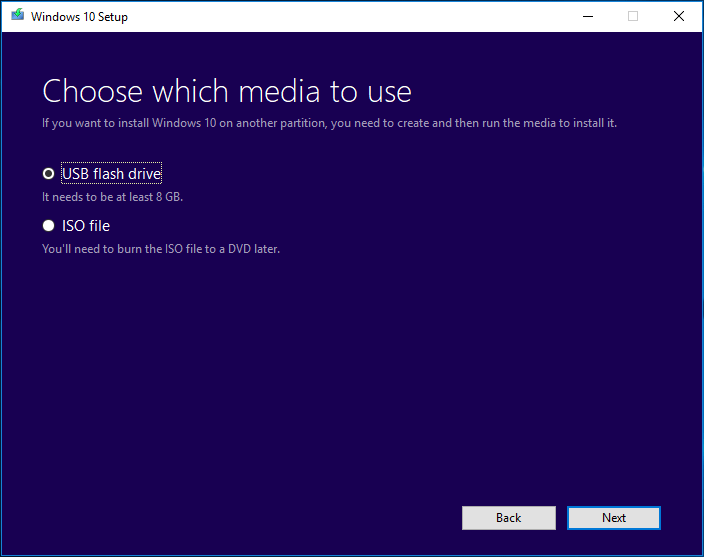
Step 6: Choose the USB flash drive option so as to create a bootable USB drive. Additionally, you can also check the option ISO file but you need to burn the file to a USB drive or CD/DVD. Here, we recommend the first one.
Step 7: Next, all your drives on your computer will be listed. Just choose the USB flash drive from the list to continue.
Step 8: Then, this tool will start downloading needed files and creating a bootable drive from ISO file that is compatible with Windows 10 64 bit. Wait for the process to be finished.
Install Windows 10 64 Bit from Scratch
How to upgrade Windows 7 32 bit to 64 bit without CD or upgrade Windows 8/10 to 64 bit without disk? Now, restart your computer with the bootable USB drive and then follow these steps:
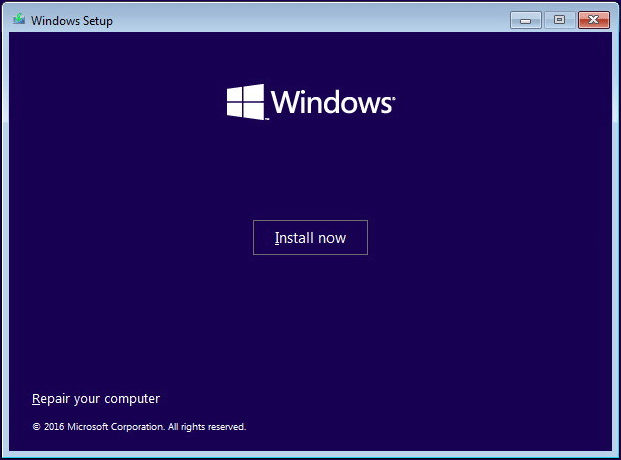
Step 1: After booting your PC from the USB drive, choose language, time and currency format and keyboard.
Step 2: Click Install now to continue.
Step 3: Your purpose is to upgrade 32 bit to 64 bit for Windows 10, so you should click the I don’t have a product key link (assuming your PC has been already properly activated).
Step 4: Choose the edition of Windows 10 to go on.
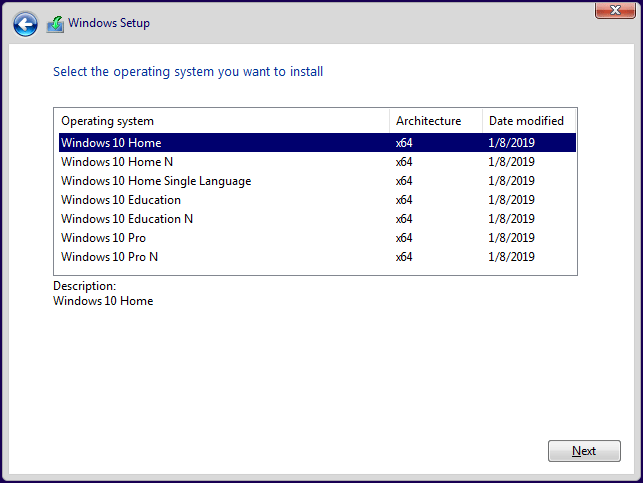
Step 5: Accept the license terms. To upgrade Windows 10 32 bit to 64 bit, please choose Custom: Install Windows only (advanced).

Step 6: You may ask: how to upgrade 32 bit to 64 bit Windows 7/8/10 without formatting? Actually, it is easy. In the following drive list option page, choose the partition(s) with the current installation of Windows, and click the Delete button instead of formatting operation to remove it from the hard drive.
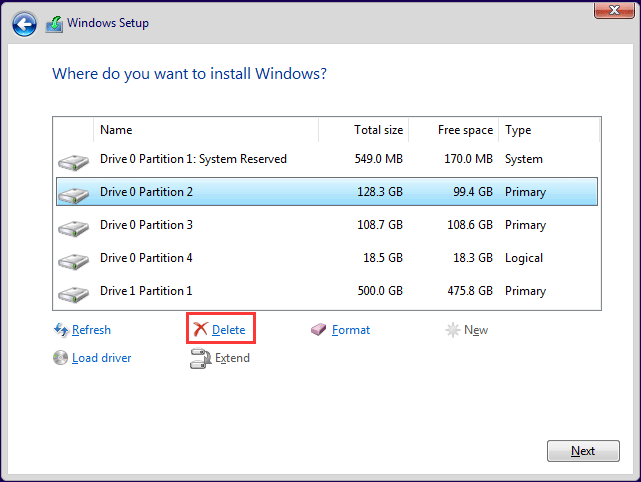
Step 7: Then, click the unallocated space to continue. Then, the setup will install the 64-bit version of Windows 10 on your computer. Later, you need to complete the Out-of-box experience (OOBE) setup the OS with your preferences by following the on-screen directions.
Bottom Line
Want to upgrade 32 bit to 64 bit? Here is the overview that you should do before the upgrade and how to convert 32 bit to 64 bit Windows 7/8/10. Just follow the above guides to start the upgrade operation.
Remember to leave a comment below or contact [email protected] if you have any different idea or question when you change 32 bit to 64 bit.
Upgrade Windows 10 32 Bit to 64 Bit FAQ
ABOUT THE AUTHOR

Position: Columnist
Vera is an editor of the MiniTool Team since 2016 who has more than 5 years’ writing experiences in the field of technical articles. Her articles mainly focus on disk & partition management, PC data recovery, video conversion, as well as PC backup & restore, helping users to solve some errors and issues when using their computers. In her spare times, she likes shopping, playing games and reading some articles.


