- Change the name and address associated with your Microsoft account
- Windows 10
- Xbox One
- Change the email address or phone number for your Microsoft account
- Change a user name and email address
- Change a user’s email address
- Set the primary email address
- Change a user’s display name
- Resolve error messages
- «A parameter cannot be found that matches parameter name ‘EmailAddresses»
- «We’re sorry, the user couldn’t be edited. Review the user information and try again»
- What to do with old email addresses
- What if the person’s offline address book won’t sync with the Global Address List?
Change the name and address associated with your Microsoft account
Windows 10
To update your name or your business’s name:
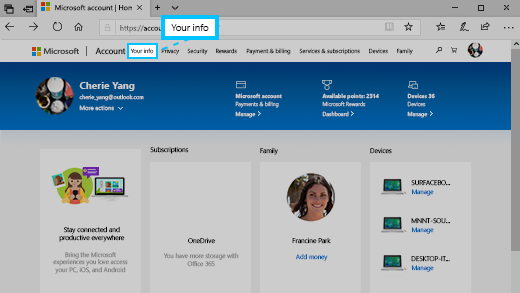
Sign in to your Microsoft account. Note: If you see a screen asking you which account you want to use, it means you have two Microsoft accounts associated with the same email address. Get more info about how to Change the email address or phone number for your Microsoft account.
Select Your info.
Select Edit name, make your preferred changes, and then select Save.
If you’re having problems signing into your account or changing or adding other personal information, see Microsoft account help.
To update your preferred name and address for billing, shipping or taxes:
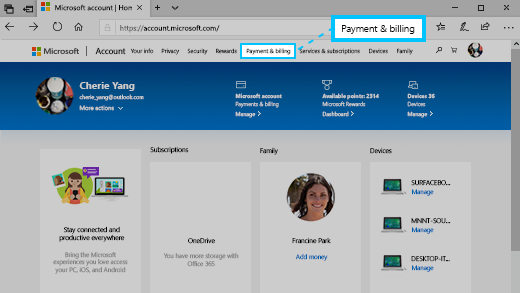
Sign in to your Microsoft account. Note: If you see a screen asking you which account you want to use, it means you have two Microsoft accounts associated with the same email address. Get more info about how to Change the email address or phone number for your Microsoft account.
Select Payment & billing > Address book.
If you’re updating an existing address, select Edit. If you’re adding a new address, select Add a new address.
Select Set as your preferred billing and shipping address > Save.
Note: The steps above may vary based on your country/region.
Xbox One
Select Settings > All Settings .
Under Account select Payment & billing > Change billing address.
Edit your billing account information.
To skip billing info that doesn’t need to be updated, press B on your controller, and then select Next.
When you’re done, select Save info.
If you need to change something else, select Make more changes.
Change the email address or phone number for your Microsoft account
Your Microsoft account lets you manage Microsoft services and subscriptions, like Xbox Live, Outlook.com, OneDrive, Skype, and Windows 10, from a single account.
You can add up to 10 email addresses or phone numbers to your Microsoft account. Email addresses and phone numbers that are associated with your Microsoft account are called aliases and they use the same contacts, online storage, subscriptions, and account settings. Each alias lets you sign in to all your Windows 10 devices and services that use the Microsoft account.
Your aliases share a single password, and you can send and receive email with each. Your primary alias will be the username you use to sign in to your account, the username that appears on your Windows 10 devices, and how you show up to recipients in email.
You can make changes to the email addresses or phone numbers (aliases) that are associated with your Microsoft account. Here are some reasons you might want to make changes:
You want to add or remove an email address or phone number.
You want to use a different email address or phone number to sign in.
You want a different username to appear on your Windows 10 devices.
You want an email address you can give to other companies or other people that can’t be used to sign in to your account or access your info.
You received the “Which account do you want to use” message at sign-in.
If you’re trying to change your Outlook email account or change your email password, see Add or remove an email alias in Outlook.com or Change or update your email password.
To learn how to change which account sends email in Outlook.com, see Add your other email accounts to Outlook.com.
If you have questions about your email account, see Get help with Outlook.com.
The following sections provide the steps that you need to change the email address or phone number for your Microsoft account. Select the one that best fits your scenario.
To add a new email address or phone number as an alias:
Sign in to Manage how you sign in to Microsoft with your Microsoft account. If you’re having issues signing in to your Microsoft account, go to Microsoft account help.
Note: You may be prompted to enter your Microsoft account password, or to enter a code sent to the email address or phone number listed in your account’s security information. By providing this info to us, we know the request is coming from you.
Under the Account aliases section, select either Add email or Add phone number.
If you selected Add a phone number, go to step 5. If you selected Add email, choose whether to add:
A new email address. Select Create a new email address and add it as an alias, and then follow the instructions.
A non-Microsoft email address (such as an @gmail.com or @yahoo.com email address). Select Add an existing email address as a Microsoft account alias, and then select Add alias.
After you’ve added the email address, you’ll be asked to verify that you’re the account owner:
Select Verify next to the new alias. A message is sent to the account for verification.
After you receive the message, select the included link to confirm that you own the account.
If you selected Add a phone number, follow these steps:
Select your country from the list.
Enter the phone number you want to use, and then select Next.
When you add a new phone number, we’ll send a text message to that number to verify it. Enter the code from the text message, and then select Next.
You can use any email address or phone number you’ve listed as a username to sign in to your Microsoft account. If you want to sign in with a specific one or change the one you’re signing in with, here’s how:
Sign in to Manage how you sign in to Microsoft with your Microsoft account. If you’re having issues signing in to your Microsoft account, go to Microsoft account help.
Note: You may be prompted to enter your Microsoft account password, or to enter a code sent to the email address or phone number listed in your account’s security information. By providing this info to us, we know the request is coming from you.
If you want to use an existing email address or phone number, go to step 6. If you’re adding a new email address or phone number, go to step 3.
If you selected Add a phone number, go to step 5. If you selected Add email, choose whether to add:
A new email address. Select Create a new email address and add it as an alias, and then follow the instructions.
A non-Microsoft email address (such as an @gmail.com or @yahoo.com email address). Select Add an existing email address as a Microsoft account alias, and then select Add alias.
After you’ve added the email address, you’ll be asked to verify that you’re the account owner:
Select Verify next to the new alias. A message is sent to the account for verification.
After you receive the message, select the included link to confirm that you own the account.
If you selected Add a phone number, follow these steps:
Select your country from the list.
Enter the phone number you want to use, and then select Next.
When you add a new phone number, we’ll send a text message to that number to verify it. Enter the code in the text message, and then select Next.
Under Sign-in preferences, select Change sign-in preferences.
Either select the check boxes next to the aliases you want to use to sign in, or clear the check boxes for the aliases that you don’t want to use to sign in, and then select Save.
To change the username that appears on your Windows 10 devices, like your Xbox or Surface, change your primary alias.
Note: If you want to change how your name appears for your Microsoft account, use the steps on the How to change your Microsoft account display name page.
Sign in to Manage how you sign in to Microsoft with your Microsoft account. If you’re having issues signing in to your Microsoft account, go to Microsoft account help.
Note: You may be prompted to enter your Microsoft account password, or to enter a code sent to the email address or phone number listed in your account’s security information. By providing this info to us, we know the request is coming from you.
Select Your info, and then select Manage how you sign in to Microsoft.
Under the Account aliases section, select Make primary next to the alias you want to appear on your Windows 10 devices.
Just because you aren’t using an email account or phone number anymore doesn’t mean you have to remove it from your list of aliases. However, if you want to remove it, here’s how.
If you remove an alias that’s an email address from a Microsoft domain (like @hotmail.com, @live.com, @outlook.com, or @msn.com), the email is permanently deleted from our systems and can no longer be used to send or receive emails, nor can it be transferred to a different account. Microsoft also doesn’t recycle email addresses, which means the alias can’t be reclaimed later.
BEFORE YOU DELETE—Make sure you review the following before you delete an alias:
If you want to remove an email address from a non-Microsoft domain (like @gmail.com), then it usually becomes immediately available and can be added as an alias on another Microsoft account. NOTE: This removal doesn’t trigger a deletion of the email across our systems. You can learn more about how to control your personal data in the Microsoft Privacy Statement.
Save any info that you want from this alias before you remove it.
If you’re removing a primary alias, you’ll need to choose another primary alias before it can be removed. Nothing associated with a deleted alias will transfer to your new primary alias. So if you use the primary account to sign in to any other Microsoft services, you won’t be able to sign in to any of them after deleting the account.
Sign in to Manage how you sign in to Microsoft with your Microsoft account. If you’re having issues signing in to your Microsoft account, go to Microsoft account help.
Note: You may be prompted to enter your Microsoft account password, or to enter a code sent to the email address or phone number listed in your account’s security information. By providing this info to us, we know the request is coming from you.
Select Your info, and then select Manage how you sign in to Microsoft.
Make sure you have one verified option that you can continue to use. If you only have one option and you plan to remove it, add a new phone or email.
Under the Account aliases section, select Remove next to the email address or phone number you want to remove.
If you received the «Which account do you want to use?» message when you sign in, it means you have two accounts with Microsoft that use the same email address:
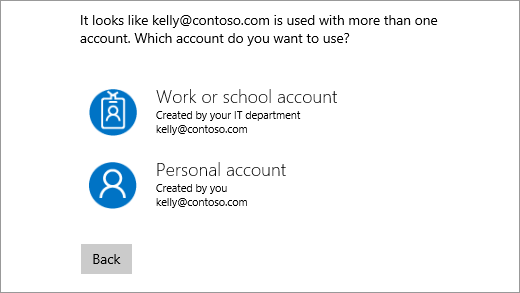
To stop receiving this message, use the steps in the “I want to use a different email address or phone number to sign in” section on this page to change the email address that you use to sign in to your Microsoft account. Doing this changes the way you sign in to your account, but it won’t affect any of the data associated with it.
Aliases can’t be moved from one Microsoft account to another.
If you remove your alias from the account it’s on today, it will be deleted from our systems and isn’t recoverable, so you’ll no longer be able to use it to send or receive emails.
Microsoft doesn’t recycle aliases once they are deleted. This means it won’t be available again as an alias or new account to you or anyone else at a later time.
Change a user name and email address
You may need to change someone’s email address and display name if, for example, they get married and their last name changes.
Watch a short video about changing a user’s email address.
You must be a global admin to do these steps.
Change a user’s email address
In the admin center, go to the Users > Active users page.
Select the user’s name, and then on the Account tab select Manage username.
In the first box, type the first part of the new email address. If you added your own domain to Microsoft 365, choose the domain for the new email alias by using the drop-down list.
Select Save changes.
In the admin center, go to the Users > Active users page.
Select the user. In the flyout pane, next to Username / Email, select Edit.
In the first box, type the first part of the new email address. If you added your own domain to Microsoft 365, you can choose the domain for the new email alias by using the drop-down list.
Select Save.
If you get an error message, see Resolve error messages.
Set the primary email address
In the admin center, go to the Users > Active users page.
Select the user’s name, and then on the Account tab select Manage email aliases.
Select Set as Primary for the email address that you want to set as the primary email address for that person.
You won’t see this option to Set as Primary if you purchased Microsoft 365 from GoDaddy or another Partner service that provides a management console. Instead, sign in to the GoDaddy / partner’s management console to set the primary alias.
Also, you’ll only see this option if you’re a global admin. If you don’t see the option, you don’t have permissions to change a user’s name and primary email address.
You’ll see a big yellow warning that you’re about to change the person’s sign-in information. Select Save, then Close.
Give the person the following information:
This change could take a while.
Their new username. They’ll need it to sign in to Microsoft 365.
If they are using Skype for Business Online, they must reschedule any Skype for Business Online meetings that they organized, and tell their external contacts to update their contact information.
If they are using OneDrive, the URL to this location has changed. If they have OneNote notebooks in their OneDrive, they might need to close and reopen them in OneNote. If they have shared files from their OneDrive, the links to the files might not work and the user can reshare.
If their password changed too, they are prompted to enter the new password on their mobile device, or it won’t sync.
In the admin center, go to the Users > Active users page.
Select the user. In the flyout pane, next to Username / Email, select Edit.
Select Set as Primary for the email address that you want to set as the primary email address for that person.
You won’t see this option to Set as Primary if you purchased Microsoft 365 from GoDaddy or another Partner service that provides a management console. Instead, sign in to the GoDaddy / partner’s management console to set the primary alias.
Also, you’ll only see this option if you’re a global admin. If you don’t see the option, you don’t have permissions to change a user’s name and primary email address.
You’ll see a big yellow warning that you’re about to change the person’s sign-in information. Select Save, then Close.
Tell the person the following information:
This change may take a while to take effect.
What their new username is. They’ll need it to sign in to Microsoft 365.
If they are using Skype for Business Online, tell them they will need to reschedule any Skype for Business Online meetings that they organized, and that they will need to tell their external contacts to update the old contact information.
If they are using OneDrive, tell them that the URL to this location has been changed. If they have OneNote notebooks in their OneDrive, then they may need to close and reopen them in OneNote. If they have shared files from their OneDrive, then the links to the files may not work and the user can reshare.
If their password changed too, tell them that they will be prompted to enter the new password on their mobile device, or it won’t sync.
Change a user’s display name
In the admin center, go to the Users > Active users page.
Select the user’s name, and then on the Account tab select Manage contact information.
In the Display name box, type a new name for the person, and then select Save.
If you get the error message «We’re sorry, the user couldn’t be edited. Review the user information and try again, see Resolve error messages.
It might take up to 24 hours for this change to take effect across all services. After the change has taken effect, the person will have to sign in to Outlook, Skype for Business and SharePoint with their updated username.
In the admin center, go to the Users > Active users page.
Select the user. In the flyout pane, next to Contact information, select Edit.
In the Display name box, type a new name for the person, and then select Save.
If you get the error message «We’re sorry, the user couldn’t be edited. Review the user information and try again, see Resolve error messages.
It might take up to 24 hours for this change to take effect across all services. After the change has taken effect, the person will have to sign in to Outlook, Skype for Business and SharePoint with their updated username, so be sure to tell them about this change.
Resolve error messages
«A parameter cannot be found that matches parameter name ‘EmailAddresses»
If you get the error message » A parameter cannot be found that matches parameter name ‘EmailAddresses» it means that it’s taking a bit longer to finish setting up your tenant, or your custom domain if you recently added one. The setup process can take up to 4 hours to complete. Wait a while so the setup process has time to finish, and then try again. If the problem persists, call support and ask them to do a full sync for you.
«We’re sorry, the user couldn’t be edited. Review the user information and try again»
If you get the error message » We’re sorry, the user couldn’t be edited. Review the user information and try again.» it means you aren’t a global admin and you don’t have permissions to change the user name. Find the global admin in your business and ask them to make the change.
What to do with old email addresses
A person’s previous primary email address is retained as an additional email address. We strongly recommend that you don’t remove the old email address.
Some people might continue to send email to the person’s old email address and deleting it may result in NDR failures. Microsoft automatically routes it to the new one. Also, do not reuse old SMTP email addresses and apply them to new accounts. This can also cause NDR failures or delivery to an unintended mailbox.
What if the person’s offline address book won’t sync with the Global Address List?
If they are using Exchange Online or if their account is linked with your organization’s on-premises Exchange environment, you might see this error when you try to change a username and email address: «This user is synchronized with your local Active Directory. Some details can be edited only through your local Active Directory.»
This is due to the Microsoft Online Email Routing Address (MOERA). The MOERA is constructed from the person’s userPrincipalName attribute in Active Directory and is automatically assigned to the cloud account during the initial sync and once created, it cannot be modified or removed in Microsoft 365. You can subsequently change the username in the Active Directory, but it doesn’t change the MOERA and you may run into issues displaying the newly changed name in the Global Address List.
To fix this, log in to the Azure Active Directory Module for PowerShell with your Microsoft 365 administrator credentials. and use the following syntax:
This changes the person’s userPrincipalName attribute and has no bearing on their Microsoft Online Email Routing Address (MOERA) email address. It is best practice, however, to have the person’s logon UPN match their primary SMTP address.
To learn how to change someone’s username in Active Directory, in Windows Server 2003 and earlier, see Rename a user account.


