- Change or update email account settings in Outlook for Windows
- Update or change your email settings from Mail in Control Panel
- Want to see how it’s done?
- Update or change your email settings in Outlook for Windows
- Change your password in Mail for Windows 10
- Stay connected and on schedule
- Update a password
- Your account settings are out-of-date in Mail or Calendar for Windows 10
- Stay connected and on schedule
- Check your password
- Check your security certificate
- Special instructions for other accounts
- Change or update email account settings in Outlook for Windows
- Update or change your email settings from Mail in Control Panel
- Want to see how it’s done?
- Update or change your email settings in Outlook for Windows
Change or update email account settings in Outlook for Windows
Sometimes you need to make a change to your email account settings. If you have a new password, if your email provider has asked you to change settings, or if you’re having problems with sending and receiving email, you can change your email account settings through Mail in the Windows Control Panel, or from Outlook.
Update or change your email settings from Mail in Control Panel
 Want to see how it’s done? Click here to jump directly to our video instructions.
You’ll need to know your account type, the incoming and outgoing server names, and the SSL and port settings for your email account. You can either contact your email provider or, if you’re using a popular email service, you can find these settings in the POP and IMAP email settings for Outlook topic.
Unsure who your email provider is? Look at your email address. The word immediately after the @ symbol is usually your email provider.
Open the Control Panel.
Windows 10: In the search box on the taskbar, type control panel, and then select Control Panel.
Windows 8.1: Type control panel in the search box, and then select Control Panel.
Windows 7: Click the Start button, and then click Control Panel.
In Control Panel, search for and open the Mail icon.
On the Mail Setup — Outlook window, click Email Accounts.
On the Account Settings window, select the account you’re trying to troubleshoot and select Change.
On the Change Account window, check the Incoming mail server and Outgoing mail server settings against those from your email provider or the reference article. If it’s different, update the settings.
Under Logon Information, verify you’re using the correct User Name and Password associated with your email account.
Note: If your email provider requires two-factor authentication, enter the generated passcode they provided instead of your regular password.
Click More Settings.
On the Internet Email Settings window, select the Advanced tab.
Under Server Port Numbers, compare the Incoming server (IMAP) and Outgoing server (SMTP) numbers to those provided by your email provider or from the reference article. If they don’t match, manually change them.
Additionally, compare the encryption types (next to Use the following type of encrypted connection) for both Incoming and Outgoing servers as well and, if they don’t match, manually change them.
Click OK, and then click Test Account Settings on the Change Account window.
On the Test Account Settings window, check if you have green check marks or red markers:
Red markers indicate some or all settings are incorrect. Check your settings and test again. If the test fails, contact your email provider to verify the information.
Green check marks indicate a successful test. Click Close, and then click Next and Finish on the Change Account window. Your email should be properly configured.
Want to see how it’s done?

Update or change your email settings in Outlook for Windows
Open Outlook and select File.
Use the dropdown under Account Information to select the account you want to change.
Select Account Settings.
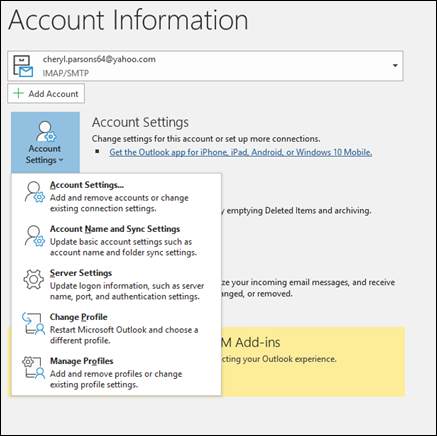
Select the type of information you want to change.
Account Settings allows you to add or remove accounts, change server settings, and more.
Account Name and Sync Settings lets you update the friendly name for the account and decide how many days’ worth of email you’d like to synchronize.
Server Settings lets you change the login information, including the password, server name, port, and authentication settings.
Change Profile lets you switch to a new profile.
Manage Profiles lets you add or remove profiles or change profile settings.
The most common settings you’ll change are Server Settings.
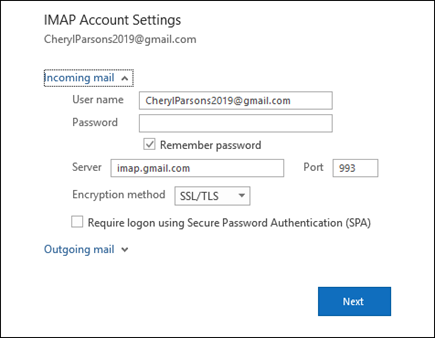
Select either Incoming mail or Outgoing mail to change a variety of server settings. This is also where you can update your email password (after you’ve changed the password with your email provider).
When you’re done updating your settings, select Next > Done.
Change your password in Mail for Windows 10
Stay connected and on schedule
You can be organized, on time, and buttoned up with Outlook — your life organizer.
Once you’ve set up your account in Mail for Windows 10, you don’t have to enter your password every time you open the app. If the password for your email account expires or you change it for security purposes, you may need to update your password in the Mail app.
Update a password
If you’ve changed your password with your email provider, you can update the stored password in Mail for Windows 10.
Choose Settings > Manage Accounts, and then choose the account you need to update.
If you selected an Outlook.com account, you can change or update your password by choosing Change account settings. Mail for Windows 10 will take you to a webpage for your account where you can change your password. After you update the password on the webpage, Mail for Windows 10 will receive that change automatically.
For all other accounts, after you update your password with your email provider, you can update the password in the Account Settings dialog box and then choose Save.
If your password has expired or you think your account has been compromised, you’ll need to change your password with your email service provider—€for example, Gmail or iCloud—€before you update the password in the Account Settings dialog box.
If Mail for Windows 10 won’t accept your new password, make sure Caps Lock is turned off, and then reenter your password.
Your account settings are out-of-date in Mail or Calendar for Windows 10
Stay connected and on schedule
You can be organized, on time, and buttoned up with Outlook — your life organizer.
If you receive a message in Mail or Calendar for Windows 10 that your account settings are out of date, there are several things you can do to fix the problem.
Check your password
The most common cause of an out-of-date account is an incorrect password. Select Fix account in the notification bar at the top of the Mail or Calendar app. If your password is incorrect, you’ll see a message asking you to update your password. Enter the new password and choose Done.
Tip: If you want to change the password for your account with your email provider—for example, Gmail or iCloud—you’ll need to visit the website for your email provider. See Change your password for more information.
Check your security certificate
If your password isn’t the problem, you may have a certificate error. If so, you’ll see a message that says, «There is a problem with the server’s security certificate. The security certificate is not from a trusted certifying authority.»
This error often happens when you don’t use SSL to secure your email account. To fix this error, use the following steps.
Choose Settings > Manage Accounts.
Choose the account that’s out of date to display the account settings dialog.
Choose Change mailbox sync settings > Advanced mailbox settings. You may have to scroll down in the dialog to see Advanced mailbox settings.
Check the boxes for Require SSL for incoming email and Require SSL for outgoing email and then choose Done > Save.
Special instructions for other accounts
In order to use your iCloud account, you must enable two-factor authentication on your iCloud account, and generate an app-specific password to add your iCloud account to the Mail app. For more information on generating an app-specific password to use with iCloud, see Two-factor authentication for your Apple ID.
Select Generate Password below App-Specific Passwords.
Follow the instructions on your screen.
Microsoft has added OAuth support for Yahoo! accounts in the Windows 10 Creators update. To install the Creators Update now, go to the software download site, and select Update now. For more information about the update, see Windows 10 Creators Update is here.
If you have a Japanese Yahoo! email account you will need to do the following:
Add your Yahoo! account as an IMAP account. To do this, follow the steps in Add an account using advanced setup above using imap.mail.yahoo.co.jp for your incoming mail server and smtp.mail.yahoo.co.jp for your outgoing mail server.
To sync your QQ mailbox with the Mail and Calendar apps, you need to enable IMAP on QQ.
Sign in to your QQ account.
Select Settings > Account > Enable IMAP.
Note: Your QQ account needs to be active for more than 14 days before you can enable IMAP.
In the Mail and Calendar apps, remove your QQ account and add it again.
Your QQ account should now sync automatically.
When you try to connect your GMX.de or WEB.de account to the Mail and Calendar apps, you’ll receive an email in your GMX.de or WEB.de mailbox with instructions about how to enable access.
In a web browser, sign in to your GMX.de or WEB.de account.
Find the email message with instructions about how to connect your account to the Mail and Calendar apps, and follow the instructions.
Your account should now sync with the Mail and Calendar apps automatically.
Change or update email account settings in Outlook for Windows
Sometimes you need to make a change to your email account settings. If you have a new password, if your email provider has asked you to change settings, or if you’re having problems with sending and receiving email, you can change your email account settings through Mail in the Windows Control Panel, or from Outlook.
Update or change your email settings from Mail in Control Panel
Want to see how it’s done? Click here to jump directly to our video instructions.
You’ll need to know your account type, the incoming and outgoing server names, and the SSL and port settings for your email account. You can either contact your email provider or, if you’re using a popular email service, you can find these settings in the POP and IMAP email settings for Outlook topic.
Unsure who your email provider is? Look at your email address. The word immediately after the @ symbol is usually your email provider.
Open the Control Panel.
Windows 10: In the search box on the taskbar, type control panel, and then select Control Panel.
Windows 8.1: Type control panel in the search box, and then select Control Panel.
Windows 7: Click the Start button, and then click Control Panel.
In Control Panel, search for and open the Mail icon.
On the Mail Setup — Outlook window, click Email Accounts.
On the Account Settings window, select the account you’re trying to troubleshoot and select Change.
On the Change Account window, check the Incoming mail server and Outgoing mail server settings against those from your email provider or the reference article. If it’s different, update the settings.
Under Logon Information, verify you’re using the correct User Name and Password associated with your email account.
Note: If your email provider requires two-factor authentication, enter the generated passcode they provided instead of your regular password.
Click More Settings.
On the Internet Email Settings window, select the Advanced tab.
Under Server Port Numbers, compare the Incoming server (IMAP) and Outgoing server (SMTP) numbers to those provided by your email provider or from the reference article. If they don’t match, manually change them.
Additionally, compare the encryption types (next to Use the following type of encrypted connection) for both Incoming and Outgoing servers as well and, if they don’t match, manually change them.
Click OK, and then click Test Account Settings on the Change Account window.
On the Test Account Settings window, check if you have green check marks or red markers:
Red markers indicate some or all settings are incorrect. Check your settings and test again. If the test fails, contact your email provider to verify the information.
Green check marks indicate a successful test. Click Close, and then click Next and Finish on the Change Account window. Your email should be properly configured.
Want to see how it’s done?
Update or change your email settings in Outlook for Windows
Open Outlook and select File.
Use the dropdown under Account Information to select the account you want to change.
Select Account Settings.
Select the type of information you want to change.
Account Settings allows you to add or remove accounts, change server settings, and more.
Account Name and Sync Settings lets you update the friendly name for the account and decide how many days’ worth of email you’d like to synchronize.
Server Settings lets you change the login information, including the password, server name, port, and authentication settings.
Change Profile lets you switch to a new profile.
Manage Profiles lets you add or remove profiles or change profile settings.
The most common settings you’ll change are Server Settings.
Select either Incoming mail or Outgoing mail to change a variety of server settings. This is also where you can update your email password (after you’ve changed the password with your email provider).
When you’re done updating your settings, select Next > Done.


