How to Permanently Activate Windows 10 Free with CMD [MiniTool News]
By Alisa | Follow | Last Updated December 31, 2020
Summary :
This post provides step-by-step guide to help you activate Windows 10 by using CMD. Check how to activate Windows 10 with CMD but not with Windows 10 activation tool. If you need to recover lost data from Windows 10 computer, MiniTool data recovery software is a good choice.
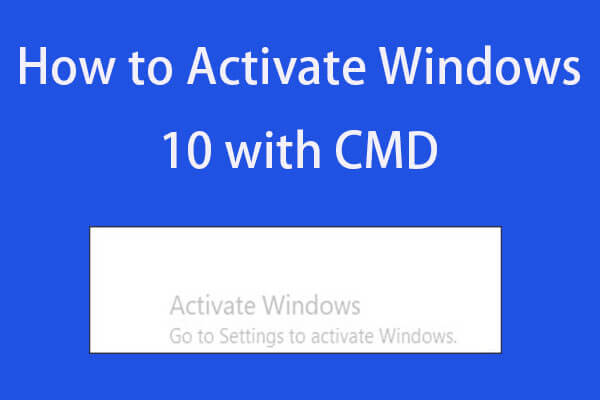
After you install or reinstall Windows 10, it will ask you to activate Windows 10. If your Windows 10 system has not been activated, it will appear a watermark at the lower-right screen saying “Activate Windows. Go to Settings to activate Windows”. It would be annoying to have the watermark on screen.

Besides, if you don’t activate Windows 10, you can’t change the Windows Personalization settings like lock screen, wallpaper, theme, etc.
Before we learn how to activate Windows 10 with CMD, you can firstly check the edition of your installed Windows 10 system.
You can press Windows logo key and Pause/Break key on the keyboard at the same time to quickly check the Windows 10 edition of your computer.
How to Permanently Activate Windows 10 with CMD
Without third-party Windows 10 activation tools, you can activate Windows 10 with CMD for free. Here we’ll introduce how to activate Windows Enterprise edition with CMD.
Step 1. You can press Windows + R key on the keyboard to open Windows Run box. Type cmd, and press Ctrl + Shift + Enter to open and run Windows Command Prompt as administrator.
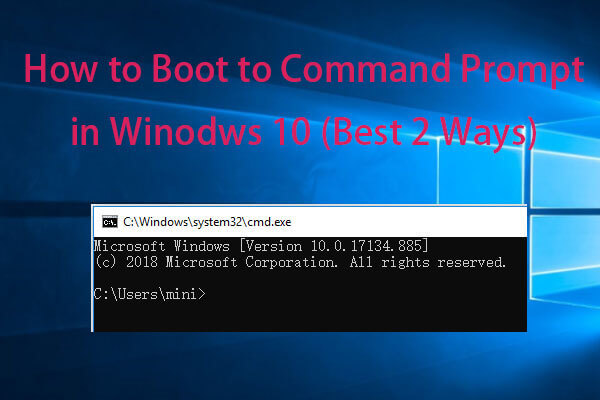
Best 2 ways to boot to Command Prompt Windows 10. Check how to open Command Prompt at boot in Windows 10, how to repair Windows 10 using Command Prompt.
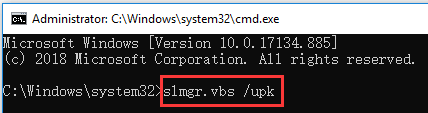
Step 2. After you enter into Windows 10 Command Prompt, you can copy and paste this command line: slmgr.vbs /upk, in the Command Prompt window. Hit Enter to execute the command.
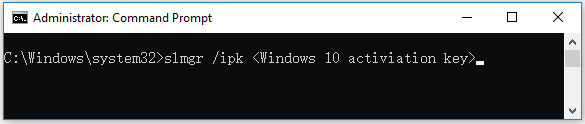
Step 3. Next you can copy and paste this command line and hit Enter to install the Windows 10 product key: slmgr /ipk . Replace «Windows 10 activiation key» with the real license key that you buy or find online for Windows 10 OS.
Note: It’s advised that you support and buy the original Windows 10 license key from Microsoft and use this way to permanently activate Windows 10. You may find some free available Windows 10 product keys online and use them to activate Windows 10 permanently, but be careful since it may violate Microsoft copyright policies.
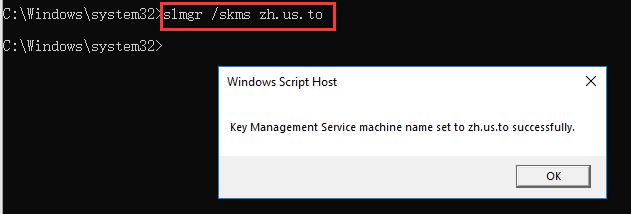
Step 4. Then you can type slmgr /skms zh.us.to command line and hit Enter.
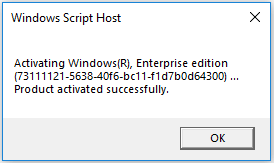
Step 5. At last, copy and paste slmgr /ato and hit Enter to activate Windows 10 for free with CMD.
How to Activate Windows 10 Pro with CMD
Step 1. Click Start and type cmd, right-click Command Prompt app and choose Run as administrator.
Step 2. Copy and paste the following command line in Command Prompt window and hit Enter. If you buy or find the activiation key for Windows 10 Pro, you can replace «Windows 10 license key» in the command line after slmgr /ipk.
slmgr /ipk
Step 3. Type the following command lines and remember to hit Enter after you type each line.
slmgr /skms kms.xspace.in
slmgr /ato
How to Check If Your Windows 10 Is Activated or Not
If you want to check whether your Windows 10 computer is activated or not, you can press Windows + R keys on the keyboard to open Run box, type slmgr.vbs -xpr in Run box and hit Enter.
Bottom Line
By following the steps above, you can easily activate Windows 10 for free with CMD.
If your Windows 10 computer has other problems, you can repair Windows 10 with 6 ways. If you lost some data in your Windows 10 computer, you can use MiniTool Power Data Recovery to easily recover lost data or mistakenly deleted files in 3 simple steps.

Learn how to use the 10 best free Windows 10 backup and recovery tools to backup and restore Windows 10, and recover lost/deleted data from Windows 10 PC.
ABOUT THE AUTHOR

Position: Columnist
Alisa is a professional English editor with 4-year experience. She loves writing and focuses on sharing detailed solutions and thoughts for computer problems, data recovery & backup, digital gadgets, tech news, etc. Through her articles, users can always easily get related problems solved and find what they want. In spare time, she likes basketball, badminton, tennis, cycling, running, and singing. She is very funny and energetic in life, and always brings friends lots of laughs.
Command-Line Activation of Universal Windows Apps
As we continue to close the gap between Win32 and Universal Windows Apps, one of the features we’ve recently introduced is the ability to activate a UWA from a command line and pass the app arbitrary command-line arguments. This is available to Insiders from build 16226.
This feature builds on the App Execution Alias extension already available for Desktop Bridge apps. To use this feature in a UWA, there are two key additions to your app:
- Add an appExecutionAlias extension to your app manifest.
- Override OnActivated and handle the incoming arguments.
For the manifest entry, you first need to declare the XML namespace for the AppExecutionAlias element:
xmlns=»http://schemas.microsoft.com/appx/manifest/foundation/windows10″
xmlns:mp=»http://schemas.microsoft.com/appx/2014/phone/manifest»
xmlns:uap=»http://schemas.microsoft.com/appx/manifest/uap/windows10″
xmlns:uap5=»http://schemas.microsoft.com/appx/manifest/uap/windows10/5″
IgnorableNamespaces=»uap mp uap5″>
The AppExecutionAlias is declared as an Extension within your Application. This is quite simple and almost the same as for a Desktop Bridge app:
The Executable is the name of your UWA app EXE, and the EntryPoint is the fully qualified name of your App class. The ExecutionAlias is the name that users will type in at the command-line: This can be any arbitrary name, and it must end with “.exe.” You should choose a meaningful alias that you can reasonably expect the user to associate with your app. Note that if you choose an alias that conflicts with an app that is already installed, your alias won’t be used. Similarly, if your app is installed first, and then the user installs another app later that declares the same alias – then your app will take precedence. The rule here is that the first one wins.
The manifest entry is obviously the same for VB and C++ projects, but for a JavaScript web app, it’s slightly different. Instead of Executable, you specify a StartPage, and you don’t specify EntryPoint at all:
For the OnActivated override, the first thing to do is to check the ActivationKind – this is standard practice if your app supports multiple activation kinds (file associations, custom protocols and so on). In this scenario, if the ActivationKind is CommandLineLaunch, the incoming IActivatedEventArgs will be an object of type CommandLineActivatedEventArgs. From this, you can get the CommandLineActivationOperation, and from this in turn, you can get the Arguments string. You also get the CurrentDirectoryPath, which is the directory current when the command-line activation request was made. This is typically not the install location of the app itself, but could be any arbitrary path.
async protected override void OnActivated(IActivatedEventArgs args)
<
switch (args.Kind)
<
case ActivationKind.CommandLineLaunch:
CommandLineActivatedEventArgs cmdLineArgs =
args as CommandLineActivatedEventArgs;
CommandLineActivationOperation operation = cmdLineArgs.Operation;
string cmdLineString = operation.Arguments;
string activationPath = operation.CurrentDirectoryPath;
It’s important to remember that the command-line arguments are supplied by the caller, which means that you have no control over them. You should treat these arguments as untrustworthy and parse them very carefully. They might not have any malicious intent, but they could easily be badly formed, so you need to allow for this.
After the initial checks, you can create a window as normal, and optionally pass in the (parsed and validated) command-line arguments – or some data extracted from the arguments – to that window.
Frame rootFrame = Window.Current.Content as Frame;
if (rootFrame == null)
<
rootFrame = new Frame();
Window.Current.Content = rootFrame;
>
rootFrame.Navigate(typeof(MainPage),
string.Format(«CurrentDirectory=<0>, Arguments=<1>«,
activationPath, cmdLineString));
Window.Current.Activate();
Finally, in your page’s OnNavigatedTo, you can retrieve the payload from the event args, and use the information in any way you like:
protected override void OnNavigatedTo(NavigationEventArgs e)
<
string cmdLineString = e.Parameter as string;
>
When you build and run the app on your dev machine – or when the end user installs your app – the alias is registered. From that point, the user can go to a command line and activate your app.

Note that by “command line,” we mean any common command line mechanism such as cmd.exe, powershell.exe, Windows-R and so on. Here’s a slightly more sophisticated example in which the app implements a custom parser to construct command-payload tuples from the command-line arguments:
protected override void OnActivated(IActivatedEventArgs args)
<
switch (args.Kind)
<
case ActivationKind.CommandLineLaunch:
CommandLineActivatedEventArgs cmdLineArgs =
args as CommandLineActivatedEventArgs;
CommandLineActivationOperation operation = cmdLineArgs.Operation;
string cmdLineString = operation.Arguments;
string activationPath = operation.CurrentDirectoryPath;
Frame rootFrame = Window.Current.Content as Frame;
if (rootFrame == null)
<
rootFrame = new Frame();
Window.Current.Content = rootFrame;
>
ParsedCommands parsedCommands =
CommandLineParser.ParseUntrustedArgs(cmdLineString);
if (parsedCommands != null && parsedCommands.Count > 0)
<
foreach (ParsedCommand command in parsedCommands)
<
switch (command.Type)
<
case ParsedCommandType.SelectItem:
rootFrame.Navigate(typeof(SelectItemPage), command.Payload);
break;
case ParsedCommandType.LoadConfig:
rootFrame.Navigate(typeof(LoadConfigPage), command.Payload);
break;
case ParsedCommandType.Unknown:
rootFrame.Navigate(typeof(HelpPage), cmdLineString);
break;
>
>
>
else
<
rootFrame.Navigate(typeof(MainPage));
>
The app’s logic uses these more structured commands to navigate to different pages and handle the payload in different ways. The point is that you can define whatever argument options and payload rules you like in your app.

A common scenario is testing: You can activate your app with a defined set of values for each test run – for example, to start on a particular page with boundary values set for key items – or to start a game at a particular level, with values set for player attributes, enemy count, damage levels, fuel and weaponry and so on.
If the data you provide is too long or too complex for command-line arguments, you can supply a filename on the command-line which the app can then load. One option is to include such files as content in your package (and most likely strip them out before building your release build). You can also create the files at any time later, so long as you put them in a location to which the app has access. If you want to avoid showing any filepicker UX in your app, the simplest option is to put the files in the install location for the app, which would be somewhere like %userprofile%AppDataLocalPackages

You should also allow for incoming arguments that are badly formed or otherwise unrecognized:

And a reasonable UX here would be to navigate to a page where you show the user the correct usage options:

Also, bear in mind that the UWP platform has a single-instance app model. This means that your app can be running, and you can then continue to execute command-line activation requests at any point thereafter. Each activation will result in a call into OnActivated. This is unlikely to be useful in end-user scenarios of course – but it can be a useful debugging/profiling strategy during development.
Command-line activation of UWAs is just one example of how we’re gradually closing the gaps between traditional Win32 development and UWA development. This feature brings you yet another missing piece from the old world that you can now leverage in your modern apps.


