- Управление групповыми политиками Active Directory (AD GPO)
- Виртуальный сервер на базе Windows
- Что такое групповые политики и зачем они нужны?
- Компоненты GPO
- Оснастка Управление групповыми политиками
- Создание объектов групповой политики
- Поиск объектов групповой политики
- Удаление объекта групповой политики
- Group Policy-Active Directory
- Tested environments
- Using an MST with GPO
- GPO deployments
- Assign the application to a computer:
- Removing products via GPO
- GPO registry template
- Creating GPO Templates
Управление групповыми политиками Active Directory (AD GPO)
В статье описана краткая информация о групповых политиках Active Directory и пример работы с ними на виртуальном сервере с операционной системой Windows Server.
Виртуальный сервер на базе Windows
- Лицензия включена в стоимость
- Тестирование 3-5 дней
- Безлимитный трафик
Что такое групповые политики и зачем они нужны?
Групповая политика — это инструмент, доступный для администраторов, работающих с архитектурой Active Directory. Он позволяет централизованно управлять настройками на клиентских компьютерах и серверах, подключенных к домену, а также обеспечивает простой способ распространения программного обеспечения.
Групповые политики позволяют настраивать параметры для определенного набора пользователей или компьютеров внутри домена Active Directory. Также позволяют указать политики в одном месте для группы и применить к целевому набору пользователей.
Например, можно обеспечить применение стандартного набора настроек и конфигураций для групп пользователей или компьютеров в домене или по запросу. Во всех компаниях как правило есть различные отделы, например отдел системных администраторов, разработчиков, дизайнеров, каждому из отдела необходим свой стандартный набор программного обеспечения, их рабочие компьютеры должны быть сконфигурированы под специальные задачи и нужды. С помощью групповых политик можно создать наборы настроек для конкретных групп пользователей в домене. С помощью Active Directory GPO можно установить и управлять отдельными унифицированными наборами настроек, конкретно для дизайнеров или разработчиков.
Конфигурации для компьютеров или пользователей проще и эффективнее, т.к. расположены в одном месте и не требуют повтора на каждом компьютере.
Компоненты GPO
Существует два компонента групповых политик — серверный компонент и клиентский, т.е. данная структура относится к архитектуре “клиент-сервер”.
Серверный компонент — оснастка Microsoft Management Console (MMC), которая используется для указания настроек групповой политики. MMC может быть использована для создания политик для контроля и управления административными шаблонами и настройками безопасности (скрипты, установка ПО и прочее). Каждый из них называется расширением и в свою очередь каждый из них имеет дочернее расширение, которое разрешает добавление новых компонентов или обновление существующих без возможности затронуть или подвергнуть риску всю политику.
Клиентский компонент интерпретирует и применяет настройки групповой политики для компьютеров пользователей или целевым пользователям. Клиентские расширения — это компоненты, которые запущены на пользовательской системе и несут ответственность за интерпретацию обработки и применения в объекты групповой политики.
Для администрирования GPO используют Group Policy Management Console (GPMC) и Group Policy Management Editor.
Сценарии использования Active Directory GPO:
- Централизованная настройка пакета программ Microsoft Office.
- Централизованная настройка управлением питанием компьютеров.
- Настройка веб-браузеров и принтеров.
- Установка и обновление ПО.
- Применение определенных правил в зависимости от местоположения пользователя.
- Централизованные настройки безопасности.
- Перенаправление каталогов в пределах домена.
- Настройка прав доступа к приложениям и системным программам.
Оснастка Управление групповыми политиками
После установки роли Active Directory Domain Service (AD DS) на контроллер домена на сервере появится оснастка Group Policy Management. Для того, чтобы ее открыть нажмите комбинацию клавиш Win+R и в открывшемся окне введите:

Если оснастку не удается открыть, то возможно по определенным причинам она не установлена. Установить ее можно через стандартное меню Add roles and features в диспетчере сервера, выбрав компонент Group Policy Management.

Оснастка выглядит следующим образом:

Создание объектов групповой политики
Для создания объекта групповой политики перейдите во вкладку Forest -> Domains -> -> Group Policy Objects. С помощью правой кнопки мыши откройте меню и выберете New.

В открывшемся окне в поле Name введите удобное для вас имя групповой политики.

После этого вы увидите созданный объект в списке.

Теперь необходимо настроить созданный объект под конкретные задачи. в качестве примера удалим ссылку Games из меню Start. Для это с помощью правой кнопки мыши откройте меню объекта и выберете пункт Edit.

В редакторе групповых политик перейдите по иерархии User Configuration -> Policies -> Administrative Templates -> Start Menu and Taskbar. Найдите опцию Remove Games link from Start Menu и в контекстном меню выберете пункт Edit.

В открывшемся окне отметьте Enable для включения правила и при необходимости напишите комментарий. Нажмите OK для сохранения изменений.

На этом создание объекта групповой политики закончено.
Поиск объектов групповой политики
Как правило в корпоративных средах большое количество объектов GPO, чтобы было проще найти нужный, оснастка обладает встроенным поиском. Для этого выберете ваш лес и в контекстном меню кликните Search.

Открывшееся окно поиска интуитивно понятно для работы. В первую очередь выберете конкретный домен для поиска, также можно производить поиск во всех доменах сразу. Далее выберете нужный пункт поиска, задайте условие и значение. В примере ниже производился поиск объектов групповой политики, в которых встречается слово Default.

Удаление объекта групповой политики
Если экземпляр GPO больше не нужен, его можно удалить. Выберете объект для удаления и с помощью правой кнопки мыши выберете опцию Delete.
Group Policy-Active Directory
Acrobat products support post deployment configuration via GPO. The Windows Server Group Policy Objects (GPO) and the Active Directory services infrastructure enables IT to automate one-to-many management of computers. Administrators can implement security settings, enforce IT policies, and distribute software across a range of organizational units. With the software installation extension of GPO, you can provide on-demand software installation and automatic repair of applications.
When you need to further configure applications after deployment, you can use ADM templates to propagate the requisite settings across your organization. The Group Policy settings that you create are contained in a GPO. To create a GPO, use the Group Policy Management Console (GPMC), which is available for download from the Microsoft website at https://www.microsoft.com/downloads/details.aspx?FamilyID=0A6D4C24-8CBD-4B35-9272-DD3CBFC81887&displaylang=en.
The product only supports per MACHINE installs. It does not support per-USER installs.
Tested environments
The procedures in this document were tested in the following environments:
Client computers running on OS versions Windows 7, and Windows 8 (32 & 64-bit clients).
Server computers running Windows Server 2012 Enterprise Edition 64-bit.
Using an MST with GPO
If you’ve used the Wizard to create a transform MST file for a custom installation, you apply that MST while installing the application during deployment of the GPO package. At a high level, the steps include:
Create the MST file.
Select the MST via the Modification tab.
Complete the standard GPO package deployment
GPO deployments
Copy the AIP folder and rename it as the patch version; for example, 10.0.1.
Slipstream the patch into the 10.0 MSI.
Open a command prompt and CD to the patch version copy of the AIP.
Create the AIP via msiexec /a [MSI file name] /p [MSP file name]
Add a new package to the original GPO in the standard way without moving existing packages.
Point to the new MSI.
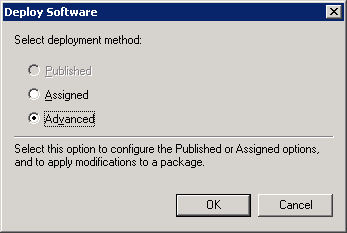
In the Deploy Software dialog, choose Advanced to bring up the properties menu for the package.
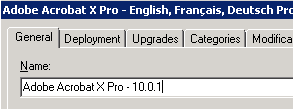
On the Properties page’s General tab, rename the package to
name + version> to distinguish this package. This name will appear in the Add/Remove Programs entry of the client system when the update is installed.
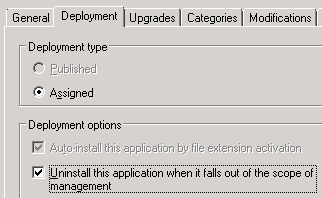
Switch to the Deployment tab.
Optional: If you need to Uninstall this application when it falls out of the scope of management setting, select the Deployment tab and select that checkbox. This will uninstall the application and patch automatically when the scope of the GPO changes or the package is removed from the GPO.
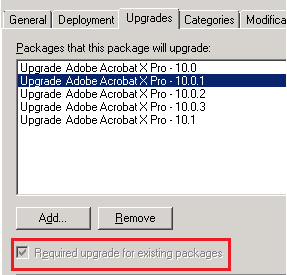
Select the Upgrades tab.
Choose the current package (in this case 10.0).
Choose Add.
In the Add Upgrade Package dialog, do the following:
Select Current GPO.
Select the package you want to upgrade.
Select Package can upgrade over the existing package to ensure that this will be an upgrade instead of uninstall/reinstall.
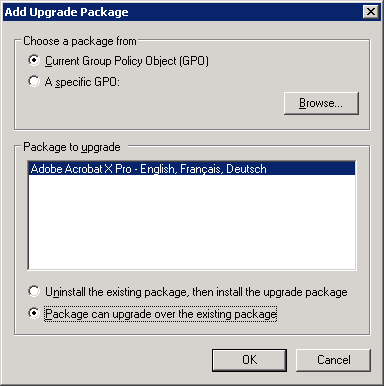
Choose OK.
Review the summary.
Users under a GPO policy will now get the latest update after the group policy refreshes and a computer restart. This procedure can be repeated for all patches.
Assign the application to a computer:
Right-click Group Policy Objects.
Choose New.
In the New GPO dialog box, enter a descriptive name for the new policy.
Choose OK.
In the left-hand panel, expand Group Policy Objects.
Highlight the new policy name you just created.
On the Scope tab, choose Add in the Security Filtering section.
Choose Object Types in the Select User, Computer, or Group dialog box.
Choose Computers in the Object Types dialog box,
Choose OK.
Check the Enter the object name to select text check box in the Select User, Computer, or Group dialog box.
Enter the name of the computer to which you want to deploy the software. (To browse available computer names, choose Advanced > Find Now.)
Repeat this step for all computer names to which you want to deploy software. Assigning the install to users is not supported. You cannot use GPO installs with Control Panel installs.
Choose OK to close the Select User, Computer, or Group dialog box.
In the console’s left panel, right-click the policy name that you initially created.
Choose Edit.
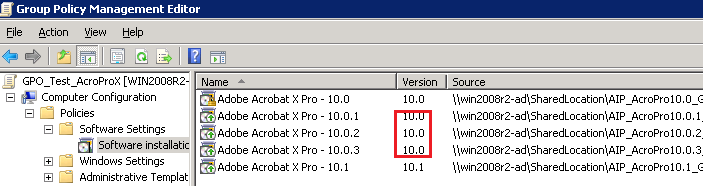
Expand Computer Configuration in the left panel n the Group Policy dialog box.
Expand Software Settings.
Right-click Software installation.
Choose New > Package.
In the Open dialog box, browse to the AIP you created.
Select the MSI file containing the installer you want to deploy.
Choose Open.
In the Deploy Software dialog box, do one of the following:
If you do not plan to apply transforms, select Assigned > OK.
If you plan to apply transforms during installation, select Advanced > OK.
In the Properties dialog box for the package you created:
Choose the Deployment tab.
Select Uninstall this application when it falls out of the scope of management.
If you plan to deploy in multiple languages, choose Advanced.
In the Advanced Deployment Options dialog box, choose Ignore language when deploying this package.
Choose OK.
On the Modifications tab, specify any modification transforms you want to apply when the package is installed by choosing Add and then opening each transform from its network location.
On the Security tab, verify the name(s) of any computer(s) to which you are assigning software.
Choose OK to close the Properties dialog box.
In the Group Policy dialog box, expand Computer Configuration > Administrative Templates > Windows Components.
In the Windows Components folder, select Windows Installer.
Select Always install with elevated privileges.
Select Properties.
In the Always install with elevated privileges Properties dialog box, choose the Setting tab > Enabled > OK.
In the Windows Installer panel of the Group Policy dialog box, right-click Logging.
Select Properties.
Choose Enabled on the Setting tab.
Enter iweaprcv in the Logging text box.
Choose OK.
In the Group Policy dialog box, choose File > Exit.
In the Group Policy Management Console, expand Forests and Domains.
Right-click the Acrobat OU to which you want to link the GPO that you created earlier in this procedure, and then select Link an Existing GPO.
In the Select GPO dialog box > Group Policy objects list > the GPO you created > OK.
The GPO must be propagated to the Active Directory Global Catalog and then to the individual computers. For this reason, allow 5-10 minutes before restarting the computers to which you are assigning the Acrobat software, or plan to restart the client computers twice before the system policies are synchronized.
Removing products via GPO
Removing Acrobat products by using GPOs requires unlinking the Active Directory OU from the GPO currently enabling the software to run.
To remove Acrobat products that are assigned to a computer, unlink the GPO from the OU, or remove the computer from the OU and GPO. The software will be removed the next time the computer restarts.
GPO registry template
Adobe provides two starter templates for Acrobat and Reader. These templates contain a few of the most important settings, but you can use the Preference Reference to extend them further.
DC Continuous Track
Classic Track 2020
Classic Track 2017
Template preferences fall into these broad categories:
General enterprise settings: Features such as disabling updates and setting the default PDF handler.
Security: Application security features such as enhanced security, sandboxing, and JS controls.
TrustManager: Trusting Windows OS security zones as defined in Internet Explorer.
Digital Signatures: Adobe Acrobat Trust List integration.
Creating GPO Templates
You can create GPO templates that will enable configuration of almost any feature as long as you conform to the Microsoft format. For more information, see:
Populate the template fields with information from the Preference Reference.
GPO template: for Accessibility
© Copyright 2020, Adobe Inc.. Last updated on Mar 29, 2021.


