- Adding Users to the Local Admin Group via Group Policy
- Local Administrators Group in Active Directory Domain
- How to Add Domain Users to the Local Administrators via GPO Preferences?
- Managing Local Admins Group Using Restricted Groups
- Using GPO to Add a Single User to the Local Admin Group on a Specific Computer
- Adding Local Users to Local Groups
- Connect to the actual group
- How to open Local Users and Groups on Windows 10
- Open Local Users and Groups on Windows 10
- 1] Using the Computer Management utility
- 2] Directly by using lusrmgr.msc
- Using the Run box
- Using Windows Search box
- Using Windows 10 Command Prompt
- Using Windows PowerShell command line
- Add or remove Users from Group
- Add a User to Group using Command Prompt
- Remove a User from a Group using Command Prompt
- Add a User to Group using PowerShell
- Remove a User from a Group using PowerShell
Adding Users to the Local Admin Group via Group Policy
You can use GPO (Group Policy) to add Active Directory users and groups to the local Administrators group on domain-joined servers and workstations. This allows you to grant local admin privileges on domain computers to technical support staff, HelpDesk team, specific users or other privileged accounts. In this article we’ll show how to manage members of the local Administrator group on domain computers using GPO.
Local Administrators Group in Active Directory Domain
When you joining a computer to an AD domain, the Domain Admins group is automatically added to the local Administrators group, and the Domain User group is added to the local Users group.
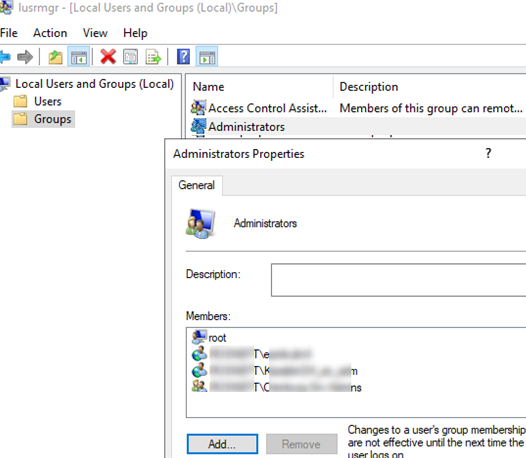
The easiest way to grant local admin privileges on a computer is to add a user or group to the local security group Administrators using the Local users and groups snap-in ( lusrmgr.msc ). However, this method is not convenient if there are a lot of computers and in some time unwanted people may stay the members of the privileged group. If you are using this method of granting local privileges, it is not convenient to control the members of the local admins group on each domain computer.
Microsoft recommends using the following groups to separate administrative privileges in an AD domain:
- Domain Admins are used only on domain controllers;
Suppose, you want to grant local administrator privileges on computers in the specific OU to the group of technical support and HelpDesk employees. Create a new security group in your domain using PowerShell and add the technical support accounts to it:
New-ADGroup munWKSAdmins -path ‘OU=Groups,OU=Munich,OU=DE,DC=woshub,DC=com’ -GroupScope Global –PassThru
Add-AdGroupMember -Identity munWKSAdmins -Members amuller, dbecker, kfisher
Open the domain Group Policy Management console ( GPMC.msc ), create a new policy (GPO) AddLocaAdmins and link it to the OU containing computers (in my example, it is ‘OU=Computers,OU=Munich,OU=DE,DC=woshub,DC=com’).
AD Group Policy provides two methods to manage local groups on domain computers. Let’s study them in turn:
- Local groups management using Group Policy Preferences;
- Restricted Groups.
How to Add Domain Users to the Local Administrators via GPO Preferences?
Group Policy Preferences (GPP) provide the most flexible and convenient way to grant local administrator privileges on domain computers through a GPO.
- Open the AddLocaAdmins GPO you created earlier in the Edit mode;
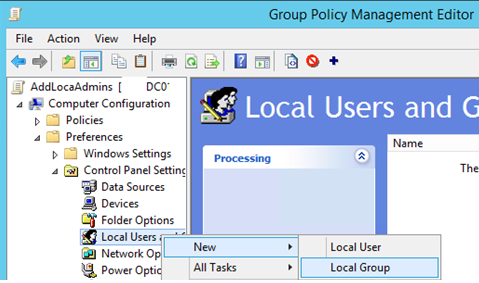
- Go to the following GPO section: Computer Configuration –> Preferences –> Control Panel Settings –> Local Users and Groups;
- Add a new rule (New ->Local Group);
- Select Update in the Action field (it is an important option!);
- In the Group Name dropdown list, select Administrators (Built-in). Even if this group has been renamed on the computer, the settings will be applied to the local Administrators group by its SID — S-1-5-32-544 ;
- Click the Add button and select the groups you want to add to the local administrators group (in our case, it is munWKSAdmins);
You can configure additional (granular) conditions for targeting the policy on the specific computers using the GPO WMI filters or Item-level Targeting.
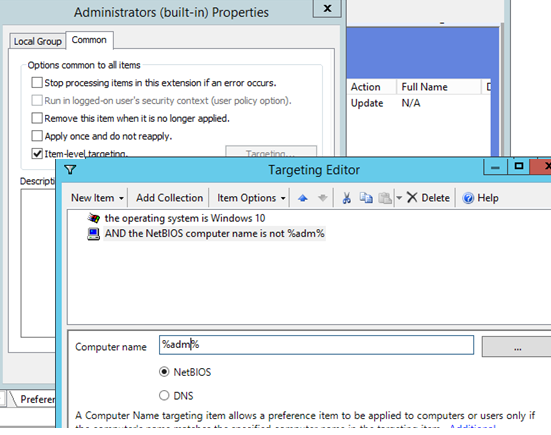
In the second case, go to the Common tab and check the Item-level targeting. Click Targeting. Here you can specify the conditions when the policy will be applied. For example, I want the policy of adding administrator groups to be applied only to Windows 10 computers, which NetBIOS/DNS names don’t contain adm . You can use your own filtering options.
It is not recommended to add individual user accounts to this policy. It is better to use the domain security groups. In this case, to grant administrator privileges to another tech support employee, it is enough to add them to the domain group (you won’t need to edit the GPO).
Managing Local Admins Group Using Restricted Groups
The Restricted Groups policy also allows to add domain groups/users to the local security group on computers. It is an older method of granting local administrator privileges and is used less often now (it is less flexible than that the Group Policy Preferences method).
- Open a GPO in the editing mode;
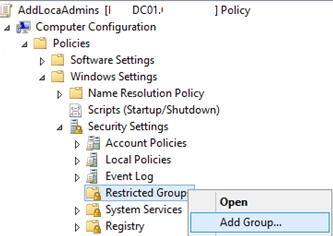
- Expand the section Computer Configuration -> Policies -> Security Settings -> Restricted Groups;
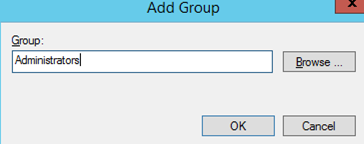
- Select Add Group in the context menu;
- In the next window, type Administrators and then click OK;
- Click Add in the Members of this group section and specify the group you want to add to the local admins;
- Save the changes, apply the policy to user computers and check the local Administrators group. It must contain only the group you have specified in the policy.
Using GPO to Add a Single User to the Local Admin Group on a Specific Computer
Sometimes you may need to grant a single user the administrator privileges on the specific computer. For example, you have several developers who need elevated privileges from time to time to test drivers, debug or install them on their computers. It is not advisable to add them to the group of workstation admins on all computers.
To grant local administrator privileges on the specific computer, you can use the following scheme:
Right in the GPO preference section (Computer Configuration –> Preferences –> Control Panel Settings –> Local Users and Groups) of AddLocalAdmins policy created earlier create a new entry for the Administrators group with the following settings:
- Action: Update
- Group Name: Administrators (Built-in)
- Description: “ Add amuller to the local administrators on the mun-dev-wsk21 computer ”
- Members: Add -> amuller
- In the Common ->Targeting tab, specify this rule: “ the NETBIOS computer name is mun—dev-wks24. ” It means that this policy will be applied only to the computer specified here.
Also, pay attention to the order in which groups are applied on the computer (the Order GPP column). Local group settings are applied from top to bottom (starting from the Order 1 policy).
The first GPP policy (with the “Delete all member users” and “Delete all member groups” settings as described above) removes all users/groups from the local administrator groups and adds the specified domain group. Then the additional computer-specific policies are applied that add the specified user to the local admins. If you want to change the membership order in your Administrators group, use the buttons on top of your GPO Editor console.
Adding Local Users to Local Groups
October 3rd, 2014
Summary : Learn how to use Windows PowerShell to add local users to local groups.
Microsoft Scripting Guy, Ed Wilson, is here. Creating local user objects and local group objects is fine, but to be useful, I need to be able to add users to groups. When working with local accounts, I need to use the ADSI type accelerator to facilitate the way things work.
Note This is the third in a series of three posts. If you haven’t read them already, you might benefit from reading the first two posts before you read this:
Today I add the users to the group.
Connect to the actual group
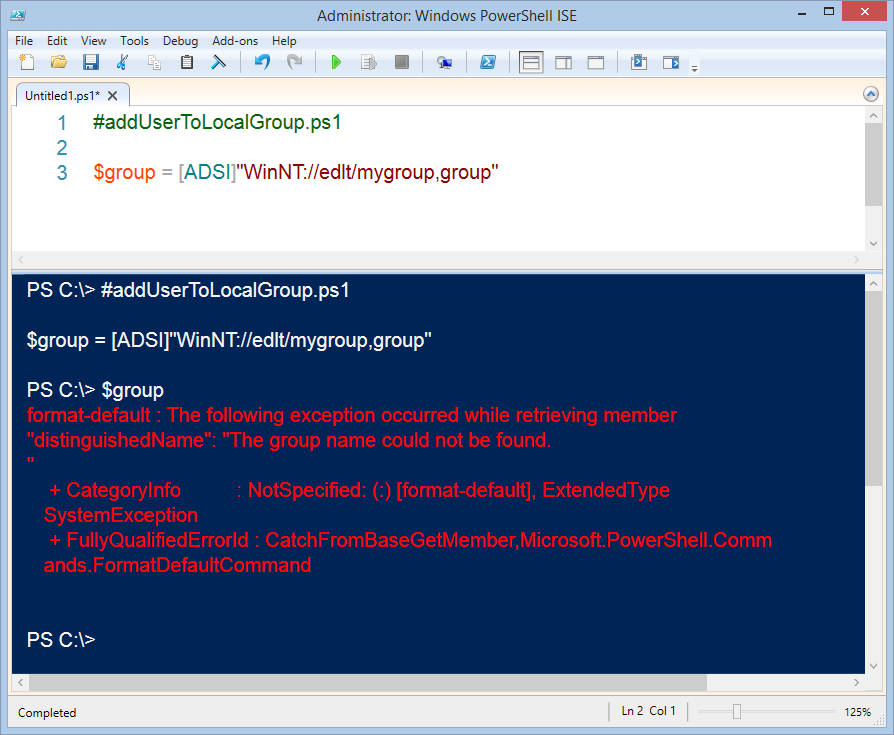
Adding a user to a group is a bit different than creating a local user or a local group. When I add a user to a group, I need to connect to the group itself. I still need to open the Windows PowerShell console or ISE with Admin rights, but this time the connection is a bit more complicated. I still use the [ADSI] type accelerator, I still use WinNT as my provider, and I still specify the name of the computer. But I also must specify the name of the group and provide a hint that I am connecting to a group. Here is the command:
If the group does not exist, the connection will not fail. In fact, it will actually appear to succeed. The error message will only appear when I try to use the object that I stored in the $group variable. This is shown here:
When I have a connection to an existing group, I call the Add method to add my local user object. The Add method accepts what is called an ADsPath—that is the complete path to the user object, including the WinNT provider. Here is an example of the ADsPath to the mred user that I created the other day:
There are four parts: WinNT, the computer name, the user account name are required. The fourth part, user, is a hint that is not really required, but it makes things go a bit faster because it tells the provider the type of object I am looking for. Here is the complete Add command:
That is it. Two lines for the complete script:
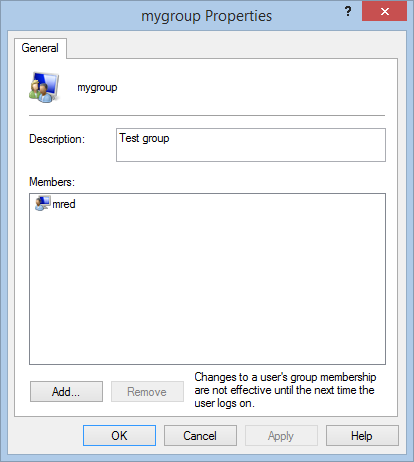
I open the group in the computer management console, and sure enough, the user is now a member of the group.
That is all there is to using Windows PowerShell to add local users to local groups. Join me tomorrow when I will talk about how to make Windows PowerShell Help always display examples.
How to open Local Users and Groups on Windows 10
Apart from what is visible to you on the login screen, Windows 10 tends to create several users and groups in the background to carry out several tasks on a computer. However, they are not visible to a normal user and are logged in in the background and serve a great deal in permission structuring. Let us learn how to see and to manage Local Users and groups on a Windows 10/8/7 on the computer.
Open Local Users and Groups on Windows 10
The following methods will help you to open and view Local Users and Groups on Windows 10:
- Using the Computer Management utility
- Directly by using lusrmgr.msc.
Let us look at the procedure in detail. We will also take a look at how to add or remove Users from a Group.
1] Using the Computer Management utility
Open the WinX menu and select Computer Management.
From the left side navigation panel, select Local Users and Groups under the expanded list of Computer Management (Local).
You will see two folders here:
- Users and
- Groups.
Expanding each will give you the required details.
2] Directly by using lusrmgr.msc
To open Local Users and Groups window, you have to invoke its process, which is called lusrmgr.msc, and you can do this in the following four ways.
Using the Run box
Hit the Windows Key + R button combination on your keyboard.
Type in lusrmgr.msc and hit Enter.
It will open the Local Users and Groups window.
Using Windows Search box
Hit the Windows Key + S button combination on your keyboard. It will launch the Windows Search Box.
Search for lusrmgr.msc and hit Enter.
The Local Users and Group window will now be open.
Using Windows 10 Command Prompt
Open Windows Command Prompt and execute the following command:
You will arrive at your destination window.
Using Windows PowerShell command line
Open Windows PowerShell and execute the following command:
It will open at your destination window.
Add or remove Users from Group
To add or remove Users from a Group:
- Open the Groups folder
- Select the Group
- Double-click on the group
- Under the Members box, select the user you want to delete.
- Click on the Delete button.
To add a User, click the Add button and follow the process.
Add a User to Group using Command Prompt
You need to execute the following command:
Replace GROUP and USER with the actual names.
Remove a User from a Group using Command Prompt
You need to execute the following command:
Replace GROUP and USER with the actual names.
Add a User to Group using PowerShell
You need to execute the following command:
Replace GROUP and USER with the actual names.
Remove a User from a Group using PowerShell
You need to execute the following command:
Replace GROUP and USER with the actual names.
I hope this helps.
Windows 10 Home user? These links may interest you:
- Use freeware Lusrmgr tool to access Local User and Group Management in Windows 10 Home
- Open and Manage Local User and Group Management in Windows 10 Home using Command Prompt or PowerShell.
