- Advanced startup options (including safe mode)
- Repair Your Computer
- Safe Mode
- Boot Parameters to Enable Debugging
- Boot Parameters to Debug the Boot Process in Windows
- See also
- Дополнительные параметры загрузки (включая безопасный режим)
- Восстановление системы
- Безопасный режим
- What are Boot Advanced Options in MSCONFIG in Windows 10?
- Boot Advanced Options in MSCONFIG
- Number of Processors
- PCI Lock
- Debug
- Windows: как перейти в безопасный режим?
- Что такое безопасный режим
- Как загрузить Windows 7 в безопасном режиме
Advanced startup options (including safe mode)
The Advanced Boot Options screen lets you start Windows in advanced troubleshooting modes. You can access the menu by turning on your computer and pressing the F8 key before Windows starts.
Some options, such as safe mode, start Windows in a limited state, where only the bare essentials are started. If a problem doesn’t reappear when you start in safe mode, you can eliminate the default settings and basic device drivers and services as possible causes. Other options start Windows with advanced features intended for use by system administrators and IT professionals. For more information, go to the Microsoft website for IT professionals.
Repair Your Computer
Shows a list of system recovery tools you can use to repair startup problems, run diagnostics, or restore your system. This option is available only if the tools are installed on your computer’s hard disk. If you have a Windows installation disc, the system recovery tools are located on that disc.
Safe Mode
Starts Windows with a minimal set of drivers and services.
To start in safe mode:
Remove all floppy disks, CDs, and DVDs from your computer, and then restart your computer. Click the Start button , click the arrow next to the Shut Down button (or the arrow next to the Lock button), and then click Restart.
Do one of the following:
If your computer has a single operating system installed, press and hold the F8 key as your computer restarts. You need to press F8 before the Windows logo appears. If the Windows logo appears, you’ll need to try again by waiting until the Windows logon prompt appears, and then shutting down and restarting your computer.
If your computer has more than one operating system, use the arrow keys to highlight the operating system you want to start in safe mode, and then press F8.
On the Advanced Boot Options screen, use the arrow keys to highlight the safe mode option you want, and then press Enter.
Log on to your computer with a user account that has administrator rights.
Safe Mode with Networking. Starts Windows in safe mode and includes the network drivers and services needed to access the Internet or other computers on your network.
Safe Mode with Command Prompt. Starts Windows in safe mode with a command prompt window instead of the usual Windows interface. This option is intended for IT professionals and administrators.
Enable Boot Logging. Creates a file, ntbtlog.txt, that lists all the drivers that are installed during startup and that might be useful for advanced troubleshooting.
Enable low-resolution video (640×480). Starts Windows using your current video driver and using low resolution and refresh rate settings. You can use this mode to reset your display settings. For more information, see Change your screen resolution.
Last Known Good Configuration (advanced). Starts Windows with the last registry and driver configuration that worked successfully.
Directory Services Restore Mode. Starts Windows domain controller running Active Directory so that the directory service can be restored. This option is intended for IT professionals and administrators.
Debugging Mode. Starts Windows in an advanced troubleshooting mode intended for IT professionals and system administrators.
Disable automatic restart on system failure. Prevents Windows from automatically restarting if an error causes Windows to fail. Choose this option only if Windows is stuck in a loop where Windows fails, attempts to restart, and fails again repeatedly.
Disable Driver Signature Enforcement. Allows drivers containing improper signatures to be installed.
Start Windows Normally. Starts Windows in its normal mode.
Boot Parameters to Enable Debugging
When a kernel debugging connection is established, the system gives a kernel debugger control over its execution. Also, when a bug check occurs or a kernel-mode program communicates with a debugger, the computer waits for a response from a kernel debugger before it continues.
Setting up a network debugging manually is a complex and error prone process. To set up network debugging automatically, see Setting Up KDNET Network Kernel Debugging Automatically. Using the KDNET utility is strongly recommended for all debugger users.
For information on manual setup of a network connection, see Setting Up Kernel-Mode Debugging over a Network Cable Manually.
Before setting BCDEdit options you might need to disable or suspend BitLocker and Secure Boot on the computer.
You can use the bcdedit command to view the current debugger boot entries and to change their settings. For more details, see BCDEdit /debug and BCDEdit /dbgsettings.
Boot Parameters to Debug the Boot Process in Windows
To enable boot debugging, use the BCDEdit /bootdebug command and specify the appropriate boot component. If you wish to perform kernel debugging after Windows starts, use the BCDEdit /debug command as well. You must also select a debugging connection, just as in normal kernel debugging. For more details, see BCDEdit /bootdebug.
See also
For information about Windows debugging tools, see Windows Debugging.
For information about setting up and configuring a kernel-mode debugging session, see Setting Up Kernel-Mode Debugging Manually and Setting Up KDNET Network Kernel Debugging Automatically.
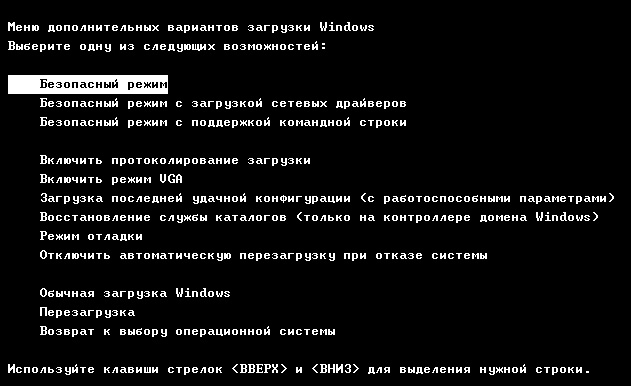
Дополнительные параметры загрузки (включая безопасный режим)
На экране Дополнительные варианты загрузки вы можете запустить Windows в расширенном режиме устранения неполадок. Вы можете открыть меню, включив компьютер и нажав клавишу F8 перед запуском Windows.
Некоторые параметры, такие как безопасный режим, запускают Windows в ограниченном состоянии, когда запускаются только основные компоненты. Если при запуске в безопасном режиме проблема не возникает, то из списка возможных причин неполадки можно исключить параметры, используемые по умолчанию, основные драйверы устройств и службы. Другие варианты позволяют запустить Windows с дополнительными функциями, предназначенными для системных администраторов и ИТ-специалистов. Дополнительные сведения можно найти на веб-сайте Майкрософт для специалистов по ИТ.
Восстановление системы
Отображает список средств восстановления системы, которые можно использовать для устранения проблем, возникающих при запуске Windows, а также для запуска средств диагностики или восстановления системы. Этот вариант доступен, только если эти средства установлены на жесткий диск компьютера. Если у вас есть установочный диск Windows, то средства восстановления системы находятся на нем.
Безопасный режим
Запуск Windows с минимальным набором драйверов и служб.
Чтобы запустить Windows в безопасном режиме, выполните указанные ниже действия.
Удалите все гибкие диски, компакт-диски и DVD-диски с компьютера, а затем перезагрузите компьютер. Нажмите кнопку «Пуск» , щелкните стрелку рядом с кнопкой Завершение работы (или стрелку рядом с кнопкой Блокировать), а затем выберите Перезагрузка.
Выполните одно из следующих действий:
Если на компьютере установлена одна операционная система, во время перезапуска компьютера нажмите и удерживайте клавишу F8. Необходимо нажать клавишу F8 до появления логотипа Windows. Если отобразился логотип Windows, необходимо повторить попытку; для этого дождитесь появления экрана входа в систему Windows, а затем завершите работу компьютера и перезапустите его.
Если на компьютере установлено несколько операционных систем, с помощью клавиш со стрелками выберите операционную систему, которую вы хотите запустить в безопасном режиме, а затем нажмите клавишу F8.
На экране Дополнительные варианты загрузки с помощью клавиш со стрелками выберите необходимый вариант безопасного режима, а затем нажмите клавишу ВВОД.
Войдите в систему, используя учетную запись пользователя с правами администратора.
Безопасный режим с загрузкой сетевых драйверов. Запуск Windows в безопасном режиме, а также загрузка сетевых драйверов и служб, необходимых для доступа к Интернету или другим компьютерам в локальной сети.
Безопасный режим с поддержкой командной строки. Запуск Windows в безопасном режиме с окном командной строки вместо обычного интерфейса Windows. Этот вариант предназначен для ИТ-специалистов и администраторов.
Вести журнал загрузки. Создает файл ntbtlog.txt, в который заносятся все драйверы, установленные во время запуска. Эта информация может оказаться полезной для расширенной диагностики.
Включение видеорежима с низким разрешением (640 × 480). Запуск Windows с использованием текущего видеодрайвера и низкими значениями разрешения и частоты обновления изображения. Этот режим можно использовать для сброса параметров дисплея. Дополнительные сведения см. в статье «Изменение разрешения экрана».
Последняя удачная конфигурация (дополнительно). Запуск Windows с использованием последней успешно работавшей конфигурации реестра и драйверов.
Режим восстановления служб каталогов. Запуск контроллера домена Windows, на котором выполняется Active Directory, для восстановления службы каталогов. Этот вариант предназначен для ИТ-специалистов и администраторов.
Режим отладки. Запуск Windows в режиме расширенной диагностики, предназначенном для ИТ-специалистов и системных администраторов.
Отключить автоматическую перезагрузку при отказе системы. Запрет автоматического перезапуска Windows в случае сбоя в работе системы. Этот вариант следует выбирать только в том случае, если Windows вошла в цикл, когда сбой в работе системы вызывает перезапуск, и система продолжает перезапускаться снова и снова.
Отключить обязательную проверку подписи драйверов. Позволяет устанавливать драйверы, содержащие неправильные подписи.
Обычная загрузка Windows. Запуск Windows в обычном режиме.
What are Boot Advanced Options in MSCONFIG in Windows 10?
MSConfig or System Configuration Utility is an inbuilt tool in Windows that allows you to manage startup items, boot options, Services & boot in Safe Mode, etc. Under the boot section, there is an Advanced Options button. This section gives you access to configure options such as the number of processors, the amount of memory, debug, and Global Debug settings. Keep in mind that these options are last-resort choices to diagnose your systems for advanced users. In this post, we will get into details about these Boot Advanced Options in MSCONFIG in Windows 10.
Boot Advanced Options in MSCONFIG
There is one thing you need to understand clearly. The advanced boot section of System Configuration Utility or MSCONFIG is built for troubleshooting. However, the confusion occurs when the end-user finds this option. We strongly urge you to keep these settings at their default values and not change them.
Number of Processors
Open Task Manager and switch to the Performance tab. Take a note of the number of CPU cores and memory.
Now, type MSCONFIG in the Run prompt, and press the Enter key. Switch to Boot section, and click on the Advanced options button
Check the number of processors box and select anything less than the maximum available in the dropdown. The maximum figure you see will be the same as what you saw in the Task Manager.
Reboot, and then check how many processors, and amount of memory is available for the OS.
I am sure you will experience a slower performance compared to what you had when computer boots under default configuration. While I am not sure why these settings are there, but I am guessing it helps developers to figure out how their application performs under low hardware configuration without changing the actual hardware configuration. The same can apply for Windows.
Now let’s take a look at the other sections:
PCI Lock
PCI is a hardware bus to add components to a computer. The BIOS or OS can determine the resource requirement and automatically assign it, so there is no conflict. In earlier days, it was useful as Windows used to take this over.
From what I have seen in forums, it is best to keep it unchecked, unless you are having issues with connected hardware. Windows can take this over, but we haven’t head about except that when checked, it results in a BSOD.
If you have checked PCI Lock, and are getting a BSOD, make sure to boot into safe mode, and then disable the PCI lock using msconfig. You may need a bootable USB device to get into the Advanced Boot configuration.
Debug
It is a developer option where to debug Kernel, debugging tools are connected to the OS. Again it is a non-consumer option and should be left as is. When you check Debug, you can configure the rest of the options, including Debug port, Channel, USB target name, and Baud rate. When using this, you will have to disable or suspend BitLocker and Secure Boot on the computer.
There is a lot that can be done using the bcdedit tool in Windows 10, which also offers /dbgsettings as one of the options. You can use it to disable driver signature, enable or disable data execution, and so on.
You will also see other settings for Maximum memory, Global debug settings, etc.
There is one thing clear here. These are not consumer options, and there is no way you can use them to speed up computers. These Advanced options are debugging tools, and they have been there as long as I can remember. There are many such tools in Windows, and unless you are into hardware debugging, do not use it.
I hope the post was easy to understand, and you were able to figure out why you, as a consumer, should not be using the Boot Advanced Options in MSCONFIG in Windows 10.
Windows: как перейти в безопасный режим?
Приветствую Вас, уважаемые читатели! В настоящее время на большинстве настольных ПК и ноутбуках установлена операционная система Windows. И наверняка многие из Вас сталкивались с проблемой, что она (Windows) не загружается. Но не все знают, что решить проблему загрузки операционной системы можно в безопасном режиме. Сегодня мы и поговорим о том как загрузиться в безопасном режиме и что это вообще за такой режим.
Что такое безопасный режим
Безопасный режим в Windows (Safe Mode) — это специальный режим работы системы, который служит для устранения неполадок, вызванных некорректной работной программных и аппаратных ресурсов персонального компьютера (ПК). В безопасном режиме Windows загружает минимальный набор драйверов устройств и системных служб.
Поэтому всякий раз, когда у вас не получается загрузить Windows в следствии заражения компьютерными вирусами или после установки нового драйвера и программного обеспечения, то вы всегда можете загрузить ПК в безопасном режиме и устранить неисправности. Загрузившись в Safe Mode у вас появится возможность просканировать компьютер на наличие вирусов, удалить драйвер или программу после установки которых Windows перестала загружаться, либо вообще выполнить откат системы. Обычно этих действий хватает для восстановления работоспособности операционной системы. Кстати о том как удалять программы в безопасном режиме вы можете почитать в этом посте.
Как загрузить Windows 7 в безопасном режиме
Чтобы загрузить систему в безопасном режиме достаточно несколько раз нажать клавишу F8 при загрузке компьютера. В случае успеха на экране появится меню выбора вариантов загрузки:
Примечание: на некоторых компьютерах если при загрузке нажать клавишу F8 может появиться меню выбора устройства с которого производить загрузку. В этом случае выбираете нужный жесткий диск на котором установлена операционная система, нажимаете Enter и продолжаете нажимать F8. После этого появиться экран с меню выбора дополнительных вариантов загрузки.
В меню выбора способов загрузки есть несколько вариантов:
- Безопасный режим (Safe Mode) — загрузка операционной системы Windows только с основными драйверами и службами необходимыми для запуска системы.
Далее с помощью клавиш со стрелками выбираете «Безопасный режим» и нажимаете клавишу «Enter». В случае необходимости можно выбрать «Безопасный режим с поддержкой командной строки» или «Безопасный режим с загрузкой сетевых драйверов» и также нажать «Enter».
После этого система загрузиться в безопасном режиме — с черным фоном рабочего стола и надписью «Безопасный режим» в углах экрана. Далее проводите необходимые операции: делаете откат системы, удаляете конфликтные драйверы или программы и другие действия.
На этом все! До новых встреч на страницах блога.


