- Настройка VLAN интерфейсов в Windows 10 и Windows Server 2016
- Настройка VLAN интерфейсов в Windows 10
- Настройка VLAN в Windows 10 на сетевой карте Realtek
- Настройка VLAN на сетевом адаптере Intel Ethernet
- Несколько VLAN в Windows 10 с помощью Hyper-V
- Настройка нескольких VLAN в Windows Server 2016
- Advanced Network Options in Windows
- Switch Embedded Teaming with Docker Networks
- Set the VLAN ID for a Network
- Specify OutboundNAT Policy for a Network
- Specify the Name of a Network to the HNS Service
- Bind a Network to a Specific Network Interface
- Specify the DNS Suffix and/or the DNS Servers of a Network
- Tips & Insights
- HNS requires that IPv6 is enabled on container host machines
- Linux Containers on Windows
- Moby Linux VMs use DockerNAT switch with Docker for Windows (a product of Docker CE)
- To use DHCP for IP assignment on a virtual container host enable MACAddressSpoofing
- Creating multiple transparent networks on a single container host
- Remember to specify —subnet and —gateway when using static IP assignment
- DHCP IP assignment not supported with L2Bridge networks
- Networks that leverage external vSwitch must each have their own network adapter
- IP assignment on stopped vs. running containers
- Existing vSwitch (not visible to Docker) can block transparent network creation
- Windows Server 2016 Work-arounds
- Multiple NAT networks on WS2016 Container Host
- Docker Compose
Настройка VLAN интерфейсов в Windows 10 и Windows Server 2016
В этой статье мы покажем, как настроить тегированный интерфейс VLAN в Windows 10 и Windows Server 2016 (2019/2012R2). Стандарт VLAN (Virtual LAN) описан в 802.1Q и предполагает маркировку трафика с помощью тегов (vlanid), необходимую для отнесения пакета к той или иной виртуальной сети. VLAN используются для разделения и сегментирования сетей, ограничения широковещательных доменов и изоляции сегментов сети для повышения безопасности. В Windows вы можете настроить несколько различных логических сетевых интерфейсов с разными VLAN на одном физическом интерфейсе с помощью различных средств.
Для использования VLAN необходимо соответствующим образом перенастроить порт коммутатора, куда подключен ваш компьютер/сервер. Порт должен быть переведен из режима access в режим транк. По умолчанию на транк порту разрешены все VLAN, но вы можете указать список номеров разрешенных VLAN(от 1до 4094), которые доступны на данном порту коммутатора Ethernet.
Настройка VLAN интерфейсов в Windows 10
В десктопных версиях Windows нет встроенный поддержки VLAN. Только в самых последних версиях Windows 10 можно установить один тег VLAN для сетевого интерфейса. Для этого используется командлет PowerShell для управления сетевыми настройками. Например:
Set-NetAdapter –Name «Ethernet1» -VlanID 50
Однако есть два способа создать отдельный виртуальный сетевой интерфейс с определенным VLAN ID в Windows 10: с помощью специального драйвера и утилиты от производителя вашей сетевой карты и с помощью Hyper-V.
Настройка VLAN в Windows 10 на сетевой карте Realtek
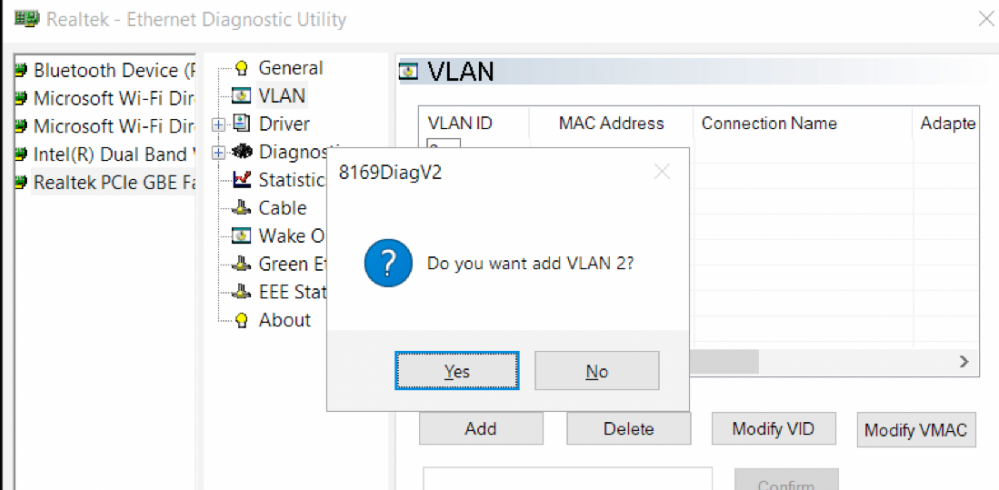
Для сетевых карт Realtek вы можете настроить несколько виртуальных сетевых адаптеров с различными VLAN при помощи специальной утилиты от вендора — Realtek Ethernet Diagnostic Utility. В описании на сайте производителя убедитесь, что ваш сетевой контроллер Realtek поддерживает настройку VLAN.
Скачайте и установите последнюю версию сетевого драйвера для вашего адаптера Realtek и запустите утилиту Ethernet Diagnostic Utility.
Перейдите в раздел VLAN, нажмите кнопку Add и добавьте нужный VLAN ID. После этого в Windows появится новое сетевое подключение.
После создания сетевых интерфейсов для ваших VLAN вы можете задать на них нужный IP из соответствующей подсети.
Настройка VLAN на сетевом адаптере Intel Ethernet
У Intel для настройки VLAN есть собственная утилита Intel Advanced Network (Intel® ANS) VLAN. Ваша модель сетевого адаптера, естественно, должна поддерживать технологию VLAN (например, VLAN не поддерживаются для карт Intel PRO/100 и PRO/1000). При установке драйвера выбейте опции Intel PROSet for Windows Device Manager и Advanced Network Services.
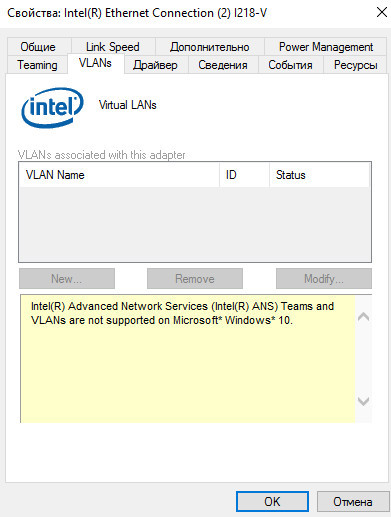
После этого в свойствах физического сетевого адаптера Intel появляется отдельная вкладка VLANs, где можно создать несколько VLAN интерфейсов.
Однако этот способ работает во всех предыдущих версиях Windows (до Windows 10 1809). В последних версиях Windows 10 на вкладке присутствует надпись:
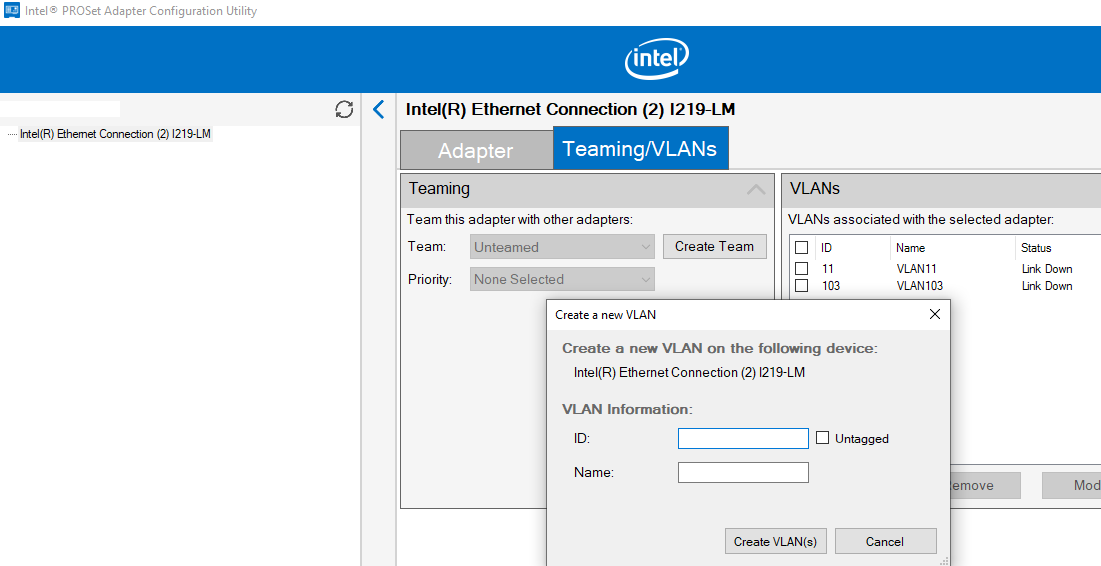
Для последних версий Windows 10 недавно Intel выпустила обновленный драйвера сетевых адаптеров и утилиту Intel PROSet Adapter Configuration Utility. Скачайте и установите последнюю версию драйвера Intel и эту утилиту.
Запустите ее, перейдите на вкладку Teaming/VLANs, нажмите кнопку New и укажите имя сетевого интерфейса и его VLANID.
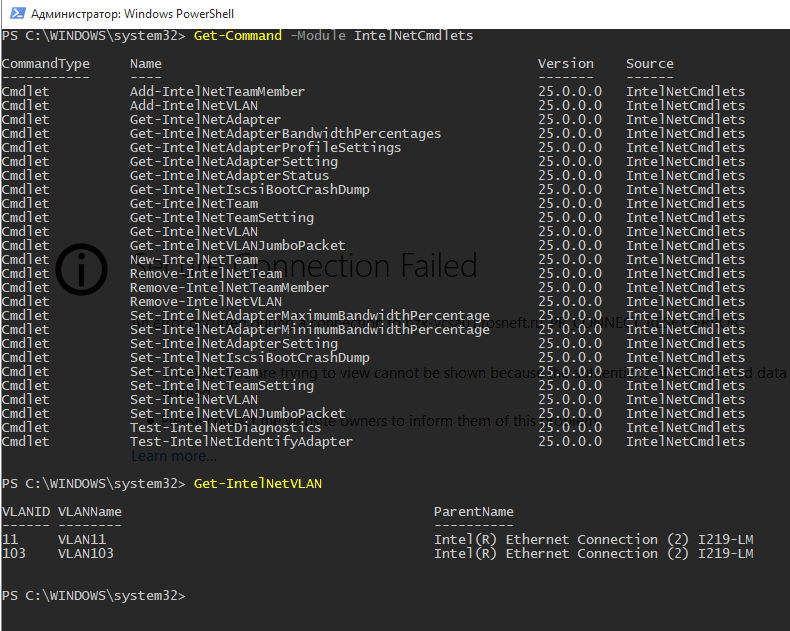
Кроме того, вы можете добавить/удалить/просмотреть список VLAN с помощью специальных PowerShell командлетов из модуля IntelNetCmdlets:
Несколько VLAN в Windows 10 с помощью Hyper-V
Есть еще один способ создать несколько VLAN в Windows 10 с помощью Hyper-V (доступен только в Pro и Enterprise). Для этого нужно установить компоненты Hyper-V:
Enable-WindowsOptionalFeature -Online -FeatureName:Microsoft-Hyper-V -All
Создайте новый виртуальный коммутатор через Hyper-V Manager или с помощью команд PowerShell (см. пример в статье о настройке Hyper-V Server).
Затем для каждого VLAN, который нужно создать, выполнить команды:
Add-VMNetworkAdapter -ManagementOS -Name VLAN50 -StaticMacAddress “11-22-33-44-55-AA” -SwitchName vSwitch2
Set-VMNetworkAdapterVlan -ManagementOS -VMNetworkAdapterName VLAN50 -Access -VlanId 50
В результате у вас в системе появится сетевой адаптер с нужным VLAN.
Настройка нескольких VLAN в Windows Server 2016
В Windows Server 2016 можно настроить VLAN с помощью встроенных средств, устанавливать специализированные драйвера или утилиты не нужно. Попробуем настроить несколько разных VLAN на одной физической сетевой карте в Windows Server 2016 с помощью NIC Teaming.
Advanced Network Options in Windows
Several network driver options are supported to take advantage of Windows-specific capabilities and features.
Switch Embedded Teaming with Docker Networks
Applies to all network drivers
You can take advantage of Switch Embedded Teaming when creating container host networks for use by Docker by specifying multiple network adapters (separated by commas) with the -o com.docker.network.windowsshim.interface option.
Set the VLAN ID for a Network
Applies to transparent and l2bridge network drivers
To set a VLAN ID for a network, use the option, -o com.docker.network.windowsshim.vlanid= to the docker network create command. For instance, you might use the following command to create a transparent network with a VLAN ID of 11:
When you set the VLAN ID for a network, you are setting VLAN isolation for any container endpoints that will be attached to that network.
Ensure that your host network adapter (physical) is in trunk mode to enable all tagged traffic to be processed by the vSwitch with the vNIC (container endpoint) port in access mode on the correct VLAN.
Specify OutboundNAT Policy for a Network
Ordinarily, when you create a l2bridge container network using docker network create , container endpoints do not have an HNS OutboundNAT policy applied, resulting in containers being unable to reach the outside world. If you are creating a network, you can use the -o com.docker.network.windowsshim.enable_outboundnat=
If there is a set of destinations (e.g. container to container connectivity is needed) for where we don’t want NAT’ing to occur, we also need to specify an ExceptionList:
Specify the Name of a Network to the HNS Service
Applies to all network drivers
Ordinarily, when you create a container network using docker network create , the network name that you provide is used by the Docker service but not by the HNS service. If you are creating a network, you can specify the name that it is given by the HNS service using the option, -o com.docker.network.windowsshim.networkname= to the docker network create command. For instance, you might use the following command to create a transparent network with a name that is specified to the HNS service:
Bind a Network to a Specific Network Interface
Applies to all network drivers except ‘nat’
To bind a network (attached through the Hyper-V virtual switch) to a specific network interface, use the option, -o com.docker.network.windowsshim.interface= to the docker network create command. For instance, you might use the following command to create a transparent network which is attached to the «Ethernet 2» network interface:
Note: The value for com.docker.network.windowsshim.interface is the network adapter’s Name, which can be found with:
Specify the DNS Suffix and/or the DNS Servers of a Network
Applies to all network drivers
Use the option, -o com.docker.network.windowsshim.dnssuffix= to specify the DNS suffix of a network, and the option, -o com.docker.network.windowsshim.dnsservers= to specify the DNS servers of a network. For example, you might use the following command to set the DNS suffix of a network to «example.com» and the DNS servers of a network to 4.4.4.4 and 8.8.8.8:
See this article for more information.
Tips & Insights
Here’s a list of handy tips and insights, inspired by common questions on Windows container networking that we hear from the community.
HNS requires that IPv6 is enabled on container host machines
As part of KB4015217 HNS requires that IPv6 is enabled on Windows container hosts. If you’re running into an error such as the one below, there’s a chance that IPv6 is disabled on your host machine.
We’re working on platform changes to automatically detect/prevent this issue. Currently the following workaround can be used to ensure IPv6 is enabled on your host machine:
Linux Containers on Windows
NEW: We are working to make it possible to run Linux and Windows containers side-by-side without the Moby Linux VM. See this blog post about Linux Containers on Windows (LCOW) for details. Here is how to get started.
NOTE: LCOW is deprecating the Moby Linux VM, and it will utilize the default HNS «nat» internal vSwitch.
Moby Linux VMs use DockerNAT switch with Docker for Windows (a product of Docker CE)
Docker for Windows (the Windows driver for the Docker CE engine) on Windows 10 will use an internal vSwitch named ‘DockerNAT’ to connect Moby Linux VMs to the container host. Developers using Moby Linux VMs on Windows should be aware that their hosts are using the DockerNAT vSwitch rather than the «nat» vSwitch that is created by the HNS service (which is the default switch used for Windows containers).
To use DHCP for IP assignment on a virtual container host enable MACAddressSpoofing
If the container host is virtualized, and you wish to use DHCP for IP assignment, you must enable MACAddressSpoofing on the virtual machine’s network adapter. Otherwise, the Hyper-V host will block network traffic from the containers in the VM with multiple MAC addresses. You can enable MACAddressSpoofing with this PowerShell command:
If you are running VMware as your hypervisor, you will need to enable promiscuous mode for this to work. Details can be found here
Creating multiple transparent networks on a single container host
If you wish to create more than one transparent network you must specify to which (virtual) network adapter the external Hyper-V Virtual Switch should bind. To specify the interface for a network, use the following syntax:
Remember to specify —subnet and —gateway when using static IP assignment
When using static IP assignment, you must first ensure that the —subnet and —gateway parameters are specified when the network is created. The subnet and gateway IP address should be the same as the network settings for the container host — i.e. the physical network. For example, here’s how you might create a transparent network then run an endpoint on that network using static IP assignment:
DHCP IP assignment not supported with L2Bridge networks
Only static IP assignment is supported with container networks created using the l2bridge driver. As stated above, remember to use the —subnet and —gateway parameters to create a network that’s configured for static IP assignment.
Networks that leverage external vSwitch must each have their own network adapter
Note that if multiple networks which use an external vSwitch for connectivity (e.g. Transparent, L2 Bridge, L2 Transparent) are created on the same container host, each of them requires its own network adapter.
IP assignment on stopped vs. running containers
Static IP assignment is performed directly on the container’s network adapter and must only be performed when the container is in a STOPPED state. «Hot-add» of container network adapters or changes to the network stack is not supported (in Windows Server 2016) while the container is running.
Existing vSwitch (not visible to Docker) can block transparent network creation
If you encounter an error in creating a transparent network, it is possible that there is an external vSwitch on your system which was not automatically discovered by Docker and is therefore preventing the transparent network from being bound to your container host’s external network adapter.
When creating a transparent network, Docker creates an external vSwitch for the network then tries to bind the switch to an (external) network adapter — the adapter could be a VM Network Adapter or the physical network adapter. If a vSwitch has already been created on the container host, and it is visible to Docker, the Windows Docker engine will use that switch instead of creating a new one. However, if the vSwitch which was created out-of-band (i.e. created on the container host using HYper-V Manager or PowerShell) and is not yet visible to Docker, the Windows Docker engine will try create a new vSwitch and then be unable to connect the new switch to the container host external network adapter (because the network adapter will already be connected to the switch that was created out-of-band).
For example, this issue would arise if you were to first create a new vSwitch on your host while the Docker service was running, then try to create a transparent network. In this case, Docker would not recognize the switch that you created and it would create a new vSwitch for the transparent network.
There are three approaches for solving this issue:
- You can of course delete the vSwitch that was created out-of-band, which will allow docker to create a new vSwitch and connect it to the host network adapter without issue. Before choosing this approach, ensure that your out-of-band vSwitch is not being used by other services (e.g. Hyper-V).
- Alternatively, if you decide to use an external vSwitch that was created out-of-band, restart the Docker and HNS services to make the switch visible to Docker.
- Another option is to use the ‘-o com.docker.network.windowsshim.interface’ option to bind the transparent network’s external vSwitch to a specific network adapter which is not already in use on the container host (i.e. a network adapter other than the one being used by the vSwitch that was created out-of-band). The ‘-o’ option is described further in the Creating multiple transparent networks on a single container host section of this document.
Windows Server 2016 Work-arounds
Although we continue to add new features and drive development, some of these features will not be back-ported to older platforms. Instead, the best plan of action is to «get on the train» for latest updates to Windows 10 and Windows Server. The section below lists some work-arounds and caveats which apply to Windows Server 2016 and older versions of Windows 10 (i.e. before 1704 Creators Update)
Multiple NAT networks on WS2016 Container Host
The partitions for any new NAT networks must be created under the larger internal NAT networking prefix. The prefix can be found by running the following command from PowerShell and referencing the «InternalIPInterfaceAddressPrefix» field.
For example, the host’s NAT network internal prefix might be, 172.16.0.0/16. In this case, Docker can be used to create additional NAT networks as long as they are a subset of the 172.16.0.0/16 prefix. For example, two NAT networks could be created with the IP prefixes 172.16.1.0/24 (gateway, 172.16.1.1) and 172.16.2.0/24 (gateway, 172.16.2.1).
The newly created networks can be listed using:
Docker Compose
Docker Compose can be used to define and configure container networks alongside the containers/services that will be using those networks. The Compose ‘networks’ key is used as the top-level key in defining the networks to which containers will be connected. For example, the syntax below defines the preexisting NAT network created by Docker to be the ‘default’ network for all containers/services defined in a given Compose file.
Similarly, the following syntax can be used to define a custom NAT network.
Note: The ‘custom NAT network’ defined in the below example is defined as a partition of the container host’s pre-existing NAT internal prefix. See the above section, ‘Multiple NAT Networks,’ for more context.
For further information on defining/configuring container networks using Docker Compose, refer to the Compose File reference.


