- MSYS2
- Software Distribution and Building Platform for Windows
- Installation
- Делюсь опытом Настройка Windows и Eclipse для ESP32
- Andrey L
- Andrey L
- Standard Setup of Toolchain for Windows (Legacy GNU Make)В
- Introduction
- Toolchain Setup
- Check it Out
- Next Steps
- Updating The Environment
- Standard Setup of Toolchain for Windows (Legacy GNU Make)В
- Introduction
- Toolchain Setup
- Check it Out
- Next Steps
- Updating The Environment
MSYS2
Software Distribution and Building Platform for Windows
MSYS2 is a collection of tools and libraries providing you with an easy-to-use environment for building, installing and running native Windows software.
It consists of a command line terminal called mintty, bash, version control systems like git and subversion, tools like tar and awk and even build systems like autotools, all based on a modified version of Cygwin. Despite some of these central parts being based on Cygwin, the main focus of MSYS2 is to provide a build environment for native Windows software and the Cygwin-using parts are kept at a minimum. MSYS2 provides up-to-date native builds for GCC, mingw-w64, CPython, CMake, Meson, OpenSSL, FFmpeg, Rust, Ruby, just to name a few.
To provide easy installation of packages and a way to keep them updated it features a package management system called Pacman, which should be familiar to Arch Linux users. It brings many powerful features such as dependency resolution and simple complete system upgrades, as well as straight-forward and reproducible package building. Our package repository contains more than 2000 pre-built packages ready to install.
For more details see ‘What is MSYS2?’ which also compares MSYS2 to other software distributions and development environments like Cygwin, WSL, Chocolatey, Scoop, . and ‘Who Is Using MSYS2?’ to see which projects are using MSYS2 and what for.
Installation
Verify with SHA256 checksum ef1dbd40d03eda274f6d101792e5d197f0709fd306967c42be025f8746fcd9af or GPG signature by 0xf7a49b0ec.
Run the installer. MSYS2 requires 64 bit Windows 7 or newer.
Enter your desired Installation Folder (short ASCII-only path on a NTFS volume, no accents, no spaces, no symlinks, no subst or network drives, no FAT).
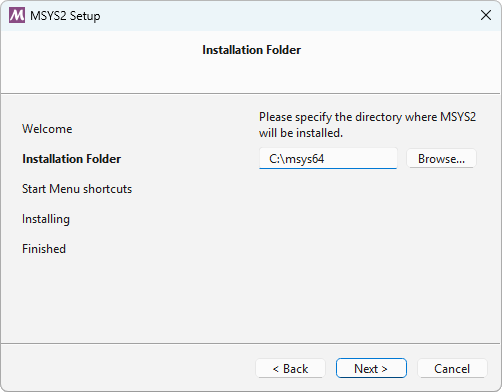
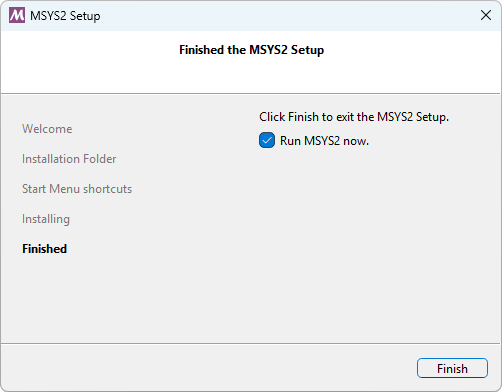
When done, tick Run MSYS2 now.
Update the package database and base packages. Unless your setup file is very recent, it will take two steps. First run pacman -Syu :
Run «MSYS2 MSYS» from Start menu. Update the rest of the base packages with pacman -Su :
Now MSYS2 is ready for you. You will probably want to install some tools and the mingw-w64 GCC to start compiling:
To start building using the mingw-w64 GCC, close this window and run «MSYS MinGW 64-bit» from Start menu. Now you can call make or gcc to build software for Windows.
Check out the introduction page to learn which Start menu item to use when and which packages to install. Take look at Detailed MSYS2 install guide for troubleshooting and additional details on how to keep your MSYS2 up-to-date.
Делюсь опытом Настройка Windows и Eclipse для ESP32

Andrey L
Member
Для работы с ESP32 вначале мы установим «тулчан» от производителя, научимся компилировать и прошивать при помощи терминала. Потом настроем Eclipse IDE и все операции сделаем там.
Скачиваем и распаковываем «тулчан»
На данный момент последний «тулчан» готов к скачиванию по этому https://dl.espressif.com/dl/esp32_win32_msys2_environment_and_toolchain-20181001.zip адресу.
Распакуем содержимое архива прямо на диск С:, чтобы всё начиналось с адреса «C:\msys32».
Теперь заходим в эту папку и запускаем там «mingw32.exe» (C:\msys32\mingw32.exe). Откроется окно терминала «тулчана».
В терминале вводим команду «mkdir -p
/esp» (создаётся новая папка «esp»). После зайдём в эту папку, введя в терминале команду «cd esp/».
Скачаем ESP-IDF
Мы уже находимся в терминале в папке «
/esp», теперь загрузим туда «ESP-IDF» командой в терминале «git clone —recursive https://github.com/espressif/esp-idf.git».
Настраиваем переменную IDF_PATH
В папке «C:/msys32/etc/profile.d/» создаём новый файл «export_idf_path.sh». В этом файле сохраняем строчку «export IDF_PATH=»C:/msys32/home/user-name/esp/esp-idf»». (Не забудьте поменять там user-name на имя вашего пользователя). После чего перезапустите терминал.
В перезапущенном терминале проверяете значение заданной переменной командой «printenv IDF_PATH», должен отобразиться путь, который мы только что указали.
Теперь скачаем нужные пакеты Python
В терминале вводим «python -m pip install —user -r $IDF_PATH/requirements.txt». Проверить установку можно командой «python —version».
Первый проект или Hello World
Используем уже готовый «привет мир» из примеров, которые дают вместе с «ESP-IDF».
В терминале сначала вводим первую команду «cd
/esp» (переходим в нужный каталог).
Там мы копируем нужный проект командой «cp -r $IDF_PATH/examples/get-started/hello_world .».
После чего мы заходим внутрь нового католога «cd hello_world/». (Или же «cd
Теперь откроем «Device Manager», для этого нажмём комбинацию клавиш Windows+R, и в командную строку вводим «devmgmt.msc» и нажимаем на кнопку «OK».
После этого откроется окно «Device Manager», там мы ищем рубрику «Ports (COM & LPT)», открываем её. Там мы смотрим через какой COM-порт было подключено устройство. У меня это COM11, у вас может быть что-то другое.
Настройка
Когда мы определили номер COM-порта, можно внести его в настройки.
Напоминаю, мы находимся в папке «
/esp/hello_world». И в терминале вводим команду «make menuconfig».
Вскоре в терминале откроется менюшка, там мы переходим по «Serial flasher config» → «Default serial port», в той строчке вводим COM-порт, через который подсоединилась ESP32. У меня это «COM11».
После чего выбираем «Exit» два раза, после чего выбираем «Yes», чтобы сохранить изменения.
Для сохранения данных понадобится некое время.
Компиляция и прошивка
Это делается командой в терминале «make flash». (Не забудьте перегрузить ESP32 в режиме прошивки.)
Мониторинг
Так же есть команда в терминале, чтобы посмотреть, что выводит модуль через COM-порт.
Эта команда — «make monitor».
Чтобы выйти из этого режима нажмите клавиши Ctrl+].
Мониторинг при помощи PUTTY
Запускаем PUTTY. В строке «Connection type:» выбираем «Serial». В поле «Serial line» вводим «COM11» (у вас скорее всего будет дрогой COM-порт), а в поле «Speed» вводим «115200», после чего жмём на кнопку «Open».
Возможные ошибки при прошивке
«A fatal error occurred: Failed to connect to ESP32: Timed out waiting for packet header» — вы забыли перезагрузить ESP32 в режим прошивке.
«serial.serialutil.SerialException: could not open port ‘COM11’: WindowsError(2, ‘Система не может найти указанный файл.’)» — по данному COM-порту не удалось найти ESP32. (Проверьте в «Device Manager», через который COM-порт подсоединён модуль.)
«serial.serialutil.SerialException: could not open port ‘COM11’: WindowsError(5, ‘Доступ запрещён’)» — с модулем уже установлено соединение другой программой (PUTTY, другой терминал с мониторингом). Проверьте все запущенные программы.
Andrey L
Member
Изначальные установки
Предполагается, что на компьютере с Windows уже установлены
- Eclipse IDE,
- ESP-IDF,
- python нужной версии.
Так же мы знаем номер COM-порта, через который подключается ESP32. (У меня в примерах это COM11, у вас может быть совсем другой, не забудьте поменять.)
Импорт нового проекта
Запускаем Eclipse IDE, выбираем «File» → «Import. ».
В новом окне переходим по «C/C++» → «Existing Code as Makefile Project» и кликаем на кнопку «Next >».
В новом окне в поле «Existing Code Location» вводим путь до папки с новым проектом. (Используем кнопку «Browse. », чтобы выбрать нужную папку.) В непосредственно в этой папке должен быть файл «Makefile». А в поле «Toolchain for Indexer Settings» выбираем «Cross GCC». После чего кликаем на кнопку «Finish».
Настройки проекта
В окне Eclipse IDE «Project Explorer» кликаем правой клавишей мышки по проекту, во всплывшем контекстном меню выбираем «Properties» или нажимаем комбинацию клавиш ALT+Enter.
В новом окне переходим в «C/C++ Build» → «Environment». Окно должно перезагрузиться. Кликаем на кнопку «Add. », в поле «Name:» вводим «BATCH_BUILD», а в поле «Value:» вводим «1» и нажимаем на кнопку «OK». Вновь кликаем на кнопку «Add. », в поле «Name:» вводим «IDF_PATH», а в поле «Value:» вводим путь до папки «esp-idf» (копируем его из Windows Explorer) и нажимаем на кнопку «OK». Потом выбираем переменную «PATH» и нажимаем кнопку «Edit. », в самый конец значения поля «Value:» дописываем «;C:\msys32\mingw32\bin;C:\msys32\opt\xtensa-esp32-elf\bin;C:\msys32\usr\bin» и нажимаем на кнопку «OK». (Если вы распаковали архив с «esp32» в другое место, то вам придётся подправить пути.)
Теперь переходим в «C/C++ General» → «Preprocessor Include Paths, Macros etc.». Окно должно перезагрузиться. Выбираем закладку «Providers». В списке выбираем «CDT Cross GCC Built-in Compiler Settings» и в поле «Command to get compiler specs» заменяем на «xtensa-esp32-elf-gcc $
После переходим в «C/C++ General» → «Indexer». Окно должно перезагрузиться. Активируем поле «Enable project specific settings». Теперь можно будет изменять остальные настройки в этом окне. Убираем галочку у поля «Allow heuristic resolution of includes». (Если это не сделать, могут появляться неожиданные ошибки.)
Напоследок переходим в «C/C++ Build», открываем там закладку «Behavior». И активируем там «Enable parallel build».
И заканчиваем настройку проекта — нажимаем на кнопку «Apply and Close».
Не забудьте, в терминале зайти в папку проекта и там запустить команду «make menuconfig», чтобы указать к какому COM-порту подсоединён модуль.
Прошивка из Eclipse
Вновь в окне Eclipse IDE «Project Explorer» кликаем правой клавишей мышки по проекту, во всплывшем контекстном меню переходим в «Build Targets» → «Create. ».
Откроется новое окно, в поле «Target name:» вводим «flash». Остальные пункты не изменяем, а жмём на кнопку «OK».
Теперь мы можем при помощи «Project» → «Build Target» → «Build» или (Shift+F9) скомпилировать код и прошить ESP32.
Standard Setup of Toolchain for Windows (Legacy GNU Make)В
Since ESP-IDF V4.0, the default build system is based on CMake. This documentation is for the legacy build system based on GNU Make. Support for this build system may be removed in future major releases.
Introduction
Windows doesn’t have a built-in “make” environment, so as well as installing the toolchain you will need a GNU-compatible environment. We use the MSYS2 environment to provide this. You don’t need to use this environment all the time (you can use Eclipse or some other front-end), but it runs behind the scenes.
Toolchain Setup
The quick setup is to download the Windows all-in-one toolchain & MSYS2 zip file from dl.espressif.com:
Unzip the zip file to C:\ (or some other location, but this guide assumes C:\ ) and it will create an msys32 directory with a pre-prepared environment.
If another toolchain location is used (different than the default C:\msys32 ), please ensure that the path where the all-in-one toolchain gets unzipped is a plain ASCII, contains no spaces, symlinks or accents.
Check it Out
Open a MSYS2 MINGW32 terminal window by running C:\msys32\mingw32.exe . The environment in this window is a bash shell. Create a directory named esp that is a default location to develop ESP32 applications. To do so, run the following shell command:
/esp you can then move to the newly created directory. If there are no error messages you are done with this step.

MSYS2 MINGW32 shell window В
Use this window in the following steps setting up development environment for ESP32.
Next Steps
To carry on with development environment setup, proceed to section Step 2. Get ESP-IDF .
Updating The Environment
When IDF is updated, sometimes new toolchains are required or new requirements are added to the Windows MSYS2 environment. To move any data from an old version of the precompiled environment to a new one:
Take the old MSYS2 environment (ie C:\msys32 ) and move/rename it to a different directory (ie C:\msys32_old ).
Download the new precompiled environment using the steps above.
Unzip the new MSYS2 environment to C:\msys32 (or another location).
Find the old C:\msys32_old\home directory and move this into C:\msys32 .
You can now delete the C:\msys32_old directory if you no longer need it.
You can have independent different MSYS2 environments on your system, as long as they are in different directories.


