- How to Create a Bootable USB Stick on Windows 10, 8, 7?
- Why make a bootable USB stick on Windows?
- How to create a bootable USB on Windows 10/8/7?
- Part 1. Create bootable Windows installation USB media via CMD
- Part 2. Create a bootable USB drive for Windows repair
- Part 3. Create a bootable USB drive for portable Windows device
- Final words
- Windows all in one usb stick
How to Create a Bootable USB Stick on Windows 10, 8, 7?
If you need to create a bootable USB stick on Windows, you can read through this page. It explains how to create a bootable Windows USB via CMD or a piece of free software.

By Emily  / Last Updated April 15, 2021
Why make a bootable USB stick on Windows?
A bootable USB drive is an external hard drive that contains the operating system and can be used to boot a computer or laptop. Most users plan to create a bootable USB drive in Windows for the following three different purposes.
в—†Repair Windows PC: the most important one should be saving the PC when it cannot boot successfully due to a virus, serious system failure, defective hard drive, or other disk errors. With the bootable USB drive, you can reboot the computer and repair it accordingly.
в—†Clean install OS: it can be used as an external installation media to clean install the operating system. This is much quicker and easier than installing OS from CD or DVD-ROM.
в—†Bring your familiar OS everywhere: the bootable USB drive can also be a portable Windows device, which you can take everywhere and enjoy the familiar OS environment on other computers, even the brand-new one without OS installed.
How to create a bootable USB on Windows 10/8/7?
As listed above, the bootable Windows USB drive can be used under different situations, so the process of creating a bootable USB stick on Windows will also differ slightly. But don’t worry, this article will outline how to make a bootable USB device for the above 3 purposes on Windows 10/8/7.
Part 1. Create bootable Windows installation USB media via CMD
First of all, we will show you how to create a bootable USB drive for installing the OS.
Tips:
в—Џ The USB drive should be at least 4GB of storage (for a 32-bit operating system) or at least 8GB (for a 64-bit system).
в—Џ Back up files you have stored on the USB drive because the drive will be formatted during this process and all files on it will be erased.
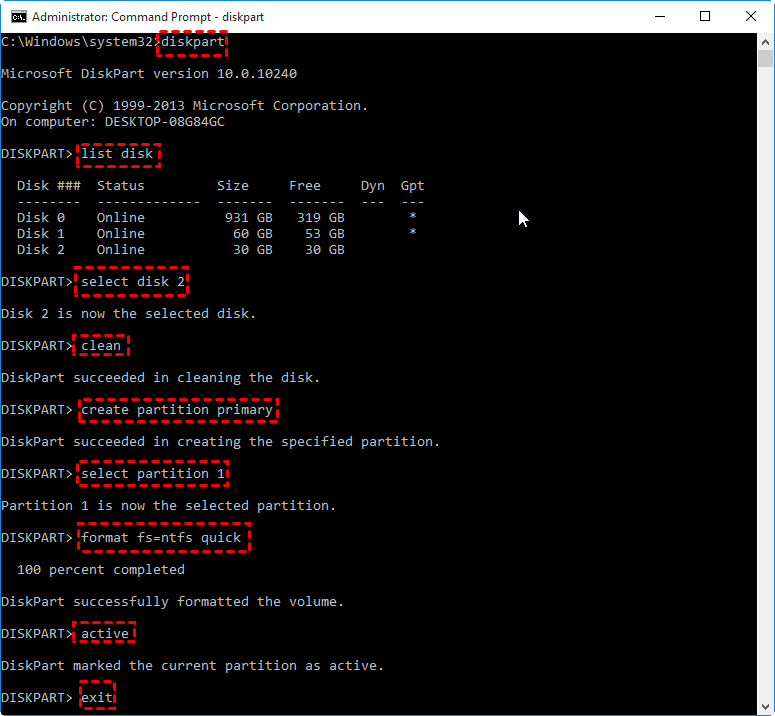
Step 1. Open Command Prompt windows: click “Start” button, input “cmd” in the Search box and press “Enter”. Right click the “Command Prompt” icon and select “Run as administrator”.
Step 2. In the pop-out Command Prompt window, type “diskpart” and press “Enter” to launch Diskpart utility. Inside the Diskpart window, input the following commands in turn and press “Enter” after each one.
list disk
select disk #
clean
create partition primary
select partition 1
format fs=ntfs quick (if you plan to create UEFI bootable USB using Diskpart, type “format fs=fat32 quick” instead to format it into FAT32 file system)
active
exit
Don’t close the Command Prompt. You can minimize it for a little bit since the process is not finished yet. Now, put the Windows DVD into your computer’s DVD drive. Open Windows File Explorer to check out the drive letter of the Windows DVD drive and the USB drive.
Then, go back to the CMD window and type in “D: CD BOOT” (replace D: with your DVD drive letter) and press Enter. Type “CD BOOT” again and press Enter. Lastly, type “BOOTSECT.EXE /NT60 H: “ (replace your USB flash drive letter for H:) and press Enter.
At last, copy all the files and folders of the Windows DVD to your USB flash drive in File Explorer. Now, you can plug the bootable USB flash drive into the target computer to start installing OS.
Part 2. Create a bootable USB drive for Windows repair
If your Windows computer cannot boot due to hard drive failure, you can create a bootable USB drive as a Windows repair tool. In this case, you can use the free AOMEI Partition Assistant Standard .
Apart from creating a bootable USB stick on Windows computer for a PC emergency, it also offers related functions to repair boot issues such as rebuilding MBR, checking and fixing bad sectors on the system drive.В Now you can free download it and learn how to create a bootable USB stick on Windows 10/8/7 for Windows repair.
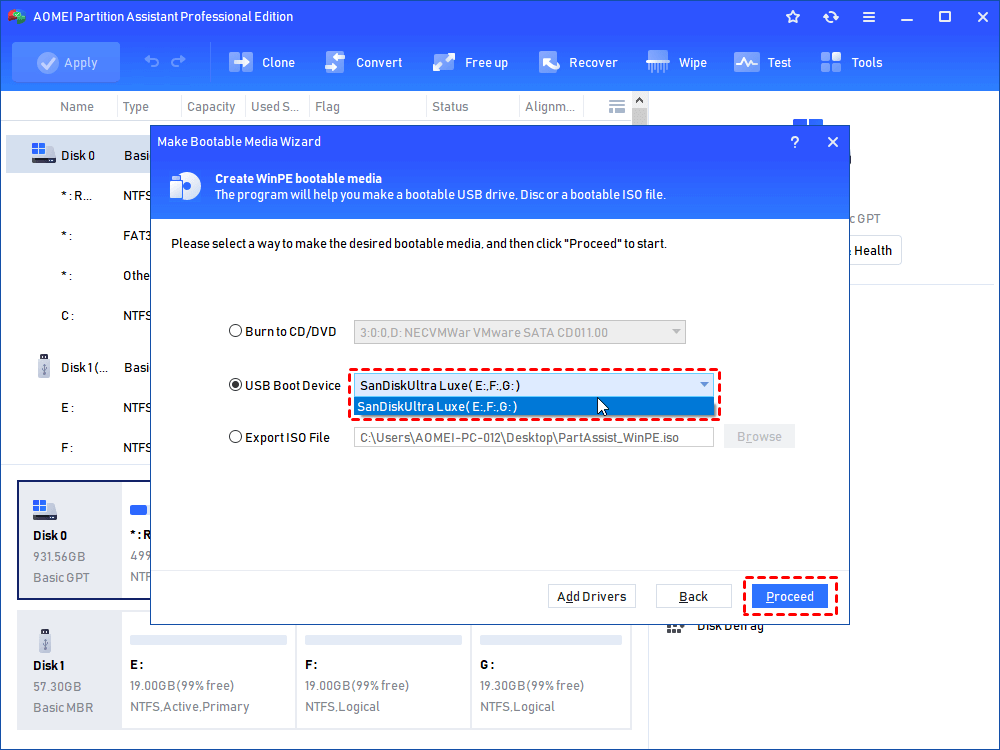
Step 1. Connect the USB drive to a working Windows computer, install and run AOMEI Partition Assistant Standard. Click “Make Bootable Media” and hit on “Next” to proceed.

Step 2. Choose the right USB drive under “USB Boot Device” and click “Proceed”.
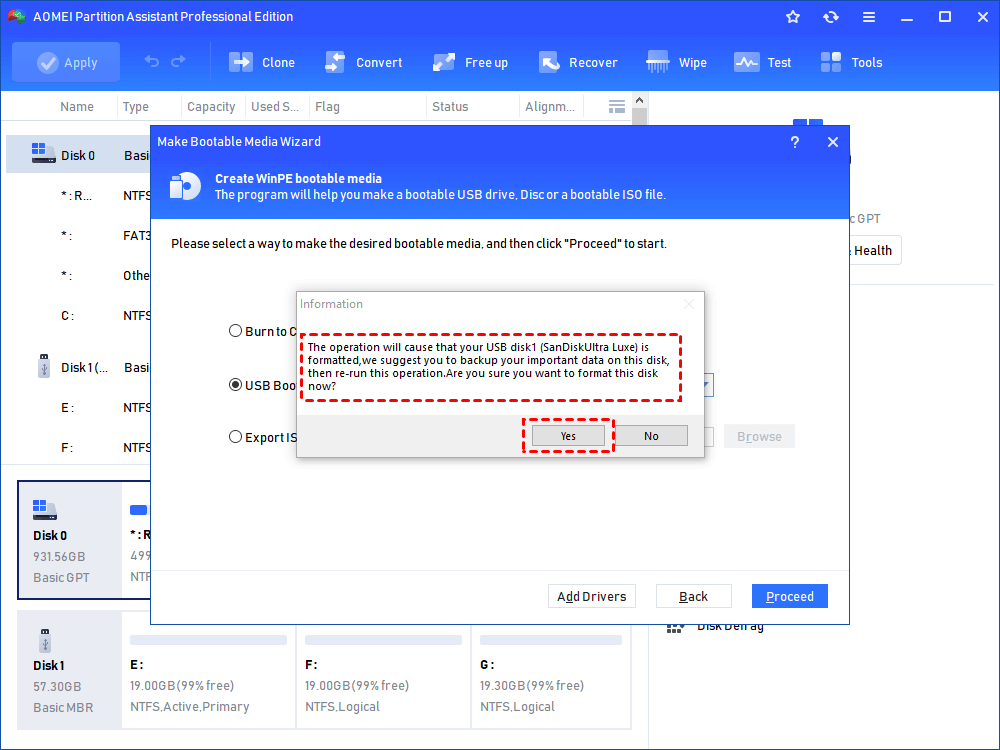
Step 3. Then you will be told the USB will be formatted, please back up important data. If you have done that, click “Yes”.
Step 4. Then wait for the process to be completed.
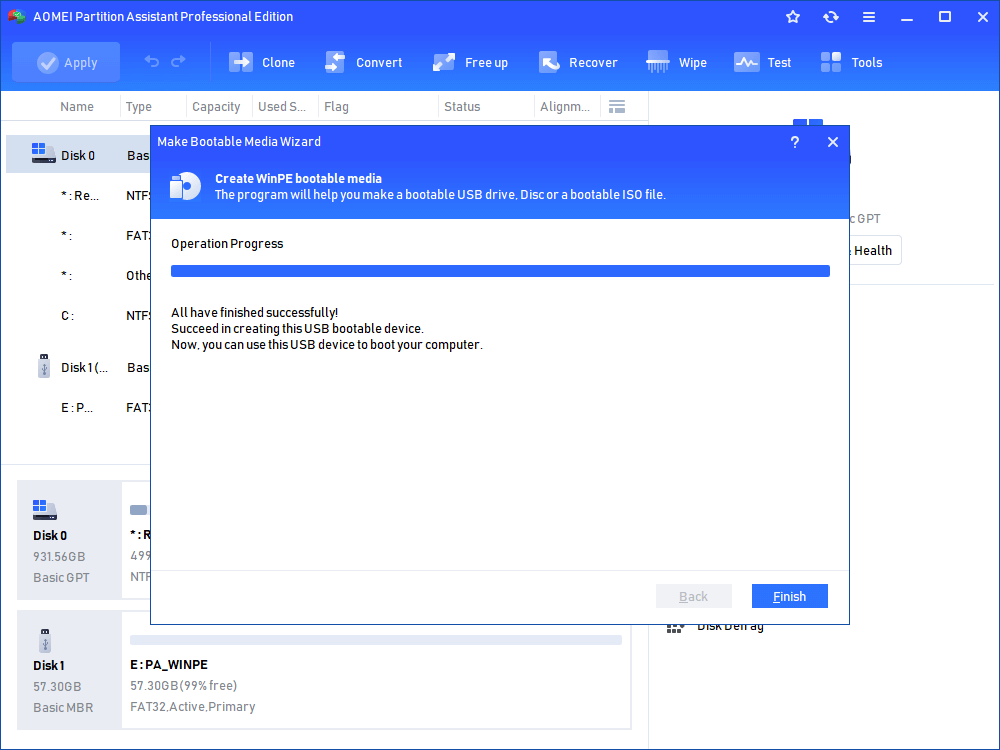
Note: the bootable USB drive contains the pre-installed AOMEI Partition Assistant Standard.
When the process is done, insert the bootable USB drive into the computer with boot issues, change boot order in Boot menu to make it boot from the bootable USB stick. Then you can rebuild MBR on the system primary hard drive.
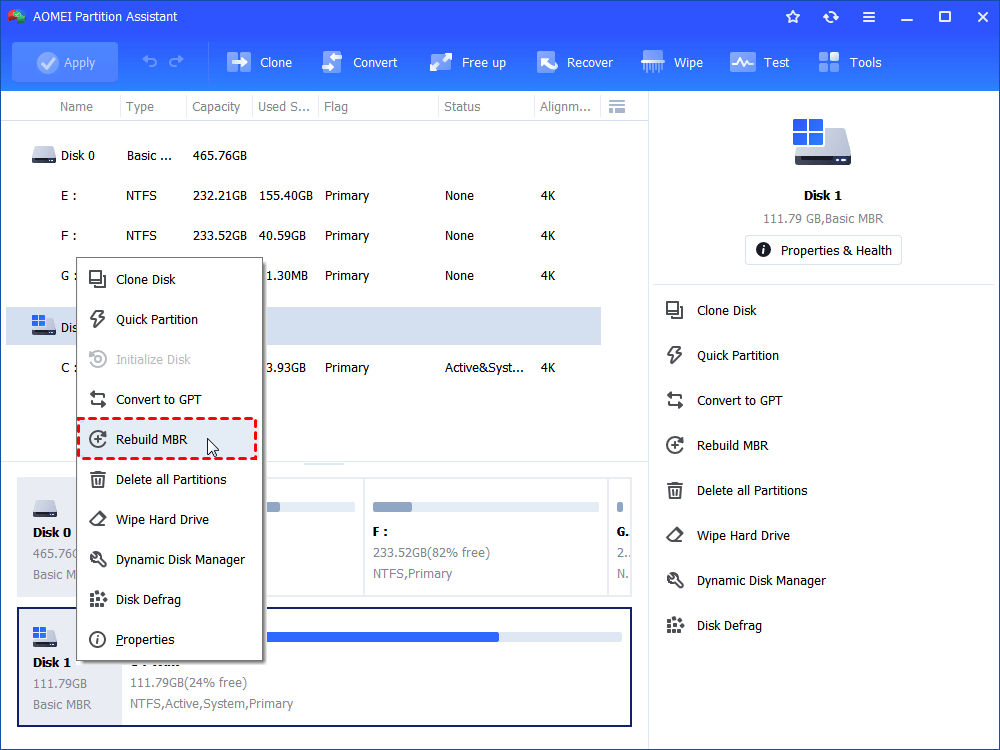
Or you can right-click the system partition to check whether there are some bad sectors on the partition and fix them if necessary. Those two functions are most commonly used functions to repair Windows boot failures.
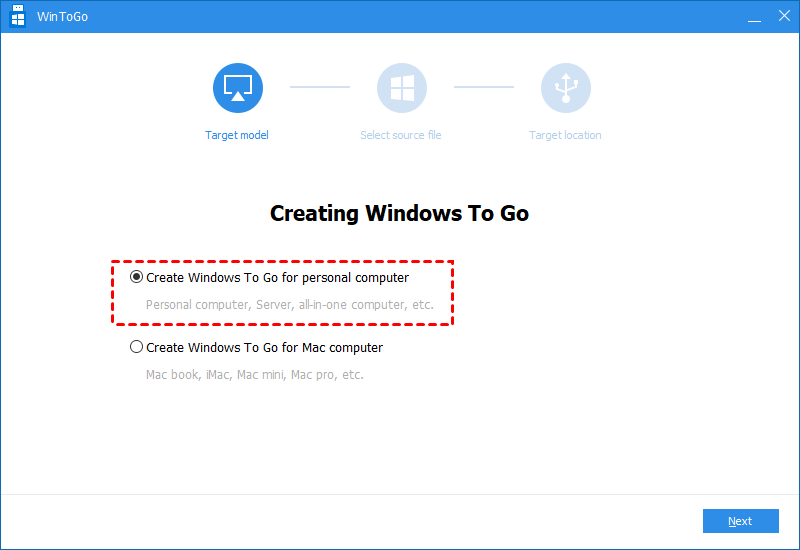
Part 3. Create a bootable USB drive for portable Windows device
In addition to the above two purposes of uses, some users want to create a bootable USB stick on Windows to get a portable Windows USB drive. For this task, you can upgrade to Professional. It offers the “Windows To Go Creator” feature. Much like “Windows To Go” developed by Microsoft, but it is much more powerful and flexible.
It supports both certified and non-certified USB drive. It can create any edition of Windows 10/8/7 bootable USB no matter it is Enterprise, Education, Home or Professional. Besides, it allows you to make Windows 10/8/7 portable USB drive with and without Windows ISO files. Moreover, it does not a USB drive over 32GB, instead, 13GB is enough in most cases.
Step 1. Install and run AOMEI Partition Assistant Pro on your PC. Click “All Tools” > “Windows To Go Creator” on the left side.

Step 2. Select «Create Windows ToGo for personal computer». PS.: if you want toВ run Windows from USB on Mac, you can use the seond option.
Step 3. Choose «Create Windows ToGo with system disc/ISO» and click on «Next».
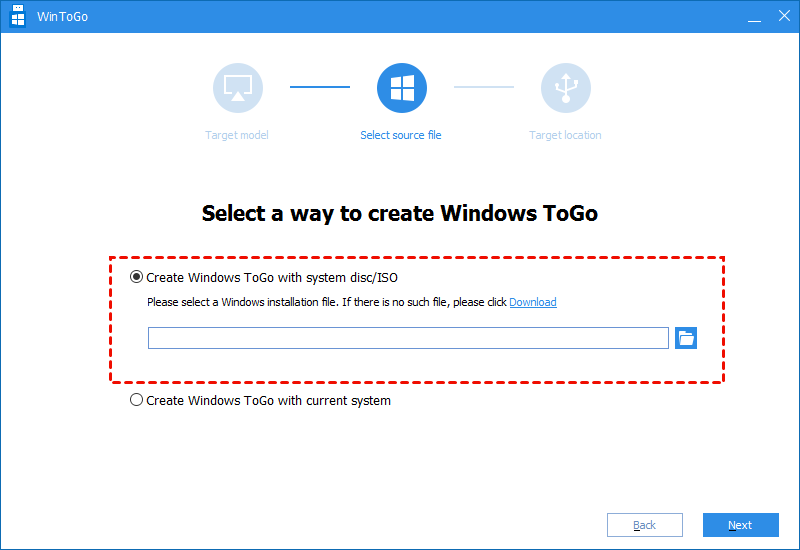
Step 4. Choose Windows ISO file in this window. Click “Next”.
Note: If you don’t have Windows ISO files, go for the second method to create Windows bootable USB with current system .

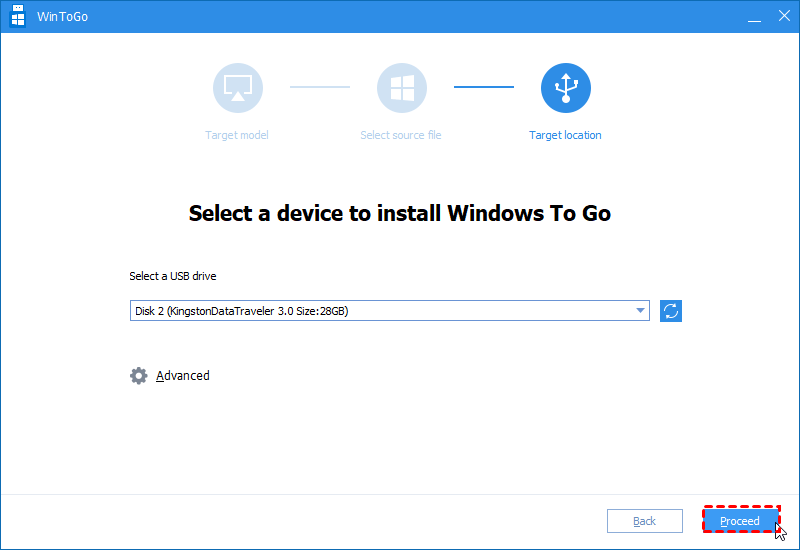
Step 5. Select USB drive and c lick on “Proceed” to start creating a bootable USB drive in Windows computer.
Final words
This article has shown how to create a bootable USB stick on Windows 10/8/7 for different usages. Be clear about your requirements and choose the right method. If you want to create a Server bootable USB drive for repairing Server computer or enjoying the customized Windows Server environment, you can try AOMEI Partition Assistant Server.
Windows all in one usb stick
Операционная система: 32-разр. версия ОС Windows* 8.1 c Bing* (с возможностью бесплатного обновления до Windows® 10) или 32-разр. версия ОС Windows® 10
Процессор: Intel® Atom™ Z3735F
Поддержка технологии виртуализации Intel® (Intel® VT-x)
Графические адаптеры: Графическое решение Intel® HD Graphics
1 порт HDMI* 1.4a
Аудиоподсистема: Intel® HD Audio через разъем HDMI, поддержка многоканального цифрового звука
Системная память: Одноканальный модуль памяти DDR3L емкостью 2 ГБ, припаян к плате, 1,35 В, 1333 МГц
Флэш-память: Модуль eMMC емкостью 32 ГБ, припаян к плате
Разъем Micro SDXC v3.0 с UHS I-Support
Подключение периферийных устройств: Интегрированный беспроводной адаптер 802.11bgn
1 порт USB 2.0
Bluetooth* 4.0
Разъем для карт Micro SD
Требования к питанию: Адаптер питания AC-DC, 5 В, 2 Вт, монтируемый на стену
Габаритные размеры корпуса: 103,4 x 37,6 x 12,5 мм
Операционная система: 64-разр. версия ОС Ubuntu* 14.04 LTS
Процессор: Intel® Atom™ Z3735F
Поддержка технологии виртуализации Intel® (Intel® VT-x)
Графические адаптеры: Графическое решение Intel® HD Graphics
1 порт HDMI* 1.4a
Аудиоподсистема: Intel® HD Audio через разъем HDMI, поддержка многоканального цифрового звука
Системная память: Одноканальный модуль памяти DDR3L емкостью 1 ГБ, припаян к плате, 1,35 В, 1333 МГц
Флэш-память: Модуль eMMC емкостью 8 ГБ, припаян к плате
Разъем Micro SDXC v3.0 с UHS I-Support
Подключение периферийных устройств: Интегрированный беспроводной адаптер 802.11bgn
1 порт USB 2.0
Bluetooth* 4.0
Разъем для карт Micro SD
Требования к питанию: Адаптер питания AC-DC, 5 В, 2 Вт, монтируемый на стену
Габаритные размеры корпуса: 103,4 x 37,6 x 12,5 мм
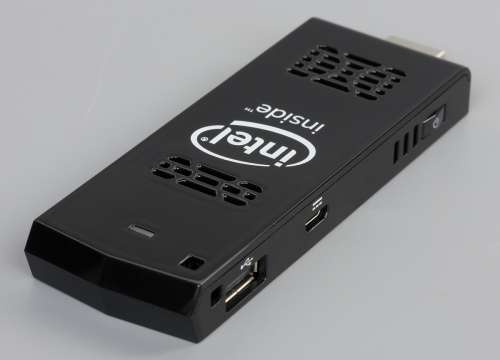
Технические характеристики компьютера Intel Stick STK1AW32SC
Общая информация
Производитель Intel
Оперативная память
Объём 2048 Мб
Максимальный объём 2 Гб
Частота шины 1600 Мгц
Интерфейсы
USB 2.0 1 шт.
USB 3.0 1 шт.
HDMI есть
Card Reader есть
Операционная система
Операционная система Microsoft Windows 10
Дополнительные характеристики
Корпус Intel
Процессор
Модель CPU Intel Atom X5 Z8300
Тактовая частота CPU 1,44 ГГц
Количество ядер процессора 4 ядра
Максимальная частота процессора 1,84 ГГц
Жесткий диск
Объем диска SSD 32 Гб
Интерфейс Flash
Коммуникации
WiFi есть
Bluetooth есть
Габариты (нетто)
Размеры (ШxВxГ) 38 х 12 х 113 мм
Вес (нетто) 0.06 кг
Технические характеристики компьютера Intel Stick BOXSTK2m3W64CC
Процессор: Intel Core m3-6Y30 (2,2 ГГц, TDP 4,5 Вт, 2 ядра, 4 потока)
Оперативная память: 4 ГБ LPDDR3 1866 МГц, CL14-17-17-40-1T, двухканальный режим
Видеокарта: Intel HD Graphics 515 (24EU, 350–850 МГц)
Дисковая подсистема: SSD Kingston M52564 (64 ГБ, eMMC) , 1х microSDXC UHS-I (до 128 ГБ)
Порты ввода/вывода: 1x HDMI 1.4b, 3х USB 3.0
Звуковая подсистема: Intel HD Audio
Коммуникации: 1х Intel Wireless-AC 8260 (IEEE 802.11a/b/g/n+ac, 2,4 ГГц и 5 ГГц, Bluetooth V4.2, Intel Wireless Display (WiDi))
Блок питания: внешний 11,5 Вт (5,2 В, 2,2 А)
Размеры, мм: 114х38х12
Предустановленная ОС: Windows 10 Home x64
Дополнительные возможности: Intel VT-x, Small Business Advantage
Гарантия 36 мес.


Обновление BIOS [FCBYT10H.86A] версия 0018 STCK1A32WFCL-STCK1A8LFC-QSG05.pdf ( 9,94 МБ )STCK1A32WFC-STCK1A32FC-STCK1A8LFC-TechProdSpec01.pdf ( 857,69 КБ )STCK1A32WFC-STCK1A32WFCR-QSG03.pdf ( 9,45 МБ )
 FC0018.zip ( 10,19 МБ )FC0022C.zip ( 5,09 МБ )FC0024C.zip ( 5,09 МБ )FC0025.zip ( 5,11 МБ )FC0027.zip ( 5,18 МБ )FC0028.zip ( 5,29 МБ )FC0030C.zip ( 5,43 МБ )FC0031.zip ( 5,43 МБ )
• НЕ ВЫКЛЮЧАЙТЕ ВАШУ СИСТЕМУ после запуска процесса обновления, пока он не будет завершен. Процесс обновления может занять до 3 минут.
• Проводить обновление BIOS на Вашей системе рекомендуется в случае, если последняя версия BIOS специально предназначена для решения Вашей проблемы. Мы не рекомендуем проводить обновление BIOS на системах, для которых в этом нет необходимости. Все изменения BIOS содержатся в комментариях по версии, представленных на странице загрузки BIOS центра загрузки.
• Перед запуском процесса обновления BIOS убедитесь, что вы в точности выполнили все инструкции, приведенные в этом документе. Вы можете распечатать инструкции для упрощения просмотра.
Большая просьба!
Если у кого имеются данные устройства с оригинальными ОС: Windows 8.1, Windows 10 и Ubuntu, снимите пожалуйста образ с помощью Acronis True Image 2014 Premium
В теме нет куратора. По вопросам наполнения шапки обращайтесь к модераторам раздела через кнопку  под сообщениями, на которые необходимо добавить ссылки.
Сообщение отредактировал AndrewP_1 — 14.04.19, 12:42
Обновление BIOS [FCBYT10H.86A]
Версия: 0018
ВАЖНАЯ ИНФОРМАЦИЯ: НЕОБХОДИМО СНАЧАЛА ВЫПОЛНИТЬ ОБНОВЛЕНИЕ НА ПРОМЕЖУТОЧНУЮ ВЕРСИЮ BIOS FC7018
1. Скопируйте два файла .BIO, FC7018.BIO и FC0018.BIO, в корневой каталог на портативном устройстве USB.
2. Подключите концентратор USB (с не менее чем 3 портами) к порту USB системы Intel Compute Stick.
3. Подключите клавиатуру и мышь с интерфейсом USB к концентратору USB.
4. Подключите портативное устройство USB к концентратору USB.
5. Подключите устройство Intel Compute Stick к дисплею через порт HDMI.
6. Подключите питание к устройству Intel Compute Stick. (Устройство Compute Stick будет включено.)
Действие 1 – Выполните обновление на промежуточную версию FC7018
1. По запросу во время загрузки нажмите клавишу F7 для перехода в режим обновления BIOS.
2. Выберите устройство USB из списка отображенных устройств.
3. Выберите обновление BIOS на версию FC7018.
4. Системная BIOS будет обновлена, а затем выполнена перезагрузка.
Действие 2 – Выполните обновление на текущую версию FC0018
1. По запросу во время загрузки нажмите клавишу F7 для перехода в режим обновления BIOS. Примечание. Если вам не удалось снова перейти в режим обновления, нажав клавишу F7, отсоедините и вновь подключите питание к устройству Compute Stick и повторите попытку.
2. Выберите устройство USB из списка отображенных устройств.
3. Выберите обновление BIOS на версию FC0018.
4. Системная BIOS будет обновлена, а затем выполнена перезагрузка.
5. Нажмите клавишу F2 для открытия программы настроек BIOS.
6. Нажмите клавишу F9 для восстановления настроек BIOS по умолчанию.
7. Скорректируйте дату и время, если необходимо.
8. Нажмите F10 для сохранения изменений и выхода из программы.
*BIO для обновления или восстановления BIOS систем Intel® Compute Stick STCK1A32WFC и STCK1A8LFC.
Сообщение отредактировал Matrixnet — 20.12.15, 20:09


