- Remote Desktop — Allow access to your PC from outside your PC’s network
- Enable port forwarding on your router
- Use a VPN
- Remote Access
- Remote Access Service (RAS) — RAS Gateway
- Routing
- Web Application Proxy
- Remote Desktop — Allow access to your PC
- How to enable Remote Desktop
- Windows 10 Fall Creator Update (1709) or later
- Windows 7 and early version of Windows 10
- All versions of Windows (Legacy method)
- Should I enable Remote Desktop?
- Why allow connections only with Network Level Authentication?
- How to Allow Standard User to RDP/Remote Access on Windows 7 and 10
- Allowing Standard User in Windows 7 and 10
- Method 1: Adding Standard User in System Properties (Win 7 & 10)
- Method 2: Adding Standard User in Local Users and Groups (Win 7 & 10)
- Method 3: Adding Standard User using PowerShell (Win 10)
Remote Desktop — Allow access to your PC from outside your PC’s network
Applies to: Windows 10, Windows Server 2016
When you connect to your PC by using a Remote Desktop client, you’re creating a peer-to-peer connection. This means you need direct access to the PC (sometimes called «the host»). If you need to connect to your PC from outside of the network your PC is running on, you need to enable that access. You have a couple of options: use port forwarding or set up a VPN.
Enable port forwarding on your router
Port forwarding simply maps the port on your router’s IP address (your public IP) to the port and IP address of the PC you want to access.
Specific steps for enabling port forwarding depend on the router you’re using, so you’ll need to search online for your router’s instructions. For a general discussion of the steps, check out wikiHow to Set Up Port Forwarding on a Router.
Before you map the port you’ll need the following:
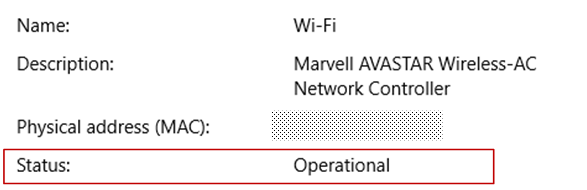
PC internal IP address: Look in Settings > Network & Internet > Status > View your network properties. Find the network configuration with an «Operational» status and then get the IPv4 address.
Your public IP address (the router’s IP). There are many ways to find this — you can search (in Bing or Google) for «my IP» or view the Wi-Fi network properties (for Windows 10).
Port number being mapped. In most cases this is 3389 — that’s the default port used by Remote Desktop connections.
Admin access to your router.
You’re opening your PC up to the internet — make sure you have a strong password set for your PC.
After you map the port, you’ll be able to connect to your host PC from outside the local network by connecting to the public IP address of your router (the second bullet above).
The router’s IP address can change — your internet service provider (ISP) can assign you a new IP at any time. To avoid running into this issue, consider using Dynamic DNS — this lets you connect to the PC using an easy to remember domain name, instead of the IP address. Your router automatically updates the DDNS service with your new IP address, should it change.
With most routers you can define which source IP or source network can use port mapping. So, if you know you’re only going to connect from work, you can add the IP address for your work network — that lets you avoid opening the port to the entire public internet. If the host you’re using to connect uses dynamic IP address, set the source restriction to allow access from the whole range of that particular ISP.
You might also consider setting up a static IP address on your PC so the internal IP address doesn’t change. If you do that, then the router’s port forwarding will always point to the correct IP address.
Use a VPN
If you connect to your local area network by using a virtual private network (VPN), you don’t have to open your PC to the public internet. Instead, when you connect to the VPN, your RD client acts like it’s part of the same network and be able to access your PC. There are a number of VPN services available — you can find and use whichever works best for you.
Remote Access
Applies To: Windows Server (Semi-Annual Channel), Windows Server 2016, Windows Server 2012 R2, Windows 10
The Remote Access guide provides you with an overview of the Remote Access server role in Windows Server 2016, and covers the following subjects:
For more information about other networking technologies, see Networking in Windows Server 2016.
The Remote Access server role is a logical grouping of these related network access technologies: Remote Access Service (RAS), Routing, and Web Application Proxy. These technologies are the role services of the Remote Access server role. When you install the Remote Access server role with the Add Roles and Features Wizard or Windows PowerShell, you can install one or more of these three role services.
Do not attempt to deploy Remote Access on a virtual machine (VM) in Microsoft Azure. Using Remote Access in Microsoft Azure is not supported. You cannot use Remote Access in an Azure VM to deploy VPN, DirectAccess, or any other Remote Access feature in Windows Server 2016 or earlier versions of Windows Server. For more information, see Microsoft server software support for Microsoft Azure virtual machines.
Remote Access Service (RAS) — RAS Gateway
When you install the DirectAccess and VPN (RAS) role service, you are deploying the Remote Access Service Gateway (RAS Gateway). You can deploy the RAS Gateway a single tenant RAS Gateway virtual private network (VPN) server, a multitenant RAS Gateway VPN server, and as a DirectAccess server.
RAS Gateway — Single Tenant. By using RAS Gateway, you can deploy VPN connections to provide end users with remote access to your organization’s network and resources. If your clients are running Windows 10, you can deploy Always On VPN, which maintains a persistent connection between clients and your organization network whenever remote computers are connected to the Internet. With RAS Gateway, you can also create a site-to-site VPN connection between two servers at different locations, such as between your primary office and a branch office, and use Network Address Translation (NAT) so that users inside the network can access external resources, such as the Internet. In addition, RAS Gateway supports Border Gateway Protocol (BGP), which provides dynamic routing services when your remote office locations also have edge gateways that support BGP.
RAS Gateway — Multitenant. You can deploy RAS Gateway as a multitenant, software-based edge gateway and router when you are using Hyper-V Network Virtualization or you have VM networks deployed with virtual Local Area Networks (VLANs). With the RAS Gateway, Cloud Service Providers (CSPs) and Enterprises can enable datacenter and cloud network traffic routing between virtual and physical networks, including the Internet. With the RAS Gateway, your tenants can use point-so-site VPN connections to access their VM network resources in the datacenter from anywhere. You can also provide tenants with site-to-site VPN connections between their remote sites and your CSP datacenter. In addition, you can configure the RAS Gateway with BGP for dynamic routing, and you can enable Network Address Translation (NAT) to provide Internet access for VMs on VM networks.
The RAS Gateway with multitenant capabilities is also available in Windows Server 2012 R2.
- Always On VPN. Always On VPN enables remote users to securely access shared resources, intranet Web sites, and applications on an internal network without connecting to a VPN.
Routing
You can use Remote Access to route network traffic between subnets on your Local Area Network. Routing provides support for Network Address Translation (NAT) routers, LAN routers running BGP, Routing Information Protocol (RIP), and multicast-capable routers using Internet Group Management Protocol (IGMP). As a full-featured router, you can deploy RAS on either a server computer or as a virtual machine (VM) on a computer that is running Hyper-V.
To install Remote Access as a LAN router, either use the Add Roles and Features Wizard in Server Manager and select the Remote Access server role and the Routing role service; or type the following command at a Windows PowerShell prompt, and then press ENTER.
Web Application Proxy
Web Application Proxy is a Remote Access role service in Windows Server 2016. Web Application Proxy provides reverse proxy functionality for web applications inside your corporate network to allow users on any device to access them from outside the corporate network. Web Application Proxy pre-authenticates access to web applications using Active Directory Federation Services (AD FS), and also functions as an AD FS proxy.
To install Remote Access as a Web Application Proxy, either use the Add Roles and Features Wizard in Server Manager and select the Remote Access server role and the Web Application Proxy role service; or type the following command at a Windows PowerShell prompt, and then press ENTER.
Remote Desktop — Allow access to your PC
Applies to: Windows 10, Windows 8.1, Windows Server 2019, Windows Server 2016, Windows Server 2012 R2
You can use Remote Desktop to connect to and control your PC from a remote device by using a Microsoft Remote Desktop client (available for Windows, iOS, macOS and Android). When you allow remote connections to your PC, you can use another device to connect to your PC and have access to all of your apps, files, and network resources as if you were sitting at your desk.
You can use Remote Desktop to connect to Windows 10 Pro and Enterprise, Windows 8.1 and 8 Enterprise and Pro, Windows 7 Professional, Enterprise, and Ultimate, and Windows Server versions newer than Windows Server 2008. You can’t connect to computers running a Home edition (like Windows 10 Home).
To connect to a remote PC, that computer must be turned on, it must have a network connection, Remote Desktop must be enabled, you must have network access to the remote computer (this could be through the Internet), and you must have permission to connect. For permission to connect, you must be on the list of users. Before you start a connection, it’s a good idea to look up the name of the computer you’re connecting to and to make sure Remote Desktop connections are allowed through its firewall.
How to enable Remote Desktop
The simplest way to allow access to your PC from a remote device is using the Remote Desktop options under Settings. Since this functionality was added in the Windows 10 Fall Creators update (1709), a separate downloadable app is also available that provides similar functionality for earlier versions of Windows. You can also use the legacy way of enabling Remote Desktop, however this method provides less functionality and validation.
Windows 10 Fall Creator Update (1709) or later
You can configure your PC for remote access with a few easy steps.
- On the device you want to connect to, select Start and then click the Settings icon on the left.
- Select the System group followed by the Remote Desktop item.
- Use the slider to enable Remote Desktop.
- It is also recommended to keep the PC awake and discoverable to facilitate connections. Click Show settings to enable.
- As needed, add users who can connect remotely by clicking Select users that can remotely access this PC.
- Members of the Administrators group automatically have access.
- Make note of the name of this PC under How to connect to this PC. You’ll need this to configure the clients.
Windows 7 and early version of Windows 10
To configure your PC for remote access, download and run the Microsoft Remote Desktop Assistant. This assistant updates your system settings to enable remote access, ensures your computer is awake for connections, and checks that your firewall allows Remote Desktop connections.
All versions of Windows (Legacy method)
To enable Remote Desktop using the legacy system properties, follow the instructions to Connect to another computer using Remote Desktop Connection.
Should I enable Remote Desktop?
If you only want to access your PC when you are physically using it, you don’t need to enable Remote Desktop. Enabling Remote Desktop opens a port on your PC that is visible to your local network. You should only enable Remote Desktop in trusted networks, such as your home. You also don’t want to enable Remote Desktop on any PC where access is tightly controlled.
Be aware that when you enable access to Remote Desktop, you are granting anyone in the Administrators group, as well as any additional users you select, the ability to remotely access their accounts on the computer.
You should ensure that every account that has access to your PC is configured with a strong password.
Why allow connections only with Network Level Authentication?
If you want to restrict who can access your PC, choose to allow access only with Network Level Authentication (NLA). When you enable this option, users have to authenticate themselves to the network before they can connect to your PC. Allowing connections only from computers running Remote Desktop with NLA is a more secure authentication method that can help protect your computer from malicious users and software. To learn more about NLA and Remote Desktop, check out Configure NLA for RDS Connections.
If you’re remotely connecting to a PC on your home network from outside of that network, don’t select this option.
How to Allow Standard User to RDP/Remote Access on Windows 7 and 10
RDP stands for Remote Desktop Protocol, which allows a user to connect from another computer with a graphical interface connection over a network connection. It has protected rules and guidelines for communicating data developed by Microsoft. Users can connect as an administrator or as a standard user depending on the permissions. Enabling access for the standard user can have many reasons, such as; allowing them to work on the remote computer from anywhere, giving access to family and friends for specific programs as a standard user but with no administrator rights.
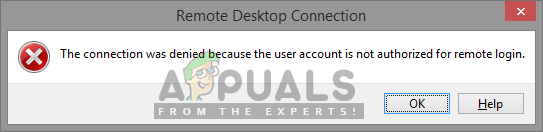 Error message when logging in as a standard user
However, several Windows users are getting the connection denied error when they try to RDP with a standard account on a computer. The error will appear with a message like this: “The connection was denied because the user account is not authorised for remote login”. This happens because the computer you’re trying to connect has not added the standard account for the remote access.
Allowing Standard User in Windows 7 and 10
Using Remote Desktop Connection application allows you to connect and control your Windows computer from a remote device. But this option is off by default, you need to enable it first.
In Windows 7 and 10 we have few different methods through which we can add the standard users for the RDP. You can try any of the methods to add the standard user and later access it by logging in to that username through Remote Desktop Connection.
Method 1: Adding Standard User in System Properties (Win 7 & 10)
- Hold the Windows Key and Press R to open Run. Now type “SystemPropertiesRemote” in the text box and click OK
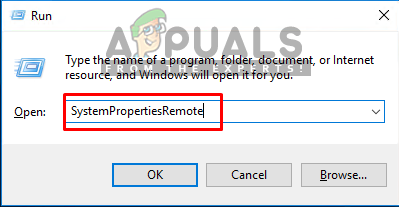 Opening Run and typing SystemPorpertiesRemote
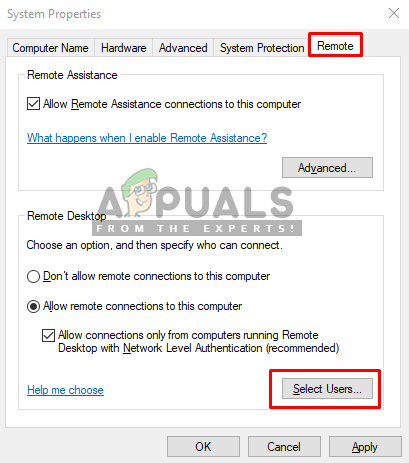 Clicking on the Select User
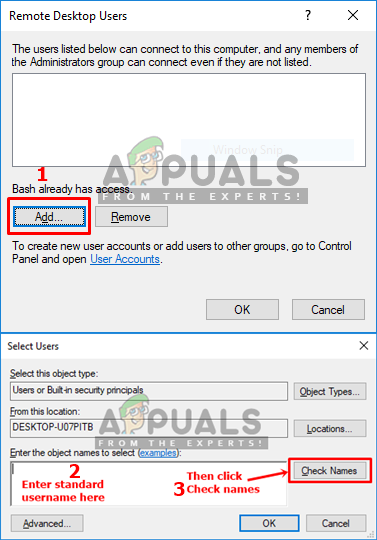 Adding the standard username and checking it
Method 2: Adding Standard User in Local Users and Groups (Win 7 & 10)
- If you are logged in as an administrator to the PC, then open Run by pressing (Windows + R) buttons. Then type “lusrmgr.msc” in it and Enter
Checking the username available or not
Method 3: Adding Standard User using PowerShell (Win 10)
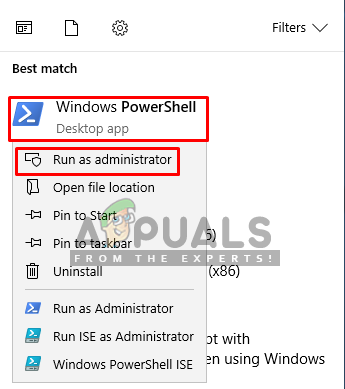
- Search for “Windows PowerShell” and open it by selecting “Run as administrator”
 Opening PowerShell with run as administrator
 - Now you just need to type the following command and Enter: Typing the command in PowerShell
 Opening PowerShell with run as administrator
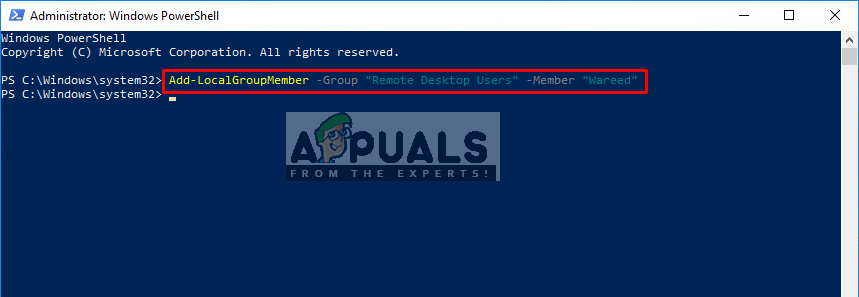 Typing the command in PowerShell
Note: User will be the username of the account that you are adding.


