- How do I undo «Always open with» option in Windows 10
- Replies (3)
- How to undo «Always open with» option in Windows 10
- Windows 10 «Always open with» doesn’t work!
- Replies (21)
- 3 Ways to Keep a Window Always on Top on Windows 10
- 1. Use a Keyboard Shortcut with an Always on Top AutoHotkey Script
- 2. Use Your Mouse with DeskPins
- 3. Use a System Tray Menu with TurboTop
- Bring the Always-on-Top Feature to All Windows
- How to set Windows 10 to ALWAYS open maximized windows when clicking on the shortcuts for the File Explorer or pinned websites of the taskbar
- Replies (13)
How do I undo «Always open with» option in Windows 10
Replies (3)
I would like to know more about the solution you mentioned in your post. Can you tell me how you were able to resolve the issue before? This is so we can avoid repeats with the troubleshooting steps that we’re going to provide you.
If you’re planning to switch the program that opens PUP files, you can do so by following these steps:
- Right-click a PUP file.
- Select Open with >Choose another app.
- Select the desired program to open PUP files.
- Make sure to select the Always use this app to open .pup files check box.
- Click OK.
Let me know the results.
2 people found this reply helpful
Was this reply helpful?
Sorry this didn’t help.
Great! Thanks for your feedback.
How satisfied are you with this reply?
Thanks for your feedback, it helps us improve the site.
How satisfied are you with this reply?
Thanks for your feedback.
Hello! I’m sorry to say that what you replied with, won’t help me in any way because the default/reset option is not available (please add it
I think I have an idea of how to solve my problem and how to find the correct app to open in. Go and download the same file I just did at https://www.playstation.com/en-us/support/system-updates/ps3/ (If you don’t want to click on the link, go to your browser and type in “PS3 System Software Update – Latest Version 4.82 – PlayStation” and then, click on the first link). It’s a firmware for PS3 I downloaded officially from PlayStation, so you know it’s legit. After It is done downloading, open it and try to find what type of program/app it is by looking at the layout of the file when it’s open.)
Please respond and help me.
2 people found this reply helpful
Was this reply helpful?
Sorry this didn’t help.
Great! Thanks for your feedback.
How satisfied are you with this reply?
Thanks for your feedback, it helps us improve the site.
How to undo «Always open with» option in Windows 10
I’m trying open an .acsm file in order to read an e-book that I purchased. The vendor has told me that I can only read it on Adobe Digital Editions. The problem is that when I tried to download the book the first time, I made the mistake of choosing the option «Always open with Adobe Acrobat reader». I keep getting a message saying that Acrobat Reader does not support the file type or that it is somehow corrupted. I’m trying to undo the always open with Acrobat Reader but I don’t know how.
I’m unable to read this file with any of the other programs suggested in the list and I cannot seem to pick Adobe Digital Editions either (it doesn’t appear when I try to browse, even though I know for a fact that it’s installed). How do I get around this? I already paid for the book and the file is useless as is. Thanks.
![]()
Thank you for posting in Microsoft Community.
I understand that you have make the Adobe Digital Editions as the default application for the e-book file. We will help you.
I suggest you to follow the below steps and check if it helps.
- Press Windows + X keys and select Control Panel.
- Select Default Programs. Select Set your default programs.
- Select the application and right side click on Set this program as default.
- Again click on the application left side and click on Choose default programs for this application in the right side.
- Check the Select all and click on Save changes.
- Restart the application and check if the issue persists.
Keep us posted to help you better.
164 people found this reply helpful
Was this reply helpful?
Sorry this didn’t help.
Great! Thanks for your feedback.
How satisfied are you with this reply?
Thanks for your feedback, it helps us improve the site.
Windows 10 «Always open with» doesn’t work!
I am trying to choose a program to always open my .lua files with. But it wont work! When I choose the program of my liking and hit «Always open with» and press OK, it opens the file but does not change the always open with choice. I tried selecting another program and then select the one I want and hit OK, but still same issue.
I have even tried to left click «Properties» -> and change «Open with» but when I pick a program it doesn’t change. This problem is driving me crazy and happens with all extensions I try to do this with.
The only thing that works is the default things such as which browser to use etc.
I would value any help I could get, thanks!
(Plus the windows was freshly reinstalled 2 weeks ago)
Replies (21)
* Please try a lower page number.
* Please enter only numbers.
* Please try a lower page number.
* Please enter only numbers.
Thank you for writing to Microsoft Community Forums.
Did you try setting the default file type application from system Settings page?
I suggest you to try the below steps to set the default file type application.
- Press Windows logo key on the keyboard, type Default Programs and select the top most search result.
- Scroll down the page and click on Choose default apps by file type from the window.
- Locate the file format, click on the program which is set to open the file type and select the application you want to set from Choose an App window.
- Close the window and check if you are able to open the file type in the application set as default.
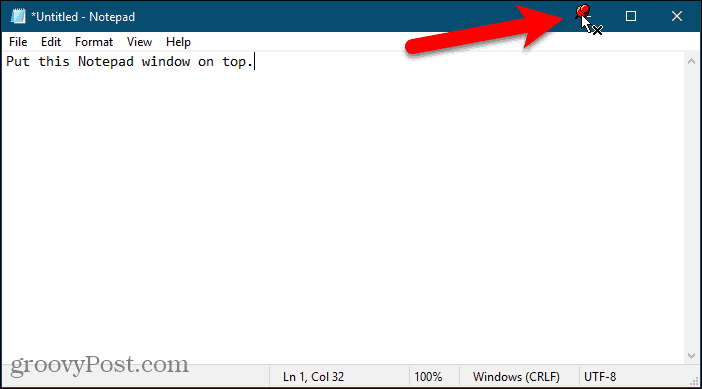
3 Ways to Keep a Window Always on Top on Windows 10


When you are working in Windows with limited screen space, it’s useful to have certain windows stay on top of others. Some programs in Windows automatically incorporate this “always on top” feature, but most programs don’t, and Windows doesn’t include this feature either.
Today we’ll cover three ways to easily add the “always on top” feature to every single program in Windows.
1. Use a Keyboard Shortcut with an Always on Top AutoHotkey Script
AutoHotkey is a free program that allows you to create scripts to perform multiple actions with a single keyboard shortcut. It runs in the background and sits in the system tray.
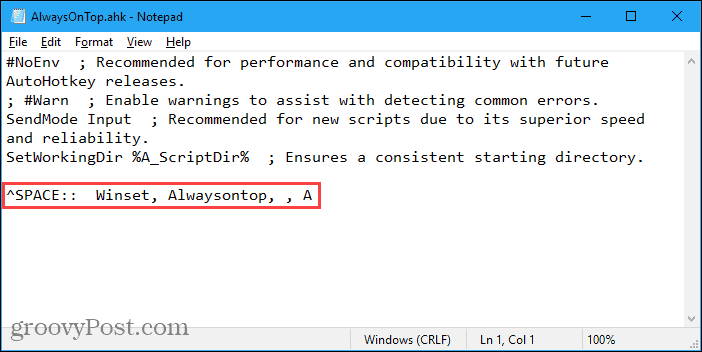
We’re going to use AutoHotkey to create a script that will keep a selected window on top of all others when you press Ctrl + Spacebar when that window is active. We’ll show you the script and explain how it works. But we’ll also provide a downloadable AutoHotkey script file you can use.
Download and install AutoHotkey and then run it.
Download the AlwaysOnTop.ahk script file, extract the .zip file, and put the script in a folder on your hard drive that won’t be moved or deleted.
The script contains some comments and then the following command:
This command sets the currently active window to always be on top when you press Ctrl + Spacebar. If you’d rather use a different key combination, you can change the first part of the command, “^SPACE“. The “^” character represents the Ctrl key. You’ll find the symbols to use for other hotkeys in the Hotkey Modifier Symbols section on this AutoHotkey help page.
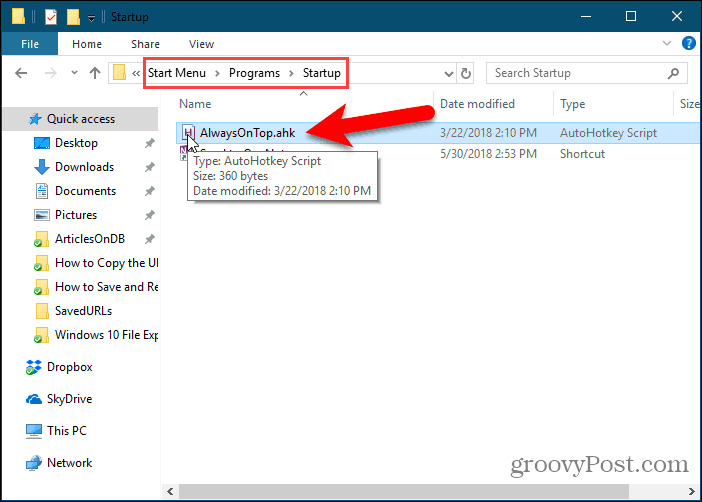
You can put the script in the Windows startup folder (%AppData%\Microsoft\Windows\Start Menu\Programs\Startup), so it starts automatically when Windows starts.
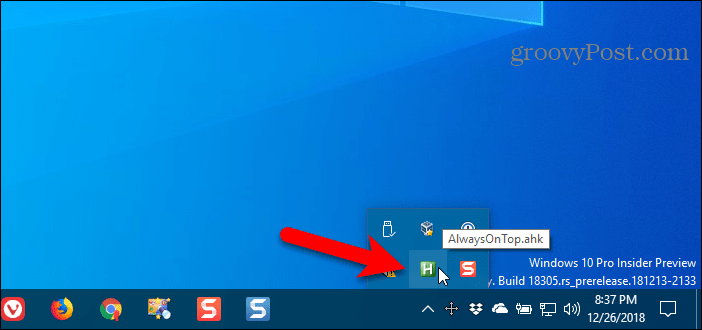
The AutoHotkey script stays in the system tray.
To make the active window always on top, press Ctrl + Spacebar (or the keyboard shortcut you assigned). Press the keyboard shortcut again to disable “always on top” for the active window.
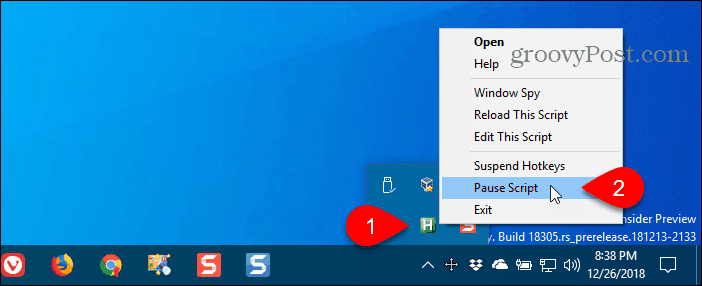
For script options, right-click on the AutoHotkey icon in the system tray.
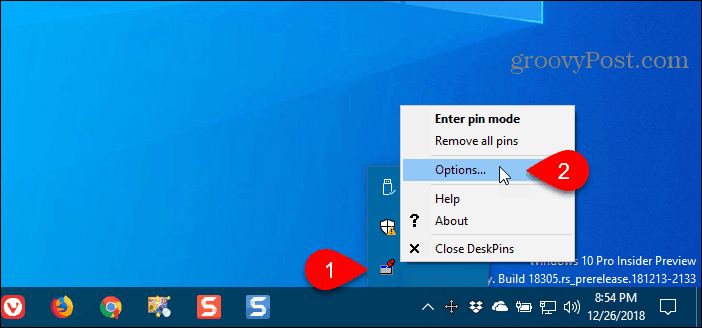
2. Use Your Mouse with DeskPins
DeskPins provides pins you can grab and use to keep any window on top of all other windows. The program sits in the system tray and uses minimal resources.
Download and install DeskPins. Run the program, right-click the icon in the system tray, and select Options to change the Pins, Autopin, and Hotkeys settings.
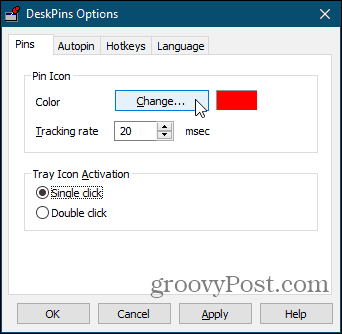
On the Pins tab, you can change the color of the pins. The Tracking rate controls how often each pin checks the pinned window’s position and state. Lower values make the pins more responsive. You can enter any number from 10 to 1000 msec (milliseonds).
If you have an older computer, you may want to increase the Tracking rate number to avoid slowing down your computer.
You can also choose Single click or Double click under Tray Icon Activation to indicate how you get pins from the DeskPins system tray icon. The default is Single click.
You can have DeskPins automatically pin certain types of windows using rules on the Autopin tab.
Check the Enable box and then click Add to add a new rule. Use the check boxes next to the rules to enable and disable individual rules.
Click Help to access the DeskPins help file for more information about automatically pinning windows.

DeskPins provides default shortcuts for entering pin mode and toggling the active window pin. You can change these shortcuts on the Hotkeys tab.

To pin a window on top, click (or double-click, depending on the setting) the DeskPins icon in the system tray.
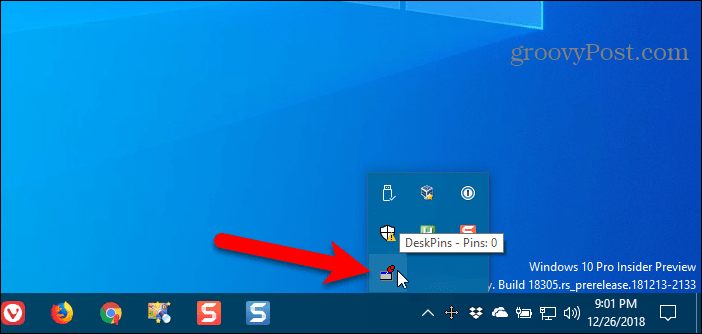
Then, click the title bar on the window you want to keep always on top.
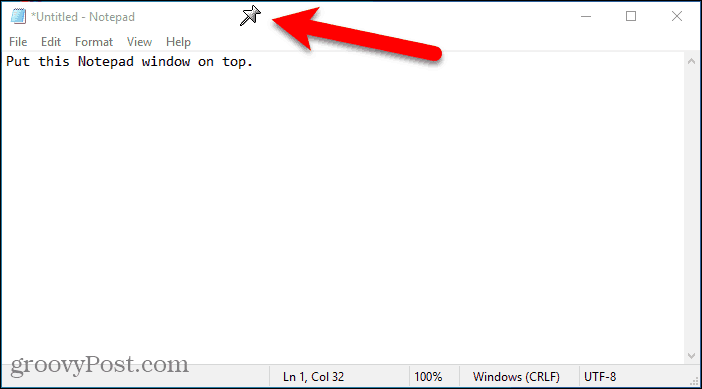
A pin displays on the title bar of the chosen window in the color you specified, or in the default color red.
Click the pin again to disable always on top for the window.
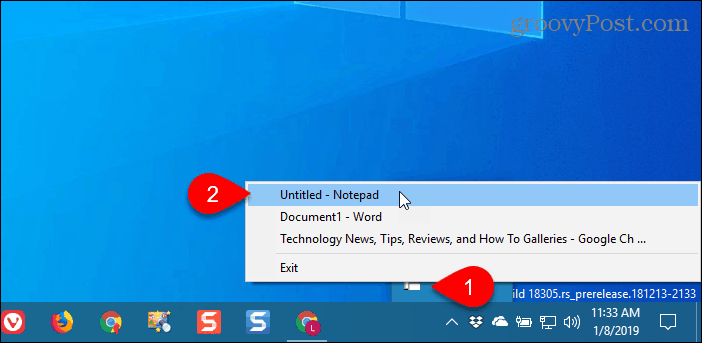
3. Use a System Tray Menu with TurboTop
TurboTop also sits in your system tray like DeskPins. But it operates differently.
Download and install TurboTop. Then, run the program.
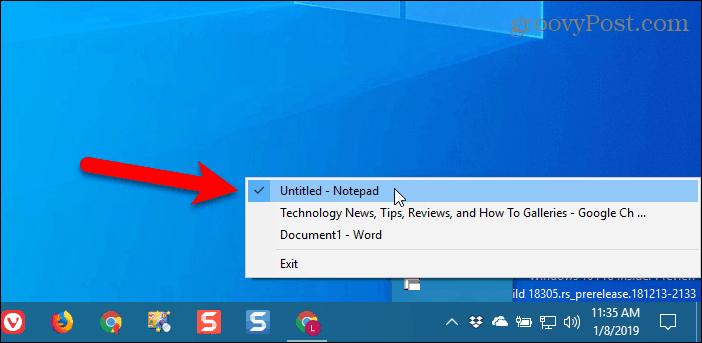
To keep a window always on top, click the TurboTop icon in the system tray. A list of all open windows displays. Select the title of the window you want.
Any windows you choose to be always on top are indicated with a check mark on the TurboTop menu.
To stop keeping a window always on top, click the TurboTop icon in the system tray and select that window again, so there’s no check mark next to the window name on the menu.
Bring the Always-on-Top Feature to All Windows
Whether you like using keyboard shortcuts or prefer using the mouse, there’s an easy solution for keeping windows always on top. If you’ve found other options for keeping windows always on top, let us know in the comments.
How to set Windows 10 to ALWAYS open maximized windows when clicking on the shortcuts for the File Explorer or pinned websites of the taskbar
Straightforward ideas which did NOT work for the File Explorer shortcut :
Right click on the File Explorer shortcut of the taskbar> Right click on “File explorer”>Left click on “Properties”>Under ‘Shortcut’; Select ‘Maximized’ for the field ‘ R un:’
Right click on an empty space on the desktop >Left click on “New”> Left click on “Shortcut”>Type “explorer” (without quotes) and select “Next”> Select “Finish”>Right click on the shortcut>Left click on “Properties”>Under ‘Shortcut’; Select ‘Maximized’ for the field ‘ R un:’>Remove the old File Explorer icon from the taskbar>Pin the new shortcut on the taskbar
Open File Explorer>Maximize its window> Hold the Ctrl key when closing it
Indeed, none of the three methods above is able to make File Explorer be opened on a maximized window in all cases. In fact, the only way in which File Explorer is opened on a maximized window is making sure that its corresponding window was maximized before closing it. Otherwise it will remember that it was not maximized when it was closed, so the next time that I click on the File Explorer shortcut to open it again, it will not be opened on maximized window.
Note that this issue seems to be restricted to File Explorer. For instance, if I use any of the three methods for the taskbar shortcuts of Word, Excel, Paint, etc. their corresponding windows will ALWAYS be maximized, regardless of the fact that they were not on maximized windows when they were closed for the last time.
For the pinned websites shortcuts (which still are currently opened with Explorer 11 on Windows 10) I cannot find any parameter to change the size of the window to be opened at all. I have tried: right click on the shortcut >Right click on the particular name of the pinned site>Left click on “Properties”
Similarly, the only (apparent) way to make it be opened on a maximized window is to remember to maximize its corresponding window before closing it.
In summary, I would like to know how to make the File Explorer or pinned websites be opened on maximized windows REGARDLESS of the fact that their windows were maximized or not when they were closed for the last time, knowing that the methods I’ve just described did NOT work.
Thanks in advance
Replies (13)
* Please try a lower page number.
* Please enter only numbers.
* Please try a lower page number.
* Please enter only numbers.
![]()
Thank you for posting your response in Microsoft Community.
I apologize for the inconvenience.
I would like to request you to post you feedback in the Windows 10 Feedback app.
For further assistance, you can post your query in Microsoft Community
14 people found this reply helpful
Was this reply helpful?
Sorry this didn’t help.
Great! Thanks for your feedback.
How satisfied are you with this reply?
Thanks for your feedback, it helps us improve the site.
How satisfied are you with this reply?
Thanks for your feedback.
Following your request I have copied my post to the Windows feedback app. Nevertheless, it was clear that I won’t get any reply from Microsoft at all (not even will they tell me when the problem is solved). So I’ll keep an eye on this Microsoft Community webpage .
Thanks for your quick answer.
159 people found this reply helpful
Was this reply helpful?
Sorry this didn’t help.
Great! Thanks for your feedback.
How satisfied are you with this reply?
Thanks for your feedback, it helps us improve the site.
How satisfied are you with this reply?
Thanks for your feedback.
18 people found this reply helpful
Was this reply helpful?
Sorry this didn’t help.
Great! Thanks for your feedback.
How satisfied are you with this reply?
Thanks for your feedback, it helps us improve the site.
How satisfied are you with this reply?
Thanks for your feedback.
That sounds like a completely different problem, like a virus or some kind of corrupted files. Of course, when I click on the button to manually maximize the windows it works as expected. Then, I’d try the following (in this order, and restart your PC after trying every step and check it the problem is solved before trying the next one):
1. Check the shortcut. Right click on the icon of the program that is not working properly (I think that by “EI” you meant to say Internet Explorer) and select “Properties”. On the ‘Shortcut’ tap, click on “Maximized” for the field “Run:”
2. Make a full virus scan using your antivirus software or Windows Defender. For this latter, open the Start Menu and type ‘Windows Defender’ and select “Windows Defender Desktop app ”. Go to the “Update” tab and click on “Update”, then wait until Windows Defender is updated and then go the “Home” tab, select “Full” from one of the radio buttons on the right. Then click on “Scan now”.
3. Restore the shortcut. Right click on the icon of the program that is not working properly and select “Properties”. Then select the “Previous versions” tab and restore the shortcut (if possible).
4. Update your display adapter driver. Open the Star Menu, type ‘Device Manager’ and select “Device Manager Control panel ”. Then expand “Display adapters” to see the name of your graphic card. Right click on it and select “Update Driver Software…” and follow the steps to update it (who knows this may be the problem…).
5. Restore your PC without losing your data. Open the Star Menu, type ‘Restore’ and click on “Create a restore point”. On the “System Protection” tab select “System Restore…” and follow the steps. Notice that this fifth option may also be very useful if after updating the driver the icons look horrible (as, indeed, it happened to me once) as you’ll restore the previous driver.


