- РеКС — друг в мире компьютеров
- Введение
- Настройки
- Тестирование
- 2 мысли о “BTest от Mikrotik: Утилита тестирования полосы сетевого трафика”
- Using iPerf to Test Network Speed and Bandwidth (Throughput)
- iPerf Versions: iPerf2 vs iPerf3
- How to Install iPerf on Windows?
- Installing iPerf on CentOS Linux
- Using iPerf Command to Measure Network Speed/Bandwidth
- Проверка пропускной способности (NTTTCP) Bandwidth/Throughput testing (NTTTCP)
- Развертывание виртуальных машин для тестирования Deploying VMs for testing
- Тестирование виртуальных машин под управлением Windows Testing VMs running WINDOWS:
- Скопируйте NTTTCP на виртуальные машины. Get NTTTCP onto the VMs.
- Разрешение трафика NTTTCP в брандмауэре Windows Allow NTTTCP through the Windows firewall
- Выполнение тестов NTTTCP Running NTTTCP tests
- Тестирование виртуальных машин под управлением Linux Testing VMs running LINUX:
- Тестирование подключения между виртуальными машинами под управлением Windows и Linux Testing between VMs running Windows and LINUX:
РеКС — друг в мире компьютеров
 Для оценки эффективности работы сетевого оборудования путем измерения фактической полосы трафика проходящего через сетевые коммутаторы и маршрутизаторы компания Mikrotik предлагает использовать утилиту BTest для Windows.
 Rick Frey consulting: Btest Server & Bandwidth Test Tools //rickfreyconsulting.com
Введение
Метод тестирования прост. На любых компьютерах в локальной сети или в сетях, между которыми выполняется маршрутизация запускаются утилиты BTest, которые создают между собой соединения с заданными параметрами входящего и исходящего трафика и отображают фактическую полосу.
Утилита BTest не требует установки, ее достаточно запустить на каждом компьютере, который будет участвовать в тестировании.

Настройки
Прежде чем приступить к тестированию сети, утилиту BTest необходимо настроить кнопкой Settings…:
- Server Enabled разрешает утилите открыть порт на прослушивание входящих подключений.
- Authentication Required требует авторизации для входящих подключений, список разрешенных пользователей находится внизу окна настроек.
- Max. Accepted Connectiion ограничивает число подключений.
- Allocate UDP Ports From
- Launch Program On System Startup регистрирует утилиту в качестве системной службы, которая будет запускать автоматические при каждом включении компьютера.
Утилита или служба запущенная с разрешением удаленного подключения открывает на прослушивание порты TCP:2000 и UDP:2000, которые следует разрешить в настройках брандмауэра.
Тестирование
Основное окно BTest позволяет задать параметры соединения с портом утилиты на удаленном компьютере.
- Address — адрес другого компьютера для подключения.
- Protocol — тип протокола соединения TCP или UDP.
- Local Tx Size
- Remote Tx Size
- Direction — направление трафика
- receive — получение
- send — передача
- both — оба направления
- Local Tx Speed — ограничение полосы исходящего трафика
- Remote Tx Speed — ограничение полосы трафика отправляемого с удаленного компьютера.
- User/Password — для авторизации подключения к тем компьютерам, где в настройках BTest определена необходимость аутентификации Authentication Required.
- Random Data
После каждого нажатия кнопки Start утилита BTest устанавливает соединение с удаленным компьютером и генерирует трафик с заданными параметрами. Фактические показатели соединения отображаются в отдельном окне. Утилита позволяет открыть произвольное число соединений с произвольными удаленными компьютерами, на которых тоже запущен утилита, либо работает служба.
2 мысли о “BTest от Mikrotik: Утилита тестирования полосы сетевого трафика”
Классная программа. Всегда ей провожу тест перед тем как войти на свой сайт.
Using iPerf to Test Network Speed and Bandwidth (Throughput)
IPerf is an open-source tool designed to test network bandwidth between two network nodes. The iPerf allows to generate TCP and UDP traffic/load between two hosts. You can use iPerf to quickly measure the maximum network bandwidth (throughput) between a server and a client, conduct stress testing of the ISP communication channel, router, network gateway (firewall), your Ethernet or Wi-Fi network.
In this article, we will show you how to install and use the iPerf tool to check the network throughput on Windows and Linux CentOS (there are iPerf versions for Android, MacOS, RouterOS from MikroTik and other platforms).
iPerf Versions: iPerf2 vs iPerf3
IPerf is a cross-platform tool and doesn’t require installation, just copy and run it on two devices, between which you want to test the network throughput.
IPerf works in a server-client mode. On the first device, the iPerf starts in server mode (it is waiting for traffic from the iPerf client). On the second computer, the iPerf starts in client mode, generates TCP or UDP traffic and measures the maximum data transfer rate.
There are currently two independent iPerf branches developing in parallel: iPerf2 and iPerf3. The functionality of these tools is mostly compatible, but they use different network ports by default. In iPerf1/2 it is 5001, in iPerf3 it is 5201.
- iPerf2 is preferably used for parallel threads, bidirectional tests, and this version is officially supported on Windows OS;
- iPerf3 has better implementation of high-speed UDP testing. IPerf3 code is significantly smaller and better optimized.
The remaining differences are not so significant, so no need to use a specific version of iPerf (even the CLI parameters are the same). In this article we will use the iperf3.
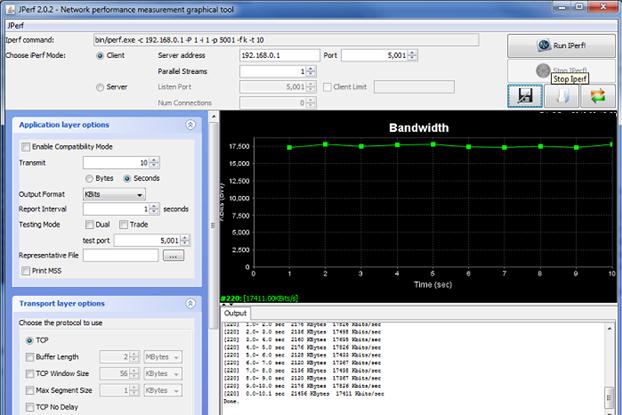
How to Install iPerf on Windows?
You can download iPerf 3.1.3 for Windows from the following link https://iperf.fr/iperf-download.php. If you want to use the iPerf 2.0 – you can get it here. You do not need to install the tool, it is enough to download the iPerf archive and extract it to a local directory on the drive. There are only two files in the archive: cygwin1.dll and iperf3.exe .

There are several iPerf GUI implementations for Windows. For example, Iperf3-Cygwin-GUI or jperf.
The jperf is written on Java (in order to run jperf, the Java VM must be installed on the computer). In addition to graphical form for the CLI interface, Jperf can build graphs bandwidth charts of the communication channel in real time.
To use it, just specify the iPerf server address and run the scan.
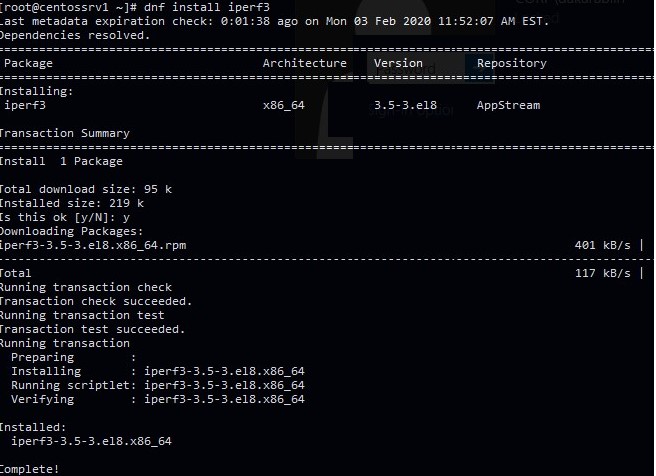
Installing iPerf on CentOS Linux
In CentOS 8, the iperf3 package is included in the AppStream base repository (in CentOS 7 you can find iperf3 in the EPEL repo). You can install it with the dnf (yum) command:
# dnf install iperf3
sudo apt install iperf3
If you want to use your Linux instance as the iperf3 server, you need to open the TCP/UDP ports 5201 in firewalld (iptables):
# firewall-cmd —permanent —add-port=5201/udp
# firewall-cmd —permanent —add-port=5201/tcp
# firewall-cmd —reload
Using iPerf Command to Measure Network Speed/Bandwidth
Let’s look at a few examples of using iPerf to test network throughput. In this example, we will use a Linux CentOS host as the iPerf server. Run the iPerf3 tool in server mode:
The iPerf server is running, it is waiting for connections on the 5201 TCP port.

# iperf3 -s -w 32768 –p 5200
- -w 32768 – set TCP windows size to 32 kB (by default it is about 8 kB)
- –p 5200 – the port on which iPerf is waiting for connections (I remind you that iperf2 listens by default on port 5001 and the iperf3 on 5201).
I am using a computer with Windows 10 installed as an iPerf client. Run the command prompt and go to the directory with the iPerf executable:
cd c:\tools\iperf
In order to run a network bandwidth test from the client, specify the iPerf server address (or DNS name):
iperf3.exe -c 192.168.1.200
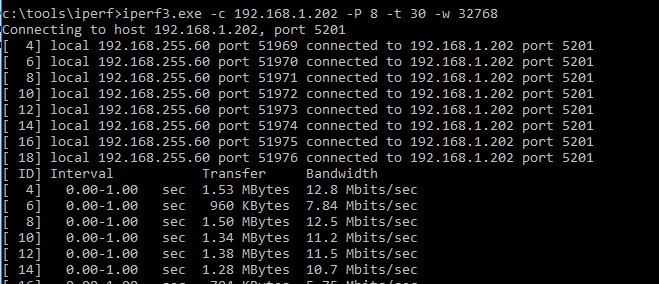
If you started the iPerf server with an increased TCP window size, you can use the following command to get the maximum network load:
iperf3.exe -c 192.168.1.200 -P 8 -t 30 -w 32768
- -c 192.168.1.200 – IP address of the iPerf server;
- -w 32768 – increase the TCP window size;
- -t 30 – is the time in seconds for the test to be done (by default, it is 10 seconds);
- -P 8 – is the number of parallel threads (streams) to get the maximum channel load;
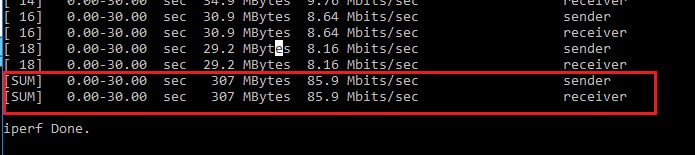
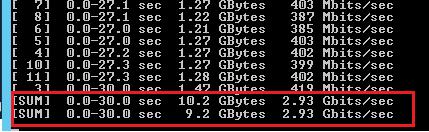
In my example, the test lasted 30 seconds. In the final report, we are interested in the values of the Bandwidth column listed in the last [SUM] line. In this case the average network bandwidth between two hosts is 85.9 Mbit/s. 307 MB of data was transferred (Transfer column) with the symmetric speed (sender=receiver).
Using the -f argument, you can change the speed format (bits, kilobits or megabits). In the continuous tests, when you have to estimate the performance during several minutes (hours), you can set the period of time to display the intermediate results using the –i option.
You can run iPerf in reverse mode (the server sends data, and the client accepts). User the –R option on the client for this.
By default, the utility generates TCP traffic, if you need to check your network bandwidth for UDP packets, you must use the –u option. In this case, you should start the iPerf server with the command: iperf3 -s –u ).
If you need to test your Internet service provider bandwidth, you can use one of the public iPerf servers (iPerf public host list is available here):
iperf3 -c iperf.scottlinux.com
If you need to measure the maximum network speed in both directions (in a duplex mode), use the –d option on the client:
iperf3.exe -c IP -P 8 -t 30 -w 32768 –d
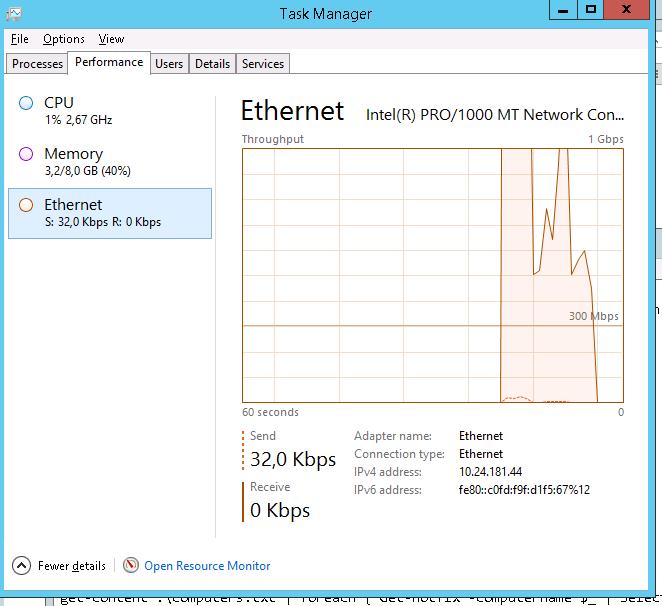
During the network test using iPerf, you can monitor your network connection throughput chart through the Task Manager.
You can display the full list of the options as follows:
Iperf is an easy-to-use and convenient network utility that helps you to measure network connection performance and maximum data transfer speed between two devices.
Проверка пропускной способности (NTTTCP) Bandwidth/Throughput testing (NTTTCP)
При тестировании пропускной способности сети в Azure рекомендуется использовать инструмент, предназначенный для тестирования сети и сводящий к минимуму использование других ресурсов, которые могут повлиять на скорость. When testing network throughput performance in Azure, it’s best to use a tool that targets the network for testing and minimizes the use of other resources that could impact performance. Рекомендуется использовать NTTTCP. NTTTCP is recommended.
Скопируйте этот инструмент на две виртуальные машины Azure одного размера. Copy the tool to two Azure VMs of the same size. Одна виртуальная машина выполняет роль отправителя, а другая — получателя. One VM functions as SENDER and the other as RECEIVER.
Развертывание виртуальных машин для тестирования Deploying VMs for testing
Для целей этого теста две виртуальные машины должны находиться в одной группе размещения или одной и той же группы доступности, чтобы можно было использовать свои внутренние IP-адреса и исключать подсистемы балансировки нагрузки из теста. For the purposes of this test, the two VMs should be in either the same Proximity Placement Group or the same Availability Set so that we can use their internal IPs and exclude the Load Balancers from the test. Существует возможность тестирования с помощью виртуального IP-адреса, но это выходит за рамки данного документа. It is possible to test with the VIP but this kind of testing is outside the scope of this document.
Запишите IP-адрес получателя. Make a note of the RECEIVER’s IP address. Назовем этот IP-адрес a.b.c.r. Let’s call that IP «a.b.c.r»
Запишите число ядер на виртуальной машине. Make a note of the number of cores on the VM. Назовем это значение #num_cores. Let’s call this «#num_cores»
Запустите тест NTTTCP продолжительностью 300 секунд (5 минут) на виртуальной машине-отправителе и виртуальной машине-получателе. Run the NTTTCP test for 300 seconds (or 5 minutes) on the sender VM and receiver VM.
Совет. При настройке этого теста для первого запуска можно попробовать более короткий период тестирования, чтобы быстрее получить результат. Tip: When setting up this test for the first time, you might try a shorter test period to get feedback sooner. Если инструмент будет работать ожидаемым образом, продлите период тестирования до 300 секунд, чтобы получить наиболее точные результаты. Once the tool is working as expected, extend the test period to 300 seconds for the most accurate results.
Для отправителя и получателя нужно указать одинаковый параметр длительности теста (-t). The sender and receiver must specify the same test duration parameter (-t).
Тестирование отдельного TCP-потока в течение 10 секунд: To test a single TCP stream for 10 seconds:
Параметры получателя: ntttcp -r -t 10 -P 1 Receiver parameters: ntttcp -r -t 10 -P 1
Параметры отправителя: ntttcp -s10.27.33.7 -t 10 -n 1 -P 1 Sender parameters: ntttcp -s10.27.33.7 -t 10 -n 1 -P 1
Предыдущий пример следует использовать только для подтверждения конфигурации. The preceding sample should only be used to confirm your configuration. Допустимые примеры тестирования рассматриваются далее в этом документе. Valid examples of testing are covered later in this document.
Тестирование виртуальных машин под управлением Windows Testing VMs running WINDOWS:
Скопируйте NTTTCP на виртуальные машины. Get NTTTCP onto the VMs.
Или просмотрите страницу GitHub верхнего уровня: https://github.com/microsoft/ntttcp Or view the top-level GitHub Page: https://github.com/microsoft/ntttcp \
Рекомендуется поместить NTTTCP в отдельную папку, например c:\tools. Consider putting NTTTCP in separate folder, like c:\tools
Разрешение трафика NTTTCP в брандмауэре Windows Allow NTTTCP through the Windows firewall
На в брандмауэре Windows виртуальной машине-получателе создайте правило, разрешающее прием трафика NTTTCP. On the RECEIVER, create an Allow rule on the Windows Firewall to allow the NTTTCP traffic to arrive. Проще разрешить саму программу NTTTCP по имени, чем входящий трафик через определенные TCP-порты. It’s easiest to allow the entire NTTTCP program by name rather than to allow specific TCP ports inbound.
Разрешите трафик NTTTCP в брандмауэре Windows следующей командой. Allow ntttcp through the Windows Firewall like this:
netsh advfirewall Firewall Добавление правила программа =
\ntttcp.exe имя = «ntttcp» Protocol = любой dir = в действии = разрешить Enable = да Profile = Any netsh advfirewall firewall add rule program=
\ntttcp.exe name=»ntttcp» protocol=any dir=in action=allow enable=yes profile=ANY
Например, если вы скопировали ntttcp.exe в папку c:\tools, то это будет следующая команда. For example, if you copied ntttcp.exe to the «c:\tools» folder, this would be the command:
netsh advfirewall firewall add rule program=c:\tools\ntttcp.exe name=»ntttcp» protocol=any dir=in action=allow enable=yes profile=ANY netsh advfirewall firewall add rule program=c:\tools\ntttcp.exe name=»ntttcp» protocol=any dir=in action=allow enable=yes profile=ANY
Выполнение тестов NTTTCP Running NTTTCP tests
Запустите NTTTCP на виртуальной машине-получателе (в командной строке, а не в PowerShell). Start NTTTCP on the RECEIVER (run from CMD, not from PowerShell):
ntttcp -r –m [2*#num_cores],*,a.b.c.r -t 300 ntttcp -r –m [2*#num_cores],*,a.b.c.r -t 300
Если у виртуальной машины четыре ядра и IP-адрес 10.0.0.4, то команда будет выглядеть следующим образом. If the VM has four cores and an IP address of 10.0.0.4, it would look like this:
ntttcp -r –m 8,*,10.0.0.4 -t 300 ntttcp -r –m 8,*,10.0.0.4 -t 300
Запустите NTTTCP на виртуальной машине-отправителе (в командной строке, а не в PowerShell). Start NTTTCP on the SENDER (run from CMD, not from PowerShell):
ntttcp -s –m 8,*,10.0.0.4 -t 300 ntttcp -s –m 8,*,10.0.0.4 -t 300
Дождитесь результатов. Wait for the results.
Тестирование виртуальных машин под управлением Linux Testing VMs running LINUX:
Выполните приведенные ниже команды на виртуальных машинах Linux (отправителе и получателе), чтобы подготовить на них ntttcp-for-linux. On the Linux VMs (both SENDER and RECEIVER), run these commands to prepare ntttcp-for-linux on your VMs:
CentOS — установите GCC и Git: CentOS — Install gcc and git:
Ubuntu-Install Build-Essentials и Git: Ubuntu — Install build-essential and git:
SUSE — Установка Git-Core, GCC и make: SUSE — Install git-core, gcc, and make:
Создание и установка в обеих ОС. Make and Install on both:
Как и в примере для Windows, предполагается, что IP-адрес виртуальной машины-получателя Linux — 10.0.0.4. As in the Windows example, we assume the Linux RECEIVER’s IP is 10.0.0.4
Запустите ntttcp-for-linux на виртуальной машине-получателе. Start NTTTCP-for-Linux on the RECEIVER:
На виртуальной машине-отправителе выполните следующую команду. And on the SENDER, run:
Если для теста не указан параметр времени, по умолчанию он длится 60 секунд. Test length defaults to 60 seconds if no time parameter is given
Тестирование подключения между виртуальными машинами под управлением Windows и Linux Testing between VMs running Windows and LINUX:
В этом сценарии нам потребуется включить режим без синхронизации, чтобы можно было запустить тест. On this scenarios we should enable the no-sync mode so the test can run. Это делается с помощью флага -N для Linux и флага -ns для Windows. This is done by using the -N flag for Linux, and -ns flag for Windows.


