- Fix the time problem on dual-boot computers (Windows and Linux or Android)
- Background
- How to set the Windows clock to Universal Time
- Alternate solution
- Share this article:
- Share this:
- Support Liliputing
- Contribute to our Patreon campaign
- Contribute via PayPal
- 16 replies on “Fix the time problem on dual-boot computers (Windows and Linux or Android)”
- Wrong Time Displayed in Windows-Linux Dual Boot Setup? Here’s How to Fix it
- Why Windows and Linux show different time in dual boot?
- Fixing Windows Showing Wrong Time in a Dual Boot Setup With Linux
- How to Dual Boot Windows 10 and Linux Starting with Windows or Linux
- Dual Boot Linux with Windows 10 – Linux Installed First
- Create Bootable Windows 10 Install Media Using Unetbootin
- Create Bootable Windows 10 Install Media Using Brasero
- Dual Boot Linux with Windows 10 – Windows Installed First
Fix the time problem on dual-boot computers (Windows and Linux or Android)
Posted on March 2, 2016 at 3:14 pm
I’ve been testing a number of tablets, notebooks, and other computers that can dual-boot Android and Windows recently. And I’ve noticed that many of them have the same problem: set the time in Windows, reboot into Android, and when you reboot into Windows again the time will be off by several hours.
It turns out that this is a long-running issue with computers that dual-boot Windows and alternate operating systems. And there’s a pretty simple fix.

Background
Windows uses your local time zone to set the time, but most other operating systems including OS X, Android, and many Linux distributions use Universal Time, or GMT to keep track of time and then convert that into your local time zone.
You could theoretically change set some of those operating systems to use LocalTime… but it’s easier to set Windows to Universal Time.
Note that the steps outlined below only work reliably if you’re using Windows 7 or later. But really, you should be. Windows XP is no longer officially supported, and Windows Vista is best forgotten altogether.
I’ve been playing with dual-boot configurations for over a decade, but hadn’t really noticed this problem until recently, when I started using a series of dual-boot Android/Windows tablets from China or when I tried installing Remix OS (a custom version of Android) on my PC.
It turns out that’s because most of the dual-boot solutions I’d tried involved Ubuntu… which automatically detects if Windows is installed on a computer when you’re installing the operating system, and uses LocalTime if it is.
But the problem has been around for a long time… as has a solution.
How to set the Windows clock to Universal Time
All we need to do is change one small registry setting:
1. Open the Start Menu (or Start Screen, depending on the version of Windows you’re using.
2. Type “regedit.exe” into the search box and hit enter.
3. When the registry editor opens, navigate to:

4. Right-click in the pane on the right and select New.
5. Choose DWORD (32-bit Value)

6. Name that new DWORD “RealTimeIsUniversal” (without the quotes).
7. Doubleclick RealTimeIsUniversal and change the Value from 0 to 1.

8. Reboot your computer into the non-Windows operating system.
Now the next time you boot into Windows, the time should be correct.
Alternate solution
Move to London, where the local time and Universal Time are always the same the same during at least part of the year.
Share this article:
Share this:
Support Liliputing
Liliputing’s primary sources of revenue are advertising and affiliate links (if you click the «Shop» button at the top of the page and buy something on Amazon, for example, we’ll get a small commission).
But there are several ways you can support the site directly even if you’re using an ad blocker* and hate online shopping.
Contribute to our Patreon campaign
Contribute via PayPal
* If you are using an ad blocker like uBlock Origin and seeing a pop-up message at the bottom of the screen, we have a guide that may help you disable it.
16 replies on “Fix the time problem on dual-boot computers (Windows and Linux or Android)”
Tx for this, mon. Helpful. Ire. Jah bless. Jah bless.
Thank you. I use f.lux to adjust the warmth of the screen so it’s important to have it be at the right time. See problems like this are why Windows sucks. Linux doesn’t have random errors like this and never made me go into obscure settings like that.
First solution is too hard for me. Will probably try the alternate one.
hello.. i have installed ubuntu with windows but at boot time ubuntu is directly started and
i can’t access windows.
This long ago fixed my problem with my Hackintosh, but I suspect that the Linux I’m using on the same box CommedoreOSVision is using Local time. It’s a minor annoyance that requires me to run the clock control panel when I boot back to windows.
i prefer the alternate solution – problem solved.
Does this tweak enable Windows to automatically adjust clock to current time zone when traveling?
Previously, I thought that it was simpler to just boot linux and edit /etc/default/rcS to:
Set UTC=no
…but when added Remix to the mix I found that there is no such file to edit in the Android file system, so I had to resort to this dirty old hack.
The simplest solution is probably to move to an equatorial country with a UTC offset of zero, which allows you to skirt the whole daylight savings time issue. I have heard lots of good things about Burkina Faso.
I don’t think I have seen this issue since I used Corel Linux. I don’t remember it using PCLOS, Red Hat, or Linux Mint. These days I rarely boot Windows and all but one of my computers run Linux exclusively.
Best Solution: Don’t install Windows.
Are there any phones that can dual boot windows and android? Could snapdragon 820 do it?
As Zdnet said recently, the best advice about getting a Windows Phone is….. don’t.
i always just leave the windows boxen at GMT. Works for win7. I hope win10 or whatever doesn’t “fix” that.
>Move to London, where the local time and Universal Time are always the same.
They are not! London runs on BST in the summer.
Whoops! That’s what I get for trying to be clever. 🙂
But I already packed my suitcase and gave the land lord and boss my notice and everything…
😀
Wrong Time Displayed in Windows-Linux Dual Boot Setup? Here’s How to Fix it
Last updated April 1, 2021 By Abhishek Prakash 47 Comments
If you dual boot Windows and Ubuntu or any other Linux distribution, you might have noticed a time difference between the two operating systems.
When you use Linux, it shows the correct time. But when you boot into Windows, it shows the wrong time. Sometimes, it is the opposite and Linux shows the wrong time and Windows has the correct time.
That’s strange specially because you are connected to the internet and your date and time is set to be used automatically.
Don’t worry! You are not the only one to face this issue. You can fix it by using the following command in the Linux terminal:
Again, don’t worry. I’ll explain in detail how the above command fixes the wrong time issue in Windows after dual boot. But before that, let me tell you why you encounter a time difference in a dual boot setup.
Why Windows and Linux show different time in dual boot?
A computer has two main clocks: a system clock and a hardware clock.
A hardware clock which is also called RTC (real time clock) or CMOS/BIOS clock. This clock is outside the operating system, on your computer’s motherboard. It keeps on running even after your system is powered off.
The system clock is what you see inside your operating system.
When your computer is powered on, the hardware clock is read and used to set the system clock. Afterwards, the system clock is used for tracking time. If your operating system makes any changes to system clock, like changing time zone etc, it tries to sync this information to the hardware clock.
By default, Linux assumes that the time stored in the hardware clock is in UTC, not the local time. On the other hand, Windows thinks that the time stored on the hardware clock is local time. That’s where the trouble starts.
Let me explain with examples.
You see I am in Kolkata time zone which is UTC+5:30. After installing, when I set the timezone in Ubuntu to the Kolkata time zone, Ubuntu syncs this time information to the hardware clock but with an offset of 5:30 because hardware clock (RTC) has to be in UTC for Linux.
Let’ say the current time in Kolkata timezone is 15:00 which means that the UTC time is 09:30.
Now when I turn off the system and boot into Windows, the hardware clock has the UTC time (09:30 in this example). But Windows thinks the hardware clock has stored the local time. And thus it changes the system clock (which should have shown 15:00) to use the UTC time (09:30) as the local time. And hence, Windows shows 09:30 as the time which is 5:30 hours behind the actual time (15:00 in this example).

Again, if I set the correct time in Windows by toggling the automatic time zone and time buttons, you know what is going to happen? Now it will show the correct time on the system (15:00) and sync this information (notice the “Synchronize your clock” option in the image) to the hardware clock.
If you boot into Linux, it reads the time from the hardware clock which is in local time (15:00) but since Linux believes it to be the UTC time, it adds an offset of 5:30 to the system clock. Now Linux shows a time of 20:30 which is 5:30 hours ahead of the actual time.
Now that you understand the root cause of the time difference issues in dual boot, it’s time to see how to fix the issue.
Fixing Windows Showing Wrong Time in a Dual Boot Setup With Linux
There are two ways you can go about handling this issue:
- Make Windows use UTC time for the hardware clock
- Make Linux use local time for the hardware clock
It is easier to make the changes in Linux and hence I’ll recommend going with the second method.
Ubuntu and most other Linux distributions use systemd these days and hence you can use timedatectl command to change the settings.
What you are doing is to tell your Linux system to use the local time for the hardware clock (RTC). You do that with the set-local-rtc (set local time for RTC) option:
As you can notice in the image below, the RTC now uses the local time.

Now if you boot into Windows, it takes the hardware clock to be as local time which is actually correct this time. When you boot into Linux, your Linux system knows that the hardware clock is using local time, not UTC. And hence, it doesn’t try to add the off-set this time.
This fixes the time difference issue between Linux and Windows in dual boot.
You see a warning about not using local time for RTC. For desktop setups, it should not cause any issues. At least, I cannot think of one.
I hope I made things clear for you. If you still have questions, please leave a comment below.
Like what you read? Please share it with others.
How to Dual Boot Windows 10 and Linux Starting with Windows or Linux


A computer that boots both Windows 10 and Linux can easily be the best of both worlds. Having easy access to either of the operating systems lets you enjoy the benefits of both. You can hone your Linux skills and enjoy the free software only available for Linux platforms. Or, you can switch back to Windows 10 to use apps like Photoshop, AutoCAD or Microsoft Office. The beauty of dual booting is that it lets each operating system take full advantage of the hardware resources of your computer. While virtual machines and the Windows Subsystem for Linux can give you a taste of the Linux experience, dual booting lets you tap its full potential.
The good news is that Windows 10 and Linux live in harmony better than ever these days. Dual booting Windows 10 and Linux used to be a precarious process that could wreck your Windows installation, your Linux installation or both. While the process isn’t quite a smooth as dual booting macOS and Windows with Boot Camp, it comes close. In this article, we’ll show you how to safely install Windows 10 and Linux on the same hard drive. It doesn’t matter if you’re starting with Linux or starting with Windows—dual booting is easy to set up either way.
Dual Boot Linux with Windows 10 – Linux Installed First
Let’s start with the (slightly) harder way first; you already have a copy Linux installed and you want to install Windows on a partition. The first step is to create the partition where Windows 10 will be installed. We have covered how to create partitions in Linux, so, start by reviewing our article on how to do that.
Once you have your partition set up, you will need to purchase Windows 10, download the ISO file then create a bootable copy. Creating a bootable copy of Windows 10 on Linux can be done using the free Unetbootin (USB thumb drive) or Brasero software if you are installing from a DVD.
Create Bootable Windows 10 Install Media Using Unetbootin
Unetbootin can be downloaded from the Software Center in Ubuntu. Once you have it up and running, launch it. Make sure you are using a thumb drive with at least 8 GBs of free space.
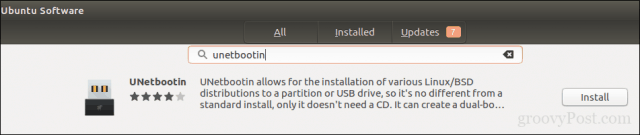
Select the Disk Image radio box, click the browse button (represented by an ellipsis …), browse to the ISO file then click Open. Chose the medium from the Type list box—in this case, your USB drive. Click on the drive list box then select your USB thumb drive.
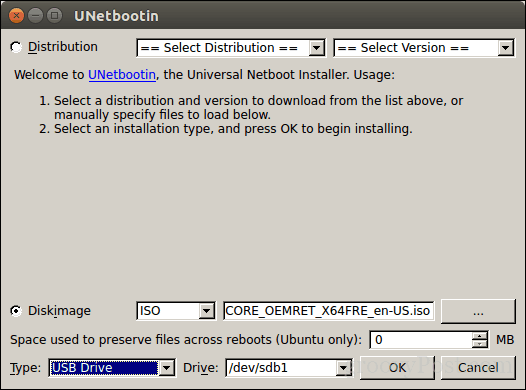
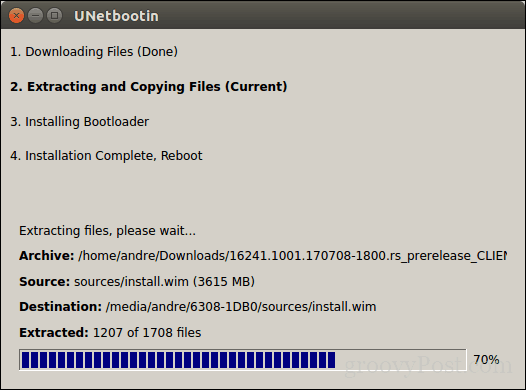
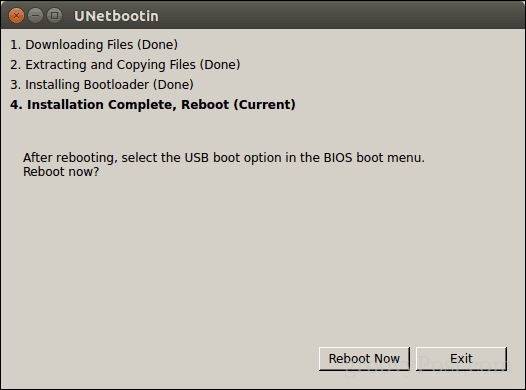
Click OK, then wait while the bootable copy is created.
When complete, click Exit.
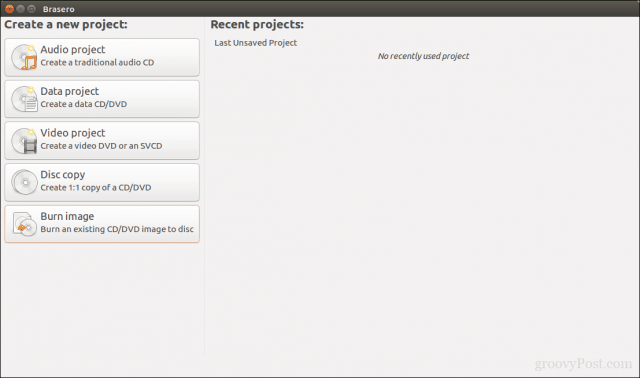
Create Bootable Windows 10 Install Media Using Brasero
If you already made a bootable USB with Unetbootin, you can skip this part. If you are still using an old school system with a DVD drive, you can use the Brasero DVD Burning software, which you can download from the Software Center also. Please keep in mind, Windows 10 ISO files are getting larger beyond the standard 4.7 GB DVDs. So, in some cases, it’s best you use 8.5 GB dual-layer DVDs if supported by your drive. If you can’t, then it’s best you use a USB thumb drive.
In Brasero, click Burn Image.
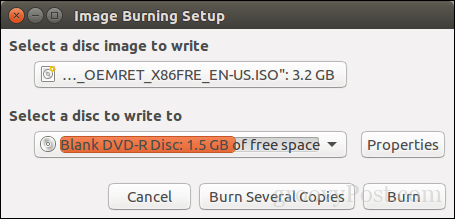
Select your disc image, make sure a blank DVD disc is inserted then click Burn.
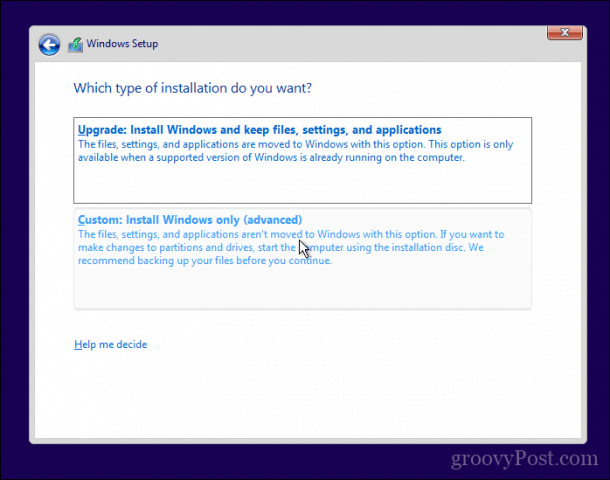
After preparing your install media, insert it or connect it. Reboot your computer, then configure your BIOS to boot from the drive. Windows 10 will boot into setup as it normally does. After you arrive at the setup screen, click Custom: Install Windows only (advanced).
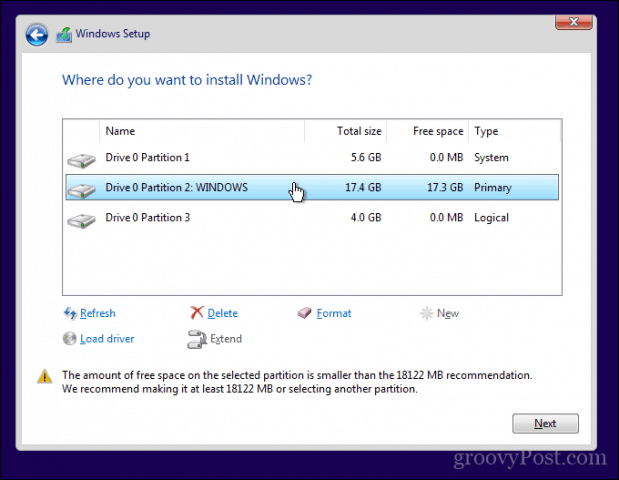
Make sure you select the right partition; don’t wipe out your Linux installation. Click Next then wait while Windows 10 Setup copies files to the drive. Your computer will be rebooted several times.
When setup is complete, follow the instructions to complete the out of box experience.
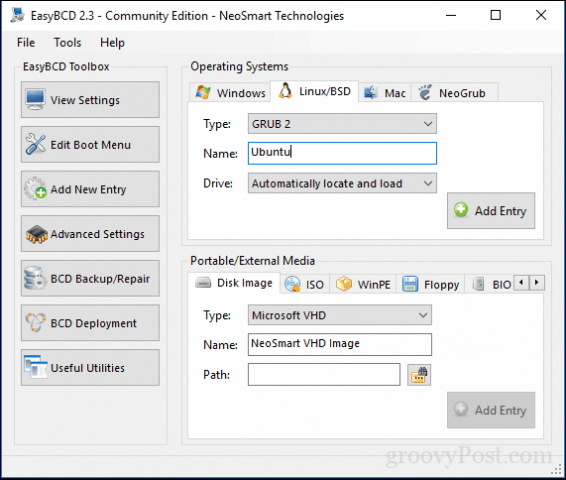
After that’s complete, you might notice the obvious—there is no way to boot into Linux anymore. Here is how you fix that. Download a free utility called EasyBCD from Neosmart Technologies. Proceed to install EasyBCD then launch it. Select the Linux/BSD tab. Click in the type list box, select Ubuntu; enter the name of the Linux distribution, choose automatically locate and load then click Add Entry. Reboot your computer.
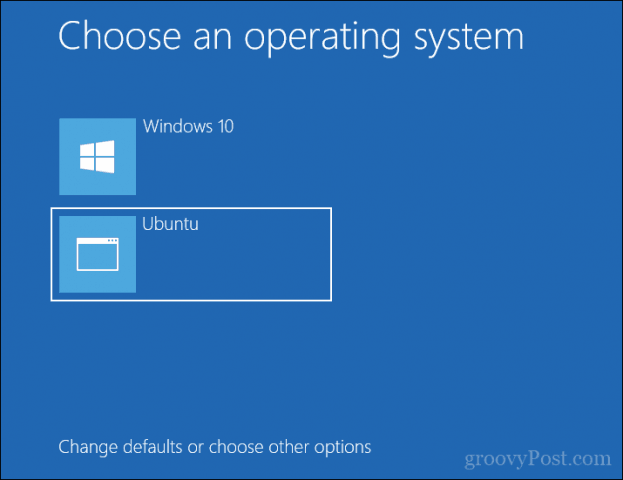
You will now see a boot entry for Linux on the Windows graphical boot manager.
Dual Boot Linux with Windows 10 – Windows Installed First
For many users, Windows 10 installed first will be the likely configuration. In fact, this is the ideal way to dual boot Windows and Linux. Again, I will be using the Ubuntu Linux distribution. You can download the Ubuntu Linux ISO image from Canonical’s web page then create a bootable copy using Unetbootin for Windows or burn to a blank DVD using disc image in Windows 10.
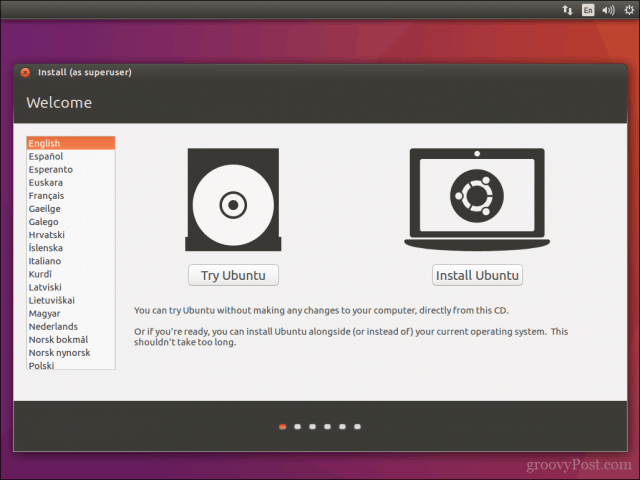
After creating your install media, configure your BIOS to boot from it. Ubuntu’s installation wizard intelligently detects existing Windows installations. It will ask you if you would like to install Ubuntu alongside Windows.
At the Ubuntu install screen, click Install Ubuntu.
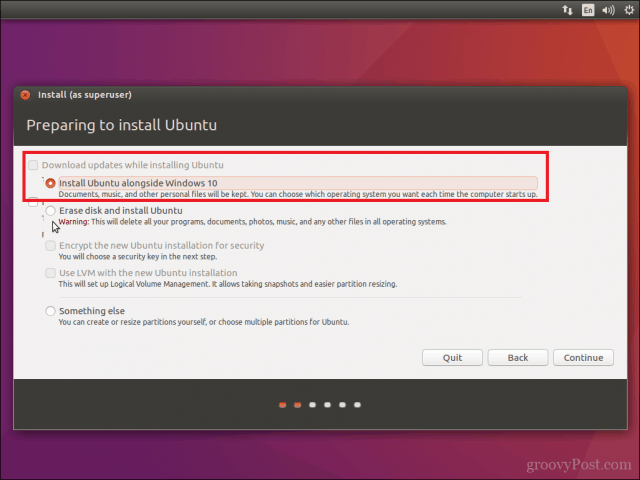
Choose whether you want to download and install updates and third-party drivers and codecs then click Continue.

Select the option Install Ubuntu alongside Windows 10 then click Continue.
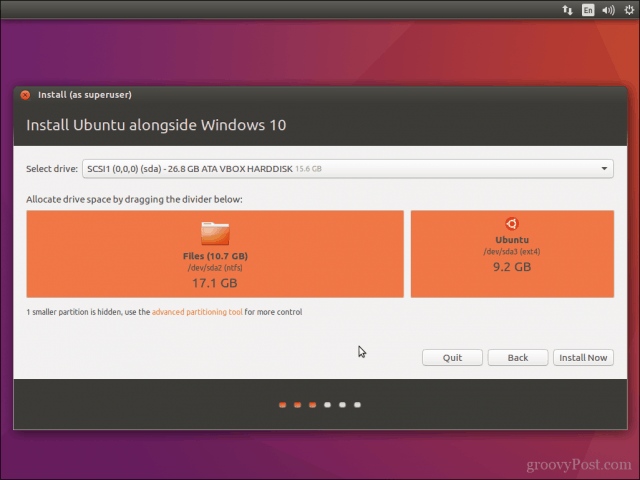
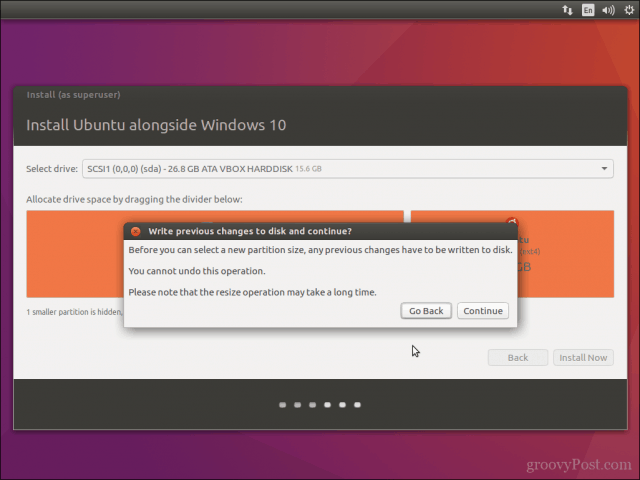
Ubuntu’s installer will set a default allocation of space for the installation. If you have enough space, you can resize the partition by placing your mouse between the divider then drag it left or right to make adjustments. Once you are satisfied with the allocated amount for your Ubuntu installation, click Install Now.
Click Continue to confirm changes.
Click Continue again.
Enter your time zone then click Continue.

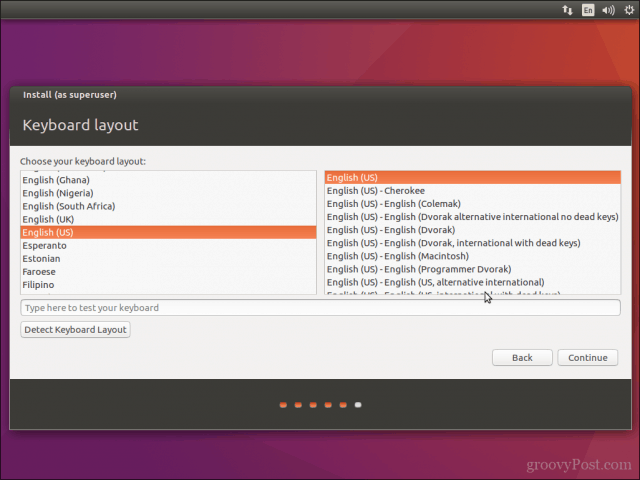
Select your keyboard layout, click Continue.
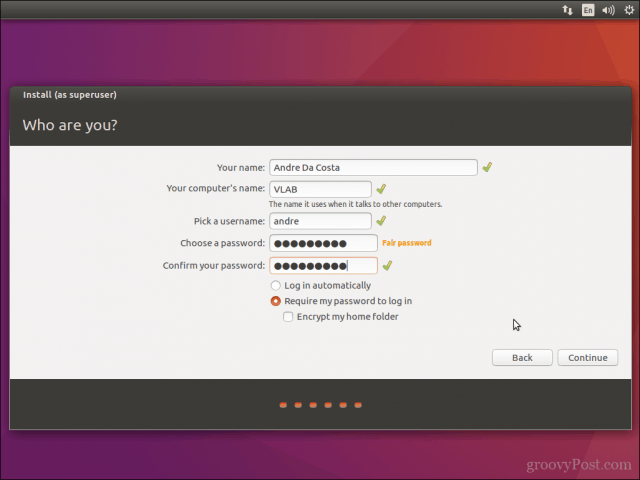
Create your user account by providing your full name, computer name, login name, and password. Choose whether you want to log in automatically or be prompted for a password. You can also encrypt your home folder for extra security. Click Continue.
Wait while Ubuntu copies files.
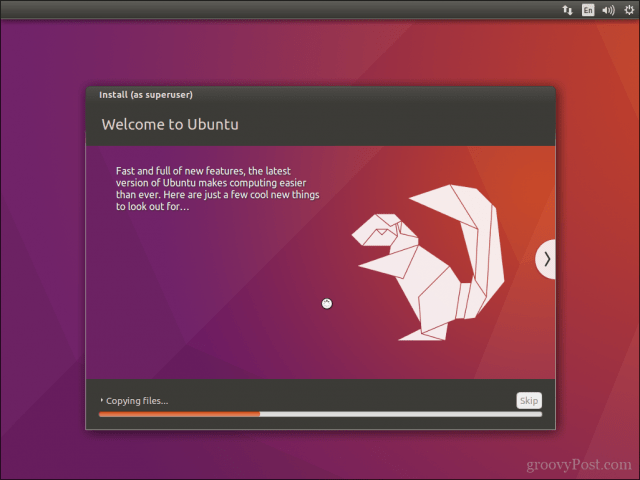
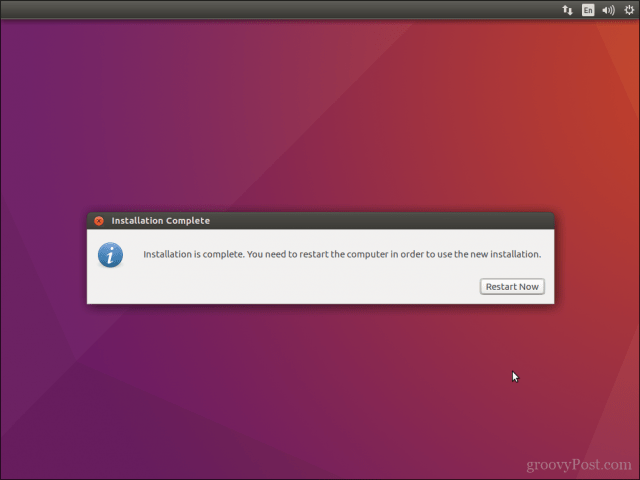
When complete, click Restart Now.
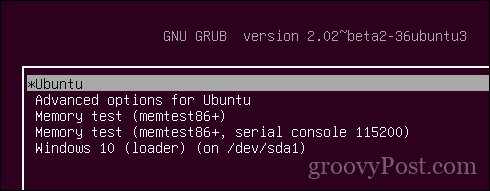
Ubuntu will add a boot entry for Windows 10 to the GRUB boot manager, which you can select using the up or down arrow then hitting Enter.
That’s it, Windows 10 and Ubuntu is now set up on your computer.
Let us know what you think. If you have done this before, share some of your tips with us. By the way, what’s your favorite distro?


