Dual Boot Windows 10 and Linux Ubuntu on Separate Hard Drives [duplicate]
How would I go about dual booting Windows 10 and Ubuntu, the windows drive is on an ssd as my c drive and my s drive is a hdd that I want to use for Linux. I have no idea what I need to download it or anything.

3 Answers 3
This should work for most systems that use UEFI and which have two HDD.
Specification used for the tutorial below:
Dell Inspiron E5440:
Main HDD — 256GB Samsung SSD (Windows 10 installed)
Secondary HDD — 64GB Transcend mSATA SSD (Mint 18 was installed to this drive)
A) UEFI/BIOS
Set to «UEFI mode only» (no legacy/CSM).
Disable «secure boot«
Disable «Intel Rapid Start» (if equipped)
Disable «fast boot» in UEFI (note this is different than the «fastboot» setting in Windows 8/10). The options in your UEFI/BIOS might say something like Full/Minimal/Automatic for boot mode. Select Full (or thorough, or complete, etc whatever your UEFI vendor has chosen to call it).
B) Advanced Power Options (Fastboot)
Disable fastboot in Windows 8/10 under «advanced power options«. Restart computer to ensure that this subsequent boot and the next reboot/shutdown will be in «normal» mode.
Install Macrium Reflect (free) and create a backup image and reinstallation media should something go wrong with Windows 10.
C) Rufus / Bootable USB stick
Use Rufus to create a bootable USB stick with your choice of Ubuntu based distro. Make sure in Rufus that you CHOOSE the option UEFI/GPT only. This ensures the Linux environment boots only into UEFI mode during your install.
D) Boot Menu
Reboot your computer and press key for one time boot menu (Dell is typically F12). Select your USB stick from the boot options.
Make sure it says UEFI in front of the USB stick in the boot menu.
If not, return to Windows and recreate your USB stick with Rufus ensuring you choose the UEFI/GPT (only) option.
E) Boot into USB Stick
Boot into Linux live environment and begin install.
F) Installation type
When you get to the installation option, choose «Something else» at the bottom of the Ubiquity installer.
G) Create partitions
Find your secondary HDD that you will be installing Linux to.
In my case it was listed as /dev/sdc (with /dev/sda being the windows drive and /dev/sdb the USB drive [which was invisible in the installer]).
1st Partition / EFI
Select your target drive (in my case /dev/sdc)
Select «Make New Partition Table«
Partition the target drive as follows:
Size: 650 MB
Type for the new partition: Primary
Location for the new partition: Beginning of this space
Use as: EFI (this will be listed as /dev/sdc1 efi in the partitioning tool once you create it)
2nd Partition / Root
Select «free space» under your target drive (in my case /dev/sdc)
Partition the target drive as follows:
Size: min. 10 GB (20+GB better)
Type for the new partition: Primary
Location for the new partition: Beginning of this space
Use as: ext4
Mount point: Choose «/»
3rd Partition / Swap
Select «free space» under your target drive (in my case /dev/sdc)
Partition the target drive as follows:
Size: min. 2 GB (20+GB better)
Type for the new partition: Primary
Location for the new partition: Beginning of this space
Use as: swap (if you wish to use hibernation, the swap needs to be just slightly larger than your total amount of RAM — example I have 8 GB so the size of this parition was set at 9000 MB)
4th Partition / Home
Select «free space» under your target drive (in my case /dev/sdc)
Partition the target drive as follows:
Size: remainder of space on drive
Type for the new partition: Primary
Location for the new partition: Beginning of this space
Use as: ext4
Mount point: Choose «/home»
H) Boot loader Device
- BEFORE clicking «Install Now», from the «device for boot loader installation» option button, select the 650MB EFI partition you just created as the target for the bootloader. (example /dev/sdc1 in my case).
- Click «Install Now«.
I) Installation & Reboot
- Finish installation process and reboot (removing the USB stick when your UEFI/BIOS screen logo appears).
J) Upon reboot
After UEFI/BIOS reads the new bootloader entry that Linux has added to it, you will be presented with the grub menu with a listing of your Linux distro as well as a listing to boot Windows 10.
Boot into Linux
Install any updates and then reboot and attempt to enter Windows 10 from the grub menu to make sure that grub correctly handles the hand-off to the Windows 10 bootloader.
What you have done:
You have installed the Linux EFI bootloader to the newly created EFI partition. In the process of this, Linux has added an entry to your UEFI listings in your systems UEFI/BIOS. Linux has also automatically detected your Windows 10 install and added a grub menu item to boot it. Your computer at this point will now automatically boot to Linux unless you choose to boot to Windows (from the Grub menu).
What you have not done:
You have not in any way altered your Windows 10 install or its bootloader or even so much as touched the Windows 10 EFI partition. Everything is reversible simply by removing the Linux UEFI listing from your UEFI/BIOS settings. How to do so varies from each vendor.
How to install Windows and linux on separate drives so that their booting is independent
I’ve a system with a UEFI firmware, to which I’ll be adding two drives. I wish to install Windows 7 on one and a linux distro on another. I would like it set up such that if one drive were to be offline, I could reliably boot and operate the other OS, save for complaints about missing data partitions.
My plan is to install Windows first with only one drive connected. Partition the drive as GPT and install. Windows will create an EFI partition and add its UEFI boot entry.
Then connect the other drive — so both are online — and tell the linux installer to create its EFI partition on the 2nd drive and install its bootloader there. I’m deciding between OpenSuse Tumbleweed and one of the Arch-based distros. Will they allow me to do this at install time?
So the UEFI boot entry for Windows points to Drive1\EFI and that for linux, points to Drive2\EFI. These entries should identify the partitions via UUID. I’ll use the UEFI boot menu at startup to choose OS.
Is my plan viable? In linux, will the drive device address change (sdb —> sda) if only one drive is present wreck things?
Can this be carried out via BIOS/MBR modes? If this can’t be done at all, why not?
P.S. I scanned most of the related questions displayed, but none seemed to have had the same requirements or circumstances. If there is one, with an answer, do let me know.
4 Answers 4
I think UEFI can automatically handle that. At least it should find both EFI Partitions, just like it will find any EFI Partition on a DVD that is inserted or on USB Sticks.
You can configure the order in UEFI manually, or you can press a button on startup in most cases that let’s you choose what to boot.
Yup, distros will allow you to do that on install time, but depending on what you install you might have to do more or less work. Antergos for example specifically asks for the /boot/efi partition and you can create one if it does not exist — just google it if you can’t figure it out in install times, this is basic stuff that should be mentioned somewhere for every distro.
I don’t know about BIOS/MBR, but I think it would be possible even with that instead of UEFI.
Edit:
There shouldn’t be any need to connect them one after the other. It should work fine with both connected from the beginning.
What you’re proposing was somewhat common in the days of BIOS-only booting, and worked reasonably well in that context. There is a complication in EFI-mode booting, though: Under EFI, boot loaders are stored in the EFI System Partition (ESP) using semi-arbitrary filenames. To tell the computer what boot loader to use, boot loader filenames (including identification of the partition(s) on which they reside) are stored in NVRAM. The complication is that many EFIs will automatically delete NVRAM entries that point to files that don’t exist. Thus, once you remove a disk from the computer, the EFI may delete references to its boot loader(s), and when you plug that disk back in, it will no longer be bootable — at least, not without some way to restore its NVRAM entry.
I’d like to emphasize that not all EFIs do this; some leave invalid NVRAM entries in place, which means that they’ll continue to work after you remove and then restore a hard disk. I’m not sure of the percentage of computers that remove NVRAM entries; you’ll just have to check this for yourself.
One possible way around this issue is to make use of the «fallback filename,» which is EFI/BOOT/bootx64.efi (for x86-64/AMD64/x64 systems) on the ESP. The boot loader with this filename is launched if the firmware can’t find any other valid boot loaders. Thus, you could copy or rename the OS’s normal boot loader to this name to make it work; or you could put a boot manager in that place. (A boot manager lets you pick which OS to boot; a boot loader loads the OS kernel into memory. Some programs, like GRUB, do both things.) Something like my rEFInd boot manager might be helpful for this. In theory, putting rEFInd in the fallback position on both disks and clearing the NVRAM entries for Windows and Ubuntu should work fairly well, but there is one complication: Many EFIs treat the Windows boot loader ( EFI/Microsoft/Boot/bootmgfw.efi ) as if it were another fallback filename. It may be promoted over the regular fallback filename, so the system may boot to Windows if the Windows disk is installed.
Note that, if the computer removes invalid NVRAM entries and so you rely on the fallback filename, booting may become unpredictable. That is, the computer might go to Windows one time and Linux another time, depending on what it had last booted, what disk(s) had been plugged in the last time it booted, etc. You should be able to use the computer’s built-in boot manager to force a boot to a specific OS, but these tools are often awkward and are sometimes unreliable.
All of this makes the answer to the question of why you want to be able to remove disks important. Under EFI, leaving both your disks plugged in at all times is likely to be simpler than swapping them out, as you say you want to do. If you want to reduce the odds of one OS trashing the other’s files, you might be better off with good backups and good planning of which partition(s) each OS is permitted to read and write.
Depending on your needs, an in-between option is to leave one disk permanently installed and place both OSes’ boot loaders on that disk. You could then unplug the second disk on an as-needed basis. Be aware, though, that many distributions configure GRUB to rely on files in the Linux /boot directory, so if you want to make the Linux disk unpluggable, you may need to put a /boot partition on the permanently-installed disk. Alternatively, you could become an expert in GRUB so as to keep its configuration and support files on the ESP; or you could use something other than GRUB. As an extreme-case alternative, you could have a very small disk (even a USB flash drive) with an ESP and, if necessary, a /boot partition, and use separate disks for the bulk of each OS’s installation.
Another option is to rely on the Compatibility Support Module (CSM), which provides support for BIOS-mode (aka «legacy») booting. You could install both Windows and Linux in BIOS mode and boot the computer much like you’d have done ten years ago. Controlling the CSM requires some expertise, though; it’s easy to accidentally boot in EFI mode rather than BIOS mode (or vice-versa), and if you’re unfamiliar with it, you might not even realize what you’ve done until you’ve fully installed the OS and it ends up not booting the way you expected. See this page of mine for more on this subject.
Разбираемся с UEFI и GPT: установка Windows и Kubuntu на один диск
Помните те времена, когда BIOS был 16-битным с адресным пространством в 1 Мб, а вся информация о загрузчиках писалась в MBR? На смену уже давно пришли более гибкие технологии: UEFI (замена BIOS), и GPT (замена MBR).
Предыстория: Понадобилось мне недавно на свой домашний десктоп поставить 2 системы, чтобы разграничить окружение. Kubuntu для разработки на Ruby on Rails (ибо работаю удаленно), и Windows для всяких игрушек в свободное время. Хочу заметить, что несколько лет назад это было достаточно просто: один раздел для винды и один раздел для линукса, загрузчик записывался в MBR. Однако, технологии не стоят на месте, и оказалось, что настройка dual boot’а теперь несколько изменилась.
Итак, начнем.
Терминология
GPT (GUID Partition Table, Таблица разделов GUID) — часть спецификации UEFI. UEFI использует GPT так же как BIOS использует MBR.
Главным отличием GPT от MBR, на мой взгляд, являются:
- Количество разделов: MBR поддерживает только 4 раздела. Можно и больше, но только через extended partition, что является просто хаком ограничений. GPT поддерживает до 128 разделов.
- Размер диска: MBR поддерживает диски до 2Тб, в то время как GPT — до 9.4 Зеттабайт (=9.4 × 10^21 байт, или условно 1000 Тб)
- Порядок загрузки: раньше BIOS загружал MBR, и в нем содержались адреса загрузчиков для каждого раздела диска. Теперь UEFI считывает GPT, находит в таблице все разделы типа efi (на них содержатся загрузчики), и подгружает их в память. Разберем это на примере немного позже.
Что делаем:
Устанавливаем следующие ОС на пустой HDD размером в 1 Тб.
- Windows 8.1 x64. Windows поддерживает загрузку с GPT начиная с Windows 8 для 32 битной архитектуры и с Windows Server 2003 и Windows Vista для 64 бит (Источник).
- Kubuntu 15.04. По идее подойдет любой дистрибутив, который поддерживает Grub2, лично я предпочитаю Kubuntu.
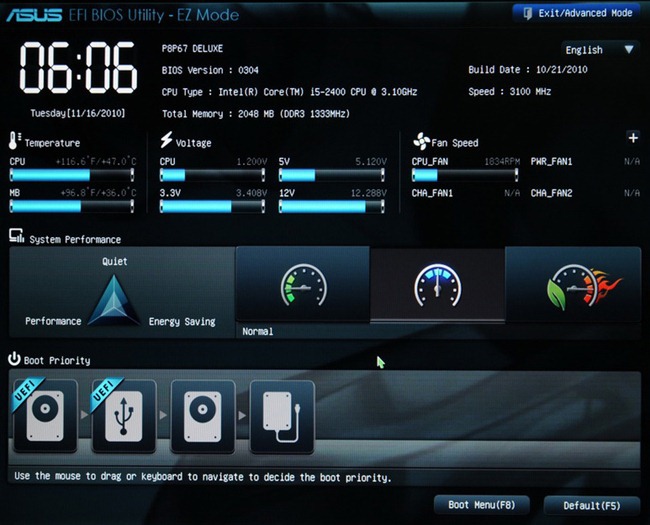
NB: Материнская плата поддерживает UEFI
Разбивка диска
Сначала устанавливаем Windows 8, т.к. она автоматически будет использовать GPT.
Разбивка будет выглядеть так (пардон за кривой снимок):
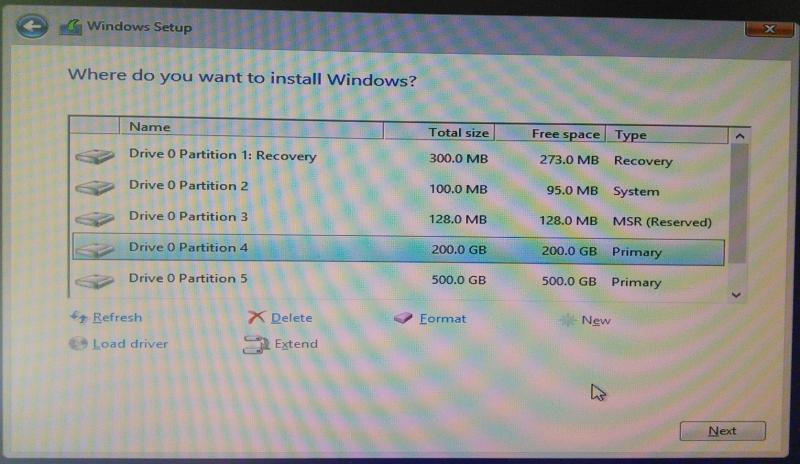
Винда по умолчанию создает 4 раздела:
- Recovery (300Мб). Очевидно, что он используется для восстановления системы. Оставим как есть.
- EFI partition (100Мб). Помечается как system type (не любят в Майкрософте называть вещи своими техническими именами). Собственно сюда и пишутся загрузчики.
- MSR (128Мб, Microsoft Reserved Partition). Для меня остается загадкой, зачем он нужен. Данных там никаких нет, просто пустое место, зарезервированное для каких-то непонятных целей в будущем.
- Основной раздел. Мы его поделим на 3: 200 гигов под винду, 500 гигов для раздела под данные и остальное пространство пока оставим неразмеченным (отформатируем потом при установке Kubuntu).
Пропустим саму установку Windows, т.к. в ней все стандартно и понятно.
Теперь загрузимся с USB в Kubuntu Live.
Проверим EFI раздел:
Boot0000 — виндовый загрузчик
Boot0001 — дефолтный загрузчик
Boot0003 — флешка с Kubuntu Live
Обратите внимание, что список загрузчиков не привязан к одному физическому диску как в MBR. Он хранится в NVRAM.
Можем также сразу посмотреть, что же в этом разделе, подмонтировав его:
Там окажутся следующие файлы:
Убедились, что все хорошо. Теперь продолжаем разбивку диска (через KDE Partition Manager).
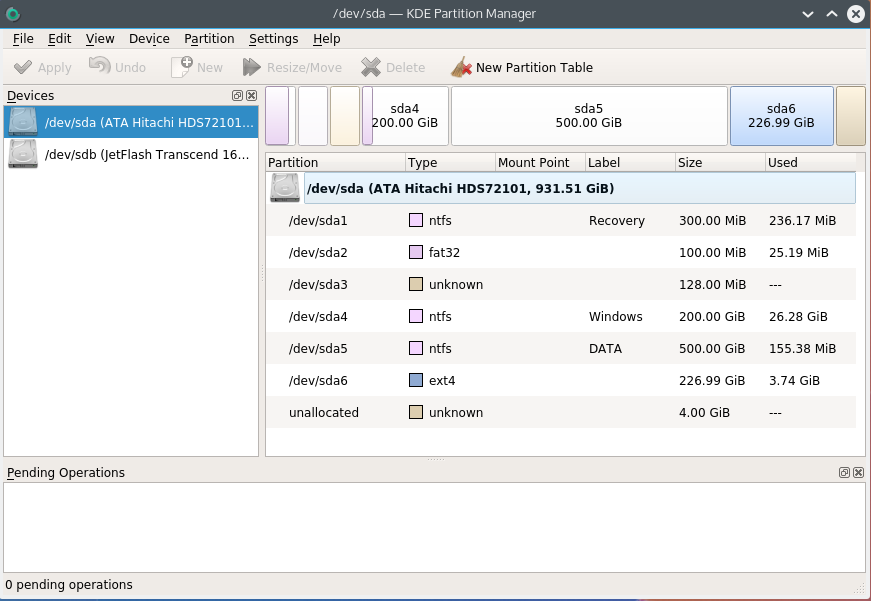
Первые пять разделов остались прежними. Обратите внимание, как Kubuntu определила разделы:
- sda2 определился как FAT32. Это практически верно, т.к. файловая система типа EFI основана на FAT, только с жесткими спецификациями.
- sda3 (MSR) не определился, т.к. файловой системы там так таковой нет.
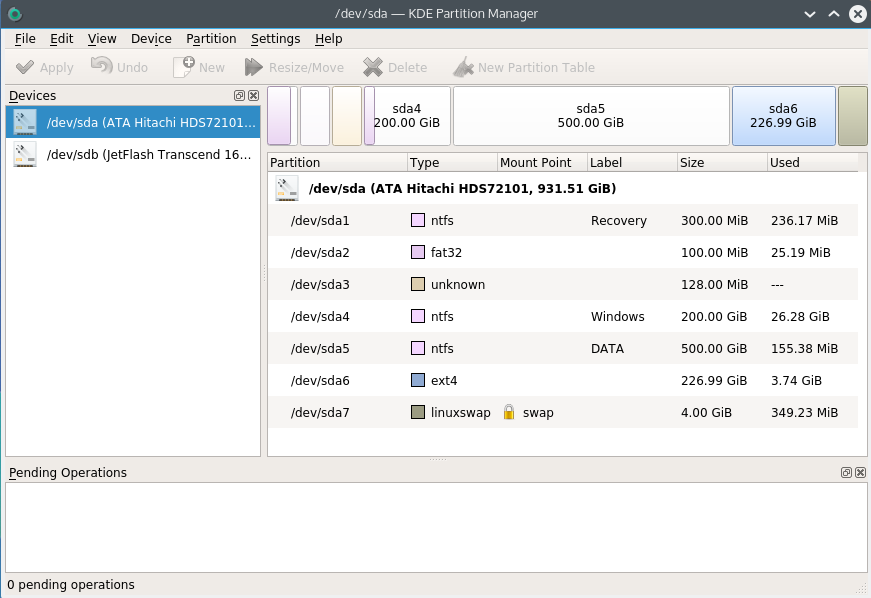
Нам осталось только отформатировать раздел для Kubuntu в ext4, и выделить раздел под swap.
Несколько слов про swap. Рекомендуют на swap выделять от SQRT(RAM) до 2xRAM. Т.к. у меня 16 Гб RAM, то по минимуму мне надо 4 Гб свопа. Хотя я с трудом могу представить ситуации, при которых он будет использоваться: десктоп в hibernate я не перевожу, и сильно тяжелых программ, которые жрут больше 16 гигов, не использую.
P.S. При форматировании раздела в swap Partition Manager может выдать ошибки, которые связаны с тем, что Kubuntu автоматически монтирует в себя любой swap раздел, однако на результат эти ошибки не влияют.
Итак, финальная разбивка:
Теперь самое главное для правильного dual boot’а. При установке Kubuntu важно выбрать, куда установить загрузчик:

Указываем, конечно же на раздел EFI.
После завершения установки Kubuntu, заходим в систему и проверяем, какие файлы появились на efi разделе (монтировать уже не нужно):
Смотрим, как теперь выглядит список загрузчиков:
Вот как это выглядит при загрузке:

А еще эти загрузчики доступны сразу из UEFI (в старом BIOS’е такое было бы невозможно — там был выбор только диска, он просто не знал, что такое загрузчики):
Ну и напоследок: чтобы dual boot правильно работал, в Windows надо обязательно отключить fast boot. Это такая нехорошая фича, которая может привести к потере данных.

При выключении компьютера Windows сохраняет файловую структуру NTFS разделов в файл (видимо, потому что один файл прочитать быстрее, чем сканировать много разных файлов). Если записать файл на NTFS раздел через линукс, и потом загрузиться в Windows, то Windows просто не увидит файл. Источник
Если выключить комп через Windows, и потом попытаться загрузить Linux, то он просто не запустится из-за «ошибки» NTFS. Источник


