Use the System File Checker tool to repair missing or corrupted system files
If some Windows functions aren’t working or Windows crashes, use the System File Checker to scan Windows and restore your files.
Though the steps below might look complicated at first glance, just follow them in order, step-by-step, and we’ll try to get you back on track.
Run the System File Checker tool (SFC.exe)
To do this, follow these steps:
Open an elevated command prompt. To do this, do the following as your appropriate:
If you are running Windows 10, Windows 8.1 or Windows 8, first run the inbox Deployment Image Servicing and Management (DISM) tool prior to running the System File Checker. (If you are running Windows 7 or Windows Vista, skip to Step 3.)
Type the following command, and then press Enter. It may take several minutes for the command operation to be completed.
DISM.exe /Online /Cleanup-image /Restorehealth
Important: When you run this command, DISM uses Windows Update to provide the files that are required to fix corruptions. However, if your Windows Update client is already broken, use a running Windows installation as the repair source, or use a Windows side-by-side folder from a network share or from a removable media, such as the Windows DVD, as the source of the files. To do this, run the following command instead:
DISM.exe /Online /Cleanup-Image /RestoreHealth /Source: C:\RepairSource\Windows /LimitAccess
Note: Replace the C:\RepairSource\Windows placeholder with the location of your repair source. For more information about using the DISM tool to repair Windows, reference Repair a Windows Image.
At the command prompt, type the following command, and then press ENTER:
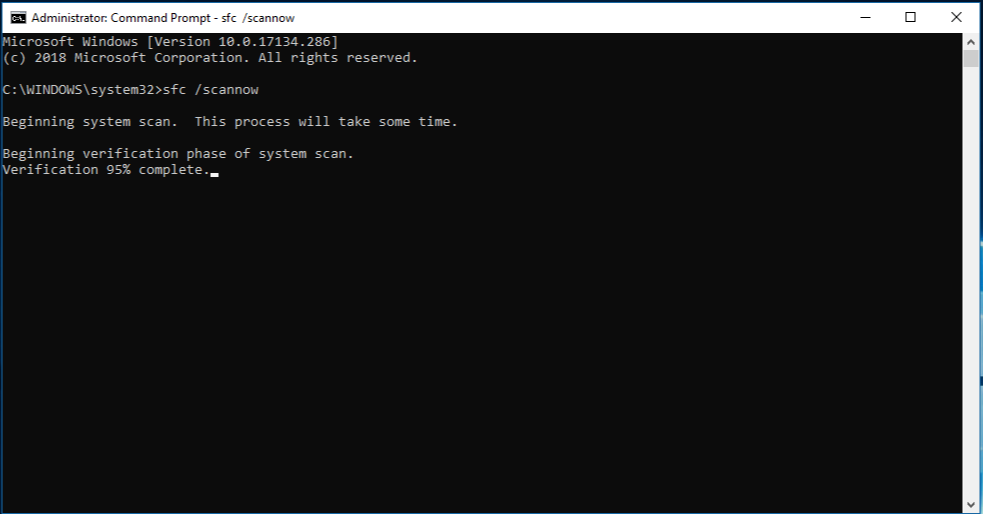
The sfc /scannow command will scan all protected system files, and replace corrupted files with a cached copy that is located in a compressed folder at %WinDir%\System32\dllcache.
The %WinDir% placeholder represents the Windows operating system folder. For example, C:\Windows.
Note Do not close this Command Prompt window until the verification is 100% complete. The scan results will be shown after this process is finished.
After the process is finished, you may receive one of the following messages:
Windows Resource Protection did not find any integrity violations.
This means that you do not have any missing or corrupted system files.
Windows Resource Protection could not perform the requested operation.
To resolve this problem, perform the System File Checker scan in safe mode, and make sure that the PendingDeletes and PendingRenames folders exist under %WinDir%\WinSxS\Temp.
Windows Resource Protection found corrupt files and successfully repaired them. Details are included in the CBS.Log %WinDir%\Logs\CBS\CBS.log.
To view the detail information about the system file scan and restoration, go to How to view details of the System File Checker process.
Windows Resource Protection found corrupt files but was unable to fix some of them. Details are included in the CBS.Log %WinDir%\Logs\CBS\CBS.log.
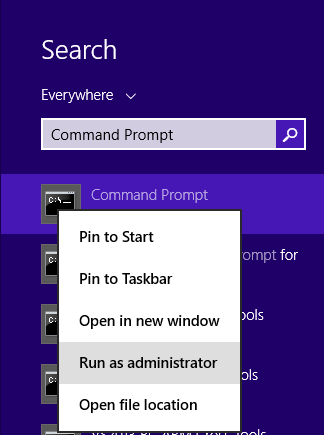
Swipe in from the right edge of the screen, and then tap Search. Or, if you are using a mouse, point to the lower-right corner of the screen, and then click Search. Type Command Prompt in the Search box, right-click Command Prompt, and then click Run as administrator. If you are prompted for an administrator password or for a confirmation, type the password, or click Allow.
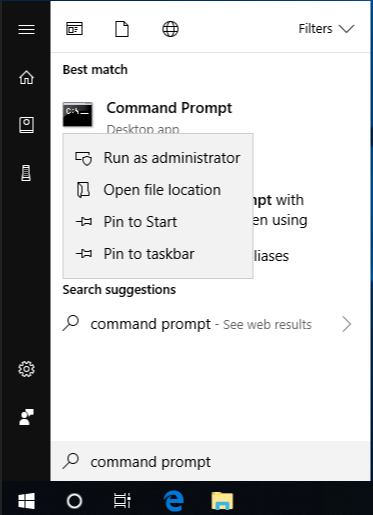
To do this, click Start, type Command Prompt or cmd in the Search box, right-click Command Prompt, and then click Run as administrator. If you are prompted for an administrator password or for a confirmation, type the password, or click Allow.
More Information
To view the details that included in the CBS.Log file, you can copy the information to the Sfcdetails.txt file by using the Findstr command, and then view the details in the Sfcdetails.txt. To do this, follow these steps:
Open an elevated command prompt as described in the previous step 1.
At the command prompt, type the following command, and then press ENTER:
Note The Sfcdetails.txt file contains details from every time that the System File Checker tool has been run on the computer. The file includes information about files that were not repaired by the System File Checker tool. Verify the date and time entries to determine the problem files that were found the last time that you ran the System File Checker tool.
Open the Sfcdetails.txt file from your desktop.
The Sfcdetails.txt file uses the following format:
Date/Time SFC detail The following sample log file contains an entry for a file that could not be repaired: 2007-01-12 12:10:42, Info CSI 00000008 [SR] Cannot repair member file [l:34<17>]»Accessibility.dll» of Accessibility, Version = 6.0.6000.16386, pA = PROCESSOR_ARCHITECTURE_MSIL (8), Culture neutral, VersionScope neutral, PublicKeyToken =
How to manually replace a corrupted system file with a known good copy of the file
After you determine which system file was corrupted and could not be repaired through the detail information in the Sfcdetails.txt file, find where the corrupted file located, and then manually replace the corrupted file with a known good copy of the file. To do this, follow these steps:
Note You may be able to get a known good copy of the system file from another computer that is running the same version of Windows with your computer. You may perform a System File Checker process on that computer to make sure the system file that you intend to copy is a good copy.
Take administrative ownership of the corrupted system file. To do this, at an elevated command prompt, copy and then paste (or type) the following command, and then press ENTER:
takeown /f Path_And_File_Name Note The Path_And_File_Name placeholder represents the path and the file name of the corrupted file. For example, type takeown /f C:\windows\system32\jscript.dll. 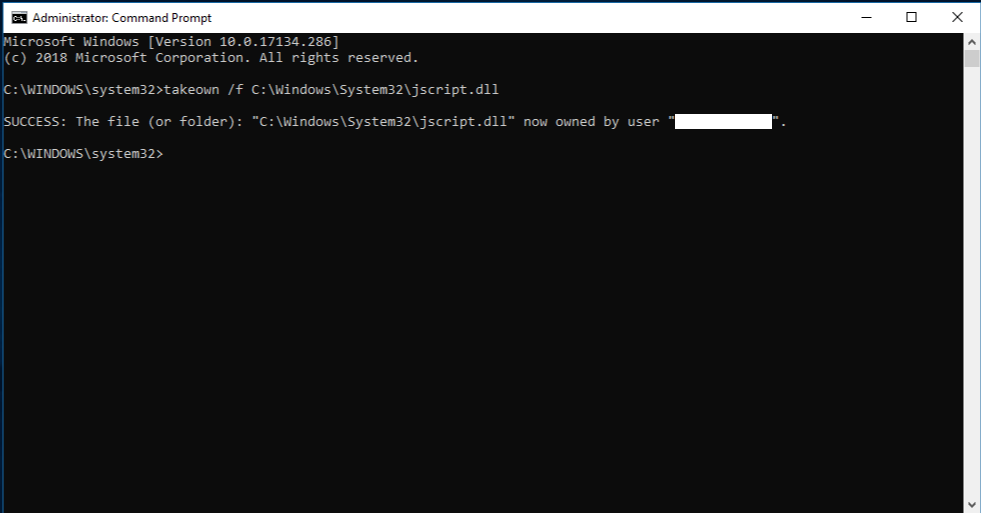
Grant administrators full access to the corrupted system file. To do this, copy and paste (or type) the following command, and then press ENTER:
icacls Path_And_File_Name /GRANT ADMINISTRATORS:F Note The Path_And_File_Name placeholder represents the path and the file name of the corrupted file. For example, type icacls C:\windows\system32\jscript.dll /grant administrators:F.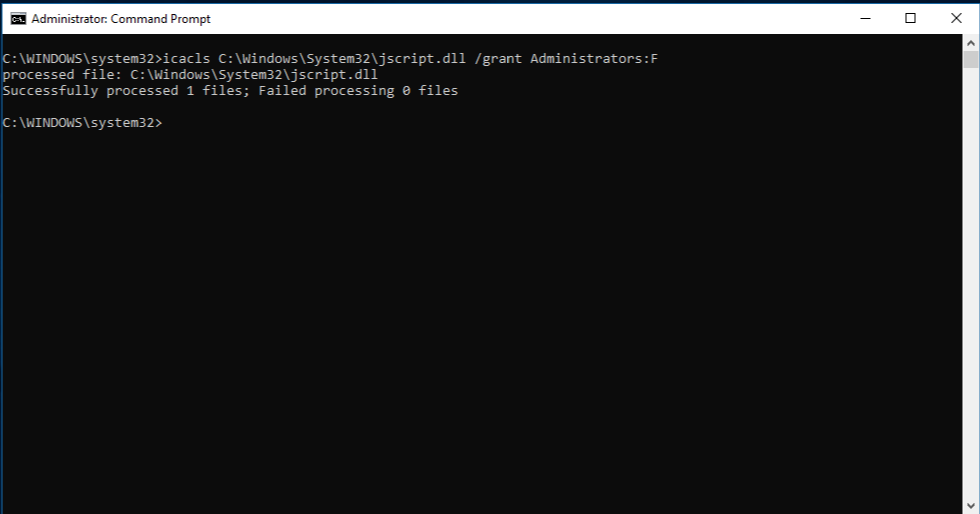
Replace the corrupted system file with a known good copy of the file. To do this, copy and paste (or type) the following command, and then press ENTER:
Copy Source_File Destination Note The Source_File placeholder represents the path and file name of the known good copy of the file on your computer, and the Destination placeholder represents the path and file name of the corrupted file. For example, type copy E:\temp\jscript.dll C:\windows\system32\jscript.dll.
If the steps above don’t work, you may need to reinstall Windows. For more info, see Windows 10 recovery options.
windows\system32\config\SYSTEM file missing or corrupt
I was using my computer, when the screen went black. Tried to restart my computer, and got the «windows could not start because the following file is missing or corrupt: windows\system32\config\SYSTEM
You can attempt to repair this file b starting Windows Setup using the original setup CD-ROM (which I don’t have since XP was pre-installed on the computer.
The first couple times I tried to restart, I could go through SafeMode, but even that won’t work now.
Replies (3)
You need an XP installation CD to fix this. Try to borrow one just to run the fix
Configure your PC to boot from CD if it isn’t already set up that way. You may need to enter the BIOS to configure the PC to boot from the CD.
Set the boot order to
Floppy (if present)
SAVE and EXIT
Start your PC with the XP Setup CD in the drive. When you see the «Press any key to boot from CD. » prompt, do so and let the CD-based boot process begin.
When the Recovery Console option is offered («Press R to start the Recovery Console»), do so. You may be asked which Windows installation to enter, in which case type the number of the Windows installation you wish to work on (usually «1»).
When prompted, enter the Administrator’s password for that Windows installation. If you did not set a password just press ENTER
At the command prompt, type the commands in the instructions at the site below
Was this reply helpful?
Sorry this didn’t help.
Great! Thanks for your feedback.
How satisfied are you with this reply?
Thanks for your feedback, it helps us improve the site.
How satisfied are you with this reply?
Thanks for your feedback.
1 person found this reply helpful
Was this reply helpful?
Sorry this didn’t help.
Great! Thanks for your feedback.
How satisfied are you with this reply?
Thanks for your feedback, it helps us improve the site.
How satisfied are you with this reply?
Thanks for your feedback.
![]()
Instead of attaching yourself to a post from 1.5 years ago, you should start a new question/post for your new issue — this thread makes no sense and will not help you.
When you create your new question, describe your issue and, since the MS Answers forums prompts for no system information when a new question is asked, include answers to the following questions:
Please provide additional information about your system as best you can:
What is your system make and model?
What is your XP Version and Service Pack?
Describe your current antivirus and anti malware situation: McAfee, Symantec, Norton, Spybot, AVG, Avira!, MSE, Panda, Trend Micro, CA, Defender, ZoneAlarm, PC Tools, Comodo, etc.
Was the issue preceded by a power interruption, aborted restart, or improper shutdown? (this includes plug pulling, power buttons, removing the battery, etc.)
Does the afflicted system have a working CD/DVD drive (internal or external)?
Do you have a genuine bootable XP installation CD (this is not the same as any Recovery CDs that came with your system)?
What do you see that you don’t think you should be seeing and when do you see it?
If the system used to work properly, what do you think might have changed since the last time it did work properly?
windows\system32\config\system file missing or corrupt
HELP — As per above title i have done this:-
To complete part one, follow these steps:
- Insert the Windows XP startup disk into the floppy disk drive, or insert the Windows XP CD-ROM into the CD-ROM drive, and then restart the computer.
Click to select any options that are required to start the computer from the CD-ROM drive if you are prompted to do so. - When the «Welcome to Setup» screen appears, press R to start the Recovery Console.
- If you have a dual-boot or multiple-boot computer, select the installation that you want to access from the Recovery Console.
- When you are prompted to do so, type the Administrator password. If the administrator password is blank, just press ENTER.
- At the Recovery Console command prompt, type the following lines, pressing ENTER after you type each line:
md tmp
copy c:\windows\system32\config\system c:\windows\tmp\system.bak
copy c:\windows\system32\config\software c:\windows\tmp\software.bak
copy c:\windows\system32\config\sam c:\windows\tmp\sam.bak
copy c:\windows\system32\config\security c:\windows\tmp\security.bak
copy c:\windows\system32\config\default c:\windows\tmp\default.bak
delete c:\windows\system32\config\system
delete c:\windows\system32\config\software
delete c:\windows\system32\config\sam
delete c:\windows\system32\config\security
delete c:\windows\system32\config\default
copy c:\windows\repair\system c:\windows\system32\config\system
copy c:\windows\repair\software c:\windows\system32\config\software
copy c:\windows\repair\sam c:\windows\system32\config\sam
copy c:\windows\repair\security c:\windows\system32\config\security
copy c:\windows\repair\default c:\windows\system32\config\default
Note This procedure assumes that Windows XP is installed to the C:\Windows folder. Make sure to change C:\Windows to the appropriate windows_folder if it is a different location.
If you have access to another computer, to save time, you can copy the text in step five, and then create a text file called «Regcopy1.txt» (for example). To use this file, run the following command when you start in Recovery Console:
With the batch command in Recovery Console, you can process all the commands in a text file sequentially. When you use thebatch command, you do not have to manually type as many commands.
To complete the procedure described in this section, you must be logged on as an administrator, or an administrative user (a user who has an account in the Administrators group). If you are using Windows XP Home Edition, you can log on as an administrative user. If you log on as an administrator, you must first start Windows XP Home Edition in Safe mode. To start the Windows XP Home Edition computer in Safe mode, follow these steps.
Note Print these instructions before you continue. You cannot view these instructions after you restart the computer in Safe Mode. If you use the NTFS file system, also print the instructions from Knowledge Base article KB309531. Step 7 contains a reference to the article.
- Click Start , click Shut Down (or click Turn Off Computer ), click Restart , and then click OK (or click Restart ).
- Press the F8 key.
On a computer that is configured to start to multiple operating systems, you can press F8 when you see the Startup menu.
In part two, you copy the registry files from their backed up location by using System Restore. This folder is not available in Recovery Console and is generally not visible during typical usage. Before you start this procedure, you must change several settings to make the folder visible:
- Start Windows Explorer.
- On the Tools menu, click Folder options .
- Click the View tab.
- Under Hidden files and folders , click to select Show hidden files and folders , and then click to clear theHide protected operating system files (Recommended) check box.
- Click Yes when the dialog box that confirms that you want to display these files appears.
- Double-click the drive where you installed Windows XP to display a list of the folders. If is important to click the correct drive.
- Open the System Volume Information folder. This folder is unavailable and appears dimmed because it is set as a super-hidden folder.
Note This folder contains one or more _restore
Note You may receive the following error message:
These files are the backed up registry files from System Restore. Because you used the registry file that the Setup program created, this registry does not know that these restore points exist and are available. A new folder is created with a new GUID under System Volume Information and a restore point is created that includes a copy of the registry files that were copied during part one. Therefore, it is important not to use the most current folder, especially if the time stamp on the folder is the same as the current time.
The current system configuration is not aware of the previous restore points. You must have a previous copy of the registry from a previous restore point to make the previous restore points available again.
The registry files that were copied to the Tmp folder in the C:\Windows folder are moved to make sure that the files are available under Recovery Console. You must use these files to replace the registry files currently in the C:\Windows\System32\Config folder. By default, Recovery Console has limited folder access and cannot copy files from the System Volume folder.
Note The procedure described in this section assumes that you are running your computer with the FAT32 file system. For more information about how to access the System Volume Information Folder with the NTFS file system, click the following article number to view the article in the Microsoft Knowledge Base:
In part three, you delete the existing registry files, and then copy the System Restore Registry files to the C:\Windows\System32\Config folder:
- Start Recovery Console.
- At the command prompt, type the following lines, pressing ENTER after you type each line:
copy c:\windows\tmp\software c:\windows\system32\config\software
copy c:\windows\tmp\system c:\windows\system32\config\system
copy c:\windows\tmp\sam c:\windows\system32\config\sam
copy c:\windows\tmp\security c:\windows\system32\config\security
copy c:\windows\tmp\default c:\windows\system32\config\default
Note This procedure assumes that Windows XP is installed to the C:\Windows folder. Make sure to change C:\Windows to the appropriate windows_folder if it is a different location.
If you have access to another computer, to save time, you can copy the text in step two, and then create a text file called «Regcopy2.txt» (for example). To use this file, run the following command when you start in Recovery Console:
and now when I go to part four and try to log on it says that I have to activate windows in order to log on. If I click yes, the computer just hangs at my background picture, if I click no it chucks me back to the log in page. what is going wrong with this blooming thing
PLEASE HELP — it’s taken three days of messing around and effectively Ive got nowhere!!


