- Stay protected with Windows Security
- Important security info
- Understand and customize Windows Security features
- Status icons indicate your level of safety:
- Run a malware scan manually
- Run a quick scan in Windows Security
- Run an advanced scan in Windows Security
- Schedule your own scan
- Schedule a scan
- Turn Microsoft Defender Antivirus real-time protection on or off
- Turn real-time protection off temporarily
- Virus & threat protection in Windows Security
- Run the scans you want
- Manage your Virus & threat protection settings
- Manage your real-time protection
- Get access to cloud-delivered protection
- Send us files with automatic sample submission
- Tamper Protection defends your security settings
- Protect files from unauthorized access
- Exclude items from virus scans
- Curate your notifications
- Protect your device with the latest updates
- Защита от вирусов и угроз Virus and threat protection
- Скрытие раздела «Защита от вирусов и угроз» Hide the Virus & threat protection section
- Требования Requirements
- Скрыть область защиты вымогателей Hide the Ransomware protection area
- Требования Requirements
Stay protected with Windows Security
Windows 10 includes Windows Security, which provides the latest antivirus protection. Your device will be actively protected from the moment you start Windows 10. Windows Security continually scans for malware (malicious software), viruses, and security threats. In addition to this real-time protection, updates are downloaded automatically to help keep your device safe and protect it from threats.
Windows 10 in S mode
Some features will be a little different if you’re running Windows 10 in S mode. Because this mode is streamlined for tighter security, the Virus & threat protection area has fewer options. But don’t worry—the built-in security of this mode automatically prevents viruses and other threats from running on your device, and you’ll receive security updates automatically. For more info, see Windows 10 in S mode FAQ.
Important security info
Windows Security is built-in to Windows 10 and includes an antirvirus program called Microsoft Defender Antivirus. (In previous versions of Windows 10, Windows Security is called Windows Defender Security Center).
If you have another antivirus app installed and turned on, Microsoft Defender Antivirus will turn off automatically. If you uninstall the other app, Microsoft Defender Antivirus will turn back on automatically.
If you’re having problems receiving Windows Security updates, see Fix Windows Update errors and the Windows Update FAQ.
For info on how to uninstall an app, see Repair or remove an app in Windows 10.
To change your user account to an admin account, see Create a local user or administrator account in Windows 10.
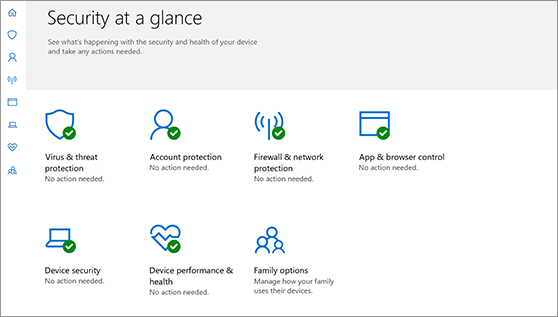
Understand and customize Windows Security features
Windows Security is your home to manage the tools that protect your device and your data:
Virus & threat protection. Monitor threats to your device, run scans, and get updates to help detect the latest threats. (Some of these options are unavailable if you’re running Windows 10 in S mode.)
Account protection. Access sign-in options and account settings, including Windows Hello and dynamic lock.
Firewall & network protection. Manage firewall settings and monitor what’s happening with your networks and internet connections.
App & browser control. Update settings for Microsoft Defender SmartScreen to help protect your device against potentially dangerous apps, files, sites, and downloads. You’ll have exploit protection and you can customize protection settings for your devices.
Device security. Review built-in security options to help protect your device from attacks by malicious software.
Device performance & health. View status info about your device’s performance health, and keep your device clean and up to date with the latest version of Windows 10.
Family options. Keep track of your kids’ online activity and the devices in your household.
You can customize how your device is protected with these Windows Security features. To access them, select Start > Settings > Update & Security > Windows Security . Then select the feature you want to explore.
Open Windows Security settings
Status icons indicate your level of safety:
Green means your device is sufficiently protected and there aren’t any recommended actions.
Yellow means there is a safety recommendation for you.
Red is a warning that something needs your immediate attention.
Run a malware scan manually
When you’re concerned about risks to a specific file or folder, you can right-click the file or folder in File Explorer, then select Scan with Microsoft Defender.
If you suspect there’s malware or a virus on your device, you should immediately run a quick scan. This is much faster than running a full scan on all your files and folders.
Run a quick scan in Windows Security
Select Start > Settings > Update & Security > Windows Security and then Virus & threat protection.
Open Windows Security settings
Under Current threats, select Quick scan (or in previous versions of Windows 10, under Threat history, select Scan now).
If the scan doesn’t find any issues, but you’re still concerned, you may want to check your device more thoroughly.
Run an advanced scan in Windows Security
Select Start > Settings > Update & Security > Windows Security and then Virus & threat protection.
Under Current threats, select Scan options (or in previous versions of Windows 10, under Threat history, select Run a new advanced scan).
Select one of the scan options:
Full scan (check files and programs currently running on your device)
Custom scan (scan specific files or folders)
Microsoft Defender Offline scan (run this scan if your device has been, or could potentially be, infected by a virus or malware). Learn more about Microsoft Defender Offline
Select Scan now.
Note: Because of streamlined security, this process isn’t available if you’re running Windows 10 in S mode.
Schedule your own scan
Even though Windows Security is regularly scanning your device to keep it safe, you can also set when and how often the scans occur.
Schedule a scan
Select the Start button, type schedule tasks in the Search box, and in the list of results, select Task Scheduler.
In the left pane, select the arrow (>) next to Task Scheduler Library to expand it, do the same with Microsoft > Windows, and then scroll down and select the Windows Defender folder.
In the top-center pane, select Windows Defender Scheduled Scan. (Point to the choices to see the full names.)
In the Actions pane on the right, scroll down and then select Properties.
In the window that opens, select the Triggers tab, and then select New.
Set your preferred time and frequency, and then select OK.
Review the schedule and select OK.
Note: Because of streamlined security, this process isn’t available if you’re running Windows 10 in S mode.
Turn Microsoft Defender Antivirus real-time protection on or off
Sometimes you may need to briefly stop running real-time protection. While real-time protection is off, files you open or download won’t be scanned for threats. However, real-time protection will soon turn on automatically again to protect your device.
Turn real-time protection off temporarily
Select Start > Settings > Update & Security > Windows Security and then Virus & threat protection > Manage settings. (In previous versions of Windows 10, select Virus & threat protection > Virus & threat protection settings.)
Open Windows Security settings
Switch the Real-time protection setting to Off and choose Yes to verify.
Note: Because of streamlined security, this process isn’t available if you’re running Windows 10 in S mode.
Virus & threat protection in Windows Security
If you’re running Windows 10 in S mode, some of the features of the Windows Security interface will be a little different. Windows 10 in S mode is streamlined for tighter security, so the Virus & threat protection area has fewer options than those described here. This is because the built-in security of Windows 10 in S mode automatically prevents viruses and other threats from running on your device. Additionally, devices running Windows 10 in S mode receive security updates automatically.
In previous versions of Windows 10, Windows Security is called Windows Defender Security Center.
Virus & threat protection in Windows Security helps you scan for threats on your device. You can also run different types of scans, see the results of your previous virus and threat scans, and get the latest protection offered by Microsoft Defender Antivirus.
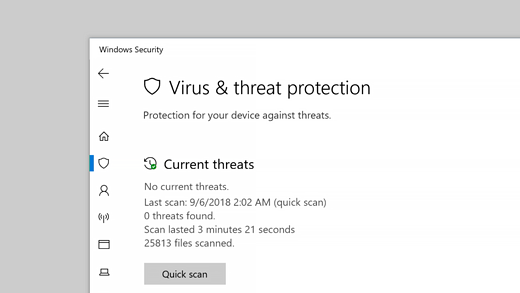
The Current threats area lets you:
See any threats currently on your device.
See the last time a scan was run on your device, how long it took, and how many files were scanned.
Start a new scan.
See threats that have been quarantined before they can affect you.
See anything identified as a threat that you have allowed to run on your device.
Note: If you are using third-party antivirus software, you’ll be able to use its virus and threat protection options here.
Run the scans you want
Even though Windows Security is turned on and scans your device automatically, you can perform an additional scan whenever you want.
Quick scan. Concerned that you may have done something to introduce a suspicious file or virus to your device? Select Quick scan (called Scan now in previous versions of Windows 10) to immediately check your device for any recent threats. This option is useful when you don’t want to spend the time running a full scan on all your files and folders. If Windows Security recommends that you run one of the other types of scans, you’ll be notified when the Quick scan is done.
Scan options .Select this link (called Run a new advanced scan in previous versions of Windows 10) to choose from one of the following advanced scan options:
Full scan. Scans every file or program that’s currently running on your device to make sure there’s nothing dangerous in progress.
Custom scan. Scans only files and folders that you select.
Microsoft Defender Offline scan. Uses the latest definitions to scan your device for the latest threats. Run it when you are concerned that your device has been exposed to malware or a virus, or if you want to scan your device without being connected to the Internet. This will restart your device, so be sure to save files you may have open.
Manage your Virus & threat protection settings
Use Virus & threat protection settings when you want to customize your level of protection, send sample files to Microsoft, exclude trusted files and folders from repeated scanning, or temporarily turn off your protection.
Manage your real-time protection
Want to stop running real-time protection for a short while? You can use the Real-time protection setting to turn it off temporarily; however, real-time protection will turn back on automatically after a short while to resume protecting your device. While real-time protection is off, files you open or download won’t be scanned for threats.
Note: If the device you’re using is part of an organization, your system administrator may prevent you from turning off real-time protection.
Get access to cloud-delivered protection
Provide your device with access to the latest threat definitions and threat behavior detection in the cloud. This setting allows Microsoft Defender to get constantly updated improvements from Microsoft while you’re connected to the internet. This will result in more accurately identifying, stopping, and fixing, threats.
This setting is turned on by default.
Send us files with automatic sample submission
If you’re connected to the cloud with cloud-delivered protection, you can send suspicious sample files to Microsoft to check them for potential threats. Microsoft will notify you if you need to send additional files—and alert you if a requested file contains personal information.
Tamper Protection defends your security settings
Microsoft Defender Antivirus settings can occasionally get changed by malicious, or careless, apps or processes; or sometimes by unaware people. With Tamper Protection turned on, important settings like real-time protection, can’t be easily or accidentally turned off.
This setting is turned on, by default, for consumers.
Protect files from unauthorized access
Use the Controlled folder access setting to manage which folders untrusted apps can make changes to. You can also add additional apps to the trusted list so they can make changes in those folders. This is a powerful tool to make your files safer from ransomware.
When you turn on Controlled folder access, a lot of the folders you use most often will be protected by default. This means that content in any of these folders cannot be accessed or changed by any unknown or untrusted apps. If you add additional folders, they become protected as well.
Exclude items from virus scans
There may be times when you’ll want to exclude specific files, folders, file types, or processes from being scanned, such as if these are trusted items and you are certain you don’t need to take time to scan them. In those rare instances you can add an exclusion for them.
Curate your notifications
Windows Security will send notifications about the health and safety of your device. You can turn these notifications on, or off, on the notifications page. In Virus & threat protection, under Virus & threat protection settings, select Manage settings, scroll down to Notifications and select Change notification settings.
Protect your device with the latest updates
Security intelligence (sometimes referred to as «definitions») are files that contain information about the latest threats that could infect your device. Windows Security uses security intelligence every time a scan is run.
Microsoft automatically downloads the latest intelligence to your device as part of Windows Update, but you can also manually check for it. On the Virus & threat protection page, under Virus & threat protection updates, select Check for updates to scan for the latest security intelligence.
Защита от вирусов и угроз Virus and threat protection
Область применения Applies to
- Windows 10, версия 1703 и более поздние Windows 10, version 1703 and later
Раздел защиты & вирусов содержит сведения и параметры антивирусной защиты от антивируса Microsoft Defender и сторонних продуктов AV. The Virus & threat protection section contains information and settings for antivirus protection from Microsoft Defender Antivirus and third-party AV products.
В Windows 10 версии 1803 этот раздел также содержит сведения и параметры для защиты и восстановления программ-вымогателей. In Windows 10, version 1803, this section also contains information and settings for ransomware protection and recovery. Это включает параметры доступа к управляемым папкам, чтобы предотвратить изменение неизвестными приложениями файлов в защищенных папках, а также конфигурацию Microsoft OneDrive, чтобы помочь вам восстановиться после атаки вымогателей. This includes Controlled folder access settings to prevent unknown apps from changing files in protected folders, plus Microsoft OneDrive configuration to help you recover from a ransomware attack. Эта область также сообщает пользователям и предоставляет инструкции по восстановлению в случае атаки вымогателей. This area also notifies users and provides recovery instructions in case of a ransomware attack.
ИТ-администраторы и ИТ-специалисты могут получать дополнительные сведения о конфигурации из этих статей: IT administrators and IT pros can get more configuration information from these articles:
Вы можете скрыть от пользователей & раздел защиты от угрозы или область защиты вымогателей. **** You can hide the Virus & threat protection section or the Ransomware protection area from users of the machine. Это может быть полезно, если вы не хотите, чтобы сотрудники в организации видели или получили доступ к настраиваемому пользователем параметру для этих функций. This can be useful if you don’t want employees in your organization to see or have access to user-configured options for these features.
Скрытие раздела «Защита от вирусов и угроз» Hide the Virus & threat protection section
Можно скрыть весь раздел с помощью групповой политики. You can choose to hide the entire section by using Group Policy. Раздел не будет отображаться на домашней странице приложения Windows Security, а его значок не будет отображаться на панели navigiation на стороне приложения. The section will not appear on the home page of the Windows Security app, and its icon will not be shown on the navigiation bar on the side of the app.
Это можно сделать только в групповой политике. This can only be done in Group Policy.
Требования Requirements
Вы должны иметь Windows 10, версию 1709 или более поздней версии. You must have Windows 10, version 1709 or later. В файлах шаблонов ADMX/ADML для более ранних версий Windows этих параметров групповой политики нет. The ADMX/ADML template files for earlier versions of Windows do not include these Group Policy settings.
На компьютере, осуществляющем групповую политику, откройте Консоль управления групповыми политиками, правой кнопкой мыши щелкните объект групповой политики, который вы хотите настроить, и выберите команду Редактировать. On your Group Policy management machine, open the Group Policy Management Console, right-click the Group Policy Object you want to configure and click Edit.
В разделе Редактор управления групповой политикой перейдите в раздел Конфигурация компьютера и выберите Административные шаблоны. In the Group Policy Management Editor go to Computer configuration and click Administrative templates.
Расширь дерево до компонентов Windows > Windows Security > и защиты от угроз. Expand the tree to Windows components > Windows Security > Virus and threat protection.
Откройте параметр Скрыть область «Защита от вирусов и угроз» и установите для него значение Включено. Open the Hide the Virus and threat protection area setting and set it to Enabled. Нажмите OК. Click OK.
Если скрыть все разделы, в приложении будет отображаться ограниченный интерфейс, как на снимке экрана ниже: If you hide all sections then the app will show a restricted interface, as in the following screenshot:

Скрыть область защиты вымогателей Hide the Ransomware protection area
Область защиты вымогателей можно скрыть с помощью групповой политики. **** You can choose to hide the Ransomware protection area by using Group Policy. Область не будет отображаться в разделе & защиты от угроз приложения Windows Security. The area will not appear on the Virus & threat protection section of the Windows Security app.
Это можно сделать только в групповой политике. This can only be done in Group Policy.
Требования Requirements
Вы должны иметь Windows 10, версию 1709 или более поздней версии. You must have Windows 10, version 1709 or later. В файлах шаблонов ADMX/ADML для более ранних версий Windows этих параметров групповой политики нет. The ADMX/ADML template files for earlier versions of Windows do not include these Group Policy settings.
На компьютере, осуществляющем групповую политику, откройте Консоль управления групповыми политиками, правой кнопкой мыши щелкните объект групповой политики, который вы хотите настроить, и выберите команду Редактировать. On your Group Policy management machine, open the Group Policy Management Console, right-click the Group Policy Object you want to configure and click Edit.
В разделе Редактор управления групповой политикой перейдите в раздел Конфигурация компьютера и выберите Административные шаблоны. In the Group Policy Management Editor go to Computer configuration and click Administrative templates.
Расширь дерево до компонентов Windows > Windows Security > и защиты от угроз. Expand the tree to Windows components > Windows Security > Virus and threat protection.
Откройте параметр Hide the Ransomware data recovery area and set it to Enabled. Open the Hide the Ransomware data recovery area setting and set it to Enabled. Нажмите OК. Click OK.


