- Event Objects (Synchronization)
- Events in WIN API
- Решение
- Создание событий в компонентах среды выполнения Windows Raising events in Windows Runtime components
- Фон Background
- Вариант 1: создание события с помощью CoreDispatcher (Option 1) Raise the event through the CoreDispatcher
- Вариант 2: использование EventHandler , но с потерей сведений о типе (Option 2) Use EventHandler but lose type information
- Вариант 3: создание собственных прокси и заглушки (Option 3) Create your own proxy and stub
- Создание компонента среды выполнения Windows To create the Windows Runtime component
- Создание приложения JavaScript To program the JavaScript app
- Создание идентификаторов GUID для интерфейсов компонента (C# и другие языки .NET) To generate GUIDs for the component’s interfaces (C# and other .NET languages)
- Создание идентификаторов GUID для интерфейсов компонента (C++) To generate GUIDs for the component’s interfaces (C++)
- Создание исходного кода прокси и заглушки To generate the proxy and stub source code
- Компиляция кода прокси и заглушки в библиотеке DLL To compile the proxy and stub code into a DLL
- Регистрация прокси и заглушки To register the proxy and stub
Event Objects (Synchronization)
An event object is a synchronization object whose state can be explicitly set to signaled by use of the SetEvent function. Following are the two types of event object.
| Object | Description |
|---|---|
| Manual-reset event | An event object whose state remains signaled until it is explicitly reset to nonsignaled by the ResetEvent function. While it is signaled, any number of waiting threads, or threads that subsequently specify the same event object in one of the wait functions, can be released. |
| Auto-reset event | An event object whose state remains signaled until a single waiting thread is released, at which time the system automatically sets the state to nonsignaled. If no threads are waiting, the event object’s state remains signaled. If more than one thread is waiting, a waiting thread is selected. Do not assume a first-in, first-out (FIFO) order. External events such as kernel-mode APCs can change the wait order. |
The event object is useful in sending a signal to a thread indicating that a particular event has occurred. For example, in overlapped input and output, the system sets a specified event object to the signaled state when the overlapped operation has been completed. A single thread can specify different event objects in several simultaneous overlapped operations, then use one of the multiple-object wait functions to wait for the state of any one of the event objects to be signaled.
A thread uses the CreateEvent or CreateEventEx function to create an event object. The creating thread specifies the initial state of the object and whether it is a manual-reset or auto-reset event object. The creating thread can also specify a name for the event object. Threads in other processes can open a handle to an existing event object by specifying its name in a call to the OpenEvent function. For additional information about names for mutex, event, semaphore, and timer objects, see Interprocess Synchronization.
Events in WIN API
Здравстуйте.
Раскажите про события которыми оперируют функции CreateEventEx, OpenEvent, SetEvent.
Я пробую ждать установки события так WaitForSingleObject(h,9999), но ожидания не происходит, код выполняется дальше без задержки.
Сколько имеет состояний событие? Какие поля имеет событие? В каком состоянии оно появляется при создании через CreateEvent ? Может ли ошибка быть не в состоянии события?
API Win 32
Вообщем-то нужно определить конфигурацию компьютера посредствам функций api win 32. Какие диски.
WIN API C++
Недавно заинтересовался win api, с++ знаю только по консоли и с++ билдере. У меня 2 вопроса) 1.
 Функции WIN API
Здравствуйте. Подскажите пожалуйста где можно посмотреть реализацию некоторых функций в WIN API.
Literature on Win API
I need Manual or similar kinds of text information on win API.
Решение
Event — это объект, который, как правило, используется либо для
синхронизации потоков (Synchronization Event), либо для уведомления о
каком либо событии (Notification Event). В терминологии WinAPI
первый тип называется Auto-Reset Event, второй Manual-Reset Event.
Event в любой момент времени может находиться только в одном из двух
состояний — сигнальное (signaled) или не сигнальное (non-signaled).
Любое ожидание на Event-е длится до тех пор, пока Event не перейдет в
сигнальное состояние.
Два или более потоков одновременно ждут одного и того же Event-а.
При его переходе в сигнальное состояние они все будут разбужены.
Event при этом так и останется в сигнальном состоянии.
Такая схема часто используется для того, чтобы один поток мог
сообщить другому или другим о каком-либо событии.
Два или более потоков одновременно ждут одного и того же Event-а.
При его переходе в сигнальное состояние только один из потоков, — какой
именно — неизвестно, — будет разбужен, остальные продолжат ожидание.
При этом Event будет автоматически сброшен в несигнальное состояние.
Разбуженный поток на выходе из критического участка может снова перевести
Event в сигнальное состояние, разбудив тем самым еще один ждущий поток.
И так далее. Такое поведение часто используется для синхронизации потоков,
так как в один момент времени только один поток может «захватить» Event.
При создании Event-а нужно указать его тип, исходное состояние, имя,
если оно есть, а также атрибуты безопасности. Event является охраняемым
объектом (securable object), как и большинство других объектов Windows,
т.е. на него можно навесить DACL (разрешения доступа), IL (уровень
целостности), даже вроде бы события аудита (лично не проверял, но
должно работать), метку AppContainer и т.д.
Имя Event-а определяет, в каком пространстве имен диспетчера объектов
он будет создан: если имя с префиксом «Local», тогда событие будет видно
только внутри соответствующего пользовательского сеанса, если с «Global»,
тогда внутри глобального пространства имен, которое видно из всех сеансов.
Event на самом деле является объектом ядра, а из пользовательского режима
мы с ним работаем, как и с большинством других объектов, через HANDLE.
Этот HANDLE, как и все другие, можно наследовать, копировать, закрывать и т.д.
Создание событий в компонентах среды выполнения Windows Raising events in Windows Runtime components
Дополнительные сведения о вызове событий в компоненте среда выполнения Windows c++/WinRT см. в разделе события автора в c++/WinRT. For more info about raising events in a C++/WinRT Windows Runtime Component, see Author events in C++/WinRT.
Если компонент среда выполнения Windows вызывает событие определяемого пользователем типа делегата в фоновом потоке (рабочем потоке) и вы хотите, чтобы JavaScript мог получать событие, то его можно реализовать и (или) вызвать одним из следующих способов. If your Windows Runtime component raises an event of a user-defined delegate type on a background thread (worker thread), and you want JavaScript to be able to receive the event, then you can implement and/or raise it in any one of these ways.
- (Вариант 1) Вызывайте событие с помощью интерфейса Windows. UI. Core. CoreDispatcher , чтобы маршалировать событие в контекст потока JavaScript. (Option 1) Raise the event through the Windows.UI.Core.CoreDispatcher to marshal the event to the JavaScript thread context. Хотя обычно это оптимальный вариант, в некоторых случаях он не обеспечивает максимальную производительность. Although typically this is the best option, in some scenarios it might not provide the fastest performance.
- (Вариант 2) Используйте ** Windows. Foundation. EventHandler ** (но теряются сведения о типе события). (Option 2) Use Windows.Foundation.EventHandler (but lose the event type information). Если вариант 1 непригоден или если его производительность недостаточна, это хороший выбор, при котором возможна утрата информации о типе. If Option 1 is not feasible, or if its performance is not adequate, then this is a good second choice provided that loss of type information is acceptable. Если вы создаете компонент среда выполнения Windows C#, тип **Windows. Foundation. EventHandler ** недоступен; вместо этого этот тип проецируется на System. EventHandler, поэтому его следует использовать вместо этого. If you’re authoring a C# Windows Runtime Component, then the Windows.Foundation.EventHandler type is not available; instead, that type is projected to System.EventHandler, so you should use that instead.
- Вариант 3: создать собственный прокси и заглушку для компонента. (Option 3) Create your own proxy and stub for the component. Этот вариант сложнее всего реализовать, но он сохраняет сведения о типе и может обеспечивать более высокую, чем вариант 1, производительность для ресурсоемких сценариев. This option is the most difficult to implement, but it preserves type information and might provide better performance compared to Option 1 in demanding scenarios.
Если создать событие в фоновом потоке без использования одного из этих вариантов, клиент JavaScript просто не получит его. If you just raise an event on a background thread without using one of these options, a JavaScript client will not receive the event.
Фон Background
Все компоненты и приложения среды выполнения Windows — это COM-объекты независимо от того, какой язык используется для их создания. All Windows Runtime components and apps are fundamentally COM objects, no matter what language you use to create them. В API Windows большая часть компонентов представляет собой динамичные COM-объекты, способные одинаково хорошо взаимодействовать с объектами в фоновом потоке и в потоке пользовательского интерфейса. In the Windows API, most of the components are agile COM objects that can communicate equally well with objects on the background thread and on the UI thread. Если COM-объект не может быть динамичным, ему требуются вспомогательные объекты, прокси и заглушки, для связи с другими COM-объектами в потоке пользовательского интерфейса и фоновом потоке. If a COM object can’t be made agile, then it requires helper objects known as proxies and stubs to communicate with other COM objects across the UI thread-background thread boundary. (С точки зрения модели COM такую связь называют связью между подразделениями потока.) (In COM terms, this is known as communication between thread apartments.)
Большинство объектов в API Windows динамичные или содержат встроенные прокси и заглушки. Most of the objects in the Windows API are either agile or have proxies and stubs built in. Однако прокси и заглушки невозможно создать для универсальных типов, таких как Windows.Foundation.TypedEventHandler , поскольку они не представляют собой полные типы, если не указать аргумент типа. However, proxies and stubs can’t be created for generic types such as Windows.Foundation.TypedEventHandler because they are not complete types until you provide the type argument. Отсутствие прокси и заглушек становится проблемой только для клиентов JavaScript, но если вы хотите, чтобы ваш компонент можно было использовать из JavaScript так же, как из C++ или языка .NET, необходимо использовать один из следующих трех вариантов. It’s only with JavaScript clients that the lack of proxies or stubs becomes an issue, but if you want your component to be usable from JavaScript as well as from C++ or a .NET language, then you must use one of the following three options.
Вариант 1: создание события с помощью CoreDispatcher (Option 1) Raise the event through the CoreDispatcher
Вы можете отправлять события любого типа делегата, определяемого пользователем, с помощью Windows.UI.Core.CoreDispatcher, и JavaScript получит их. You can send events of any user-defined delegate type by using the Windows.UI.Core.CoreDispatcher, and JavaScript will be able to receive them. Если вы не знаете точно, какой вариант использовать, сначала попробуйте этот. If you are unsure which option to use, try this one first. Если задержка между срабатыванием события и его обработкой становится проблемой, попробуйте один из других вариантов. If latency between the event firing and the event handling becomes an issue, then try one of the other options.
В следующем примере показано, как с помощью CoreDispatcher создать строго типизированное событие. The following example shows how to use the CoreDispatcher to raise a strongly-typed event. Обратите внимание, что аргумент типа — Toast, а не Object. Notice that the type argument is Toast, not Object.
Вариант 2: использование EventHandler , но с потерей сведений о типе (Option 2) Use EventHandler but lose type information
Если вы создаете компонент среда выполнения Windows C#, тип **Windows. Foundation. EventHandler ** недоступен; вместо этого этот тип проецируется на System. EventHandler, поэтому его следует использовать вместо этого. If you’re authoring a C# Windows Runtime Component, then the Windows.Foundation.EventHandler type is not available; instead, that type is projected to System.EventHandler, so you should use that instead.
Другим способом отправки события из фонового потока является использование объекта Windows. Foundation. EventHandlerв качестве типа события. Another way to send an event from a background thread is to use Windows.Foundation.EventHandler as the type of the event. Windows предоставляет этот экземпляр универсального типа, а также прокси и заглушку для него. Windows provides this concrete instantiation of the generic type and provides a proxy and stub for it. Недостаток состоит в том, что сведения о типе аргументов и отправителя события теряются. The downside is that the type information of your event args and sender is lost. Клиенты C++ и .NET должны знать, в какой тип следует преобразовать экземпляр при получении события. Эти сведения берутся из документации. C++ and .NET clients must know through documentation what type to cast back to when the event is received. Клиентам JavaScript не нужна информация об исходном типе. JavaScript clients don’t need the original type information. Они находят свойства аргументов на основе их имен в метаданных. They find the arg properties, based on their names in the metadata.
В этом примере показано, как использовать Windows.Foundation.EventHandler на языке C#: This example shows how to use Windows.Foundation.EventHandler in C#:
Это событие используется в части JavaScript следующим образом: You consume this event on the JavaScript side like this:
Вариант 3: создание собственных прокси и заглушки (Option 3) Create your own proxy and stub
Для повышения производительности с определяемыми пользователем типами событий, которые полностью сохраняют сведения о типе, необходимо создать собственные объекты прокси и заглушки и внедрить их в пакет приложения. For potential performance gains on user-defined event types that have fully-preserved type information, you have to create your own proxy and stub objects and embed them in your app package. Обычно этот вариант следует использовать только в тех редких случаях, когда ни один из других вариантов не пригоден. Typically, you have to use this option only in rare situations where neither of the other two options are adequate. Кроме того, нет гарантии, что этот метод обеспечит лучшую производительность, чем остальные. Also, there is no guarantee that this option will provide better performance than the other two options. Фактическая производительность зависит от множества факторов. Actual performance depends on many factors. Используйте профилировщик Visual Studio или другие средства профилирования для измерения фактической производительности в приложении и определите, действительно ли событие — это «узкое место». Use the Visual Studio profiler or other profiling tools to measure actual performance in your application and determine whether the event is in fact a bottleneck.
Далее в этой статье показано, как использовать C# для создания простого компонента среды выполнения Windows, а затем использовать C++ для создания библиотеки DLL для прокси и заглушки, которые позволят JavaScript использовать событие Windows.Foundation.TypedEventHandler , вызываемое компонентом в асинхронной операции. The rest of this article shows how to use C# to create a basic Windows Runtime component, and then use C++ to create a DLL for the proxy and stub that will enable JavaScript to consume a Windows.Foundation.TypedEventHandler event that’s raised by the component in an async operation. (Вы также можете использовать C++ или Visual Basic для создания компонента. (You can also use C++ or Visual Basic to create the component. Действия, относящиеся к созданию прокси и заглушек, аналогичны.) Это пошаговое руководство основано на примере создания внутрипроцессного компонента среды выполнения Windows (C++/CX) и объясняет его назначение. The steps that are related to creating the proxies and stubs are the same.) This walkthrough is based on Creating a Windows Runtime in-process component sample (C++/CX) and helps explain its purposes.
Это пошаговое руководство содержит следующие компоненты. This walkthrough has these parts.
- Здесь вы создаете два базовых класса среды выполнения Windows. Here you will create two basic Windows Runtime classes. Один класс предоставляет событие типа Windows.Foundation.TypedEventHandler , а другой класс — это тип, возвращаемый среде JavaScript в качестве аргумента TValue. One class exposes an event of type Windows.Foundation.TypedEventHandler and the other class is the type that’s returned to JavaScript as the argument for TValue. Эти классы не могут взаимодействовать с JavaScript, если не выполнить последующие действия. These classes can’t communicate with JavaScript until you complete the later steps.
- Это приложение активирует объект основного класса, вызывает метод и обрабатывает событие, вызываемое компонентом среды выполнения Windows. This app activates the main class object, calls a method, and handles an event that’s raised by the Windows Runtime component.
- Это необходимо для средств, создающих классы прокси и заглушки. These are required by the tools that generate the proxy and stub classes.
- Затем вы используете файл IDL для генерации исходного кода C для прокси и заглушки. You then use the IDL file to generate the C source code for the proxy and stub.
- Зарегистрируйте объекты прокси и заглушки, чтобы среда выполнения COM могла их найти, и добавьте ссылку на соответствующую библиотеку DLL в проект приложения. Register the proxy-stub objects so that the COM runtime can find them, and reference the proxy-stub DLL in the app project.
Создание компонента среды выполнения Windows To create the Windows Runtime component
В Visual Studio в строке меню выберите файл > создать проект. In Visual Studio, on the menu bar, choose File > New Project. В диалоговом окне Создание проекта разверните узел JavaScript > Универсальное приложение для Windows и выберите Пустое приложение. In the New Project dialog box, expand JavaScript > Universal Windows and then select Blank App. Назовите проект ToasterApplication и нажмите кнопку ОК . Name the project ToasterApplication and then choose the OK button.
Добавьте компонент среды выполнения Windows на C# в решение: в обозревателе решений откройте контекстное меню для нужного решения и выберите Добавить > Новый проект. Add a C# Windows Runtime component to the solution: In Solution Explorer, open the shortcut menu for the solution and then choose Add > New Project. Разверните ** > Microsoft Store Visual C#** , а затем выберите компонент Среда выполнения Windows. Expand Visual C# > Microsoft Store and then select Windows Runtime Component. Назовите проект ToasterComponent и нажмите кнопку ОК. Name the project ToasterComponent and then choose the OK button. ToasterComponent будет корневым пространством имен для компонентов, которые вы создадите позднее. ToasterComponent will be the root namespace for the components you will create in later steps.
В обозревателе решений откройте контекстное меню решения и выберите пункт Свойства. In Solution Explorer, open the shortcut menu for the solution and then choose Properties. В диалоговом окне Страницы свойств выберите элемент Свойства конфигурации в левой области, а затем в верхней части диалогового окна задайте для параметра Конфигурация значение Отладка, а для параметра Платформа выберите «x86», «x64» или «ARM». In the Property Pages dialog box, select Configuration Properties in the left pane, and then at the top of the dialog box, set Configuration to Debug and Platform to x86, x64, or ARM. Нажмите кнопку ОК . Choose the OK button.
Важно! Platform = любой ЦП не будет работать, так как он недействителен для DLL-библиотеки Win32 машинного кода, который будет добавлен в решение позже. Important Platform = Any CPU won’t work because it’s not valid for the native-code Win32 DLL that you’ll add to the solution later.
В обозревателе решений переименуйте файл class1.cs на ToasterComponent.cs, чтобы он соответствовал имени проекта. In Solution Explorer, rename class1.cs to ToasterComponent.cs so that it matches the name of the project. Visual Studio автоматически переименует класс в файле. Visual Studio automatically renames the class in the file to match the new file name.
Добавьте в CS-файл директиву using для пространства имен Windows.Foundation, чтобы добавить TypedEventHandler в область действия. In the .cs file, add a using directive for the Windows.Foundation namespace to bring TypedEventHandler into scope.
Если вам необходимы прокси и заглушки, компонент должен использовать интерфейсы, чтобы предоставлять доступ к открытым членам. When you require proxies and stubs, your component must use interfaces to expose its public members. В файле ToasterComponent.cs укажите интерфейс для тостера и интерфейс для всплывающего уведомления, которое создает тостер. In ToasterComponent.cs, define an interface for the toaster, and another one for the Toast that the toaster produces.
Примечание . В C# этот шаг можно пропустить. Note In C# you can skip this step. Вместо этого сначала создайте класс, а затем откройте его контекстное меню и выберите Рефакторинг > извлечь интерфейс. Instead, first create a class, and then open its shortcut menu and choose Refactor > Extract Interface. В созданном коде вручную сделайте интерфейсы общедоступными. In the code that’s generated, manually give the interfaces public accessibility.
Интерфейс IToast содержит строку, которую можно извлечь для описания типа всплывающего уведомления. The IToast interface has a string that can be retrieved to describe the type of toast. Интерфейс IToaster содержит метод для создания всплывающего уведомления и событие для уведомления об этом. The IToaster interface has a method to make toast, and an event to indicate that the toast is made. Поскольку это событие возвращает определенный элемент (т. е. тип) всплывающего уведомления, его называют типизированным событием. Because this event returns the particular piece (that is, type) of toast, it’s known as a typed event.
Затем нам понадобятся открытые классы, реализующие эти интерфейсы, которые будут доступны из приложения JavaScript, созданного позже. Next, we need classes that implement these interfaces, and are public and sealed so that they are accessible from the JavaScript app that you’ll program later.
В предыдущем фрагменте кода мы создаем всплывающее уведомление, а затем выполняем операции с пулом потоков для вызова уведомления. In the preceding code, we create the toast and then spin up a thread-pool work item to fire the notification. Хотя среда IDE может порекомендовать применить ключевое слово await в асинхронном вызове, в данном случае это необязательно, поскольку метод не выполняет никаких действий, которые зависят от результатов операции. Although the IDE might suggest that you apply the await keyword to the async call, it isn’t necessary in this case because the method doesn’t do any work that depends on the results of the operation.
Примечание . Асинхронный вызов в предыдущем коде использует ThreadPool. RunAsync только для демонстрации простого способа запуска события в фоновом потоке. Note The async call in the preceding code uses ThreadPool.RunAsync solely to demonstrate a simple way to fire the event on a background thread. Вы можете написать этот метод, как показано в следующем примере, и он будет работать, так как планировщик заданий .NET автоматически маршалирует асинхронные вызовы и вызовы await в поток пользовательского интерфейса. You could write this particular method as shown in the following example, and it would work fine because the .NET Task scheduler automatically marshals async/await calls back to the UI thread.
Если выполнить построение сейчас, все пройдет без ошибок. If you build the project now, it should build cleanly.
Создание приложения JavaScript To program the JavaScript app
Теперь мы можем добавить кнопку в приложение JavaScript, чтобы использовать определенный нами класс для создания всплывающего уведомления. Now we can add a button to the JavaScript app to cause it to use the class we just defined to make toast. Перед этим необходимо добавить ссылку на проект ToasterComponent, который мы только что создали. Before we do this, we must add a reference to the ToasterComponent project we just created. В обозревателе решений откройте контекстное меню для проекта ToasterApplication, выберите команду Добавить > Ссылки, а затем нажмите кнопку Добавить новую ссылку. In Solution Explorer, open the shortcut menu for the ToasterApplication project, choose Add > References, and then choose the Add New Reference button. В диалоговом окне «Добавление ссылки» в левой области под решением выберите проект компонента, а затем в средней области выберите ToasterComponent. In the Add Reference dialog box, in the left pane under Solution, select the component project, and then in the middle pane, select ToasterComponent. Нажмите кнопку ОК . Choose the OK button.
В обозревателе решений откройте контекстное меню для проекта ToasterApplication и выберите команду Назначить запускаемым проектом. In Solution Explorer, open the shortcut menu for the ToasterApplication project and then choose Set as Startup Project.
В конце файла default.js добавьте пространство имен для функций, которые будут вызывать компонент и которые будет вызывать сам компонент. At the end of the default.js file, add a namespace to contain the functions to call the component and be called back by it. Пространство имен будет содержать две функции: одну для создания всплывающего уведомления и одну для обработки события toast-complete. The namespace will have two functions, one to make toast and one to handle the toast-complete event. Реализация makeToast создает объект Toaster, регистрирует обработчик событий и создает всплывающее уведомление. The implementation of makeToast creates a Toaster object, registers the event handler, and makes the toast. Пока обработчик событий ничего особого не делает, как показано здесь: So far, the event handler doesn’t do much, as shown here:
Функцию makeToast необходимо связать с кнопкой. The makeToast function must be hooked up to a button. Обновите файл default.html, добавив кнопку и немного места для отображения результата всплывающего уведомления: Update default.html to include a button and some space to output the result of making toast:
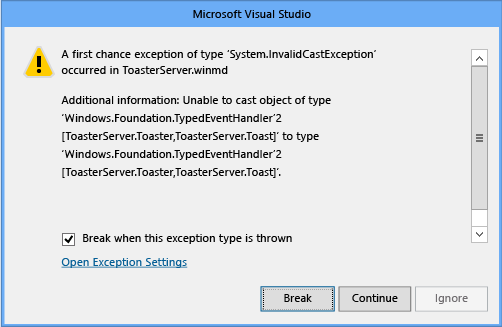
Если бы мы не использовали TypedEventHandler, мы смогли бы запустить приложение на локальном компьютере и нажать кнопку, чтобы создать уведомление. If we weren’t using a TypedEventHandler, we would now be able to run the app on the local machine and click the button to make toast. Но в нашем приложении ничего не происходит. But in our app, nothing happens. Чтобы выяснить причину, отладим управляемый код, который генерирует событие ToastCompletedEvent. To find out why, let’s debug the managed code that fires the ToastCompletedEvent. Остановите проект, а затем в строке меню выберите команду Отладка > Свойства приложения Toaster. Stop the project, and then on the menu bar, choose Debug > Toaster Application properties. Измените значение Тип отладчика на Только управляемый код. Change Debugger Type to Managed Only. В строке меню выберите пункты Отладка > Исключения, а затем — Common Language Runtime Exceptions (Исключения среды CLR). Again on the menu bar, choose Debug > Exceptions, and then select Common Language Runtime Exceptions.
Теперь запустите приложение и нажмите кнопку создания всплывающего уведомления. Now run the app and click the make-toast button. Отладчик перехватывает исключение недопустимого приведения. The debugger catches an invalid cast exception. Хотя это неочевидно из его сообщения, это исключение возникает из-за отсутствия прокси для данного интерфейса. Although it’s not obvious from its message, this exception is occurring because proxies are missing for that interface.
Первый шаг создания прокси и заглушки компонента — добавление уникального идентификатора или GUID в интерфейсы. The first step in creating a proxy and stub for a component is to add a unique ID or GUID to the interfaces. Однако используемый формат GUID зависит от применяемого языка. However, the GUID format to use differs depending on whether you’re coding in C#, Visual Basic, or another .NET language, or in C++.
Создание идентификаторов GUID для интерфейсов компонента (C# и другие языки .NET) To generate GUIDs for the component’s interfaces (C# and other .NET languages)
В строке меню выберите «Средства > Создать GUID». On the menu bar, choose Tools > Create GUID. В диалоговом окне выберите значение 5. In the dialog box, select 5. [GUID («XXXXXXXX-XXXX. XXXX «) ] . [Guid(«xxxxxxxx-xxxx. xxxx»)]. Нажмите кнопку «Создать GUID», а затем кнопку «Копировать». Choose the New GUID button and then choose the Copy button.
Вернитесь к определению интерфейса, а затем вставьте новый GUID перед интерфейсом IToaster, как показано в следующем примере. Go back to the interface definition, and then paste the new GUID just before the IToaster interface, as shown in the following example. (Не используйте идентификатор GUID из примера. (Don’t use the GUID in the example. У каждого уникального интерфейса должен быть собственный GUID.) Every unique interface should have its own GUID.)
Добавьте директиву using для пространства имен System.Runtime.InteropServices. Add a using directive for the System.Runtime.InteropServices namespace.
Повторите эти действия для интерфейса IToast. Repeat these steps for the IToast interface.
Создание идентификаторов GUID для интерфейсов компонента (C++) To generate GUIDs for the component’s interfaces (C++)
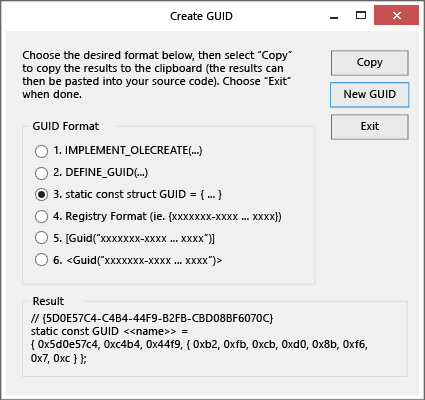
В строке меню выберите «Средства > Создать GUID». On the menu bar, choose Tools > Create GUID. В диалоговом окне выберите значение 3. In the dialog box, select 3. static const struct GUID = <. >. static const struct GUID = <. >. Нажмите кнопку «Создать GUID», а затем кнопку «Копировать». Choose the New GUID button and then choose the Copy button.
Вставьте GUID перед определением интерфейса IToaster. Paste the GUID just before the IToaster interface definition. После вставки GUID должен выглядеть, как в следующем примере. After you paste, the GUID should resemble the following example. (Не используйте идентификатор GUID из примера. (Don’t use the GUID in the example. У каждого уникального интерфейса должен быть собственный GUID.) Every unique interface should have its own GUID.)
Добавьте директиву using для Windows.Foundation.Metadata, чтобы добавить GuidAttribute в область действия. Add a using directive for Windows.Foundation.Metadata to bring GuidAttribute into scope.
Теперь вручную преобразуйте константу GUID в GuidAttribute, чтобы она выглядела, как показано в следующем примере. Now manually convert the const GUID to a GuidAttribute so that it’s formatted as shown in the following example. Обратите внимание, что фигурные скобки заменяются квадратными и круглыми скобками, а конечная точка с запятой удаляется. Notice that the curly braces are replaced with brackets and parentheses, and the trailing semicolon is removed.
Повторите эти действия для интерфейса IToast. Repeat these steps for the IToast interface.
Теперь интерфейсы получили уникальные идентификаторы, и мы можем создать файл IDL, передав WINMD-файл в программу командной строки winmdidl, а затем создать исходный код C для прокси и заглушки, передав этот файл IDL программе командной строки MIDL. Now that the interfaces have unique IDs, we can create an IDL file by feeding the .winmd file into the winmdidl command-line tool, and then generate the C source code for the proxy and stub by feeding that IDL file into the MIDL command-line tool. Visual Studio делает это автоматически при создании событий после построения, как показано ниже. Visual Studio do this for us if we create post-build events as shown in the following steps.
Создание исходного кода прокси и заглушки To generate the proxy and stub source code
Чтобы добавить пользовательское событие после построения, в обозревателе решений откройте контекстное меню для проекта ToasterComponent, а затем выберите «Свойства». To add a custom post-build event, in Solution Explorer, open the shortcut menu for the ToasterComponent project and then choose Properties. В левой области страницы свойств выберите «События построения», а затем нажмите кнопку «Изменить событие после построения». In the left pane of the property pages, select Build Events, and then choose the Edit Post-build button. Добавьте следующие команды в используемую после построения командную строку. Add the following commands to the post-build command line. (Сначала необходимо вызвать пакетный файл, чтобы задать переменные среды для поиска средства winmdidl.) (The batch file must be called first to set the environment variables to find the winmdidl tool.)
Важно! Для конфигурации проекта ARM или x64 измените значение параметра MIDL/env на x64 или ARM32. Important For an ARM or x64 project configuration, change the MIDL /env parameter to x64 or arm32.
Чтобы файл IDL создавался каждый раз при изменении WINMD-файла, измените значение параметра Выполнить событие после сборки на При обновлении выходных файлов проекта во время сборки. To make sure the IDL file is regenerated every time the .winmd file is changed, change Run the post-build event to When the build updates the project output. Страница свойств события сборки должна выглядеть примерно так: 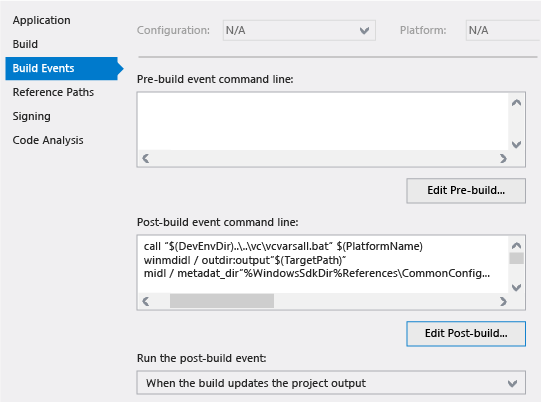 The Build Events property page should resemble this:
Перестройте решение, чтобы создать и скомпилировать файл IDL. Rebuild the solution to generate and compile the IDL.
Вы можете убедиться, что средство MIDL правильно скомпилировало решение, найдя файлы ToasterComponent.h, ToasterComponent_i.c, ToasterComponent_p.c и dlldata.c в каталоге проекта ToasterComponent. You can verify that MIDL correctly compiled the solution by looking for ToasterComponent.h, ToasterComponent_i.c, ToasterComponent_p.c, and dlldata.c in the ToasterComponent project directory.
Компиляция кода прокси и заглушки в библиотеке DLL To compile the proxy and stub code into a DLL
Получив необходимые файлы, мы можем скомпилировать их для создания библиотеки DLL, т. е. файла C++. Now that you have the required files, you can compile them to produce a DLL, which is a C++ file. Чтобы упростить операцию, добавьте новый проект для поддержки построения прокси-объектов. To make this as easy as possible, add a new project to support building the proxies. Откройте контекстное меню для решения ToasterApplication и выберите команду Добавить новый проект. Open the shortcut menu for the ToasterApplication solution and then choose Add > New Project. В левой области диалогового окна Новый проект разверните узел Visual C++ > Windows > универсальной Windows, а затем в средней области выберите DLL (приложения UWP). In the left pane of the New Project dialog box, expand Visual C++ > Windows > Univeral Windows, and then in the middle pane, select DLL (UWP apps). (Обратите внимание, что это НЕ проект компонента среды выполнения Windows на C++.) Назовите проект Proxies и нажмите кнопку ОК. (Notice that this is NOT a C++ Windows Runtime Component project.) Name the project Proxies and then choose the OK button. Эти файлы обновляются событиями после построения при изменение класса C#. These files will be updated by the post-build events when something changes in the C# class.
По умолчанию проект Proxies создает H-файлы заголовков и CPP-файлы C++. By default, the Proxies project generates header .h files and C++ .cpp files. Поскольку библиотека DLL компилируется на основе файлов, созданных MIDL, H- и CPP-файлы не требуются. Because the DLL is built from the files produced from MIDL, the .h and .cpp files are not required. В обозревателе решений откройте контекстное меню для них, выберите команду Удалить и подтвердите удаление. In Solution Explorer, open the shortcut menu for them, choose Remove, and then confirm the deletion.
Теперь, когда проект пуст, вы можете добавить созданные средством MIDL файлы. Now that the project is empty, you can add back the MIDL-generated files. Откройте контекстное меню для проекта Proxies и выберите команду Добавить > Существующий элемент. Open the shortcut menu for the Proxies project, and then choose Add > Existing Item. В диалоговом окне перейдите в каталог проекта ToasterComponent и выделите следующие файлы: ToasterComponent.h, ToasterComponent_i.c, ToasterComponent_p.c и dlldata.c. In the dialog box, navigate to the ToasterComponent project directory and select these files: ToasterComponent.h, ToasterComponent_i.c, ToasterComponent_p.c, and dlldata.c files. Выберите кнопку Добавить. Choose the Add button.
В проекте Proxies создайте DEF-файл, чтобы определить экспортные таблицы DLL, описанные в dlldata.c. In the Proxies project, create a .def file to define the DLL exports described in dlldata.c. Откройте контекстное меню для проекта и выберите команду Добавить > Новый элемент. Open the shortcut menu for the project, and then choose Add > New Item. В левой области диалогового окна выберите «Код», а затем в средней области выберите «Файл определения модуля». In the left pane of the dialog box, select Code and then in the middle pane, select Module-Definition File. Назовите файл proxies.def и нажмите кнопку Добавить. Name the file proxies.def and then choose the Add button. Откройте этот DEF-файл и добавьте в него операции EXPORTS, указанные в файле dlldata.c: Open this .def file and modify it to include the EXPORTS that are defined in dlldata.c:
Если выполнить построение проекта сейчас, оно завершится ошибкой. If you build the project now, it will fail. Для правильной компиляции проекта необходимо изменить способ его компиляции и компоновки. To correctly compile this project, you have to change how the project is compiled and linked. В обозревателе решений откройте контекстное меню проекта Proxies и выберите пункт Свойства. In Solution Explorer, open the shortcut menu for the Proxies project and then choose Properties. Измените страницы свойств, как это описано далее. Change the property pages as follows.
В левой области выберите C/C++ > Препроцессор, в области справа выберите Определения препроцессора, нажмите кнопку со стрелкой вниз и выберите команду Изменить. In the left pane, select C/C++ > Preprocessor, and then in the right pane, select Preprocessor Definitions, choose the down-arrow button, and then select Edit. Добавьте следующие определения: Add these definitions in the box:
В разделе C/C++ > Предварительно скомпилированные заголовки измените значение параметра Предварительно скомпилированный заголовок на Не использовать предварительно скомпилированные заголовки, а затем нажмите кнопку Применить. Under C/C++ > Precompiled Headers, change Precompiled Header to Not Using Precompiled Headers, and then choose the Apply button.
В разделе Компоновщик > Общее измените значение параметра Пропустить библиотеку импорта на Да и нажмите кнопку Применить. Under Linker > General, change Ignore Import Library to Yes, and then choose the Apply button.
В разделе Компоновщик > Ввод выберите элемент Дополнительные зависимости, нажмите кнопку со стрелкой вниз и выберите команду Изменить. Under Linker > Input, select Additional Dependencies, choose the down-arrow button, and then select Edit. Добавьте следующий текст в поле: Add this text in the box:
Не вставляйте эти библиотеки напрямую в строку списка. Do not paste these libs directly into the list row. Используйте окно Изменить, чтобы MSBuild в Visual Studio сохранил необходимые дополнительные зависимости. Use the Edit box to ensure that MSBuild in Visual Studio will maintain the correct additional dependencies.
После внесения изменений нажмите кнопку ОК в диалоговом окне Страницы свойств. When you have made these changes, choose the OK button in the Property Pages dialog box.
Затем добавьте зависимость от проекта ToasterComponent. Next, take a dependency on the ToasterComponent project. При этом проект Toaster будет построен перед проектом Proxy. This ensures that the Toaster will build before the proxy project builds. Это необходимо, поскольку проект Toaster отвечает за создание файлов для построения прокси. This is required because the Toaster project is responsible for generating the files to build the proxy.
Откройте контекстное меню для проекта Proxies и выберите элемент «Зависимости проекта». Open the shortcut menu for the Proxies project and then choose Project Dependencies. Установите флажки, чтобы указать, что проект Proxies зависит от проекта ToasterComponent, и чтобы убедиться, что Visual Studio выполняет их построение в правильном порядке. Select the check boxes to indicate that the Proxies project depends on the ToasterComponent project, to ensure that Visual Studio builds them in the correct order.
Убедитесь, что сборка решения происходит правильно, выбрав команду Построение > Перестроить решение в строке меню Visual Studio. Verify that the solution builds correctly by choosing Build > Rebuild Solution on the Visual Studio menu bar.
Регистрация прокси и заглушки To register the proxy and stub
В проекте ToasterApplication откройте контекстное меню для файла package.appxmanifest и выберите команду Открыть с помощью. In the ToasterApplication project, open the shortcut menu for package.appxmanifest and then choose Open With. В диалоговом окне «Открыть с помощью» выберите Редактор (текстовый) XML и нажмите кнопку ОК. In the Open With dialog box, select XML Text Editor and then choose the OK button. Мы вставим XML-код для регистрации расширения windows.activatableClass.proxyStub, который основан на идентификаторах GUID в прокси. We’re going to paste in some XML that provides a windows.activatableClass.proxyStub extension registration and which are based on the GUIDs in the proxy. Чтобы узнать идентификаторы GUID для APPXMANIFEST-файла, откройте файл ToasterComponent_i.c. To find the GUIDs to use in the .appxmanifest file, open ToasterComponent_i.c. Найдите записи, которые похожи на записи в следующем примере. Find entries that resemble the ones in the following example. Также обратите внимание на определения для IToast, IToaster и третьего интерфейса — обработчика типизированного события с двумя параметрами: Toaster и Toast. Also notice the definitions for IToast, IToaster, and a third interface—a typed event handler that has two parameters: a Toaster and Toast. Они соответствуют событию, которое определяется в классе Toaster. This matches the event that’s defined in the Toaster class. Обратите внимание, что идентификаторы GUID для IToast и IToaster соответствуют GUID, которые определены в интерфейсах в файле C#. Notice that the GUIDs for IToast and IToaster match the GUIDs that are defined on the interfaces in the C# file. Поскольку интерфейс типизированного обработчика события создается автоматически, GUID для этого интерфейса также формируется автоматически. Because the typed event handler interface is autogenerated, the GUID for this interface is also autogenerated.
Теперь мы копируем эти идентификаторы GUID, вставим их в файл package.appxmanifest в узле, который мы добавим с именем Extensions, а затем переформатируем их. Now we copy the GUIDs, paste them in package.appxmanifest in a node that we add and name Extensions, and then reformat them. Запись манифеста похожа на следующий пример (но не забывайте использовать собственные GUID). The manifest entry resembles the following example—but again, remember to use your own GUIDs. Обратите внимание, что GUID ClassId в XML-коде совпадает с ITypedEventHandler2. Notice that the ClassId GUID in the XML is the same as ITypedEventHandler2. Это вызвано тем, что это первый GUID в файле ToasterComponent_i.c. This is because that GUID is the first one that’s listed in ToasterComponent_i.c. Здесь идентификаторы GUID не учитывают регистр. The GUIDs here are case-insensitive. Вместо того чтобы вручную переформатировать GUID для IToast и IToaster, можно вернуться в определения интерфейса и получить значение GuidAttribute в правильном формате. Instead of manually reformatting the GUIDs for IToast and IToaster, you can go back into the interface definitions and get the GuidAttribute value, which has the correct format. В C++ GUID с правильным форматом указан в комментарии. In C++, there is a correctly-formatted GUID in the comment. В любом случае необходимо вручную изменить формат GUID, который используется для ClassId и обработчика событий. In any case, you must manually reformat the GUID that’s used for both the ClassId and the event handler.
Вставьте XML-узел Extensions как прямого потомка узла Package и одноранговый элемент, например, узла Resources. Paste the Extensions XML node as a direct child of the Package node, and a peer of, for example, the Resources node.
Перед продолжением важно убедиться следующем. Before moving on, it’s important to ensure that:
- Идентификатор ClassId для Проксистуб устанавливается в первый GUID в _ файле ToasterComponent i. c. The ProxyStub ClassId is set to the first GUID in the ToasterComponent_i.c file. Используйте первый идентификатор GUID, указанный в этом файле, для classId. Use the first GUID that’s defined in this file for the classId. (Он может совпадать с GUID для ITypedEventHandler2.) (This might be the same as the GUID for ITypedEventHandler2.)
- Path — это относительный путь к пакету для двоичного файла прокси. The Path is the package relative path of the proxy binary. (В этом руководстве библиотека proxies.dll находится в той же папки, что ToasterApplication.winmd.) (In this walkthrough, proxies.dll is in the same folder as ToasterApplication.winmd.)
- Идентификаторы GUID заданы в нужном формате. The GUIDs are in the correct format. (Здесь довольно легко запутаться.) (This is easy to get wrong.)
- Идентификаторы интерфейса в манифесте соответствуют идентификаторов IID в файле ToasterComponent _ i. c. The interface IDs in the manifest match the IIDs in ToasterComponent_i.c file.
- Имена интерфейсов в манифесте уникальны. The interface names are unique in the manifest. Так как они не используются системой, значения можете выбирать вы. Because these are not used by the system, you can choose the values. Рекомендуется выбирать имена интерфейсов, которые соответствуют заданным вами интерфейсам. It is a good practice to choose interface names that clearly match interfaces that you have defined. Для созданных интерфейсов рекомендуется использовать описательные имена. For generated interfaces, the names should be indicative of the generated interfaces. _Для создания имен интерфейсов можно использовать файл ToasterComponent i. c. You can use the ToasterComponent_i.c file to help you generate interface names.
Теперь, если вы попытаетесь запустить решение, появится сообщение о том, что файл proxies.dll не входит в полезные данные. If you try to run the solution now, you will get an error that proxies.dll is not part of the payload. Откройте контекстное меню папки Ссылки в проекте ToasterApplication и выберите команду Добавить ссылку. Open the shortcut menu for the References folder in the ToasterApplication project and then choose Add Reference. Установите флажок рядом с проектом Proxies. Select the check box next to the Proxies project. Кроме того, убедитесь, что флажок «ToasterComponent» также установлен. Also, make sure that the check box next to ToasterComponent is also selected. Нажмите кнопку ОК . Choose the OK button.
Теперь можно выполнить сборку проекта. The project should now build. Запустите проект и убедитесь, что вы можете создать всплывающее уведомление. Run the project and verify that you can make toast.


