- Windows 10 — advanced appearance settings
- Replies (7)
- Windows 10 — advanced appearance settings
- Replies (7)
- Optimize Windows 10 Performance by tweaking Visual Effects
- Disable visual effects in Windows 10
- How to open and use Windows 10 Settings
- How to open Windows 10 Settings
- How to use Windows 10 Settings
- 1. System
- 2. Devices
- 3. Phone
- 4. Network and Internet
- 5. Personalization
- 6. Apps
- 7. Accounts
- 8. Time and Language
- 9. Gaming
- 10. Ease of Access
- 11. Search
- 12. Cortana
- 13. Privacy
- 14. Update and Security
Windows 10 — advanced appearance settings
I have just bought a new laptop with Windows 10 preinstalled. The default white background of applications is hurting my eyes. I was wondering if it is possible to change the background colour of applications (previously customised in ‘Advanced Appearance Settings’ by selecting ‘window’ from the dropdown list — when using Windows 7 and XP). I have tried changing the colour using personalise, but this only seems to change the desktop background, taskbar, start menu, and window borders. The background of my applications remains white, and this, with the black writing is hurting my eyes. The title bar also remains white, which doesn’t make it very clear.
Replies (7)
![]()
I have just bought a new laptop with Windows 10 preinstalled. The default white background of applications is hurting my eyes. I was wondering if it is possible to change the background colour of applications (previously customised in ‘Advanced Appearance Settings’ by selecting ‘window’ from the dropdown list — when using Windows 7 and XP). I have tried changing the colour using personalise, but this only seems to change the desktop background, taskbar, start menu, and window borders. The background of my applications remains white, and this, with the black writing is hurting my eyes. The title bar also remains white, which doesn’t make it very clear.
I think you have 3 options:
1. Control Panel > Appearance & Personalization > Pick one of the High Contrast themes with black background
2. Reduce screen brightness, or use a computer built-in screen color effects software (e.g Dell True Color/ Sony VAIO Control Center. )
3. Get a third-party theme (some kinda Dark theme for Windows 10 — deviantart forum) — Read its own instruction carefully. Sometime this may get you in some terrible security issues, consider
5 people found this reply helpful
Was this reply helpful?
Sorry this didn’t help.
Great! Thanks for your feedback.
How satisfied are you with this reply?
Thanks for your feedback, it helps us improve the site.
How satisfied are you with this reply?
Thanks for your feedback.
Thanks for taking the trouble to reply.
I have already tried the first two options, and they were not any better. The high contrast themes were just as bad, if not worse. When I turned the screen brightness down it turned everything down, not just the background. I’ve also looked at third party themes, with no luck.
What I would really like to be able to do is to customise my colours using something similar to the Advanced Appearance Settings form Windows 7. I had made a colour scheme with a light pink background in application windows, which suited me and was easy on my eyes.
Thanks again for taking the trouble to reply.
5 people found this reply helpful
Was this reply helpful?
Sorry this didn’t help.
Great! Thanks for your feedback.
How satisfied are you with this reply?
Thanks for your feedback, it helps us improve the site.
How satisfied are you with this reply?
Thanks for your feedback.
![]()
Oh, sorry to hear that, I have no other option. Get your eyes off the screen for a minute every 30 minutes
3 people found this reply helpful
Was this reply helpful?
Sorry this didn’t help.
Great! Thanks for your feedback.
How satisfied are you with this reply?
Thanks for your feedback, it helps us improve the site.
How satisfied are you with this reply?
Thanks for your feedback.
Oh, sorry to hear that, I have no other option. Get your eyes off the screen for a minute every 30 minutes
If you’re an insider, perhaps you can get someone in the ‘bug’ department to look at this?
For years I’ve set my Active Window colour to be much more restful — didn’t take Rocket Science, just plain, common sense!!
I’ve also been advising people to do this for years, so there’ll be quite a few people who’ll want to know why some dumb person dropped this VITAL control.
Sensible people always look away from the screen on a regular basis, but that doesn’t mean that we also don’t want to adjust the colours . . . . .
3 people found this reply helpful
Was this reply helpful?
Sorry this didn’t help.
Great! Thanks for your feedback.
How satisfied are you with this reply?
Thanks for your feedback, it helps us improve the site.
How satisfied are you with this reply?
Thanks for your feedback.
I had a very similar problem. I wanted to change the background cell color in Excel to grey. What I did was edit the registry.
1) Hit the windows key + R, opening the «run window»
2) Type «regedit» to open the registry editor. This is dangerous and normally you should do it only if you are an advanced user and know what you are doing.
3) Click «yes» when Windows asks you if want to allow the program to make changes.
4) Open HKEY_CURRENT_USER > Control Panel > Colors. You should see a long list on the right, including «Windows» and probably the numbers 255 255 255. These are the RGB values for the color.
5) Click Windows and type in any numbers you like. I chose 192 192 192 which gives a nice neutral grey.
6) Restart your computer to allow the changes to take effect.
When you restart, and open Word or Excel, you will get a grey background instead of a white background. When you print, it will still be white, but on screen it is grey. You can even use «white ink» in Excel for cells. You can read the cells on your screen but when the document prints they will be hidden.
Optimize Windows 10 Performance by tweaking Visual Effects
Windows 10 is the most optimized and fastest OS provided by them, there will always be tweak enthusiasts and power users who want to squeeze out the last drop of performance to make Windows 10 run faster. Windows 10 too offers some visual effects, animations, and features can be disabled to improve its performance – similar to what was being offered in Windows 8/7.
Today in this article, we’re going to talk about the visual performance optimization of Windows 10/8.
Disable visual effects in Windows 10
1. Press Windows Key + X combination to see the following menu. Select System in the bottom left corner.
2. In the System window, in the left pane, click on Advanced system settings.
3. In the System Properties window, pick Settings for Performance.
4. In the Performance Options window, you will see 3 options:
- Let Windows choose what’s best for my computer
- Adjust for best appearance
- Adjust for best performance.
Selecting Adjust for best performance may make your Windows perform slightly better, but you will have to sacrifice on the visual effect – and that maybe something you may not want to do.
Here are the settings I prefer to uncheck. Feel free to change them and make them suit your needs.
I prefer to remove checkmarks from the following options:
- Fade out menu items after clicking
- Enable transparent glass (you will lose the cool Aero look though)
- Animations in the taskbar
- Fade or slide menus into view
- Fade or slide Tool Tips into view
- Animate windows when minimizing and maximizing
- Show shadows under windows
- Slide open combo boxes
Finally, click Apply and then OK. Now you could access to Desktop, if you like using Windows + D key combination.
You’ll now see that performance of your Windows 10 may have increased marginally.
You also have another way and that is as follows:
Open Control Panel > Ease of Access > Make the computer easier to see.
Here you will see a Turn off all unnecessary animations (when possible) setting. Check the box and click Apply.
This setting is, of course, available in Windows 8/7 too!
See this post if you frequently receive 100% Disk Usage message.
How to open and use Windows 10 Settings
If you have installed Windows 10, you might have started exploring it already. Windows 10 comes with new opportunities for users to personalize it, according to their own preferences. In this post, we will take a bird-eye view of the settings offered by Windows 10.
While Microsoft has always been offering a decent range of settings options and personalization capabilities in all its Windows versions, things are a bit different in Windows 10. While the familiar Control Panel is still there, the new Settings app comes with a new design and a new interface.
The latest version of Windows 10 offers a wide range of settings, which include personalization, system, and privacy options. You will be able to see this once you open the Windows 10 Settings window and explore your way through all the options. The new Windows 10 Settings app now comes with a new design and a new interface that allows its users to customize and personalize it according to their preferences.
In this post, we will be covering the following points:
- How to open the Windows 10 Settings app.
- How to use the Windows 10 Settings app.
Users can sync their settings by using their email id, manage sign-in options, change privacy settings, manage and update security, customize the Start menu and Taskbar, and a lot more. We will first see how to open the Settings app in Windows 10 and then go step by step through all the settings. So, let’s get started!
How to open Windows 10 Settings
To open the Windows 10 Settings app, click on the Start button, and then further click on the gear icon called Settings. The Settings app window will open.
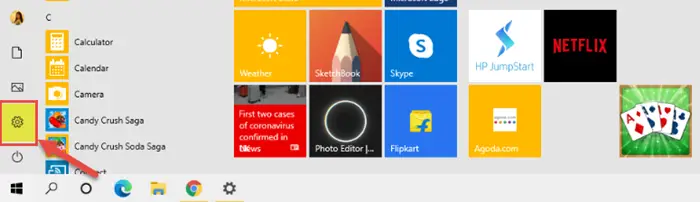
Another way to open it is to simply search for it in the Taskbar Search option. The keyboard shortcut is Windows key + I.
As you can see, the Windows 10 Settings include the following sections.
- System
- Devices
- Phone
- Network & Internet
- Personalization
- Apps
- Accounts
- Time & Language
- Gaming
- Ease of Access
- Search
- Cortana
- Privacy
- Update & Security
How to use Windows 10 Settings
Windows 10 Settings allow the users to customize and configure the Operating System as per their needs. We will now go through all the sections and settings in detail.
1. System
The System Settings let you adjust the settings of all your apps, notifications, display, and power. You can change the display resolution, display orientation, and brightness and color of the built-in display. You can also change the size of the text, apps, and other items.
In the Sound category, you can choose your input and output devices, manage all the sounds devices, and set other advanced sound options. You can edit, add, remove, select the quick actions, show or hide notifications, adjust the power and sleep and battery saver settings, configure storage settings, and more.
Storage lets you decide where your apps, documents, music, pictures, and videos are saved by default. If you are using a touch-enabled device, you can set your PC into tablet mode from System Settings > Tablet mode.
The Multitasking feature enables you to work with multiple windows and virtual desktops. Projecting to this PC allows you to project your Windows phone or PC to the existing screen to use its keyboards, mouse and other devices. You can share or receive content with a nearby device using Bluetooth and WiFi. It is also possible to sync your clipboard data across devices as well as clear it.
You can set up Remote Desktop which lets you connect and control your existing PC from a remote device by using a remote desktop client. In the About section, you will be able to see your device specifications such as the device name, processor, installed RAM, device ID, product ID, etc.
2. Devices
You can adjust the Devices Settings for connected devices like printer, scanner, mouse, keyboard, etc. You can explore the touchpad sensitivity and advanced typing and keyboard settings. Other related settings such as AutoPlay, USB, and Pen and Windows Ink are also under this section of settings.
3. Phone
Under Phone Settings, you can add a phone and link it to your PC which will allow you to browse the web and use apps on your phone and then instantly switch onto your computer.
4. Network and Internet
All your WiFi networks, Dial-up connections, VPN, Ethernet, etc. can be managed here in the Network & Internet section of settings. You can check for available networks and change the connection properties. More settings related to a mobile hotspot, airplane mode, data usage, Wi-Fi Sense and the proxy can be found here.
5. Personalization
Under Personalization Settings, the users can customize the background, colours, lock screen, fonts, and themes. The Start menu and the Taskbar can also be personalized as per the user’s preferences.
6. Apps
In Apps & features, you can search, sort, filter, move as well as uninstall the apps here. You can choose the default apps, download offline maps, associate apps with websites, and so on. You can also change the video playback and startup apps settings.
7. Accounts
In the Accounts settings section, you will find all your information, such as billing details, subscriptions, family settings, and all about your Microsoft account. You can add another Microsoft account as well as a work/school account here. There are several sign-in options to choose from, such as a password, picture password, PIN, fingerprint, etc. You can sync your settings as well.
8. Time and Language
The Time & Language settings include the date and time settings, region and language settings, and speech settings. You can change date formats, add additional clocks for different time zones, choose the language you speak with your device, and also add preferred languages.
9. Gaming
The Gaming settings let you control how the Game bar opens and recognizes your game. You can create your own keyboard shortcuts for various functions such as to open game bar, start/stop recording, microphone on / off, and so on.
This section allows you to control and determine the audio quality, microphone volume, system volume, and how you capture your game through screenshots and game clips. You can turn the game mode on here and control how your game appears when you broadcast. Under Xbox Networking, you will find details regarding the connection status and performance.
10. Ease of Access
The Ease of Access settings is categorized into three settings related to vision, hearing, and interaction.
Vision includes settings that make your display, pointer, cursor, and touch feedback easier to see. You can use a magnifier to zoom, a narrator, high contrast, and color filters for a better viewing experience. Hearing includes the settings that make your device easier to hear or use without sound by displaying audio text. Interaction includes all the settings related to speech, keyboard, mouse, and eye control.
11. Search
Under Search Settings, you will find the permissions, search history, and advanced search indexer settings and learn all about the Windows Search and your privacy.
12. Cortana
The Cortana Settings section lets you learn all about Cortana and your privacy settings where you can manage what you permit Cortana to do, see, and use.
13. Privacy
Privacy includes the Windows permissions as well as the App permissions.
Windows permissions include general settings, speech, ink and typing personalization settings, diagnostics and feedback, and activity history. App permissions include all the settings related to location, camera, microphone, voice activation, notifications, account info, calendar, contacts, phone calls, history, email, tasks, messaging, radio, other devices, background apps, app diagnostics, automatic file download, documents, pictures, videos, and file system. Take a look at the Windows 10 Privacy Settings.
14. Update and Security
Microsoft has added an option of Update and Security settings where you can check for the latest Windows updates, Check Activation state, adjust the Windows Defender settings, open Windows Security and also rollback to your previous version of Windows via Recovery option.
In this section, you will find all about the Windows updates and security, delivery optimization and troubleshooting settings. You can backup using file history and explore the recovery options. You will find information regarding the activation and product key here in this section under the Activation tab. You will also see the Find my device settings and Developers settings here.


