- App Center Crashes (Windows)
- Unhandled exceptions on WinForms applications
- Configure the application to exit on crash
- Report the unhandled exception as a runtime error
- Generate a test crash
- Get more information about a previous crash
- Did the app crash in the previous session?
- Details about the last crash
- Customize your usage of App Center Crashes
- Should the crash be processed?
- Ask for the user’s consent to send a crash log
- Get information about the sending status for a crash log
- The following callback will be invoked before the SDK sends a crash log
- The following callback will be invoked after the SDK sent a crash log successfully
- The following callback will be invoked if the SDK has failed to send a crash log
- Add attachments to a crash report
- Enable or disable App Center Crashes at runtime
- Check if App Center Crashes is enabled
- Handled Errors
- Windows application crash files
- Versions History
- Using AppCrashView
- Command-Line Options
- How to View Windows 10 Crash Logs and Error Logs (2021 Updated) [Partition Magic]
- Summary :
- Quick Navigation :
- Method 1. View Windows 10 Crash Logs with Event Viewer
- Method 2. View Windows 10 Crash Log with Reliability Monitor
- Conclusion
App Center Crashes (Windows)
App Center Crashes will automatically generate a crash log every time your app crashes. The log is first written to the device’s storage and when the user starts the app again, the crash report will be sent to App Center.
The App Center SDK collects only crashes caused by unhandled .NET exceptions. It doesn’t collect native crashes e.g. when using C or C++. However, if you have an app with C++ crashes, you can upload them to App Center via the upload crashes API.
Follow the WPF/WinForms Getting Started if you haven’t set up the SDK in your application yet.
Unhandled exceptions on WinForms applications
This section and following sub sections apply only to WinForms. You can skip this section if you’re integrating the SDK on WPF.
By default, an unhandled exception in a WinForms application doesn’t trigger a crash (the application doesn’t exit) if the debugger isn’t attached.
Instead, Windows shows a dialog to the user the option to continue or quit app execution. Consequently, the App Center SDK is unable to automatically capture these exceptions (even if the user clicks on the Quit button).
Crashes are collected on App Center only if it causes the application to exit automatically. App Center supports only one crash per session.
There are two ways to report unhandled exceptions in WinForms. The application can be configured to crash on unhandled exceptions, or continue running but report unhandled exceptions as runtime errors.
Configure the application to exit on crash
This is the only way to report the unhandled exception as a crash on App Center, make the application exit on unhandled exceptions.
To do that, call a Windows method before initializing the SDK:
If this option isn’t acceptable in your application, you can report the unhandled exception as a runtime error (described below).
Report the unhandled exception as a runtime error
If your application must keep running after an unhandled exception, you can’t report the exception as a crash in App Center but you can instead report it as an error.
To do that, you can use the following code sample:
When the debugger is attached, unhandled exceptions will cause application to exit (crashes) unless a handler is attached to Application.ThreadException .
Generate a test crash
App Center Crashes provides you with an API to generate a test crash for easy testing of the SDK. This API checks for debug vs release configurations. So you can only use it when debugging as it won’t work for release apps.
Get more information about a previous crash
App Center Crashes has two APIs that give you more information in case your app has crashed.
Did the app crash in the previous session?
At any time after starting the SDK, you can check if the app crashed in the previous launch:
This comes in handy in case you want to adjust the behavior or UI of your app after a crash has occurred. Some developers choose to show additional UI to apologize to their users, or want a way to get in touch after a crash has occurred.
This method must only be used after Crashes has been started, it will always return false before start.
Details about the last crash
If your app crashed previously, you can get details about the last crash.
This method must only be used after Crashes has been started, it will always return null before start.
There are numerous use cases for this API, the most common one is people who call this API and implement their custom Crashes delegate or listener.
Customize your usage of App Center Crashes
App Center Crashes provides callbacks for developers to perform additional actions before and when sending crash logs to App Center.
Set the callback before calling AppCenter.Start() , since App Center starts processing crashes immediately after the start.
Should the crash be processed?
Set this callback if you want to decide if a particular crash needs to be processed or not. For example, there could be a system level crash that you’d want to ignore and that you don’t want to send to App Center.
Ask for the user’s consent to send a crash log
If user privacy is important to you, you might want to get user confirmation before sending a crash report to App Center. The SDK exposes a callback that tells App Center Crashes to await user confirmation before sending any crash reports.
If you chose to do so, you’re responsible for obtaining the user’s confirmation, e.g. through a dialog prompt with one of the following options: Always Send, Send, and Don’t send. Based on the input, you’ll tell App Center Crashes what to do and the crash will then be handled accordingly.
The SDK doesn’t display a dialog for this, the app must provide its own UI to ask for user consent.
The app shouldn’t call NotifyUserConfirmation explicitly if it doesn’t implement a user confirmation dialog; the Crashes module will handle sending logs for you implicitly.
The following callback shows how to tell the SDK to wait for user confirmation before sending crashes:
In case you return true in the callback above, your app must obtain (using your own code) user permission and message the SDK with the result using the following API.
Get information about the sending status for a crash log
At times, you want to know the status of your app crash. A common use case is that you might want to show UI that tells the users that your app is submitting a crash report, or, in case your app is crashing quickly after the launch, you want to adjust the behavior of the app to make sure the crash logs can be submitted. App Center Crashes provides three different callbacks that you can use in your app to be notified of what’s going on:
The following callback will be invoked before the SDK sends a crash log
In case we have network issues or an outage on the endpoint, and you restart the app, SendingErrorReport is triggered again after process restart.
The following callback will be invoked after the SDK sent a crash log successfully
The following callback will be invoked if the SDK has failed to send a crash log
Receiving FailedToSendErrorReport means a non-recoverable error such as a 4xx code occurred. For example, 401 means the appSecret is wrong.
This callback isn’t triggered if it’s a network issue. In this case, the SDK keeps retrying (and also pauses retries while the network connection is down).
Add attachments to a crash report
You can add binary and text attachments to a crash report. The SDK will send them along with the crash so that you can see them in App Center portal. The following callback will be invoked right before sending the stored crash from previous application launches. It won’t be invoked when the crash happens. Be sure the attachment file is not named minidump.dmp as that name is reserved for minidump files. Here is an example of how to attach text and an image to a crash:
The size limit is currently 7 MB. Attempting to send a larger attachment will trigger an error.
Enable or disable App Center Crashes at runtime
You can enable and disable App Center Crashes at runtime. If you disable it, the SDK won’t do any crash reporting for the app.
To enable App Center Crashes again, use the same API but pass true as a parameter.
You don’t need to await this call to make other API calls (such as IsEnabledAsync ) consistent.
The state is persisted in the device’s storage across application launches.
Check if App Center Crashes is enabled
You can also check if App Center Crashes is enabled or not:
Handled Errors
App Center also allows you to track errors by using handled exceptions. To do so, use the TrackError method:
An app can optionally attach properties to a handled error report to provide further context. Pass the properties as a dictionary of key/value pairs (strings only) as shown in the example below.
You can also optionally add binary and text attachments to a handled error report. Pass the attachments as an array of ErrorAttachmentLog objects as shown in the example below.
Windows application crash files
Versions History
- Version 1.35
- Added ‘Quick Filter’ feature (View -> Use Quick Filter or Ctrl+Q). When it’s turned on, you can type a string in the text-box added under the toolbar and AppCrashView will instantly filter the application crashes list, showing only lines that contain the string you typed.
- Version 1.31
- Added ‘Run As Administrator’ option (Ctrl+F11), which allows you to easily run AppCrashView as administrator for viewing crash reports that are not accessible for non-admin user.
- Fixed bug: AppCrashView failed to remember the last size/position of the main window if it was not located in the primary monitor.
- Version 1.30
- Added ‘Exception Code Description’ column.
- Version 1.25
- Added option to delete the selected reports.
- Version 1.21
- Fixed to display date/time values according to daylight saving time settings.
- Version 1.20
- Added ‘Open Report File Folder’ option.
- Added ‘Open Process Folder’ option.
- Version 1.15
- Added /ReportsFolder command-line option, which allows you to specify the exact reports folder you want to load, for example:
AppCrashView.exe /ReportsFolder «c:\temp\wer»
- Added /ReportsFolder command-line option, which allows you to specify the exact reports folder you want to load, for example:
- Version 1.12
- Fixed bug: The crash items located under ‘All Users’ profile displayed twice.
- Added ‘Auto Size Columns+Headers’ option.
- Version 1.11
- Added ‘Mark Odd/Even Rows’ option, under the View menu. When it’s turned on, the odd and even rows are displayed in different color, to make it easier to read a single line.
- Version 1.10
- Added ‘Add Header Line To CSV/Tab-Delimited File’ option. When this option is turned on, the column names are added as the first line when you export to csv or tab-delimited file.
- Version 1.07
- Fixed issue: removed the encoding from the xml string, which caused problems to some xml viewers.
- Version 1.06
- Added /ShowReportQueue and /ShowReportArchive command-line options
- Version 1.05
- Added more WER folders.
- Added ‘Show ReportArchive Files’ and ‘Show ReportQueue Files’ options. ‘Show ReportQueue Files’ option is turned off by default, because the ReportQueue folder doesn’t contain crashes or critical errors.
- Added /ProgramData command-line option.
- Version 1.00 — First release.
Using AppCrashView
The main window of AppCrashView contains 2 pane. The upper pane displays the list of all crashes found in your system, while the lower pane displays the content of the crash file that you select in the upper pane.
You can select one or more crashes in the upper pane, and then save them (Ctrl+S) into text/html/xml/csv file or copy them to the clipboard ,and paste them into Excel or other spreadsheet application.
Command-Line Options
| /ProfilesFolder | Specifies the user profiles folder (e.g: c:\users) to load. If this parameter is not specified, the profiles folder of the current operating system is used. |
| /ReportsFolder | Specifies the folder that contains the WER files you wish to load. |
| /ShowReportQueue | Specifies whether to enable the ‘Show ReportQueue Files’ option. 1 = enable, 0 = disable |
| /ShowReportArchive | Specifies whether to enable the ‘Show ReportArchive Files’ option. 1 = enable, 0 = disable |
| /stext | Save the list of application crashes into a regular text file. |
| /stab | Save the list of application crashes into a tab-delimited text file. |
| /scomma | Save the list of application crashes into a comma-delimited text file (csv). |
| /stabular | Save the list of application crashes into a tabular text file. |
| /shtml | Save the list of application crashes into HTML file (Horizontal). |
| /sverhtml | Save the list of application crashes into HTML file (Vertical). |
| /sxml | Save the list of application crashes into XML file. |
| /sort | This command-line option can be used with other save options for sorting by the desired column. If you don’t specify this option, the list is sorted according to the last sort that you made from the user interface. The parameter can specify the column index (0 for the first column, 1 for the second column, and so on) or the name of the column, like «Event Name» and «Process File». You can specify the ‘ |
‘ prefix character (e.g: «
Event Time») if you want to sort in descending order. You can put multiple /sort in the command-line if you want to sort by multiple columns.
How to View Windows 10 Crash Logs and Error Logs (2021 Updated) [Partition Magic]
By Irene | Follow | Last Updated January 05, 2021
Summary :
When you computer crashes, a crash log will be generated, which can help you analyze the causes of the crash. But, do you know how to view Windows 10 crash logs and error logs? If you don’t know, don’t worry. This article from MiniTool will show you how to view Windows 10 crash log with two methods.
Quick Navigation :
Method 1. View Windows 10 Crash Logs with Event Viewer
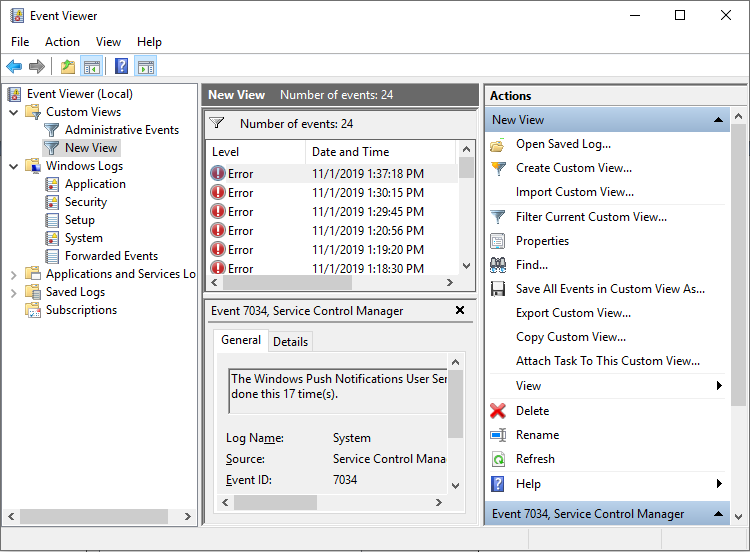
To view Windows 10 crash logs, you can make use of the built-in tool Event Viewer, which keeps a log of application and system messages, errors, warnings, etc. You can follow the steps below to check Windows crash logs Windows 10 with Event Viewer.
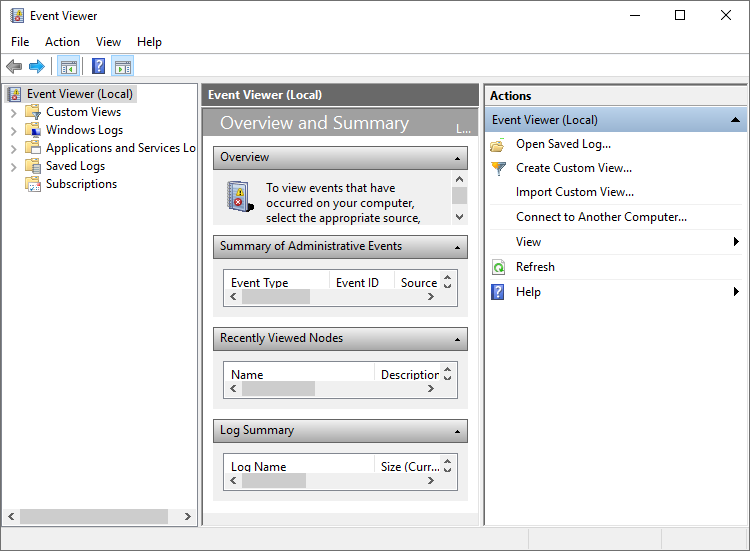
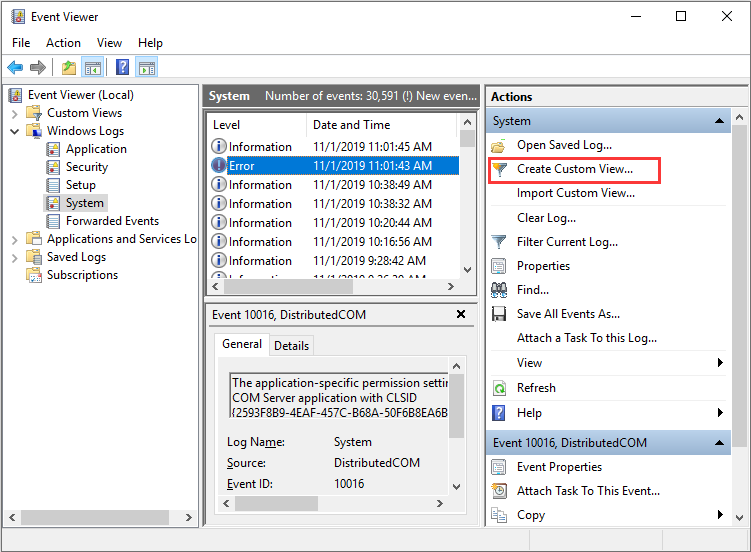
Step 1. Type Event Viewer in the Windows 10 Cortana search box. Then right click the best match Event Viewer and choose Run as Administrator.
Step 2. Here is the main interface of Event Viewer. On the left side of the window, you can view all the Logs according to the category. To view Windows 10 crash logs such as the logs of blue screen error, just click on Windows Logs.
Step 3. Then choose System under Windows Logs.
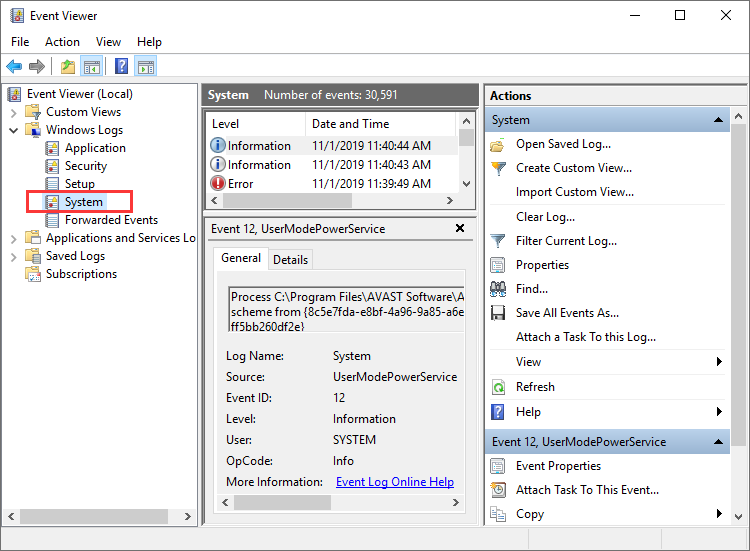
Step 4. Find and click Error on the event list. Then you can view the detailed crash log information shown up in the bottom of the window.

You can also create a custom view so you can view the crash logs more quickly. Here are steps on how to create a custom view.
Step 1. Click on Create a Custom View on the right window. As you click on Create Custom View, a new window will pop up.
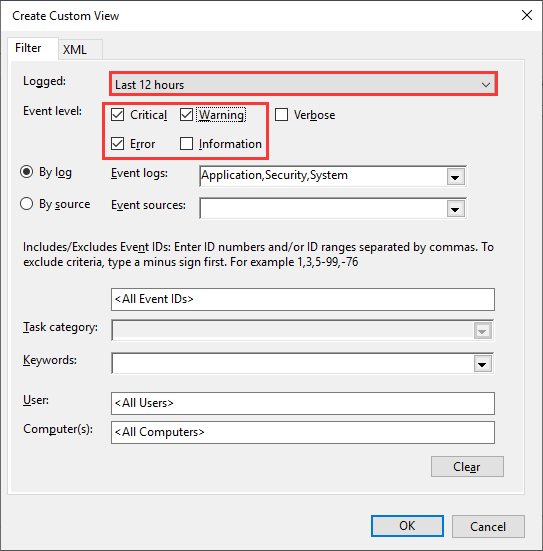
Step 2. Choose a time period you want to view. Then check the boxes next Critical, Warning and Error in the Event levels section.
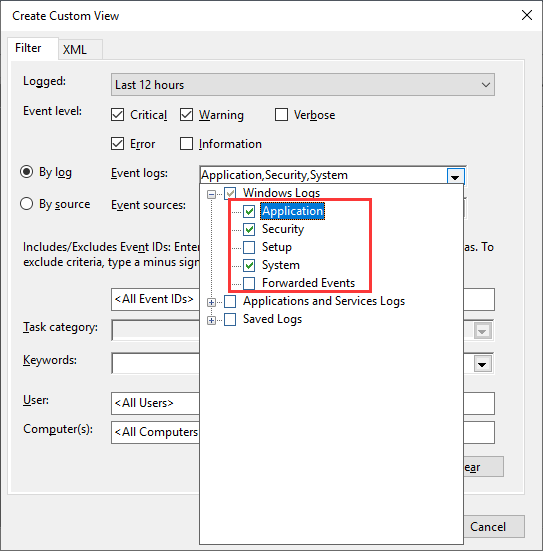
Step 3. Select the By log option. Then click the drop-down menu next to Event logs, and then select Application, Security and System.
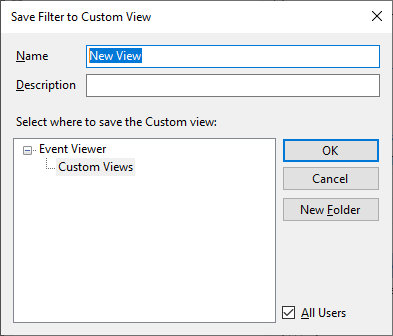
Step 4. Then click OK to save the settings.
Step 5. Name this custom view and then click OK to start to view the Windows 10 crash log.
Step 6. Then you can view all the Windows 10 crash logs during the tome period you select.
Windows Reliability Monitor also enables you to view recent system and application crashes. Here’s how to check Windows 10 crash logs with Reliability Monitor.

As a game lover, you may run into computer crashes when playing games. This article offers some solutions to this issue.
Method 2. View Windows 10 Crash Log with Reliability Monitor
Step 1. Type reliability in the Windows 10 Cortana search box. Then click the best match View reliability history.
Step 2. From the main interface, you can see that the Reliability Monitor window is arranged by dates. If Windows crashes or freezes, you will see a red circle with an «X» representing the failure, as shown below.
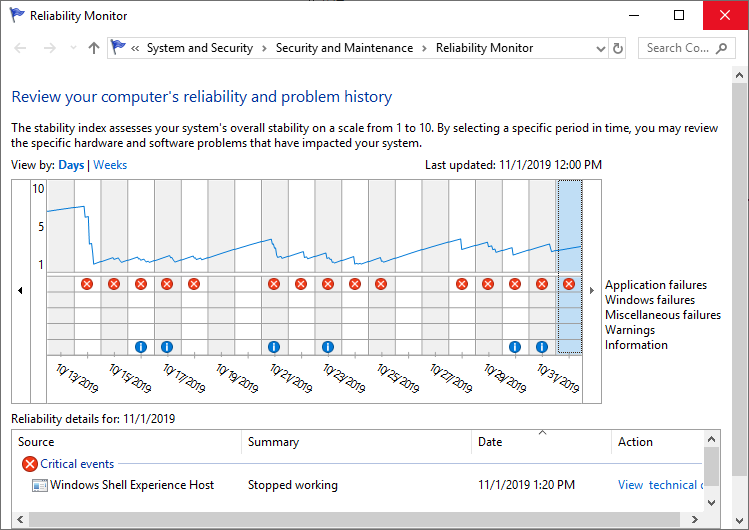
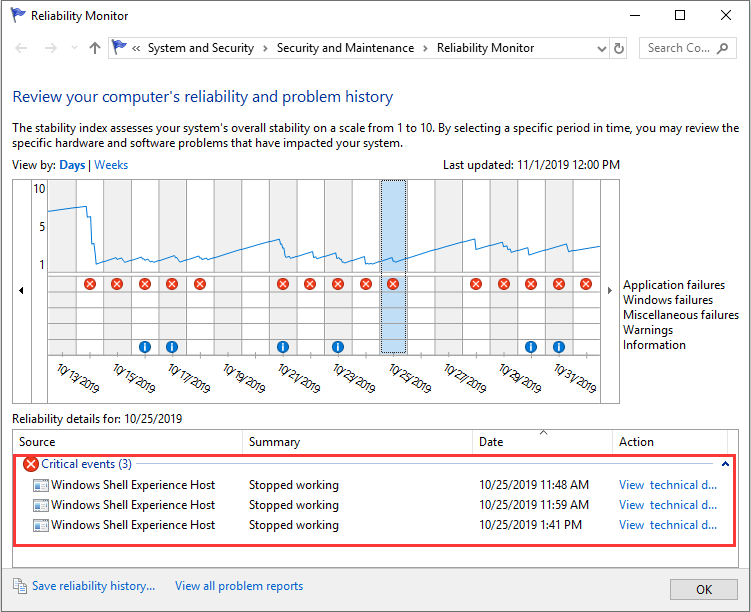
Step 3. If you want to view a certain day’s crash log, just click that day’s column and more detailed information will be displayed at the bottom. You can also double click one of the listed events to open a new window with more information.
Conclusion
Event viewer and Reliability Monitor are all good for you to check Windows 10 crash logs. Choose a tool you like and you can get all the Windows crash log information.


