- Windows desktop development with C++ in Visual Studio
- Acquiring the tools
- Opening code and building
- Creating new projects
- Project Wizard
- Editing code and navigating
- Debugging and Diagnostics
- Testing your code
- Working with others
- Windows Store packaging for desktop apps
- Try out Visual Studio 2017 for desktop development with C++!
- Tutorial: Create your first Universal Windows Platform application in Visual Studio with XAML and C#
- Create a project
- Create the application
- Add a button to the Design canvas
- Add a label to the button
- Add an event handler
- What did we just do?
- Run the application
- Next steps
Windows desktop development with C++ in Visual Studio
April 17th, 2017
The Windows desktop platform has long been the most popular platform among C++ application developers. With C++ and Visual Studio, you use Windows SDKs to target many versions of Windows ranging from Windows XP to Windows 10, which is well over a billion devices. Popular desktop applications like Microsoft Office, Adobe Creative Suite, and Google Chrome all are built using the same Win32 APIs that serve as the foundation for Windows desktop development. Developing for Windows desktop allows you to reach the highest number of users on any non-mobile development platform.
In this post we will dive into the “Desktop development with C++” workload inside Visual Studio and go over the workflow used to develop a desktop app. For information on developing Universal Windows Platform apps, check out this post.
Acquiring the tools
After installing Visual Studio, open the Visual Studio Installer from the Start menu and navigate to the Workloads Page. We need to install the “Desktop development with C++” workload, which provides the tools needed for developing Windows desktop applications that can run on Windows. The Win32 API model used in these types of applications is the development model used in Windows versions prior to the introduction of the modern Windows API that began with Windows 8. This modern API later evolved into the UWP platform for Windows 10, but traditional desktop development using Windows APIs is still fully supported on all versions of Windows.
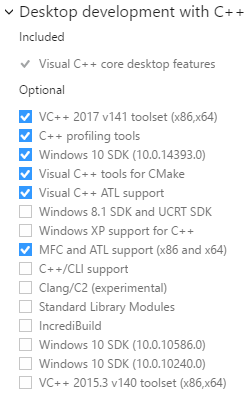
When you install the C++ Windows desktop workload, you have many options to customize the installation by selecting your desired tools, Windows SDKs, and other additional features like recent ISO C++ standards candidates such modules support for the STL. The core C++ compiler and libraries for building desktop applications that target x86 and x64 systems are included in the VC++ 2017 v141 toolset (x86, x64). Notable optional tools include support for MFC and C++/CLI development. In the following examples, we will show how to create an MFC app, so this optional component was installed.
Opening code and building
After installing the C++ desktop workload, you can begin coding in existing projects or you can create new ones. Out of the box, Visual Studio can open any folder of code and be configured to build using CMake, a cross-platform build system. The Visual Studio CMake integration even allows you to use another compiler by opening the directory containing your CMakeLists.txt files and let VS do the rest.
Of course ,there is also full support for Microsoft’s own build system called MSBuild, which uses the .vcxproj file format. MSBuild is a robust and fully featured build system that allows building projects in Visual Studio that target Windows. Building an MSBuild-based project just requires a .vcxproj file and can be built in the IDE or by using the command prompt.
In Visual Studio 2017, you can also simply open a folder of code files and immediately begin working in it. In the background, Visual Studio will index your files and providing Intellisense support along with refactoring and all the other navigation aids that you expect. You can create custom .json scripts to specify build configurations.
Creating new projects
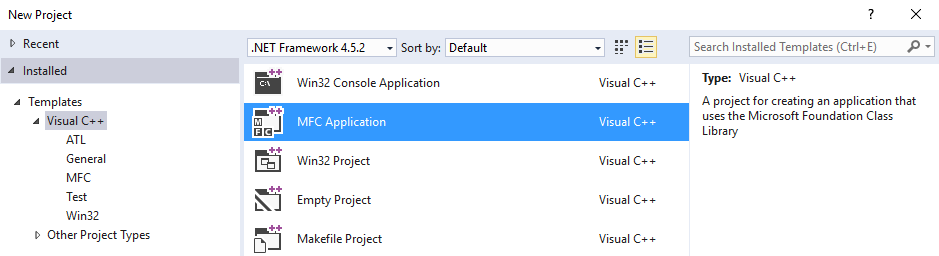
If you are creating a new project from scratch, then you can start with one of a variety of project templates.: Each template provides customizable build configurations and boilerplate code that compiles and runs out of the box:
| Project Type (folder) | Description |
| Win32 | The Win32 API (also known as the Windows API) is a C-based framework for creating GUI-based Windows desktop applications that have a message loop and react to Windows messages and commands. A Win32 console application has no GUI by default and runs in a console window from the command line. |
| ATL | The Active Template Library is a set of template-based C++ classes that let you create small, fast Component Object Model (COM) objects. COM |
| MFC | Microsoft Foundation Classes is an object oriented wrapper over the Win32 API that provides designers and extensive code-generation support for creating a native UI. |
| CLR | C++/CLI (Common Language Interface) enables efficient communication between native C++ code and .NET code written in languages such as C# or Visual Basic. |
Project templates are included for each of these types of desktop applications depending on the features you select for the workload.
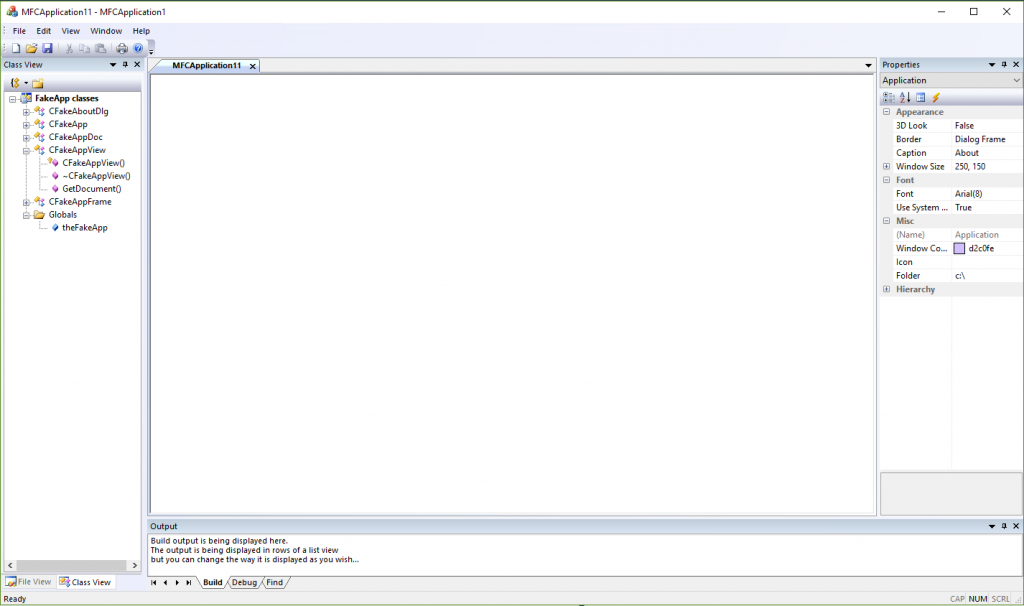
Project Wizard
Once you have selected a template, you have the option to customize the project you have selected to create. Each of these project types has a wizard to help you create and customize your new project. The illustrations below show the wizard for an MFC application.
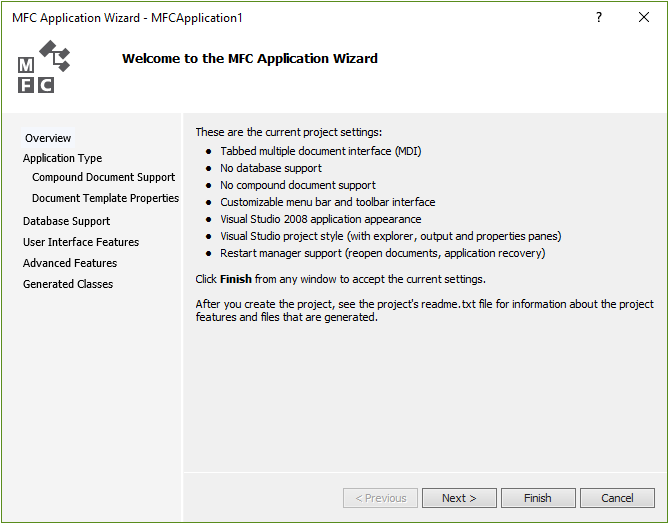
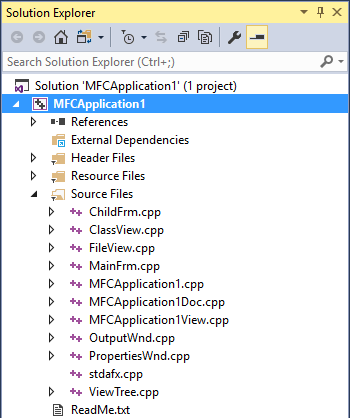
The wizard creates and opens a new project for you and your project files will show up in Solution Explorer.
At this point, even before you write a single line of code, you can build and run the application by pressing F5.
Editing code and navigating
Visual Studio provides many features that help you to code correctly and more efficiently. Whether it be the powerful predictive capabilities provided by IntelliSense or the fluid navigation found in Navigate To there is a feature to make almost any action faster inside Visual Studio. Let Visual Studio do the work for you with autocompletion simply by pressing Tab on the item you want to add from the member list.
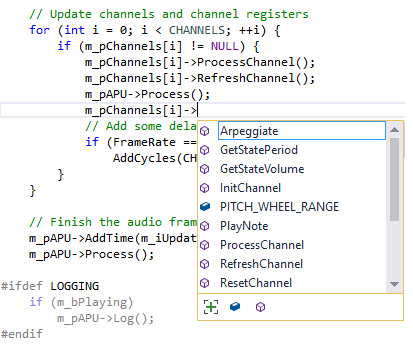
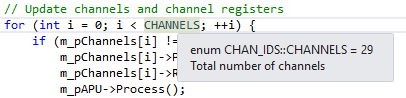
You can also hover over any variable, function, or other code symbol and get information about that symbol using the quick info feature.
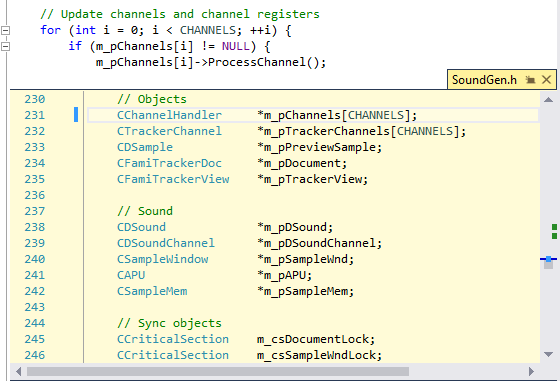
There are also many great code navigation features to make dealing with large code bases much more productive, including Go To Definition, Go To Line/Symbols/Members/Types, Find All References, View Call Hierarchy, Object Browser, and more. Peek Definition allows you to view the code that defines the selected variable without even having to open another file which minimizes context switching.
We also have support for some of the more common refactoring techniques like rename and extract function that allow you to keep your code looking nice and consistent.
Debugging and Diagnostics
Debugging applications is what Visual Studio is famous for! With a world-class debugging experience that provides a plethora of tools for any type of app, no tool is better suited to debugging applications that target the Windows desktop platform.

Powerful features like advanced breakpoints, custom data visualization, and debug-time profiling enable you to have full control of your app’s execution and pinpoint even the hardest to find bugs. View data values from your code with debugger data tips. Take memory snapshots and diff them to reveal potential memory leaks, and even invoke PageHeap on your app from inside Visual Studio to help solve the notoriously hard problem of memory corruption. Track live CPU and memory usage while your application runs and monitor performance in real-time.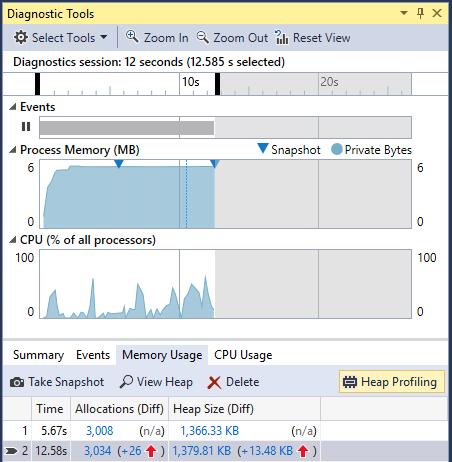
Testing your code
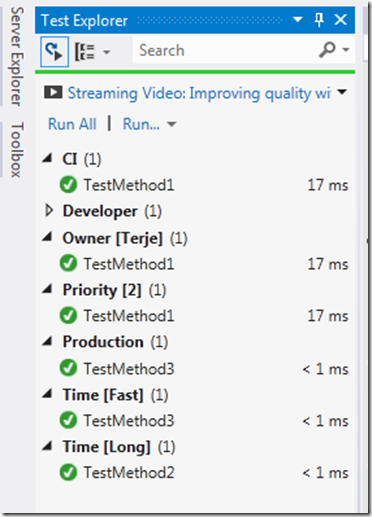
Unit testing is a very popular way of improving code quality, and test-driven-development is fully supported inside Visual Studio. Create new tests and manage them inside the Test Explorer for easy tracking and execution of tests. Writing unit tests is easy and can help find problems as they arise instead of later on when things are harder to isolate. Visual Studio allows both native and managed test project templates for testing native code which can be found in the Visual C++/Test section of the new project templates. Note that the native test template comes with the C++ desktop workload and the managed test comes with the .NET desktop workload.
Working with others
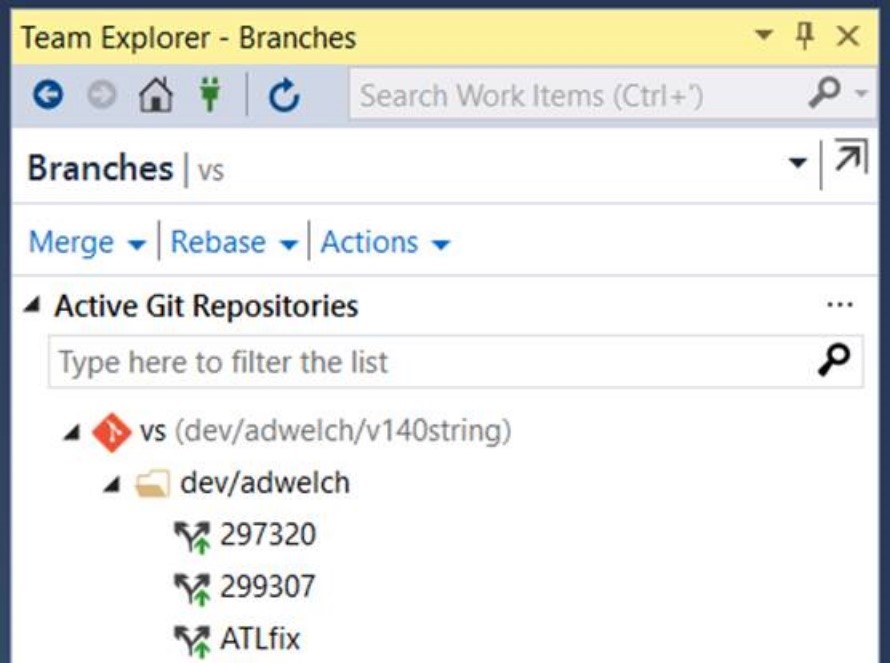
Besides all of the individual developer activities that Visual Studio makes more productive, collaboration is also something that is directly integrated into the IDE. Visual Studio Team Services is a suite of features that optimize the team collaboration process for software development organizations. Create work items, track progress, and manage your bug and open issue database all from inside Visual Studio. Git is fully supported and works seamlessly with the Team Explorer, allowing for easy management of branches, commits, and pull requests.
Simply sign up for a Visual Studio Team Services account for free, then you can track the source code of your desktop applications into Visual Studio Team Services. Visual Studio Team Services also simplifies continuous integrations for your desktop applications. Create and manage build processes that automatically compile and test your apps in the cloud.
Windows Store packaging for desktop apps
When you are ready to deploy your desktop application, you would typically build an executable (.exe) and possibly some libraries so that your application can run on a Windows device. This allows you to easily distribute your application however you like, for example via a download from your website or even through a third-party sales platform such as Steam.
A new option for Windows desktop apps is to be available in the Windows Store with all the advantages that entails. The Desktop Bridge project allows you to package and distribute your Win32 application through the Windows Store alongside Universal Windows Platform apps. When targeting Windows 10, this can provide advantages including streamlined deployment, greater reach, simpler monetization, simplified setup authoring, and differential updates.
Try out Visual Studio 2017 for desktop development with C++!
Download Visual Studio 2017, try it out and share your feedback. For problems, let us know via the Report a Problem option in the upper right corner of the VS title bar. Track your feedback on the developer community portal. For suggestions, let us know through UserVoice.
Tutorial: Create your first Universal Windows Platform application in Visual Studio with XAML and C#
In this introduction to the Visual Studio integrated development environment (IDE), you’ll create a «Hello World» app that runs on any Windows 10 device. To do so, you’ll use a Universal Windows Platform (UWP) project template, Extensible Application Markup Language (XAML), and the C# programming language.
If you haven’t already installed Visual Studio, go to the Visual Studio downloads page to install it for free.
If you haven’t already installed Visual Studio, go to the Visual Studio downloads page to install it for free.
Create a project
First, create a Universal Windows Platform project. The project type comes with all the template files you need, before you’ve even added anything!
Open Visual Studio.
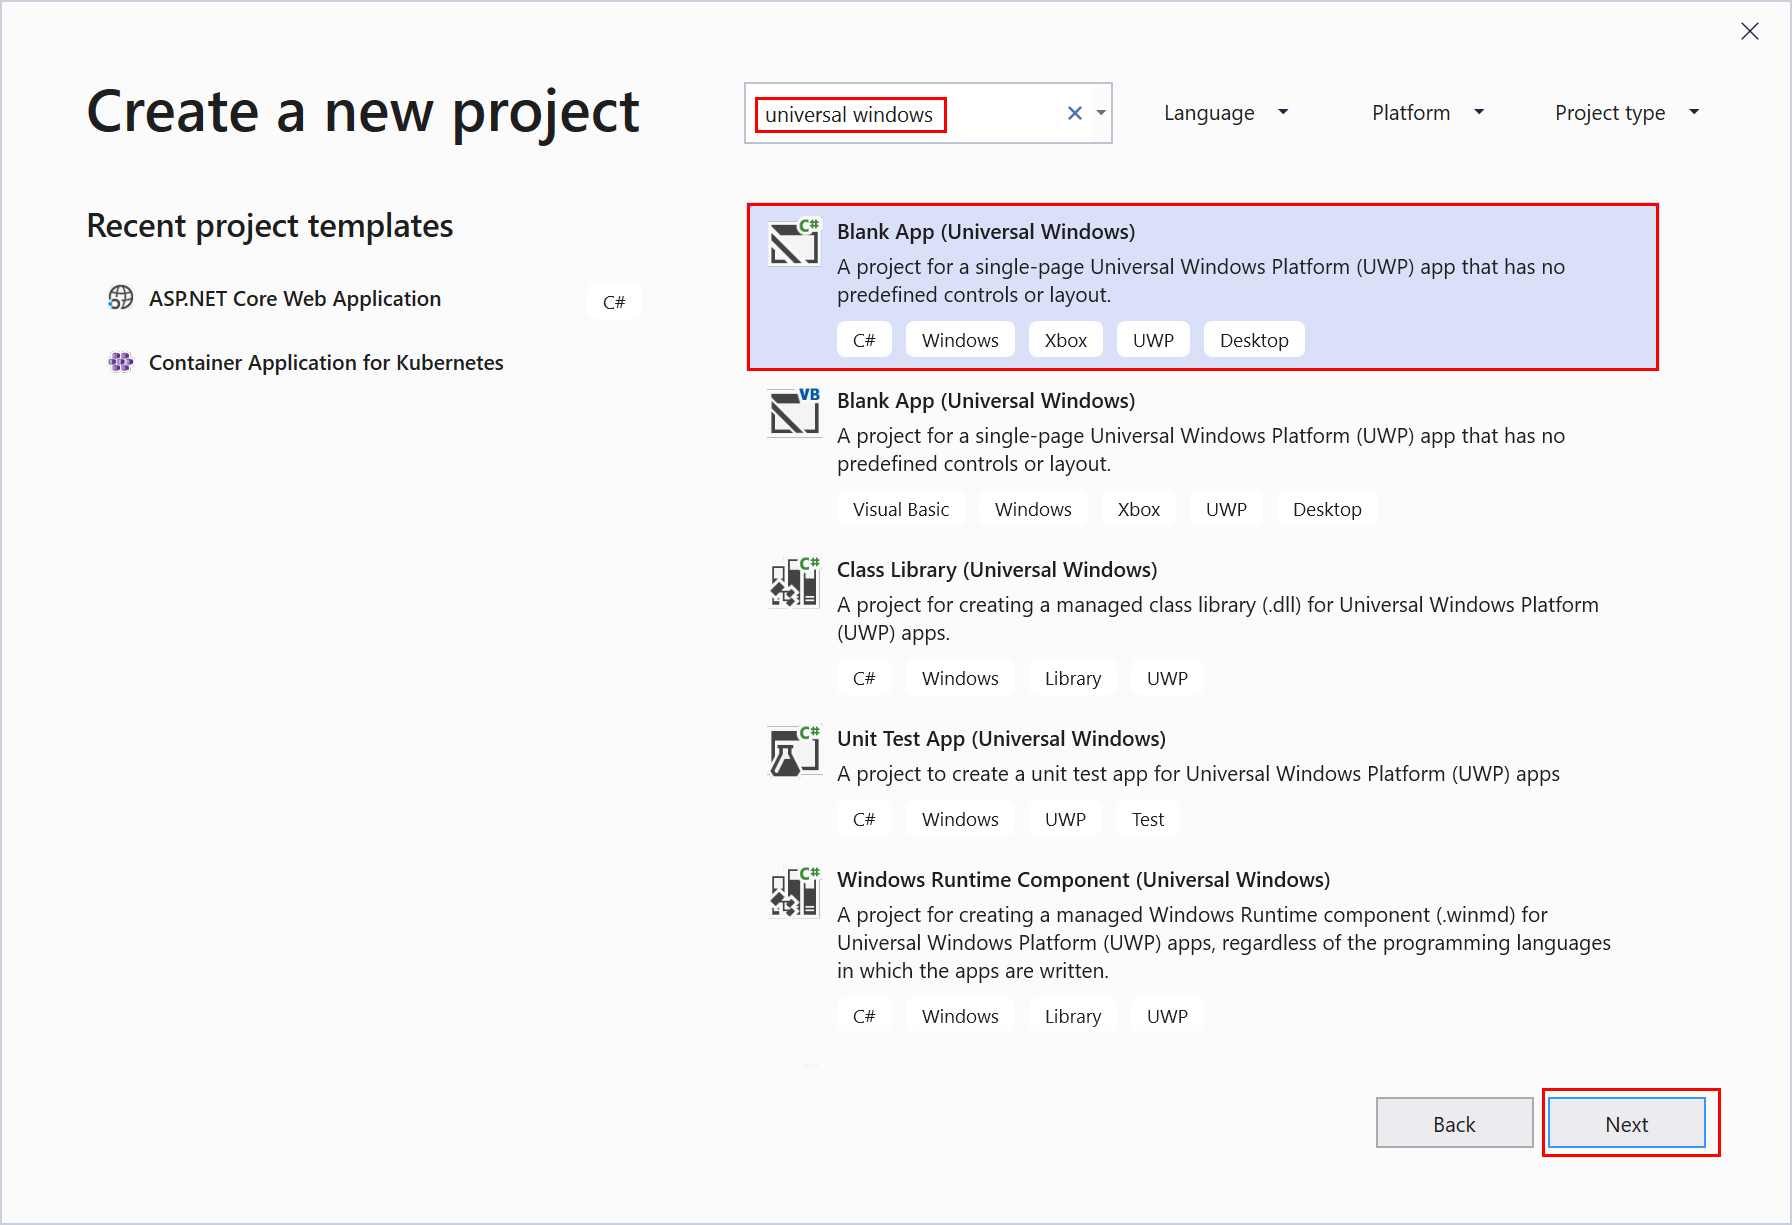
From the top menu bar, choose File > New > Project.
In the left pane of the New Project dialog box, expand Visual C#, and then choose Windows Universal. In the middle pane, choose Blank App (Universal Windows). Then, name the project HelloWorld and choose OK.
Make sure that the location of the source project is on a New Technology File System (NTFS) formatted drive, such as your Operating System (OS) drive. Otherwise, you might have trouble building and running your project.

If you don’t see the Blank App (Universal Windows) project template, click the Open Visual Studio Installer link in the left pane of the New Project dialog box.

The Visual Studio Installer launches. Choose the Universal Windows Platform development workload, and then choose Modify.

Accept the default Target version and Minimum version settings in the New Universal Windows Platform Project dialog box.

Open Visual Studio, and on the start window, choose Create a new project.
On the Create a new project screen, enter Universal Windows in the search box, choose the C# template for Blank App (Universal Windows), and then choose Next.
If you don’t see the Blank App (Universal Windows) project template, click the Install more tools and features link.

The Visual Studio Installer launches. Choose the Universal Windows Platform development workload, and then choose Modify.
Give the project a name, HelloWorld, and choose Create.

Accept the default Target version and Minimum version settings in the New Universal Windows Platform Project dialog box.

If this is the first time you have used Visual Studio to create a UWP app, a Settings dialog box might appear. Choose Developer mode, and then choose Yes.

Visual Studio installs an additional Developer Mode package for you. When the package installation is complete, close the Settings dialog box.
Create the application
It’s time to start developing. You’ll add a button control, add an action to the button, and then start the «Hello World» app to see what it looks like.
Add a button to the Design canvas
In the Solution Explorer, double-click MainPage.xaml to open a split view.


There are two panes: The XAML Designer, which includes a design canvas, and the XAML Editor, where you can add or change code.

Choose Toolbox to open the Toolbox fly-out window.

(If you don’t see the Toolbox option, you can open it from the menu bar. To do so, choose View > Toolbar. Or, press Ctrl+Alt+X.)
Click the Pin icon to dock the Toolbox window.

Click the Button control and then drag it onto the design canvas.
If you look at the code in the XAML Editor, you’ll see that the Button has been added there, too:

Add a label to the button
In the XAML Editor, change Button Content value from «Button» to «Hello World!»
Notice that the button in the XAML Designer changes, too.
Add an event handler
An «event handler» sounds complicated, but it’s just another name for code that is called when an event happens. In this case, it adds an action to the «Hello World!» button.
Double-click the button control on the design canvas.
Edit the event handler code in MainPage.xaml.cs, the code-behind page.
Here is where things get interesting. The default event handler looks like this:
Let’s change it, so it looks like this:

Here’s the code to copy and paste:
What did we just do?
The code uses some Windows APIs to create a speech synthesis object and then gives it some text to say. (For more information on using SpeechSynthesis , see System.Speech.Synthesis.)
Run the application
It’s time to build, deploy, and launch the «Hello World» UWP app to see what it looks and sounds like. Here’s how.
Use the Play button (it has the text Local Machine) to start the application on the local machine.

(Alternatively, you can choose Debug > Start Debugging from the menu bar or press F5 to start your app.)
View your app, which appears soon after a splash screen disappears. The app should look similar to this:

Click the Hello World button.
Your Windows 10 device will literally say, «Hello, World!»
To close the app, click the Stop Debugging button in the toolbar. (Alternatively, choose Debug > Stop debugging from the menu bar, or press Shift+F5.)
It’s time to build, deploy, and launch the «Hello World» UWP app to see what it looks and sounds like. Here’s how.
Use the Play button (it has the text Local Machine) to start the application on the local machine.
(Alternatively, you can choose Debug > Start Debugging from the menu bar or press F5 to start your app.)
View your app, which appears soon after a splash screen disappears. The app should look similar to this:

Click the Hello World button.
Your Windows 10 device will literally say, «Hello, World!»
To close the app, click the Stop Debugging button in the toolbar. (Alternatively, choose Debug > Stop debugging from the menu bar, or press Shift+F5.)
Next steps
Congratulations on completing this tutorial! We hope you learned some basics about UWP and the Visual Studio IDE. To learn more, continue with the following tutorial:


