- Основные задачи для веб-приложения Access
- Создание веб-приложения с помощью шаблона
- Создание собственного веб-приложения Access
- Импорт или связывание данных
- Дальнейшие действия
- Use the Windows 7 Firewall to Block a Program From Internet Access
- Block a Program From Internet Access via Windows Firewall
- 14 Comments
- Walkthrough Guide: Connect to Applications and Services from Anywhere with Web Application Proxy
- Step 1: Attempt to access the web application from an Internet client
- To install the edge server
- To access the application
- Step 2: Configure the Web Application Proxy server and publish the application
- To install the Web Application Proxy role service
- To configure Web Application Proxy
- To publish the sample claims-based application
- To access the application
- Step 3: Configure and test accessing a website using Integrated Windows authentication
- Install Windows Authentication on WebServ1
- To install Windows Authentication on WebServ1
- Create a new website using IIS
- To create a new website
- Create a non-claims-aware relying party trust
- To create a non-claims-aware relying party trust
- Configure Kerberos constrained delegation
- To configure Kerberos constrained delegation
- Test accessing the application internally
- To access the application internally
- Publish the application
- To publish the non-claims-based application
- Test accessing the application
- To test accessing the application
- Step 4: Demonstrate accessing an application using Workplace Join, MFA, and multifactor access control
- To Workplace Join your device and access the application
- To configure authentication options and attempt to access the application
- To configure multifactor access control and attempt to access the application
Основные задачи для веб-приложения Access
Важно Службы Access 2010 и 2013 удаляются из следующего выпуска SharePoint. Рекомендуется не создавать новые веб-приложения, а перенести существующие приложения на другую платформу, например Microsoft Power Apps.
Веб-приложения Access созданы для упрощения совместной работы и сотрудничества с помощью веб-браузера. Чтобы создавать и использовать веб-приложения Access, вам понадобится обычное приложение Access 2013 или более поздней версии и сайт Microsoft 365 для бизнеса либо сайт SharePoint Server 2013 или более поздней версии. Ознакомьтесь с дополнительными сведениями о создании веб-приложения Access. Ниже вкратце описаны способы создания веб-приложения, добавления в него данных и возможные дальнейшие действия по его настройке и использованию.
Если вас больше интересует работа с базой данных в классическом приложении Access, см. статью Основные задачи для базы данных классической версии Access.
Создание веб-приложения с помощью шаблона
Создание веб-приложения можно ускорить, взяв за основу один из шаблонов, поставляемых с Access.
В нижней части окна заставки Access найдите готовые шаблоны. Список возглавляют самые популярные веб-приложения, такие как «Отслеживание активов», «Контакты» и «Отслеживание запросов». На основе шаблонов со значком глобуса можно создавать веб-приложения Access.
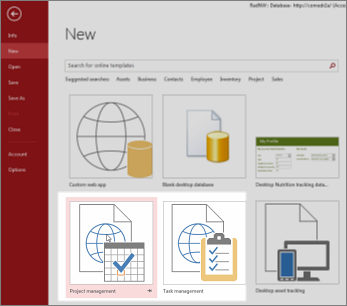
Шаблоны, названия которых содержат слово «настольный», предназначены для создания традиционных баз данных классической версии Access.
Щелкните шаблон и введите имя в поле Имя приложения.
Выберите расположение веб-приложения в Интернете, а затем нажмите кнопку Создать.
Ознакомьтесь подробнее с процессом создания базы данных из шаблона веб-приложения Access. Дополнительные сведения о поиске расположения в Интернете, используемом в поле «Имя приложения», см. в веб-приложении Access. Если приложение создали вы сами, перейдите к следующему разделу.
Создание собственного веб-приложения Access
Если ни один из шаблонов не подходит, можно создать веб-приложение с нуля.
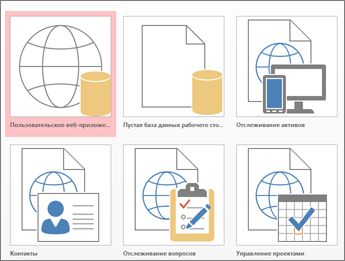
Откройте Access и выберите Пользовательское веб-приложение.
Введите имя своего веб-приложения и определите его расположение в Интернете (или выберите его из списка Расположения), а затем нажмите кнопку Создать.
Веб-приложение Access можно настроить всегда, независимо от способа его создания: с помощью шаблона или с нуля.
Импорт или связывание данных
Создав веб-приложение, вы захотите добавить в него данные. Их можно импортировать из других источников. Ниже приведены некоторые инструкции, которые помогут вам начать работу.
Откройте веб-приложение в Access (чтобы сделать это из браузера, нажмите Настройки > Настроить в Access), а затем на вкладке Главная выберите элемент Таблица.
На странице Добавление таблиц выберите источник данных в списке Создать таблицу из существующего источника данных и следуйте инструкциям мастера Внешние данные.
Дополнительные сведения об импорте данных см. в статьи «Импорт данных из базы данных Access в веб-приложение Access».
Чтобы создать связи для новой таблицы, добавьте поля подстановки.
Дальнейшие действия
Остальные действия при создании веб-приложения зависят от того, что предполагается с ним делать. Некоторые сведения по этой теме см. в указанных ниже статьях.
Use the Windows 7 Firewall to Block a Program From Internet Access


Have you ever installed a program that you only needed for offline use, but it insisted on trying to connect to the internet? About four years ago we showed you how to allow programs through the Windows firewall. This time around we’re going to show you how to block them with it in Windows 7 and 8.
Block a Program From Internet Access via Windows Firewall
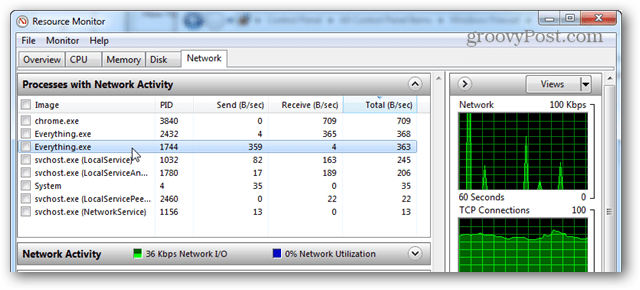
If you’re not sure which programs are accessing the internet, one easy way to find out is to open up Windows Resource Monitor. This can be done by searching for “resmon” in the start menu, or typing “resmon” into the Run Box (Windows Key + R). In this example, I noticed that the Everything app had networking activity and I’m going to block it to make sure it doesn’t send any data away from my PC.
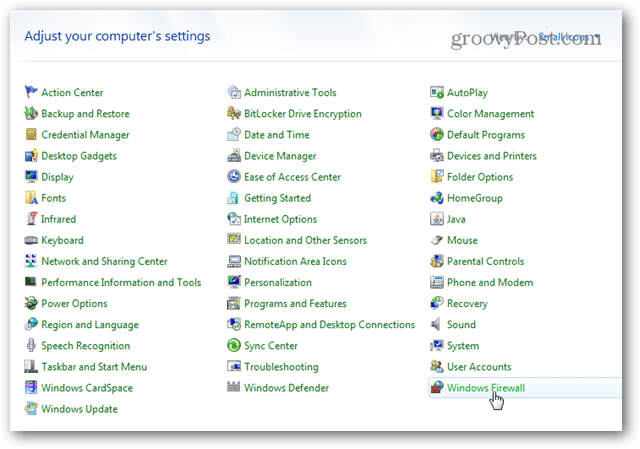
To get started we need to open up Windows Firewall. One quick way to do this is from the Control Panel. Just click the Windows Firewall icon.
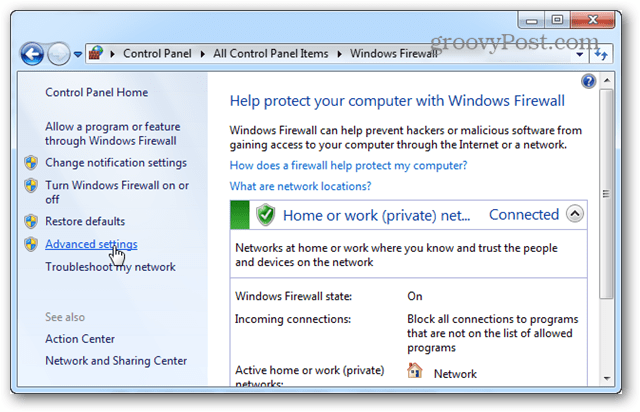
From the Firewall page click Advanced settings.
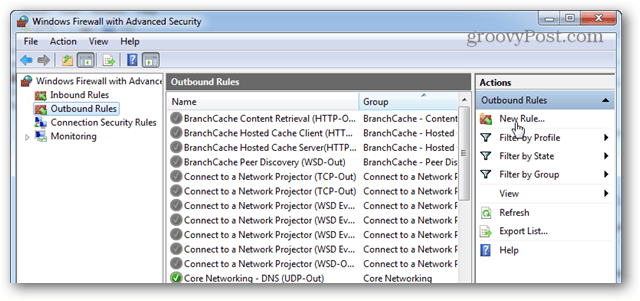
Here you can choose which you would like to block first: Inbound or Outbound. When it comes down to it I think blocking Outbound is usually enough for most applications. When Outbound connects are blocked, this means that the application can’t send any of your data to a remote server somewhere on the internet. Of course, if bandwidth is what you’re worried about you should probably block both. In any case, the process for blocking both is the same, so I’ll just cover one.
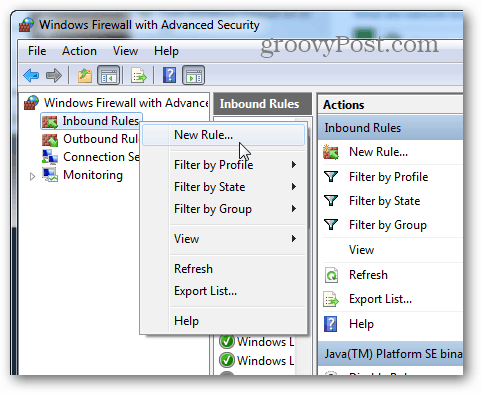
Click the New Rule… button.
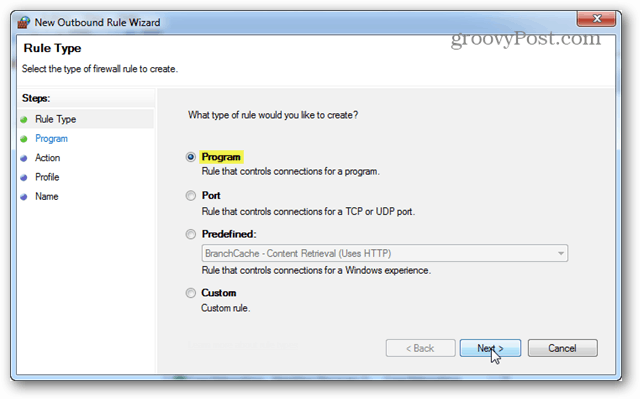
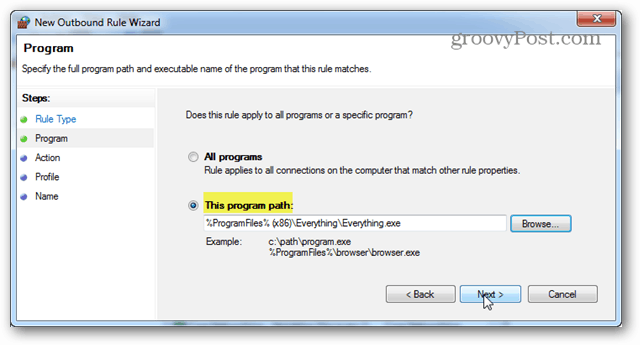
For the “Rule Type” select the Program bullet and click Next.
Select the “This program path:” option and then either type in the path or use the browse button to find the executable of the application.
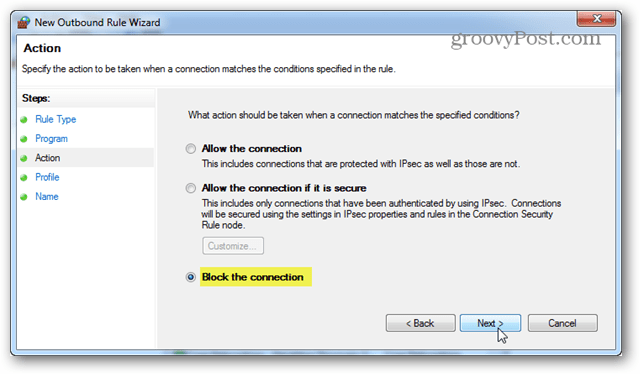
For the Action select the “Block the connection” option and click Next.
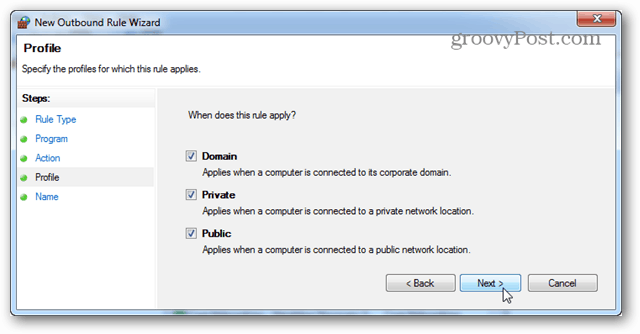
For the Profile tab, select all of the available boxes: Domain, Private, and Public.
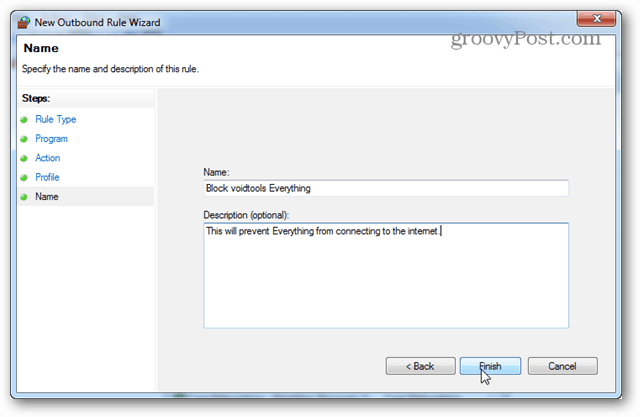
You can name the firewall rule whatever you like. It’s a good idea to keep it something memorable or relevant though because you may want to change or disable it later on.
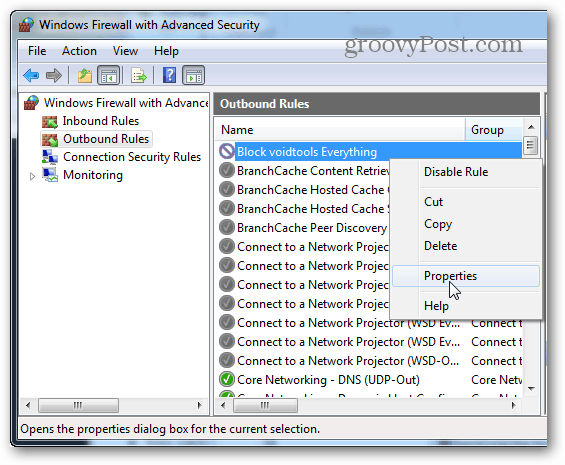
Now the rule should be created and ready to go. However some applications also run as a service, so be sure to disable that as well if you can. Right-click the newly created rule and select “Properties.”
From the Properties window select the “Programs and Services” tab and then click the Settings button.
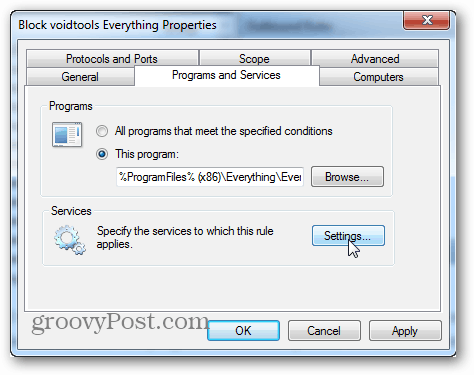
Here click to “Apply to this service” and then select the service that matches up with the program blocked by the rule. If you can’t find a matching service, chances are your program didn’t install a service alongside it (so you can just cancel out). Click OK to save change sand exit from both this and the properties window.

That’s all there is for creating an Outbound rule. Now if you want, just repeat the process for an Inbound rule. And the program will be completely blocked from internet access.
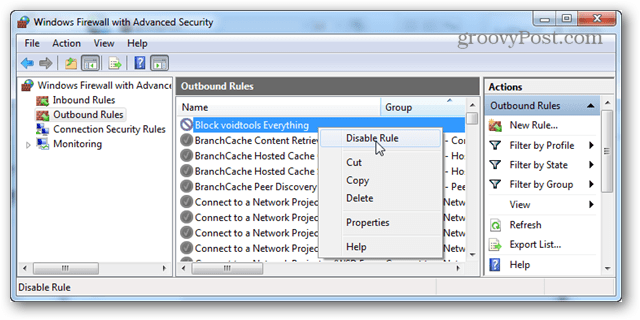
If you want to temporarily give the application internet access again, you can disable the firewall rule by right-clicking on it within the Advanced Firewall Security window. If you want to permanently get rid of this blocking rule, just delete it.
14 Comments
This is such a good topic which you are discussed and i was looking for this type of firewall protection tricks for a couple of days.than bro for this article.
Thanks Austin! I’ve been looking for this information for a while. Your overview is brilliantly simple and very easy to follow.
Thanks for the reference to “resmon”, which I had forgotten all about but is certainly one of Win 7’s most handy features.
Some readers may be interested in the following posting (http://www.raymond.cc/blog/easily-determine-if-a-specific-software-is-secretly-connecting-to-internet-2/) which provides links to programs that monitor outbound connections.
No love for Netmon? I’m ashamed!
Smarten us up on it; Netmon sounds like something we all ought to love 😉
Java is constantly askig me to install updates which, in the past, has caused major headaches on my computer. Can I use this to block Java from advising about updates?
I’m glad you asked!. You could block Java with this, but that would be a BAD idea. Because Java is the most popular application platform in the world it is also the most exploited, and it needs to be updated regularly to prevent this from happening. In other words, Java needs all of the security patches it can get!
But, I complete agree with you. Java’s autoupdate is SUPER ANNOYING. But we found a way to work around this a couple years ago and it seems to still be working today.
Instructions are here:
https://www.groovypost.com/howto/geek-stuff/what-is-jusched-exe-safe-why-running-virus/
Thanks, Austin. The problem is that I think installing updates has also caused problems with my computer being suseptible to viruses and where I work, we have been warned about Java…
You’re right to be wary of Java, but let me give you some details on the recent Java scare that has been going around.
A few months ago some HUGE exploits hit the net that infected millions of computers worldwide. These exploits infected computers through a web browser (Chrome, Firefox, Internet Explorer, Opera, etc..) via a Java plugin. The only way to get infected by this virus was to visit a website that was executing the server side script. In most cases people were fine unless they visited an unscrupulous website, or a good website that had its server hacked and reprogrammed to run the virus.
As far as vulnerability goes, the server-side Java virus can really only infect Web Browsers that have the Java plugin installed. The virus travels through the web browser plugin and into Windows. Of course, any Java program that connects to random websites is a liability, but a Web Browser is really the only application that does so, so your non-browser Java applications should be fine.
A lot of programs require that you have the JRE (Java Runtime Environment) installed. This is a local Java platform that doesn’t connect to the internet, except to update. So you probably shouldn’t try to get rid of Java completely, and a lot of the vulnerabilities are fixed in the updates that you receive.
You really don’t need to worry about Java running on your desktop. However, you should definitely disable the Web Browser plugins in (Chrome, Firefox, or Internet Explorer) whichever you use. Please, please, please keep your Java updated. Failure to update is the #1 reason people get computer viruses.
Walkthrough Guide: Connect to Applications and Services from Anywhere with Web Application Proxy
Applies To: Windows Server 2012 R2
This content is relevant for the on-premises version of Web Application Proxy. To enable secure access to on-premises applications over the cloud, see the Azure AD Application Proxy content.
This walkthrough provides instructions for connecting to applications and services from anywhere with Web Application Proxy. For more information about connecting to applications and services from anywhere with Web Application Proxy and Windows ServerВ® 2012 R2, see Connect to Applications and Services from Anywhere with Web Application Proxy and the video for Installing the Web Application Proxy.
Before you perform this walkthrough, make sure you have completed the lab setup guide, see Set up the lab environment for AD FS in Windows Server 2012 R2. Also make sure you have completed the following planning steps that are required in order to deploy Web Application Proxy and publish applications through it using ActiveВ Directory Federation Services (ADВ FS) for authentication and authorization, including workplace join, multifactor authentication (MFA), and multifactor access control.
Plan the Web Application Proxy infrastructure—Before you deploy Web Application Proxy, you must plan the infrastructure. For this walkthrough, this includes:
The Web Application Proxy server should be located between the corporate network and the Internet; in this walkthrough, this is achieved by configuring two network adapters on the Web Application Proxy server.
For clients to reach a published web application they must be able to resolve the external address of the application that is published by Web Application Proxy. In this walkthrough, this is achieved through the hosts file on the client.
Plan the Web Application Proxy server
It is recommended to join the Web Application Proxy server to the ADВ DS domain. Joining the Web Application Proxy server to the domain allows you to expand this walkthrough to demonstrate publishing applications that use Integrated Windows authentication.
Make sure that the server time of the Web Application Proxy and AD FS servers are synchronized.
To install the Web Application Proxy role service, you must have local administrator permissions on the server.
To configure the Web Application Proxy server to connect to AD FS, you are required to enter the credentials of the local administrator on the AD FS server.
Make sure that there is a certificate in the Personal certificates store on the Web Application Proxy server that covers the federation service name. This certificate is required for AD FS proxy functionality.
To locate the federation service name value, open the AD FS Management console, click Service, in the Actions pane, click Edit Federation Service Properties, and then find the value in the Federation Service name text box.
Make sure that there is a certificate in the Personal certificates store on the Web Application Proxy server that covers the external address of the sample web application; that is, the address that you will configure when you publish the application through Web Application Proxy. In this walkthrough, you can use a self-signed certificate, or a certificate from an Enterprise certification authority (CA).
In a production environment, it is recommended to use certificates from a public CA on your Web Application Proxy server.
Configure an edge server and demonstrate that before configuring Web Application Proxy and publishing the application, the web application server is protected from the Internet, and clients are unable to access the application.
Configure the edge server as a Web Application Proxy server, publish the web application, and demonstrate that with the default AD FS authentication scheme, a client device can access the published application from the Internet.
Configure an additional website on WebServ1 to use Integrated Windows authentication, configure Kerberos constrained delegation in the lab, publish the application through Web Application Proxy, and demonstrate accessing this application from the Internet.
Configure Workplace Join, multifactor authentication (MFA), and multifactor access control, and demonstrate how these additional authentication factors change the user experience when client devices attempt to access the published web application.
Step 1: Attempt to access the web application from an Internet client
In this step, you will configure an edge server and attempt to access the sample application. This step does not install the Web Application Proxy role service on the server. After configuring the edge server you will modify the hosts file on the client computer and attempt to connect to the sample web application through the edge server.
To install the edge server
Create a Windows Server 2012 R2 server with two network adapters, one connected to the corporate network, one connected to the simulated Internet.
Configure the static IP addresses on the server. For example, the network adapter on the corporate network should have an IP address of 10.0.0.2, the network adapter on the simulated Internet should have an IP address of 131.107.0.2.
Join the server to the ADВ DS domain.
To access the application
In your lab environment, connect the client computer to the simulated Internet network and assign a static IP address; for example 131.107.0.10.
On the client computer, open Notepad as the administrator.
In the Notepad window, open the hosts file located at %windir%\System32\Drivers\etc.
Add two new lines to the file; for example:
The first line contains the IP address of the Internet adapter of the edge server and the external address of the sample application that you will configure when you publish the application through Web Application Proxy.
The second line contains the same IP address and the address of the federation server.
The third line contains the same IP address and the address required for Workplace Join.
Open an Internet explorer window and go to the sample web application; for example, https://webserv1.contoso.com/claimapp/.
The edge server is not providing proxy or publishing functionality; therefore, you will not be able to access the application.
Step 2: Configure the Web Application Proxy server and publish the application
In this step you will:
Configure the Web Application Proxy server.
Connect the Web Application Proxy server to the AD FS server using the Web Application Proxy Configuration Wizard.
Publish the sample application.
Attempt to connect to the sample application using the default AD FS authentication scheme.
Before you can publish the application, make sure you have done the following:
Create a relying party trust for the sample application in the AD FS Management console. If you did not do this when setting up your environment, see Create a relying party trust on your federation server.
Verify that a certificate on the Web Application Proxy server is suitable for the sample application you want to publish.
Membership in the local Administrators group, or equivalent, is the minimum required to complete this procedure.
To install the Web Application Proxy role service
On the edge server, open Server Manager. To do this, click Server Manager on the Start screen, or Server Manager in the taskbar on the desktop.
In the Quick Start tab of the Welcome tile on the Dashboard page, click Add roles and features. Alternatively, you can click Add Roles and Features on the Manage menu.
In the Add Roles and Features Wizard, click Next three times to get to the server role selection screen.
On the Select server roles dialog, select Remote Access, and then click Next.
Click Next twice.
On the Select role services dialog, select Web Application Proxy, click Add Features, and then click Next.
On the Confirm installation selections dialog, click Install.
On the Installation progress dialog, verify that the installation was successful, and then click Close.
.jpeg) Windows PowerShell equivalent commands
Windows PowerShell equivalent commands
The following Windows PowerShell cmdlet or cmdlets perform the same function as the preceding procedure. Enter each cmdlet on a single line, even though they may appear word-wrapped across several lines here because of formatting constraints.
To configure Web Application Proxy
On the Web Application Proxy server, open the Remote Access Management console: On the Start screen, click the Apps arrow. On the Apps screen, typeВ RAMgmtUI.exe, and then press ENTER. If the User Account Control dialog box appears, confirm that the action it displays is what you want, and then click Yes.
In the Remote Access Management console, in the navigation pane, click Web Application Proxy.
In the middle pane, click Run the Web Application Proxy Configuration Wizard.
In the Web Application Proxy Configuration Wizard, on the Welcome dialog, click Next.
On the Federation Server dialog, do the following, and then click Next:
In the Federation service name box, enter the fully qualified domain name (FQDN) of the federation service; for example, adfs1.contoso.com.
To locate this value, open the AD FS Management console, click Service, in the Actions pane, click Edit Federation Service Properties, and then find the value in the Federation Service name text box.
In the User name and Password boxes, enter the credentials of a local administrator account on the AD FS servers.
On the AD FS Proxy Certificate dialog, in the list of certificates currently installed on the Web Application Proxy server, select a certificate to be used by Web Application Proxy for AD FS proxy functionality, and then click Next.
On the Confirmation dialog, review the settings. If required, you can copy the PowerShell cmdlet to automate additional installations. Click Configure.
On the Results dialog, verify that the configuration was successful, and then click Close.
Windows PowerShell equivalent commands
The following Windows PowerShell cmdlet or cmdlets perform the same function as the preceding procedure. Enter each cmdlet on a single line, even though they may appear word-wrapped across several lines here because of formatting constraints.
The following command will prompt you to enter credentials of a local administrator account on the AD FS servers.
To publish the sample claims-based application
On the Web Application Proxy server, in the Remote Access Management console, in the Navigation pane, click Web Application Proxy, and then in the Tasks pane, click Publish.
On the Publish New Application Wizard, on the Welcome page, click Next.
On the Preauthentication page, click ActiveВ Directory Federation Services (ADВ FS), and then click Next.
On the Relying Party page, in the list of relying parties select the relying party for the sample application, and then click Next.
On the Publishing Settings page, do the following, and then click Next:
In the Name box, enter a friendly name for the application.
In the External URL box, enter the external URL for this application; for example, https://webserv1.contoso.com/claimapp/.
In the External certificate list, select a certificate whose subject name covers the external URL.
In the Backend server URL box, enter the URL of the backend server. Note that this value is automatically entered when you enter the external URL.
On the Confirmation page, review the settings, and then click Publish. You can copy the PowerShell command set up additional published applications.
On the Results page, make sure that application published successfully, and then click Close.
Publishing the application may take a couple of minutes.
Windows PowerShell equivalent commands
The following Windows PowerShell cmdlet or cmdlets perform the same function as the preceding procedure. Enter each cmdlet on a single line, even though they may appear word-wrapped across several lines here because of formatting constraints.
To access the application
On the client computer, open an Internet explorer window and go to the sample web application; for example, https://webserv1.contoso.com/claimapp/.
On the sign in page, enter the credentials of the test user that you created when you set up the environment.
The application appears in the web browser.
Step 3: Configure and test accessing a website using Integrated Windows authentication
In this step you will configure a website on WebServ1 to use Integrated Windows authentication. You can publish this website as an additional application through Web Application Proxy to demonstrate how Web Application Proxy uses Kerberos constrained delegation to authenticate users to non-claims-based applications.
You must join the Web Application Proxy server to the Active DirectoryВ® Domain Services domain before you can publish applications that use Integrated Windows authentication.
Install Windows Authentication on WebServ1
When you install the Web Server (IIS) role, by default, it does not install the option to use Integrated Windows authentication (referred to by IIS as Windows Authentication). This procedure installs Windows Authentication.
To install Windows Authentication on WebServ1
On the edge server, open Server Manager. To do this, click Server Manager on the Start screen, or Server Manager in the taskbar on the desktop.
In the Quick Start tab of the Welcome tile on the Dashboard page, click Add roles and features. Alternatively, you can click Add Roles and Features on the Manage menu.
In the Add Roles and Features Wizard, click Next three times to get to the server role selection screen.
On the Select server roles dialog, expand Web Server (IIS), expand Web Server, expand Security, select Windows Authentication, and then click Next.
On the Select features dialog, click Next.
On the Confirm installation selections dialog, click Install.
On the Installation progress dialog, verify that the installation was successful, and then click Close.
Create a new website using IIS
The WebServ1 server already hosts a website that uses claims-based authentication. This procedure creates a new website that uses Integrated Windows authentication.
To create a new website
Open an Explorer window and go to C:\inetpub\.
Create a new folder called NonClaims.
Open C:\inetpub\wwwroot\ and copy the contents to the new folder C:\inetpub\NonClaims\.
Do not copy the web.config file.
On the Start screen, click the Apps arrow. On the Apps screen, typeВ inetmgr.exe, and then press ENTER.
In the IIS console, in the Connections pane, expand WebServ1, expand Sites, right-click Default Web Site, and then click Add Virtual Directory.
On the Add Virtual Directory dialog box, in the Alias box, type NonClaims.
Next to the Physical Path box, type C:\inetpub\NonClaims, and then click OK.
In the Connections pane, click the NonClaims virtual directory.
In the middle pane, in the IIS section, double-click Authentication.
In the Authentication pane, right-click Anonymous Authentication, and then click Disable. Right-click Windows Authentication, and then click Enable.
Create a non-claims-aware relying party trust
To publish the application through Web Application Proxy, you must first create a non-claims-aware relying party trust on the AD FS server.
To create a non-claims-aware relying party trust
On the AD FS server, in the AD FS Management console, in the left pane, click Trust Relationships.
In the Actions pane, click Add Non-Claims-Aware Relying Party Trust.
In the Add Non-Claims-Aware Relying Party Trust Wizard, on the Welcome page, click Start.
On the Specify Display Name page, in Display name, enter a name for this trust; for example, Non-Claims Application, and then click Next.
On the Configure Identifiers page, in Non-claims-aware relying party trust identifier, enter an arbitrary URL as an identifier for this trust, click Add, and then click Next.
Click Next twice.
On the Finish page, click Close.
The Edit Claim Rules for dialog box opens.
On the Edit Claim Rules for , click Add Rule.
In the Add Issuance Authorization Claim Rule Wizard, on the Select Rule Template page, in the Claim rule template list, select Permit All Users, and then click Next.
On the Configure Rule page, click Finish, and then on the Edit Claim Rules for dialog box, click OK.
Configure Kerberos constrained delegation
To allow users to access applications that use Integrated Windows authentication, the Web Application Proxy server must be able to provide impersonation for users to the published application.
This procedure assumes that the Web Application Proxy server is named EDGE1.
To configure Kerberos constrained delegation
On the domain controller, open Server Manager. To do this, click Server Manager on the Start screen, or Server Manager in the taskbar on the desktop.
Click Tools, and then click ADSI Edit.
On the Action menu, click Connect To, and then on the Connection Settings dialog box, accept the default settings to connect to the default naming context, and then click OK.
In the left pane, expand Default naming context, expand DC=contoso,DC=com, expand CN=Computers, right-click CN=EDGE1, and then click Properties.
On the CN=EDGE1 Properties dialog box, on the Attribute Editor tab, in the Attributes list, select servicePrincipalName, and then click Edit.
On the Multi-valued String Editor dialog box, in Value to add, enter HTTP/EDGE1.contoso.com and click Add. Then enter HTTP/EDGE1 and click Add.
The Values list now contains two new entries; for example, HTTP/EDGE1.contoso.com and HTTP/EDGE1.
On the Multi-valued String Editor dialog box, click OK.
On the CN=EDGE1 Properties dialog box, click OK.
In Server Manager, click Tools, and then click Active Directory Users and Computers.
In the navigation pane, under contoso.com, click Computers. In the details pane, right-click the edge server, and then click Properties.
On the EDGE1 Properties dialog box, on the Delegation tab, click Trust this computer for delegation to specified services only, and then click Use any authentication protocol.
Click Add, and on the Add Services dialog box, click Users or Computers.
On the Select Users or Computers dialog box, in Enter the object names to select, enter the name of the web server; for example, WebServ1, and then click OK.
On the Add Services dialog box, in the Available services list, select the http service type, and then click OK.
On the EDGE1 Properties dialog box, click OK.
Test accessing the application internally
To make sure that the application is working correctly, you should test accessing the application from the Web Application Proxy server before continuing.
To access the application internally
On the Web Application Proxy server, make sure that IE Enhanced Security Configuration is turned off.
Open an Internet explorer window and go to the non-claims-based web application; for example, https://webserv1.contoso.com/nonclaims/.
On the sign in page, enter the credentials of the test user that you created when you set up the environment.
The default IIS website appears.
Publish the application
You must publish the application through Web Application Proxy to make it available to external users.
To publish the non-claims-based application
On the Edge server, open the Remote Access Management console: On the Start screen, click the Apps arrow. On the Apps screen, typeВ RAMgmtUI.exe, and then press ENTER.
In the navigation pane, under Configuration, click Web Application Proxy.
In the Tasks pane, click Publish.
In the Publish New Application Wizard, on the Welcome page, click Next.
On the Preauthentication page, make sure that ActiveВ Directory Federation Services (ADВ FS) is selected, and then click Next.
On the Relying Party page, select the non-claims application relying party, and then click Next.
On the Publishing Settings page, do the following, and then click Next:
In the Name box, enter a friendly name for the application to identify it in the list of published applications; for example, Non-Claims Application.
In the External URL box, enter the external URL for this application; for example, https://WebServ1.contoso.com/NonClaims/.
In the External certificate list, select a certificate whose subject covers the external address.
In the Backend server URL box, the value is entered automatically and is the same as the external URL.
In the Backend server SPN box, enter the service principal name for this application; for example, HTTP/WEBSERV1.contoso.com.
On the Confirmation page, click Publish.
On the Results page, click Close.
Test accessing the application
After publishing the application through Web Application Proxy, you can test accessing the application from the simulated Internet.
To test accessing the application
Connect the client computer to the simulated Internet network and assign a static IP address; for example 131.107.0.10.
Open an Internet explorer window and go to the non-claims-based web application; for example, https://webserv1.contoso.com/nonclaims/.
On the sign in page, enter the credentials of the test user that you created when you set up the environment.
The default IIS website appears.
Step 4: Demonstrate accessing an application using Workplace Join, MFA, and multifactor access control
In this step you will join the client device to the workplace, and configure AD FS to enforce MFA, and multifactor access control when publishing the sample application through Web Application Proxy, and demonstrate that MFA and multifactor access control are working.
For Workplace Join to succeed, the client computer (Client1) must trust the SSL certificate that was used to configure AD FS in Step 2: Configure the federation server (ADFS1) by using Device Registration Service. It must also be able to validate revocation information for the certificate. If you have any issues with Workplace Join, you can view the event log on Client1. To see the event log, open Event Viewer, expand Applications and Services Logs , expand Microsoft , expand Windows and click Workplace Join .
To Workplace Join your device and access the application
On the client computer, on the Start screen, open the Charms bar and then select the Settings charm. Click Change PC Settings.
On the PC Settings page, click Network, and then click Workplace.
In the Enter your UserID to get workplace access or turn on device management box, type RobertH@contoso.com and then click Join.
When prompted for credentials, type roberth@contoso.com, and enter the password. Click OK.
You should now see the message: This device has joined your workplace network.
Open an Internet explorer window and go to the sample web application; for example, https://webserv1.contoso.com/claimapp/.
On the sign in page, enter the credentials of the test user (RobertH) that you created when you set up the environment.
The application appears in the web browser showing the claims in your security token. Notice that the token contains both user and device claims.
To configure authentication options and attempt to access the application
Configure advanced authentication options such as MFA and user certificate as described in Step 3: Configure MFA on your federation server.
In your lab environment, connect the client computer to the simulated Internet network and assign a static IP address; for example 131.107.0.10.
Open an Internet explorer window and go to the sample web application; for example, https://webserv1.contoso.com/claimapp/.
On the sign in page, enter the credentials of the test user that you created when you set up the environment.
At this point, because of the MFA policy that you configured, the user will be prompted to undergo additional authentication.
This demonstrates that the additional authentication factor that you configured is now required to access the application.
In this walkthrough, it is necessary to disable MFA before configuring multifactor access control.
To configure multifactor access control and attempt to access the application
Disable MFA as follows:
On the AD FS server, in the AD FS Management console, navigate to Authentication Policies/Per Relying Party Trust, and select the relying party trust that represents your sample application.
In the Actions pane, click Edit Custom Multi-factor Authentication.
In the Edit Relying Party Trust for dialog box, in the Users/Groups list, select the test group that you previously added, click Remove, and then click OK.
On the client computer, open an Internet explorer window and go to the sample web application; for example, https://webserv1.contoso.com/claimapp/.
On the sign in page, enter the credentials of the test user that you created when you set up the environment.
At this point, because of the access control policy that you set up in the previous steps, an вЂaccess denied’ message is displayed for this user, demonstrating that the access control rule is in effect.


