- Choose your Windows app platform
- Windows Forms
- Win32
- Platform comparison: UWP, WPF, and Windows Forms
- Use the Windows UI Library with Windows apps
- Other app platforms
- Progressive Web Apps (PWAs)
- Xamarin
- Create and deploy an application with Configuration Manager
- Before you start
- Create the Configuration Manager application
- To start the Create Application Wizard and create the application
- Examine the properties of the application and its deployment type
- Add a requirement to the deployment type
- Add the application content to a distribution point
- Deploy the application
- Monitor the application
- To review the deployment status
- End-user experience
Choose your Windows app platform
When you want to create a new desktop application for Windows PCs, the first decision you make is which application platform to use. Windows provides four main application platforms, each with different strengths:
- Universal Windows Platform (UWP): This platform provides a common type system, APIs, and application model for all devices that run Windows 10. UWP applications can be native or managed.
- WPF and Windows Forms: These .NET-based platforms provide a common type system, APIs, and application model for managed applications.
- Win32: This is the original platform for native C/C++ Windows applications that require direct access to Windows and hardware. This makes the Win32 API the platform of choice for applications that need the highest level of performance and direct access to system hardware.
Each of these platforms include a complete UI framework and set of UI controls that let you create desktop apps like Word, Excel, and Photoshop that run in the classic Windows desktop and take full advantage of that environment’s specific features. On Windows 10, each of these platforms also support using the Windows UI Library (WinUI) to create their user interfaces.
Some of these platforms share certain traits and are better suited for specific application types. For example, both UWP and .NET have deep integration with Visual Studio. This provides many benefits, especially in the areas of developer productivity, sophisticated and customizable UI, and application security. Because these frameworks support visual designers and UI markup for rapidly creating UI, they are particularly well-suited for line-of-business applications.
No matter which app platform you choose, you can use many Windows 10 features to deliver a modern experience in your app. For example, even if your desktop app is built using WPF, Windows Forms, or the Win32 API, you can still use MSIX package deployment. For more information about all the ways to modernize your desktop apps, see Modernize your desktop apps.
UWP is the leading-edge platform for Windows 10 applications and games. It’s a highly customizable platform that uses XAML markup to separate UI (presentation) from code (business logic). UWP is suitable for desktop applications that require a sophisticated UI, styles customization, and graphics-intensive scenarios. UWP also has built-in support for the Fluent Design System for the default UX experience and provides access to the Windows Runtime (WinRT) APIs. By adopting Fluent, UWP automatically supports common input methods such as ink, touch, gamepad, keyboard, and mouse.
Not only can you use UWP to create desktop applications for Windows PCs, but UWP is also the only supported platform for Xbox, HoloLens, and Surface Hub applications. UWP is our newest, leading-edge application platform.
For more information about UWP, see the following articles:
WPF is the established platform for managed Windows applications with access to .NET Core or the full .NET Framework, and it also uses XAML markup to separate UI from code. This platform is designed for desktop applications that require a sophisticated UI, styles customization, and graphics-intensive scenarios. WPF development skills are similar to UWP development skills, so migration from WPF to UWP apps is easier than migration from Windows Forms.
For more information about WPF, see the following articles:
Windows Forms
Windows Forms is the original platform for managed Windows applications with a lightweight UI model and access to .NET Core or the full .NET Framework. It excels at enabling developers to quickly get started building applications, even for developers new to the platform. This is a forms-based, rapid application development platform with a large built-in collection of visual and non-visual drag-and-drop controls. Windows Forms does not use XAML, so deciding later to extend your application to UWP entails a complete re-write of your UI.
For more information about Windows Forms, see the following articles:
Win32
Using the Win32 API with C++ makes it possible to achieve the highest levels of performance and efficiency by taking more control of the target platform with unmanaged code than is possible on a managed runtime environment like WinRT and .NET. However, exercising such a level of control over your application’s execution requires greater care and attention to get right, and trades development productivity for runtime performance.
Here are a few highlights of what the Win32 API and C++ offers to enable you to build high-performance applications.
- Hardware-level optimizations, including tight control over resource allocation, object lifetimes, data layout, alignment, byte packing, and more.
- Access to performance-oriented instruction sets like SSE and AVX through intrinsic functions.
- Efficient, type-safe generic programming by using templates.
- Efficient and safe containers and algorithms.
- DirectX, in particular Direct3D and DirectCompute (note that UWP also offers DirectX interop).
For more information, see the following articles:
Platform comparison: UWP, WPF, and Windows Forms
The following table compares various characteristics of Windows Forms, WPF, and UWP in detail.
| Feature or scenario | UWP | WPF | Windows Forms |
|---|---|---|---|
| Supported versions | Windows 10 | Windows 7 and later | Windows 7 and later |
| Languages | C#, C++/WinRT, C++/CX, VB, JavaScript | C#, C++/CLI (Managed Extensions for C++), F#, VB | C#, C++/CLI (Managed Extensions for C++), F#, VB |
| UI runtime | Native (C++/WinRT and C++/CX) and managed (.NET Native) | Managed (.NET Framework and .NET Core 3) | Managed (.NET Framework and .NET Core 3) |
| Open source | Yes (Windows UI Library only) | Yes (.NET Core only) | Yes (.NET Core only) |
| Supports XAML | Yes | Yes | No |
| Strengths |
|
|
|
| Scenarios that have limited support |
|
|
|
1 We have publicly announced features that will address this scenario in a future release of Windows 10.
2 Although the platform lacks first-class API support for this scenario, developers can support this scenario with workarounds.
Use the Windows UI Library with Windows apps
To supplement the main Windows app platforms, you can also use the Windows UI Library (WinUI) in your apps. WinUI started as a toolkit that provides new and updated versions of WinRT controls for UWP apps that target down-level versions of Windows 10. As of WinUI 3, WinUI is growing in scope to become the premier native user interface (UI) framework for Windows 10 apps across UWP, .NET, and Win32 app platforms.
You can use WinUI in the following ways in Windows apps.
- UWP apps can use WinUI 2.x controls in place of WinRT controls provided by the Windows SDK. These releases of WinUI include both all-new controls and updated versions of existing controls from the Windows SDK.
- You can update existing WPF, Windows Forms, and C++/Win32 apps to host WinUI 2.x controls by using XAML Islands.
- Starting with WinUI 3, you can create .NET and C++/Win32 apps and UWP apps that use an entirely WinUI-based UI. This release includes Visual Studio project templates that provide everything you need to create these apps.
Other app platforms
Progressive Web Apps (PWAs)
PWAs let developers package their website code so it can be installed and run like an application on Windows 10 PCs. For more information, see Progressive Web Apps.
Xamarin
Use Xamarin to build cross-platform applications for Windows 10 that can also run on iOS and Android. For more information, see Xamarin.
Create and deploy an application with Configuration Manager
Applies to: Configuration Manager (current branch)
In this topic, you’ll jump right in and create an application with Configuration Manager. In this example, you’ll create and deploy an application that contains a line-of-business app for Windows PCs called Contoso.msi, which must be installed on all PCs that are running Windows 10 in your company. Along the way, you’ll learn about many of the things you can do to manage applications effectively.
This procedure is designed to give you an overview of how to create and deploy Configuration Manager applications. However, it does not cover all the configuration options, or how to create and deploy applications for other platforms.
For specific details that are relevant to each platform, see one of the following articles:
If you are already familiar with Configuration Manager applications, you can skip this topic. However, you might want to review Create applications to learn about all the options that are available when you create and deploy applications.
Before you start
Make sure that you’ve reviewed the information in Introduction to application management so that you have prepared your site to install applications and you understand the terminology that’s used in this topic.
Also, make sure that the installation files for the Contoso.msi app are in an accessible location on your network.
Create the Configuration Manager application
To start the Create Application Wizard and create the application
In the Configuration Manager console, choose Software Library > Application Management > Applications.
On the Home tab, in the Create group, choose Create Application.
On the General page of the Create Application Wizard, choose Automatically detect information about this application from installation files. This pre-populates some of the information in the wizard with information that’s extracted from the installation .msi file. Then specify the following information:
Type: Choose Windows Installer (*.msi file).
Location: Type the location (or choose Browse to select the location) of the installation file Contoso.msi. Note that the location must be specified in the form \\Server\Share\File for Configuration Manager to locate the installation files.
You’ll end up with something that looks like the following screenshot:

Choose Next. On the Import Information page, you’ll see some information about the app and any associated files that were imported to Configuration Manager. Once you are done, choose Next again.
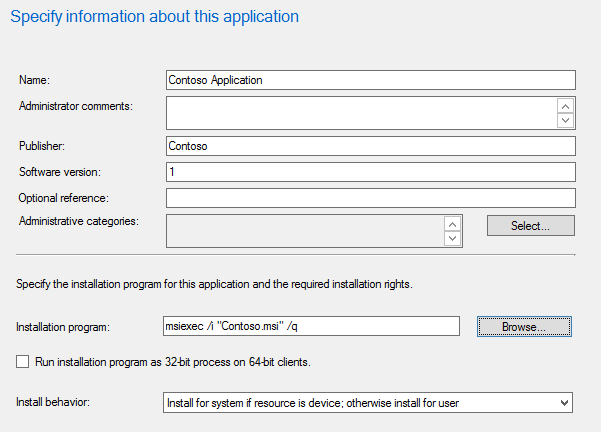
On the General Information page, you can supply further information about the application to help you sort and locate it in the Configuration Manager console.
Additionally, the Installation program field lets you specify the full command line that will be used to install the application on PCs. You can edit this to add your own properties (for example /q for an unattended installation).
Some of the fields on this page of the wizard might have been filled in automatically when you imported the application installation files.
You’ll end up with a screen that looks similar to the following screenshot:
Choose Next. On the Summary page, you can confirm your application settings and then complete the wizard.
You’ve finished creating the app. To find it, in the Software Library workspace, expand Application Management, and then choose Applications. For this example, you’ll see:

Examine the properties of the application and its deployment type
Now that you’ve created an application, you can refine the application settings if you need to. To look at the application properties, select the app, and then, in the Home tab in the Properties group, choose Properties.
In the Application Properties dialog box, you’ll see many items that you can configure to refine the behavior of the application. For details about all the settings you can configure, see Create applications. For the purposes of this example, you’ll just be changing some properties of the application’s deployment type.
Choose the Deployment Types tab > Contoso Application deployment type > Edit.
You’ll see a dialog box like this one:

Add a requirement to the deployment type
Requirements specify conditions that must be met before an application is installed on a device. You can choose from built-in requirements or you can create your own. In this example, you add a requirement that the application will only get installed on PCs that are running Windows 10.
From the deployment type properties page you just opened, choose the Requirements tab.
Choose Add to open the Create Requirement dialog box.
In the Create Requirement dialog box, specify the following information:
Category: Device
Condition: Operating system
Rule type: Value
Operator: One of
From the operating systems list, select Windows 10.
You’ll end up with a dialog box that looks like this:

Choose OK to close each property page that you opened. Then return to the Applications list in the Configuration Manager console.
Requirements can help reduce the number of Configuration Manager collections you need. Because you just specified that the application can only get installed on PCs that are running Windows 10, you can later deploy this to a collection that contains PCs that run many different operating systems. But the application will only get installed on Windows 10 PCs.
Add the application content to a distribution point
Next, to deploy the application to PCs, make sure that the application content is copied to a distribution point. PCs access the distribution point to install the application.
To find out more about distribution points and content management in Configuration Manager, see Manage content and content infrastructure.
In the Configuration Manager console, choose Software Library.
In the Software Library workspace, expand Applications. Then, in the list of applications, select the Contoso Application that you created.
On the Home tab, in the Deployment group, choose Distribute Content.
On the General page of the Distribute Content Wizard, check that the application name is correct, and then choose Next.
On the Content page, review the information that will be copied to the distribution point, and then choose Next.
On the Content Destination page, choose Add to select one or more distribution points, or distribution point groups on which to install the application content.
Complete the wizard.
You can check that the application content was copied successfully to the distribution point from the Monitoring workspace, under Distribution Status > Content Status.
Deploy the application
Next, deploy the application to a device collection in your hierarchy. In this example, you deploy the application to the All Systems device collection.
Remember that only Windows 10 computers will install the application because of the requirements that you selected earlier.
In the Configuration Manager console, choose Software Library > Application Management > Applications.
From the list of applications, select the application that you created earlier (Contoso Application), and then, on the Home tab in the Deployment group, choose Deploy.
On the General page of the Deploy Software Wizard, choose Browse to select the All Systems device collection.
On the Content page, check that the distribution point from which you want PCs to install the application is selected.
On the Deployment Settings page, make sure that the deployment action is set to Install, and the deployment purpose is set to Required.
By setting the deployment purpose to Required, you make sure that the application is installed on PCs that meet the requirements that you set. If you set this value to Available, then users can install the application on demand from Software Center.
On the Scheduling page, you can configure when the application will be installed. For this example, select As soon as possible after the available time.
On the User Experience page, choose Next to accept the default values.
Complete the wizard.
Use the information in the following Monitor the application section to see the status of your application deployment.
Monitor the application
In this section, you’ll take a quick look at the deployment status of the application that you just deployed.
To review the deployment status
In the Configuration Manager console, choose Monitoring > Deployments.
From the list of deployments, select Contoso Application.
On the Home tab, in the Deployment group, choose View Status.
Select one of the following tabs to see more status updates about the application deployment:
Success: The application installed successfully on the indicated PCs.
In Progress: The application has not yet finished installing.
Error: An error occurred installing the application on the indicated PCs. Further information about the error is also displayed.
Requirements Not Met: No installation attempt was made on the indicated devices because they did not meet the requirements you configured (in this example, because they do not run on Windows 10).
Unknown: Configuration Manager was unable to report the status of the deployment. Check back again later.
There are a few ways you can monitor application deployments. For full details, see Monitor applications.
End-user experience
Users who have PCs that are managed by Configuration Manager and running Windows 10 see a message telling them that they must install the Contoso application. Once they accept the installation, the application gets installed.
Starting in Configuration Manager version 1906, the New Software is Available notification will only show once for a user for a given application and revision. The user will no longer see the notification each time they sign in. They’ll only see another notification for an application if the application has changed or was redeployed.


