- Enable apps for websites using app URI handlers
- Register to handle http and https links in the app manifest
- Associate your app and website with a JSON file
- Wildcards
- Multiple apps
- Handle links on Activation to link to content
- Test it out: Local validation tool
- Test it: Web validation
- Publish a Web app to a web site using Visual Studio
- Prerequisites
- Publish to a Web site
- Next steps
- Progressive Web Apps on Windows overview
- Discoverable
- Installable
- Re-engageable
- Network Independent
- Progressive
- Responsive
- Linkable
- PWAs on Microsoft Edge (Chromium)
- Requirements
Enable apps for websites using app URI handlers
Apps for Websites associates your app with a website so that when someone opens a link to your website, your app is launched instead of opening the browser. If your app is not installed, your website opens in the browser as usual. Users can trust this experience because only verified content owners can register for a link. Users will be able to check all of their registered web-to-app links by going to Settings > Apps > Apps for websites.
To enable web-to-app linking you will need to:
- Identify the URIs your app will handle in the manifest file
- A JSON file that defines the association between your app and your website. with the app Package Family Name at the same host root as the app manifest declaration.
- Handle the activation in the app.
Starting with the Windows 10 Creators update, supported links clicked in Microsoft Edge will launch the corresponding app. Supported links clicked in other browsers (for example, Internet Explorer, etc.), will keep you in the browsing experience.
Register to handle http and https links in the app manifest
Your app needs to identify the URIs for the websites it will handle. To do so, add the Windows.appUriHandler extension registration to your app’s manifest file Package.appxmanifest.
For example, if your website’s address is “msn.com” you would make the following entry in your app’s manifest:
The declaration above registers your app to handle links from the specified host. If your website has multiple addresses (for example: m.example.com, www.example.com, and example.com) then add a separate entry inside of the for each address.
Associate your app and website with a JSON file
To ensure that only your app can open content on your website, include your app’s package family name in a JSON file located in the web server root, or at the well-known directory on the domain. This signifies that your website gives consent for the listed apps to open content on your site. You can find the package family name in the Packages section in the app manifest designer.
The JSON file should not have a .json file suffix.
Create a JSON file (without the .json file extension) named windows-app-web-link and provide your app’s package family name. For example:
Windows will make an https connection to your website and will look for the corresponding JSON file on your web server.
Wildcards
The JSON file example above demonstrates the use of wildcards. Wildcards allow you to support a wide variety of links with fewer lines of code. Web-to-app linking supports two types of wildcards in the JSON file:
| Wildcard | Description |
|---|---|
| * | Represents any substring |
| ? | Represents a single character |
For example, given «excludePaths» : [ «/news/*», «/blog/*» ] in the example above, your app will support all paths that start with your website’s address (for example, msn.com), except those under /news/ and /blog/ . msn.com/weather.html will be supported, but not msn.com/news/topnews.html.
Multiple apps
If you have two apps that you would like to link to your website, list both of the application package family names in your windows-app-web-link JSON file. Both apps can be supported. The user will be presented with a choice of which is the default link if both are installed. If they want to change the default link later, they can change it in Settings > Apps for Websites. Developers can also change the JSON file at any time and see the change as early as the same day but no later than eight days after the update.
To provide the best experience for your users, use exclude paths to make sure that online-only content is excluded from the supported paths in your JSON file.
Exclude paths are checked first and if there is a match the corresponding page will be opened with the browser instead of the designated app. In the example above, вЂ/news/*’ includes any pages under that path while вЂ/news*’ (no forward slash trails ‘news’) includes any paths under вЂnews*’ such as вЂnewslocal/’, вЂnewsinternational/’, and so on.
Handle links on Activation to link to content
Navigate to App.xaml.cs in your app’s Visual Studio solution and in OnActivated() add handling for linked content. In the following example, the page that is opened in the app depends on the URI path:
Important Make sure to replace the final if (rootFrame.Content == null) logic with rootFrame.Navigate(deepLinkPageType, e); as shown in the example above.
Test it out: Local validation tool
You can test the configuration of your app and website by running the App host registration verifier tool which is available in:
%windir%\system32\AppHostRegistrationVerifier.exe
Test the configuration of your app and website by running this tool with the following parameters:
AppHostRegistrationVerifier.exe hostname packagefamilyname filepath
- Hostname: Your website (for example, microsoft.com)
- Package Family Name (PFN): Your app’s PFN
- File path: The JSON file for local validation (for example, C:\SomeFolder\windows-app-web-link)
If the tool does not return anything, validation will work on that file when uploaded. If there is an error code, it will not work.
You can enable the following registry key to force path matching for side-loaded apps as part of local validation:
Keyname: ForceValidation Value: 1
Test it: Web validation
Close your application to verify that the app is activated when you click a link. Then, copy the address of one of the supported paths in your website. For example, if your website’s address is “msn.com”, and one of the support paths is “path1”, you would use http://msn.com/path1
Verify that your app is closed. Press Windows Key + R to open the Run dialog box and paste the link in the window. Your app should launch instead of the web browser.
Additionally, you can test your app by launching it from another app using the LaunchUriAsync API. You can use this API to test on phones as well.
If you would like to follow the protocol activation logic, set a breakpoint in the OnActivated event handler.
Publish a Web app to a web site using Visual Studio
You can use the Publish tool to publish ASP.NET, ASP.NET Core, .NET Core, and Python apps to a website from Visual Studio. For Node.js, the steps are supported but the user interface is different.
Prerequisites
- Visual Studio 2019 installed with the appropriate workloads for your language of choice:
- ASP.NET: ASP.NET and web development
- Python: Python development
- Node.js: Node.js development
- Visual Studio 2017 installed with the appropriate workloads for your language of choice:
- ASP.NET: ASP.NET and web development
- Python: Python development
- Node.js: Node.js development
An ASP.NET, ASP.NET Core, Python, or Node.js project. If you don’t already have a project, select an option below:
In Visual Studio 2019, choose Create a new project in the start window. If the start window is not open, choose File > Start Window. Type web app in the search box, choose C# as the language, then choose ASP.NET Core Web Application (Model-View-Controller), and then choose Next. On the next screen, name the project MyASPApp, and then choose Next.
Choose either the recommended target framework (.NET Core 3.1) or .NET 5, and then choose Create.
In Visual Studio 2017, choose File > New Project, select Visual C# > .NET Core, then select ASP.NET Core Web Application. When prompted, select the Web Application (Model-View-Controller) template, make sure that No Authentication is selected, and then select OK.
Python: Follow Quickstart: Create your first Python web app using Visual Studio, or use File > New Project, select Python, then select Flask Web Project.
Node.js: Follow Quickstart: Use Visual Studio to create your first Node.js app, or use File > New Project, select JavaScript, then select Blank Node.js Web Application.
Make sure you build the project using the Build > Build Solution menu command before following the deployment steps.
If you need to publish a Windows desktop application to a network file share, see Deploy a desktop app using ClickOnce (C# or Visual Basic). For C++/CLR, see Deploy a native app using ClickOnce or, for C/C++, see Deploy a native app using a Setup project.
Publish to a Web site
In Solution Explorer, right-click the project and choose Publish (or use the Build > Publish menu item).

If you have previously configured any publishing profiles, the Publish pane appears. Select New.
In the Publish window, choose Web Server (IIS).

Choose Web Deploy as the deployment method. Web Deploy simplifies deployment of Web applications and Web sites to IIS servers, and must be installed as an application on the server. Use the Web platform installer to install it.

Configure the required settings for the publish method and select Finish.

To publish, select Publish in the summary page. The Output window shows deployment progress and results.
If you need help troubleshooting ASP.NET Core on IIS, see Troubleshoot ASP.NET Core on Azure App Service and IIS.
Next steps
In this quickstart, you learned how to use Visual Studio to create a publishing profile. You can also configure a publishing profile by importing publish settings.
Progressive Web Apps on Windows overview
Progressive Web Apps (PWAs) provide access to open web technologies for cross-platform interoperability and provide your users with a native, app-like experience customized for their devices. PWAs are websites that are progressively enhanced to function like native apps on supporting platforms. The qualities of a PWA combine the best of the web and native apps.

Discoverable
From web search results and supporting app stores

Installable
Pin and launch from the home screen, Start Menu, Taskbar, and so on

Re-engageable
Send push notifications, even when the app is not active

Network Independent
Works offline and in low-network conditions

Progressive
Experience scales up (or down) with device capabilities

Provides a secure HTTPS endpoint and other user safeguards

Responsive
Adapts to the user’s screen size or orientation and input method

Linkable
Share and launch from a standard hyperlink
Build (or convert) your existing website to a PWA to enhance your engagement with your users. Enhancements include push notifications, app-like integration, and offline support. Continue to build your audience on the open web for users to discover your PWA through search and link-sharing. Best of all, your app is updated in using your web server code.
PWAs on Microsoft Edge (Chromium)
When you build a Progressive Web App targeting web standard APIs, your app may be deployed across platforms and devices and take advantage of the device-specific capabilities as available. PWAs in Microsoft Edge (Chromium) add the following advantages to your website.
- Your app is built on a standards-based web platform.
- Enables your users to install your app directly from the browser.
- Enables your users to install your app without a Store-based deployment or registration.
Desktop PWAs are supported on any of the platforms Microsoft Edge (Chromium) is available. Microsoft Edge (Chromium) is available on Windows 7, Windows 10, and macOS. The following benefits are included.
Apps may be installed directly from within the browser using the Install icon in the navigation bar.
Install app flyout and icon
Apps may also be installed, run, and managed from the Settings > Apps menu
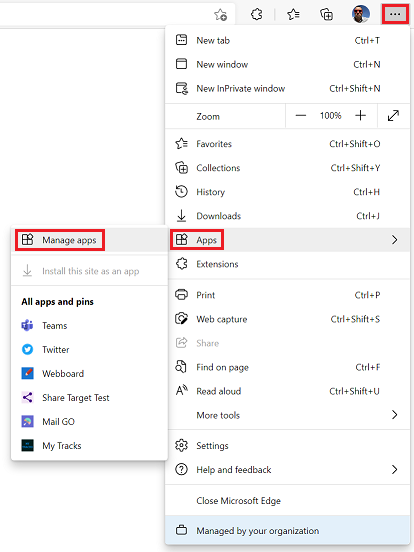
App menu items under settings
Web Notifications are integrated into the Windows notification system
Shared cookie store with the browser profile that installed the app
Access to other browser features using the Setting and more ( . ) menu including certificate validation, site permissions, tracking protection, and browser extensions
Full access to Microsoft Edge DevTools for debugging your app
For more information about PWA benefits, upcoming features, and short demos, navigate to Build 2020 PWA session.
Requirements
To run as a PWA, your server-hosted web app should include following minimum requirements.
Protects your users by providing a secure connection for server or app communication. Service Workers and other PWA technologies only work with web resources served over a secure connection (or from localhost for debugging purposes).
Uses Service Worker threads to act as network proxies between your server and client app. Service Worker threads provide offline support, resource caching, push notifications, background data sync, and page-load performance optimizations.
Provides a JSON-based metadata file that describes key information about your web app, so that Windows 10 and other host platforms provide your PWA users with an installable, native app-like experience. Key information includes icons, language, and URL entry point.
To be a great PWA, your app must also meet the following requirements.
Ensure your PWA works by testing in different browsers and environments.
Employs fluid layouts and flexible images. Responsive design includes the following elements that adapt your UX to your user’s device.
Uses device emulation tools from your browser to locally test, or create a remote debugging session on Windows or Android to test directly on a target device.
Routes each page of your site to a unique URL so existing users may help you engage an even broader audience through social media sharing.
Uses code quality tools like the Webhint linter to optimize the efficiency, robustness, safety, and accessibility of your app.
Verifies your PWA against the Google baseline PWA checklist.


