- How Can I Start and Shut Down My Computer Automatically on a Schedule?
- On Windows
- On a Mac
- How can I make my computer restart automatically everyday? Windows 10.
- Replies (3)
- How to Set Windows 10 Computer to Auto-Start on a Schedule
- Enable Computer to Auto-Start in BIOS
- Schedule Computer to Auto-Start with Task Scheduler
- Why Does My Windows 10 Restart after Entering Sleep Mode?
- Way 1: Cancel «Automatically restart» and change advanced settings of battery
- Way 2: Disable device from waking on Magic Packet or pattern match
- Windows automatically start computer
- Windows Program Automatic Startup Locations
- Users who read this also read:
How Can I Start and Shut Down My Computer Automatically on a Schedule?
Dear Lifehacker,
I like to turn my computer off at night, but I hate sitting and waiting for it to boot up in the morning. Is there any way I can make my computer start automatically in the morning so it’s ready for me when I get up?
Sincerely,
Bored During Boot
We know your pain. While many would recommend you just leave your computer on 24/7, we know that can drain unnecessary power, not to mention make a lot of noise. It’s actually pretty easy to start up your computer each morning when you wake up, or each day when you come home from work. You can even set it to shut itself down at night, too. Here’s how.
On Windows
To automatically start your computer up at a specific time of day, you’ll actually need to edit your BIOS settings. To do this:
- Boot up your computer and enter your BIOS setup. Usually this involves pressing the Delete key as your computer boots (your computer should say Press DEL to Enter Setup or something similar as you turn it on).
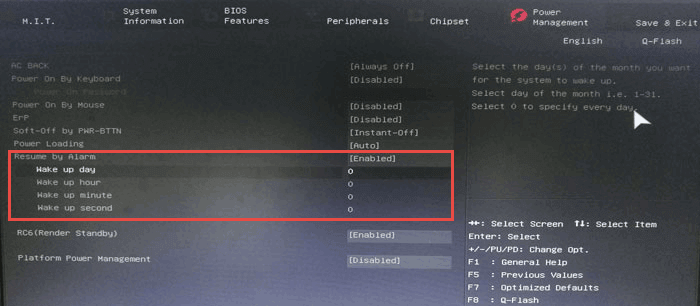
- Navigate to the Power Options. If your BIOS supports it, there should be a function for automatically starting up your computer at a certain time of day. Mine was called «Resume by Alarm», but yours might be called something different.
- Enable that setting and set the time you want your computer to start every day. Save and Exit the BIOS, and your computer should follow that schedule from now on.
You probably shut down your computer when you’re done using it at the end of the day, but if not, you can set it to shut itself down on a schedule. This is easy to do with Windows Task Scheduler:
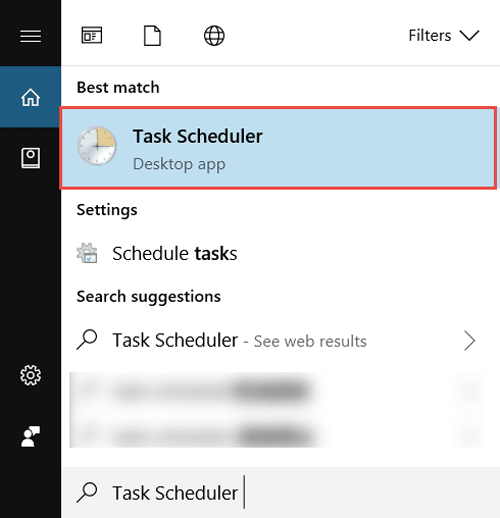
- Hit the Start menu and type in «task scheduler». Open up Task Scheduler from your results.
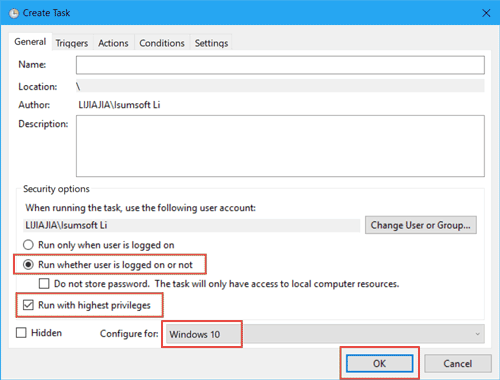
- In the right pane, hit Create Task. Give it a name, and under the General tab, check «Run with highest privileges». Also check «Run whether user is logged on or not», if you ever leave your computer logged out.
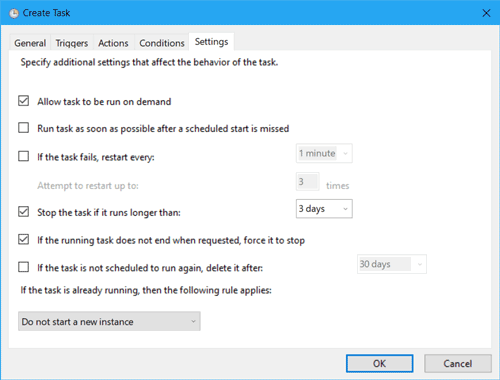
- Head to the Settings tab and check «Stop the task if it runs longer than» and set it to «1 hour». This won’t stop your computer from sleeping, but will stop your computer from thinking a task is still running.
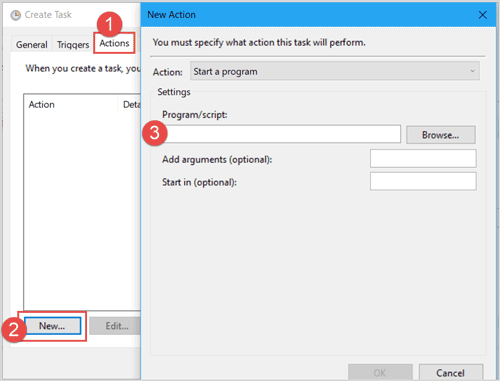
- Head to the Actions tab, hit New, and choose «Start a Program» as your action. Set the Program to shutdown and the arguments to -s .
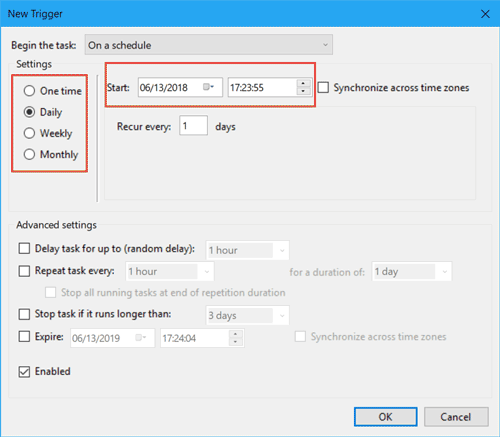
- Lastly, head to the Triggers tab and click New. Change the schedule to fit whatever you want (say, Daily at 12:00AM), and hit OK. Hit OK again at the next window and your task should be saved in Task Scheduler.
That’s it. Now your computer should shut down and wake up on your own schedule.
On a Mac
This process is much easier on a Mac than on Windows. To set it up on OS X:
- Open up System Preferences and click Energy Saver.
- In the bottom right corner, click the Schedule button.
- Check the box next to «Start up or wake» to schedule when your computer turns on and the checkbox beneath it to schedule when you computer goes to sleep, restarts, or shuts down. You can set the schedules for specific days, every day, just weekdays, or weekends only.
- Once you’ve made all your choices, click the OK button.
Note that if you’re setting schedules on a Mac laptop, it will need to be connected to power for these schedules to function.
There are a number of different ways you could do this, too, like using previously mentioned WakeupOnStandby , but this is a nice low hassle method that doesn’t require any extra software.
WakeupOnStandBy Pulls Your Computer Out of Standby on Schedule
Windows: Having your computer wake up with you or wake up in the middle of the night to do routine…
How can I make my computer restart automatically everyday? Windows 10.
How can I make my computer restart automatically everyday? Windows 10.
Replies (3)
You can use the Task Scheduler to shutdown, restart or perform any action at one time or periodically. To do so, you may follow the steps below:
1. To make your computer shut down at a particular time, type taskschd.msc in start search and hit Enter to open the Task Scheduler.
2. In the right panel, click on Create Basic Task.
3. Give it a name and a description if you wish and click Next.
4. When asked When do you want the task to start, select what you want. Click Next.
5. Select the Start date and time.
6. Clicking Next will bring you to the Action page. Here select Start a program and click Next.
7. Type shutdown on the Program/script space and /s /f /t 0 in the Add arguments box. If you want the shutdown to commence after say 60 sec, type 60 instead of 0 here.
8. Click Next to review all and finally click Finish. Your computer will shutdown at the designated day and time.
Take not that in a CMD window, you may run shutdown /? to see all the available switches. To schedule restarts, you need to use the /r parameter instead of the /s parameter. To log off the current user use /l.
Let us know if you need further assistance.
213 people found this reply helpful
Was this reply helpful?
Sorry this didn’t help.
Great! Thanks for your feedback.
How satisfied are you with this reply?
Thanks for your feedback, it helps us improve the site.
How to Set Windows 10 Computer to Auto-Start on a Schedule
Windows machine allows users to schedule computer to turn on, as a result, you can set computer to auto-start on a schedule. To schedule computer to auto-start at a precise time, we have to enable computer to wake up on alarm and then set auto-start in Task Scheduler.
Tips: If you want to set auto shutdown in Windows 10 computer, refer to 4 Ways to Set Auto Shutdown in Windows 10.
Enable Computer to Auto-Start in BIOS
Step 1: Start or restart your computer and keep pressing a hotkey such as Delete or F2 to enter the BIOS settings.
Step 2: Use the direction keys to locate to Power Management tab.
Step 3: Locate to the Resume by alarm to change settings.
Schedule Computer to Auto-Start with Task Scheduler
Step 1: Input Task Scheduler in the Cortana and hit Enter to open it.
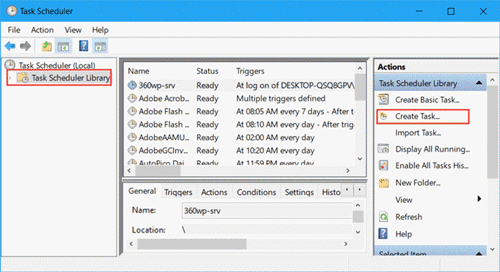
Step 2: Click on Task Scheduler Library and then tap on Create Task in the right sidebar. On the other way, you can right-click on Task Scheduler Library and select Create Task as well.
Step 3: Type a name for the task and tick on Run whether user is logged on or not and Run with highest privileges.
Step 4: Go to Triggers tab, click on New.
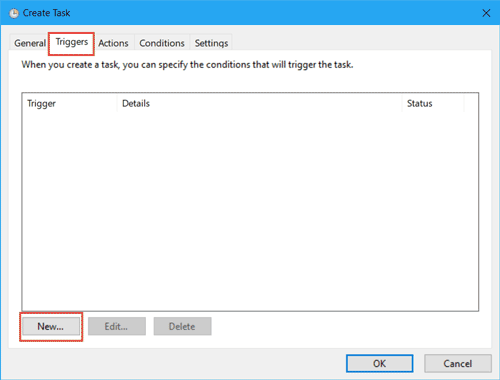
Step 5: Change the settings to your needs.
Step 6: In the action tab, click on New and type a name for the action.
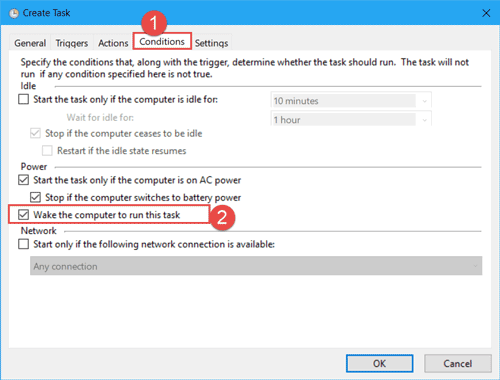
Step 7: Locate to the Conditions tab, click on the checkbox of Wake the computer to run this task.
Step 8: You can change some settings in the Settings tab. Now you have accomplished creating a new task for auto-starting of computer. Tap on OK button and input your login password then you will back to the Task Scheduler window. Right-click on the task and Run it.
Why Does My Windows 10 Restart after Entering Sleep Mode?
At times, few of computers would restart after entering sleep mode, especially for computers set auto start or shutdown. Here are two ways to address the issue.
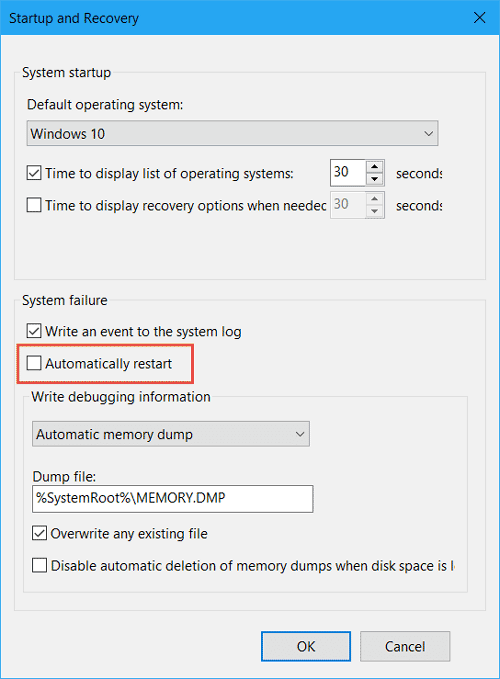
Way 1: Cancel «Automatically restart» and change advanced settings of battery
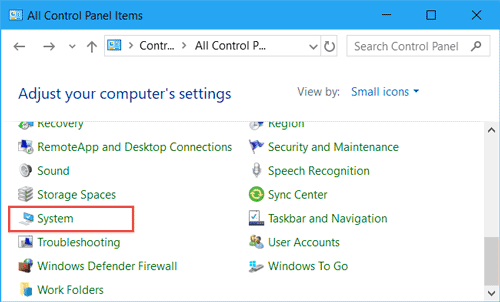
Step 1: Open Control Panel, select Small icon next to View by and click on System.
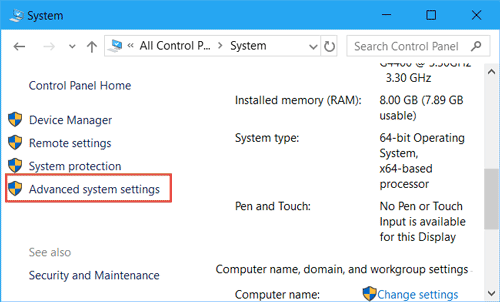
Step 2: Click on Advanced system settings on the left sidebar.
Step 3: In the System Properties window, click on Settings in Startup and Recovery section.
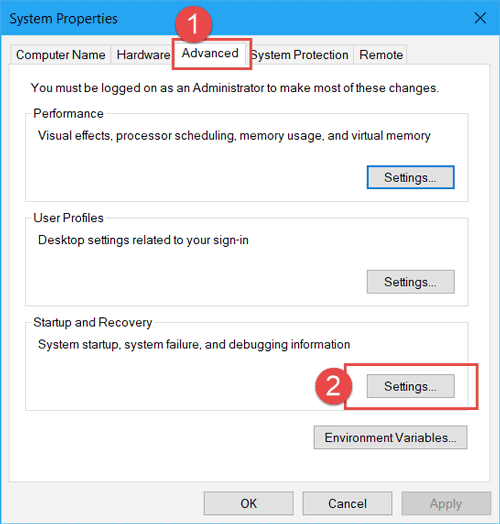
Step 4: Uncheck the «Automatically start«.
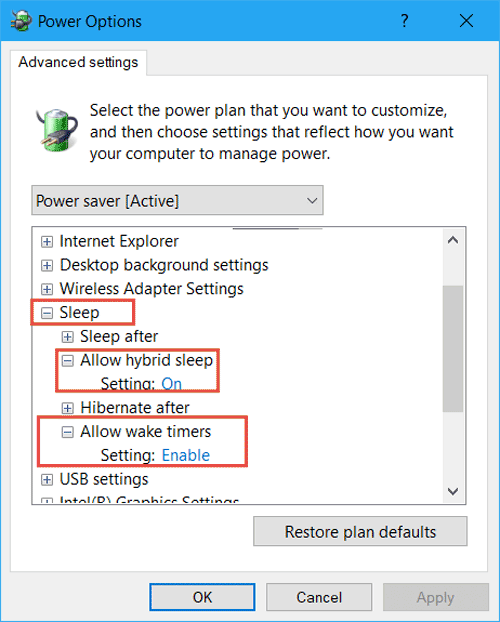
Step 5: Go back to Control Panel window above and navigate to Power Options > Change when the computer sleeps Change advanced power settings. In the Power Options window, expand Sleep > Allow hybrid sleep. Turn it on next to Settings. Expand Allow awake timer and Enable it.
Way 2: Disable device from waking on Magic Packet or pattern match
If the method above doesn’t work, try to disable device from waking on Magic Packet or pattern match.
Step 1: Right-click on Start and select Device Manager.
Step 2: Expand Network adapters and right-click on the wireless network adapter, select Properties.
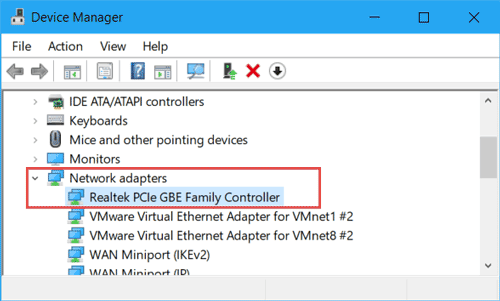
Step 3: In the Advanced tab, click on Wake on Magic Packet and Wake on pattern match, select Disabled in the right side.
Windows automatically start computer

- Home
- Tutorials & Tech Support Guides
- Windows XP Tutorials
- Windows Program Automatic Startup Locations
Windows Program Automatic Startup Locations
Lawrence Abrams
- April 1, 2004
- Read 940,013 times
Many programs that you install are automatically run when you start your computer and load Windows. For the majority of cases, this type of behavior is fine. Unfortunately, there are programs that are not legitimate, such as spyware, hijackers, trojans, worms, viruses, that load in this manner as well. It is therefore important that you check regularly your startup registry keys regularly. Windows does offer a program that will list programs that are automatically started from SOME of these locations. This program, Msconfig.exe, unfortunately, though, only lists programs from a limited amount of startup keys.
Below are the various list of registry keys that can start a program when Windows boots. I have tried to keep the keys in the exact order that they load. Keep in mind, that some of the keys are set to load at the same time, so it is possible that the order will change on each boot up. These keys generally apply to Windows 95, 98, ME, NT, XP, 2000, Windows Vista, and Windows 7, and I will note when it is otherwise.
Upon turning on the computer the following autostart locations are processed in the following order:
Windows Boot Device Drivers — These drivers are loaded first as they are required for the proper operation of hardware such as storage devices. Boot device drivers will be located under the following key and have a Start value equal to 0.
Windows will now perform various tasks and then start the Winlogon process. Winlogon eventually starts the service control manager that loads services and drivers that are set for auto-start.
Windows Auto-start Services & Drivers -The Service Control Manager (SCM) process (\Windows\System32\services.exe), will now launch any services or drivers that are marked with a Start value of 2.
RunServicesOnce — This key is designed to start services when a computer boots up. These entries can also continue running even after you log on, but must be completed before the HKEY_LOCAL_MACHINE\. \RunOnce registry can start loading its programs.
RunServices — This key is designed to start services as well. These entries can also continue running even after you log on, but must be completed before the HKEY_LOCAL_MACHINE\. \RunOnce registry can start loading its programs.
The Windows logon prompt is shown on the Screen. After a user logs in the rest of the keys continue.
Notify — This key is used to add a program that will run when a particular event occurs. Events include logon, logoff, startup, shutdown, startscreensaver, and stopscreensaver. When Winlogon.exe generates an event such as the ones listed, Windows will look in the Notify registry key for a DLL that will handle this event. Malware has been known to use this method to load itself when a user logs on to their computer. Loading in such a way allows the malware program to load in such a way that it is not easy to stop.
UserInit Key — This key specifies what program should be launched right after a user logs into Windows. The default program for this key is C:\windows\system32\userinit.exe. Userinit.exe is a program that restores your profile, fonts, colors, etc for your user name. It is possible to add further programs that will launch from this key by separating the programs with a comma. For example:
HKLM\Software\Microsoft\Windows NT\CurrentVersion\Winlogon\Userinit =C:\windows\system32\userinit.exe,c:\windows\badprogram.exe.
This will make both programs launch when you log in and is a common place for trojans, hijackers, and spyware to launch from.
Shell Value — This value contains a list of comma separated values that Userinit.exe will launch. The default shell for Windows is explorer.exe, though there are legitimate replacements that have been made. When userinit.exe starts the shell, it will first launch the Shell value found in HKEY_CURRENT_USER. If this value is not present, it will then launch the value found in HKEY_LOCAL_MACHINE.
The rest of the Autostart locations will now be processed.
RunOnce Local Machine Key — These keys are designed to be used primarily by Setup programs. Entries in these keys are started once and then are deleted from the key. If there is an- exclamation point preceding the value of the key, the entry will not be deleted until after the program completes, otherwise it will be deleted before the program runs. This is important, because if the exclamation point is not used, and the program referenced in this key fails to complete, it will not run again as it will have already been deleted. All entries in this key are started synchronously in an undefined order. Due to this, all programs in this key must be finished before any entries in HKEY_LOCAL_MACHINE\. \Run, HKEY_CURRENT_USER\. \Run, HKEY_CURRENT_USER\. \RunOnce, and Startup Folders can be loaded. The RunOnce keys are ignored under Windows 2000 and Windows XP in Safe Mode. The RunOnce keys are not supported by Windows NT 3.51.
Run — These are the most common startup locations for programs to install auto start from. By default these keys are not executed in Safe mode. If you prefix the value of these keys with an asterisk, *, it will run in Safe Mode.
All Users Startup Folder — For Windows XP, 2000, and NT, this folder is used for programs that should be auto started for all users who will login to this computer. It is generally found at:
| Windows XP | C:\Documents and Settings\All Users\Start Menu\Programs\Startup |
| Windows NT | C:\wont\Profiles\All Users\Start Menu\Programs\Startup |
| Windows 2000 | C:\Documents and Settings\All Users\Start Menu\Programs\Startup |
User Profile Startup Folder — This folder will be executed for the particular user who logs in. This folder is usually found in:
| Win 9X, ME | c:\windows\start menu\programs\startup |
| Windows XP | C:\Documents and Settings\LoginName\Start Menu\Programs\Startup |
RunOnce Current User Key — These keys are designed to be used primarily by Setup programs. Entries in these keys are started once and then are deleted from the key. If there is an exclamation point preceding the value of the key, the entry will not be deleted until after the program completes, otherwise it will be deleted before the program runs. This is important, because if the exclamation point is not used, and the program referenced in this key fails to complete, it will not run again as it will have already been deleted. The RunOnce keys are ignored under Windows 2000 and Windows XP in Safe Mode. The RunOnce keys are not supported by Windows NT 3.51.
Explorer Run — These keys are generally used to load programs as part of a policy set in place on the computer or user.
Load Key — This key is not commonly used anymore, but can be used to auto start programs.
AppInit_DLLs — This value corresponds to files being loaded through the AppInit_DLLs Registry value. The AppInit_DLLs registry value contains a list of dlls that will be loaded when user32.dll is loaded. As most Windows executables use the user32.dll, that means that any DLL that is listed in the AppInit_DLLs registry key will be loaded also. This makes it very difficult to remove the DLL as it will be loaded within multiple processes, some of which can not be stopped without causing system instability. The user32.dll file is also used by processes that are automatically started by the system when you log on. This means that the files loaded in the AppInit_DLLs value will be loaded very early in the Windows startup routine allowing the DLL to hide itself or protect itself before we have access to the system.
ShellServiceObjectDelayLoad — This Registry value contains values in a similar way as the Run key does. The difference is that instead of pointing to the file itself, it points to the CLSID’s InProcServer, which contains the information about the particular DLL file that is being used.
The files under this key are loaded automatically by Explorer.exe when your computer starts. Because Explorer.exe is the shell for your computer, it will always start, thus always loading the files under this key. These files are therefore loaded early in the startup process before any human intervention occurs.
SharedTaskScheduler — This section corresponds to files being loaded through the SharedTaskScheduler registry value for XP, NT, 2000 machines. The entries in this registry value run automatically when you start windows.
The following are files that programs can autostart from on bootup:
1. c:\autoexec.bat
2. c:\config.sys
3 . windir\wininit.ini — Usually used by setup programs to have a file run once and then get deleted.
4. windir\winstart.bat
5. windir\win.ini — [windows] «load»
6. windir\win.ini — [windows] «run»
7. windir\system.ini — [boot] «shell»
8 . windir\system.ini — [boot] «scrnsave.exe»
9. windir\dosstart.bat — Used in Win95 or 98 when you select the «Restart in MS-DOS mode» in the shutdown menu.
10. windir\system\autoexec.nt
11. windir\system\config.nt
Though it is good to know these details, if you just need a program to quickly scan these keys and produce a list for you, you can use Sysinternals Autoruns program. While you are at that site, you should browse some of the other excellent utilities.
Users who read this also read:
HijackThis Tutorial — How to use HijackThis to remove Browser Hijackers & Spyware
HijackThis is a utility that produces a listing of certain settings found in your computer. HijackThis will scan your registry and various other files for entries that are similar to what a Spyware or Hijacker program would leave behind. Interpreting these results can be tricky as there are many legitimate programs that are installed in your operating system in a similar manner that Hijackers get .
How to determine what services are running under a SVCHOST.EXE process
A very common question we see here at Bleeping Computer involves people concerned that there are too many SVCHOST.EXE processes running on their computer. The confusion typically stems from a lack of knowledge about SVCHOST.EXE, its purpose, and Windows services in general. This tutorial will clear up this confusion and provide information as to what these processes are and how to find out more .
How Malware hides and is installed as a Service
A common misconception when working on removing malware from a computer is that the only place an infection will start from is in one of the entries enumerated by HijackThis. For the most part these entries are the most common, but it is not always the case. Lately there are more infections installing a part of themselves as a service. Some examples are Ssearch.biz and Home Search Assistant.

Demystifying the Windows Registry
Ever since Windows 95, the Windows operating system has been using a centralized hierarchical database to store system settings, hardware configurations, and user preferences. This database is called the Windows Registry or more commonly known as the Registry. When new hardware is installed in the computer, a user changes a settings such as their desktop background, or a new software is installed, .

How to start Windows in Safe Mode
Windows Safe Mode is a way of booting up your Windows operating system in order to run administrative and diagnostic tasks on your installation. When you boot into Safe Mode the operating system only loads the bare minimum of software that is required for the operating system to work. This mode of operating is designed to let you troubleshoot and run diagnostics on your computer. Windows Safe Mode .


