- AOMEI Free Backup Software for Windows Backup to NAS Devices
- AOMEI Backupper
- Key Features
- Create System Image
- Create Disk Image
- Backup Files
- Clone Hard Disk
- Automatic Backup
- AOMEI Freeware
- User Say
- NAS and Backup to NAS Software Free
- Backup to NAS with Free AOMEI Backupper
- Restore from NAS with AOMEI Backupper
- Conclusion
- How to Backup Windows 10 to Different NAS Devices for FREE?
- Why backup Windows 10 to NAS?
- Set up your NAS device before Windows backup
- Top two ways to backup Windows 10 to Synology NAS
- Method 1: Backup Windows 10 to NAS with a free backup utility
- Method 2: Backup Windows 10 to NAS via Windows built-in tool
- Summary
- Backup Windows Server to NAS
AOMEI Free Backup Software for Windows Backup to NAS Devices

Looking for free software to backup Windows to network-attached storage (NAS) drive? Free AOMEI Backupper can backup data and programs to NAS and restore from NAS for Windows 10, 8, 7, Vista and XP.
AOMEI Backupper

An easy-to-use and versatile tool offers data backup, files sync, disaster recovery, and disk clone solutions.
Key Features
Create System Image
Backup all contents in system drive to an image, including Windows and apps.
Create Disk Image
Backup entire disk to an image. Support HDD/SSD, MBR/GPT, removable drives.
Backup Files
Backup specified files to local disks, external drives or NAS/network share.
Clone Hard Disk
Clone a hard disk to another or an SSD with larger or smaller capacity.
Automatic Backup
Set & forget. Create a schedule to backup data automatically.
AOMEI Freeware
User Say
I wish to inform you that AOMEI Backupper is the best software I have used previously. Thank you so much for this free backup software.
I recently found your Windows system/data backup software-AOMEI Backupper- and I must say, this is by far the best I have tried in the last 6 months.
AOMEI Backupper is awesome. Its team solved ttough problem for me. I think it is a unique and personal software belonging to me.
NAS and Backup to NAS Software Free
NAS В (network attached storage) device provides great convenience for its users. All В individuals within a company are allowed to share their data at the same time by accessing remote NAS devices. As for data backup, you can also put the backup image file to a NAS device other than manually connecting the computer to an В external hard drive.
In that case, software that supports backup Windows to NAS and restore from NAS is necessary. Here let’s take a look at the latest free Windows backup and restore solution – AOMEI Backupper Standard. The software will help you backup Windows programs, installed software as well as personal files to NAS and network drive. You can backup external hard drive and USB stick to NAS as well. Incremental backup and differential backup are supportable. It is also NAS backup software that allows you to backup NAS to PC on the contrary.
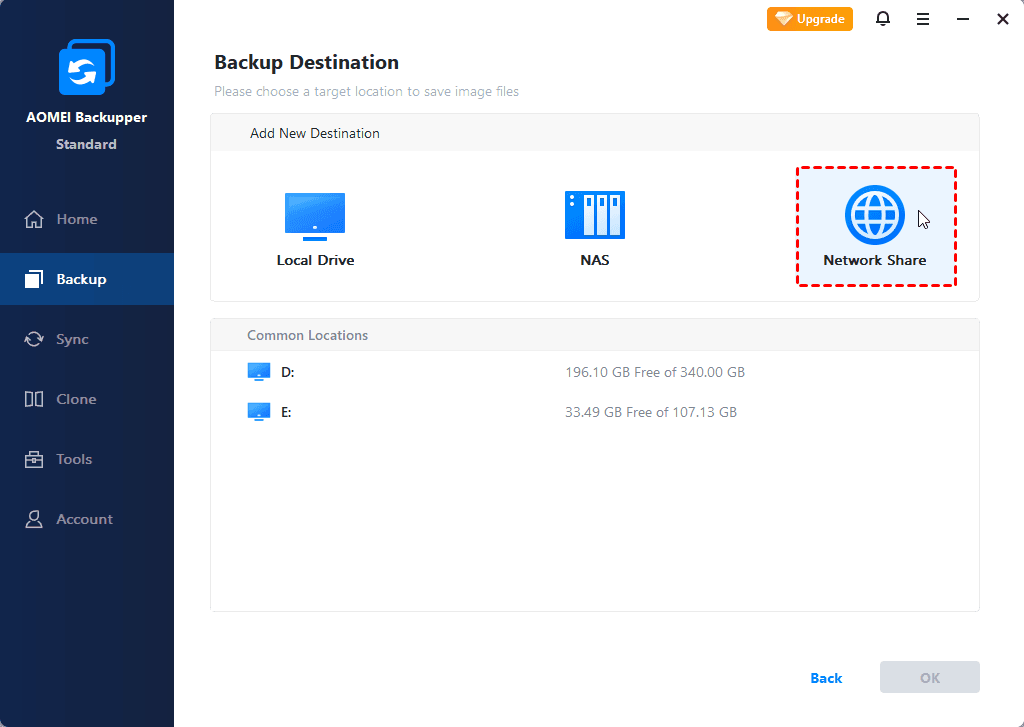
Backup to NAS with Free AOMEI Backupper
Download and install the free software. In AOMEI Backupper, to backup partition to NAS drive, first we need to add partition and then select our NAS device as the destination. Click the right edge of the column as shown below:
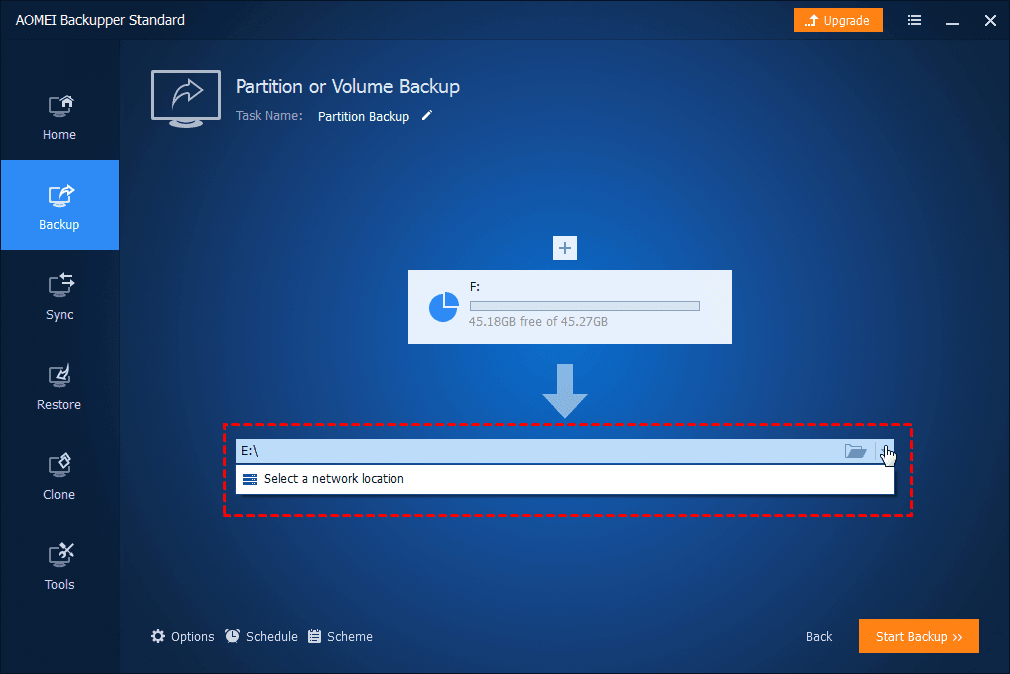
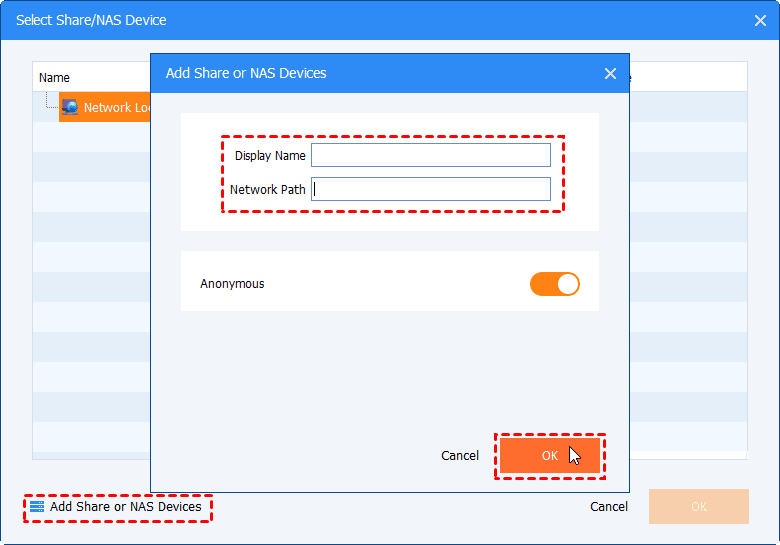
In the pop-up window, click «Share/NAS Device» on the left-hand side.
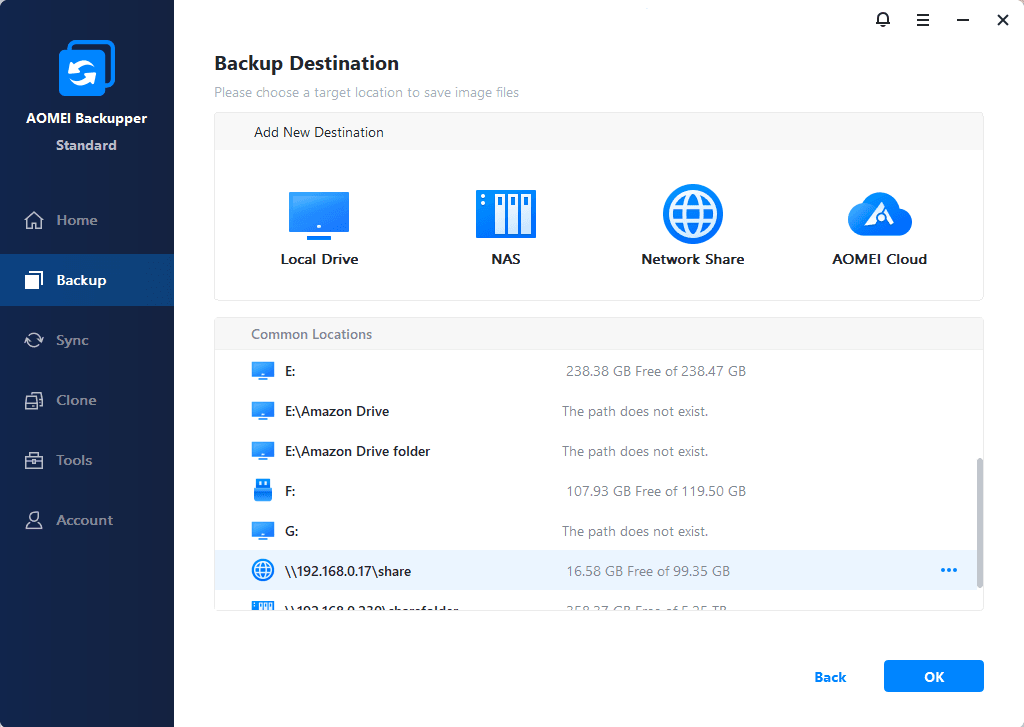
After the NAS device has been added, you can find the destination folder in the right-hand side column. Check it and then click OK at the bottom to start the process. Thus ends the execution of backing up to NAS.
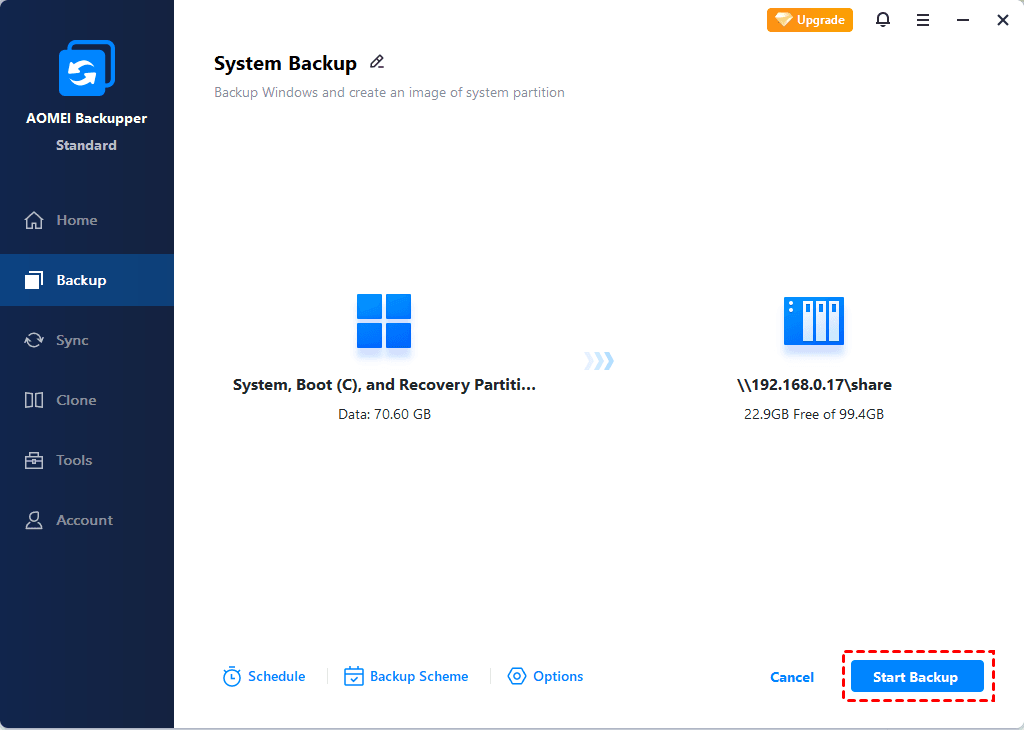
At the operation summary, make a final confirmation. Then, click «Start Backup».
Tips:
If you want to do incremental or differential backup to NAS at a regular basis, click Schedule to set. If you just want to do an incremental or differential backup once, go Home after completion. Move mouse over the backup image and click Backup in the middle. Then you are able to set desire backup type. For more information with screenshots, please see incremental and differential backup.
Backup Options: you can password encrypt backup image, split and compression images here.
Scheme: it will help you manage destination storage by auto-deleting old backups. This requires a Standard upgrading to AOMEI Backupper Professional edition or higher ones.
Restore from NAS with AOMEI Backupper
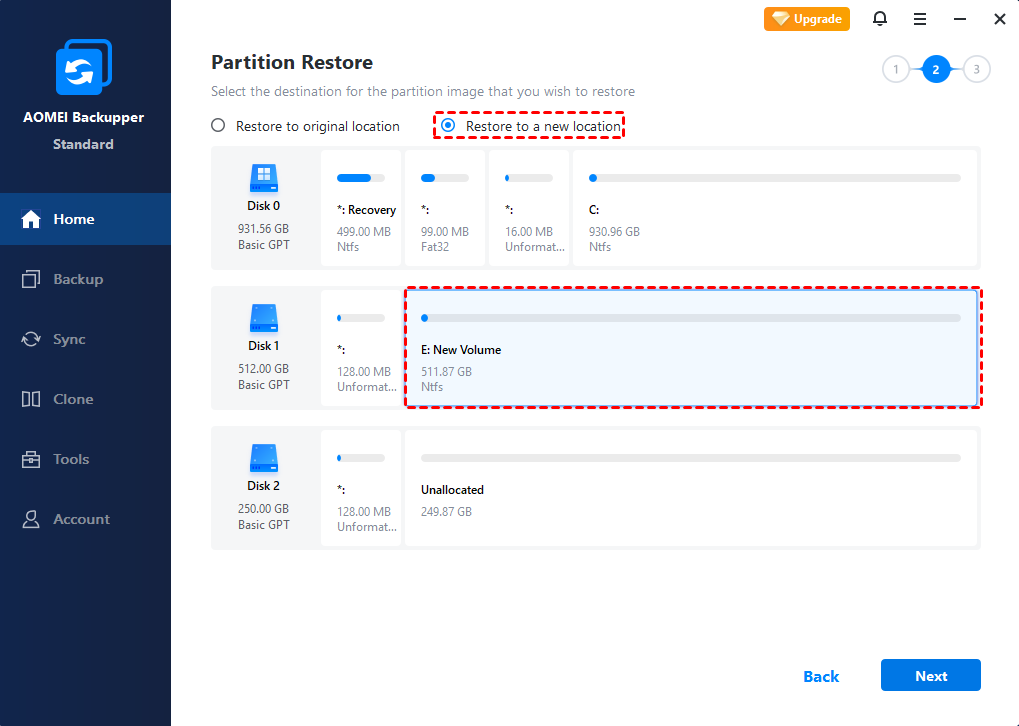
Now let’s take a look at how to restore from NAS device. First we need to locate the backup image by clicking on Restore and Select Task or Select Image File button in the main interface. Once the image shows up in the list box, select it, and then click Next. Then select the item in the image to restore.

Then we need to select a destination partition to restore. In general, restoring from NAS is not quite special. Just as easy as from an external hard drive.
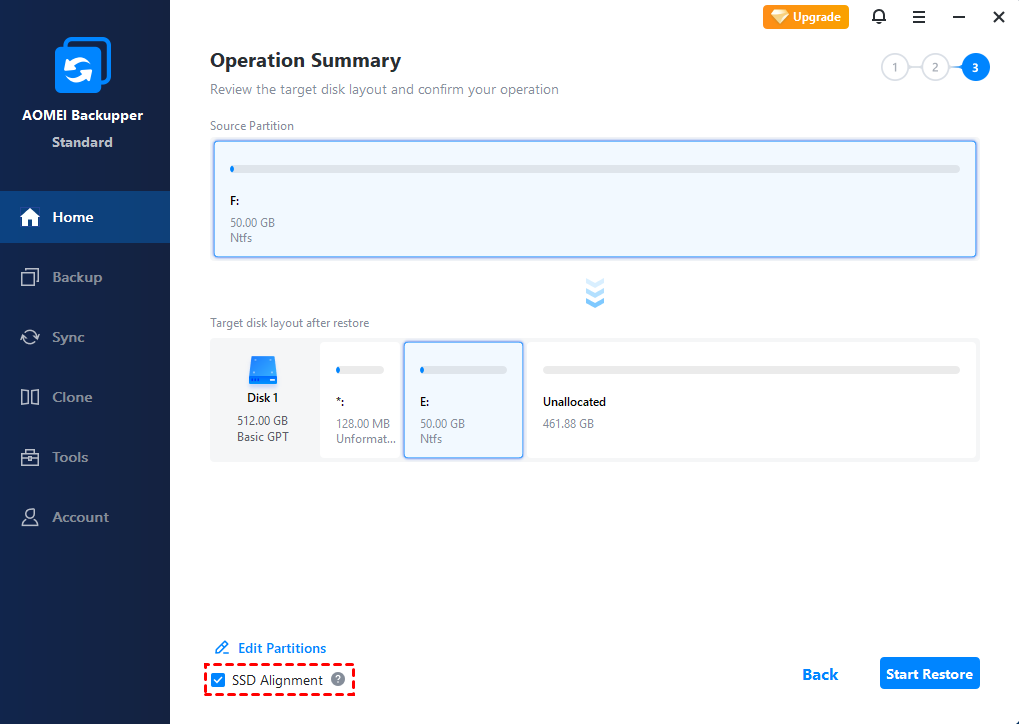
Preview the Operation Summary. If the target location is a SSD partition, you can tick «Align partition to optimize for SSD» to improve performance. Finally, click «Start Restore».
Conclusion
NAS device has provided us a possibility to backup our PCs and Servers in a more secure and convenient way. AOMEI Technology has made a full use of it by presenting the users «Backup to NAS» and «Restore from NAS» features in AOMEI Backupper. Apart from backing up files to NAS from local, you are allowed to do NAS to NAS backup in the same way. Now free download and have a try!
 В More Features
How to Backup Windows 10 to Different NAS Devices for FREE?
With the popularization of NAS device, plenty of people choose to backup Windows to NAS. Learn how to backup Windows 10 PC to Synology, QNAP and other popular NAS easily from this page.

By Lily  / Last Updated March 23, 2021
Quick Navigation:
Why backup Windows 10 to NAS?
Nowadays, more and more users realize the importance of backup. They backup the operating system, user folder or the whole PC to prevent unexpected data loss, system failures, and possible problems caused by Windows 10 update. As for the backup destination, many users choose to backup to external hard drives so that the backup file won’t be affected by computer errors.
Apart from external drives, NAS (Network Attached Storage) has gained popularity among computer users. You may backup Windows 10 to NAS for following reasons:
No juggling with removable drives. As long as you’re on your network, you’re connected to your NAS device.В
Centralized backups. You can save all your data backups and manage them on one NAS device. Some NAS devices have several drive bays which enable you to enlarge the storage space as per your need.
Data security. An NAS device is placed at home and won’t be carried around. Therefore, you won’t lose your backups due to losing the backup drive.
Since backing up Windows to NAS is advantageous, how to perform it exactly? Please read on.
Set up your NAS device before Windows backup
To perform Windows 10 backup to NAS, the first thing you should do is to choose a reliable NAS device and set it up. Synology NAS is favored by a lot of users. I’ll show you how to set up Synology NAS step by step:
1. Add drives and connect cables to your Synology NAS referring to the Hardware Installation Guide for your model.
2. Power on your Synology NAS. Open a web browser on a computer connected to the same network as the NAS.
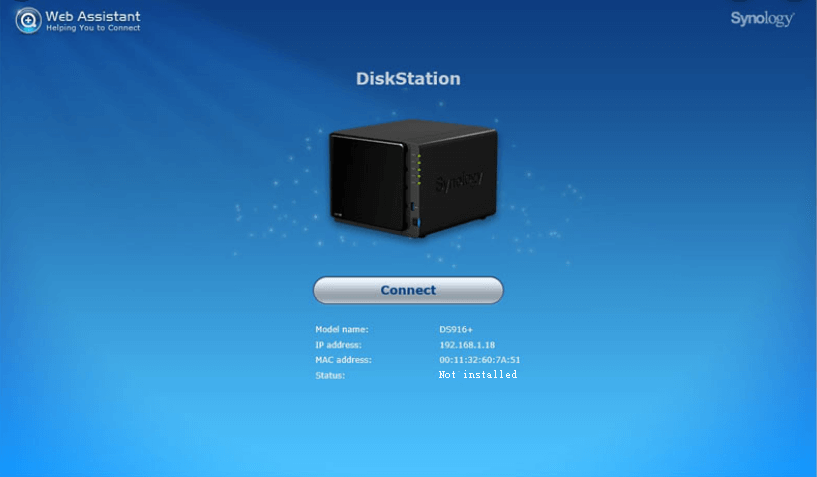
3. Go to find.synology.com. Web Assistant will find your Synology NAS within the local network.
4. Click Connect to start the setup process and follow the onscreen instructions to install DSM (DiskStation Manager).
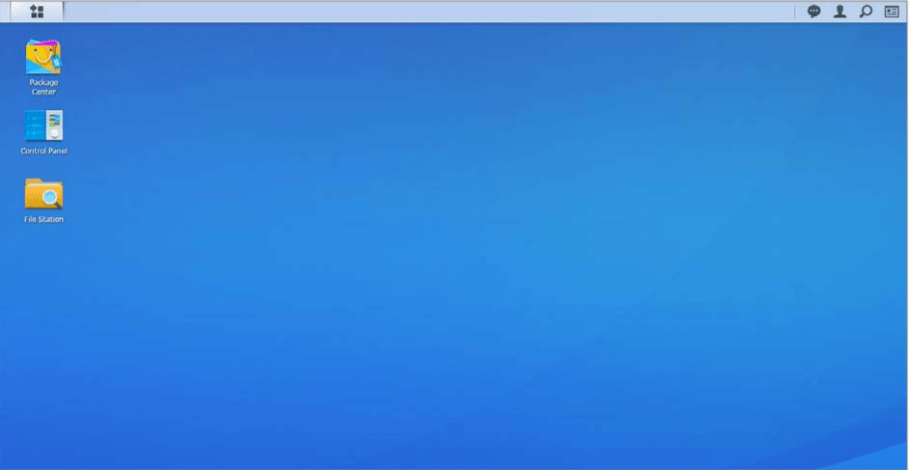
5. After DSM is installed, you’ll be prompted to take a look at the DSM interface. You’ll see three frequently used apps at the “desktop”: Package Center, Control Panel, and File Station. To logout, you can click the person-shaped icon at the top right.
6. Go to This PCВ >В Network, and you can see your NAS device there.
Top two ways to backup Windows 10 to Synology NAS
To backup Windows 10 to Synology NAS, there are two efficient ways for your reference. In fact, these methods can also help you backup Windows to QNAP, WD, Buffalo and other popular NAS devices.
Method 1: Backup Windows 10 to NAS with a free backup utility
AOMEI Backupper Standard, theВ best free backup software, can do you a favor. Following are its main features:
в—€ Help you with all kinds of backups in Windows, such as system backup, disk backup, partition backup and file backup.
в—€ Support various backup destination — you can backup to local disks, external hard drives, network location or NAS devices.
в—€ Run Windows 10/8/7 automatic backup to NASВ with the Schedule feature. You can choose the Daily, Weekly, or Monthly mode based on how often you change the backed up data.
Follow the steps below to perform Windows 10 system backup to Synology NAS via AOMEI Backupper:
Step 1.В Download, install and launch AOMEI Backupper.В
Step 2. Click “Backup” and select “System Backup”.

Step 3. The required system partition(s) is (are) selected by default. Click the inverted triangle at the right edge of the second bar and choose “Select a network location”.
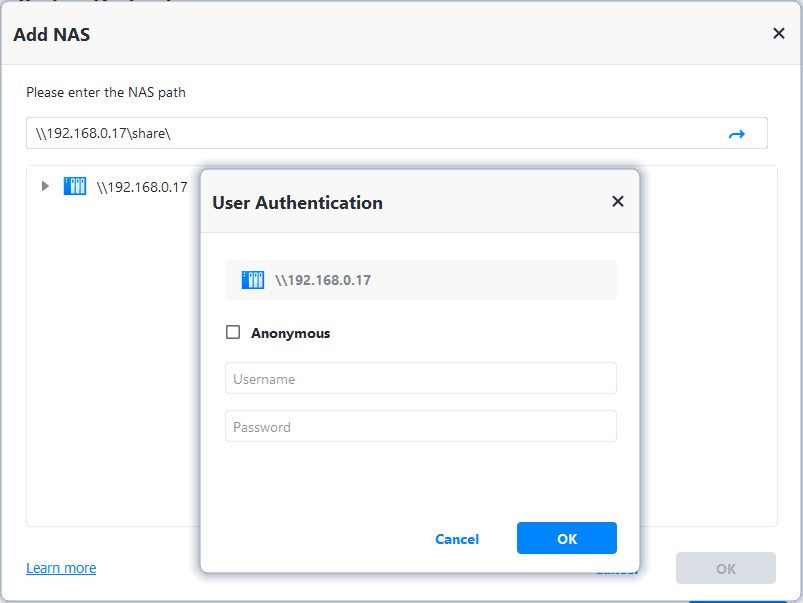
Step 4. In the Select Share/NAS Device window, click “Add Share or NAS Devices”, type the IP address of the Synology NAS and click “OK”. Type username and password if it prompts.
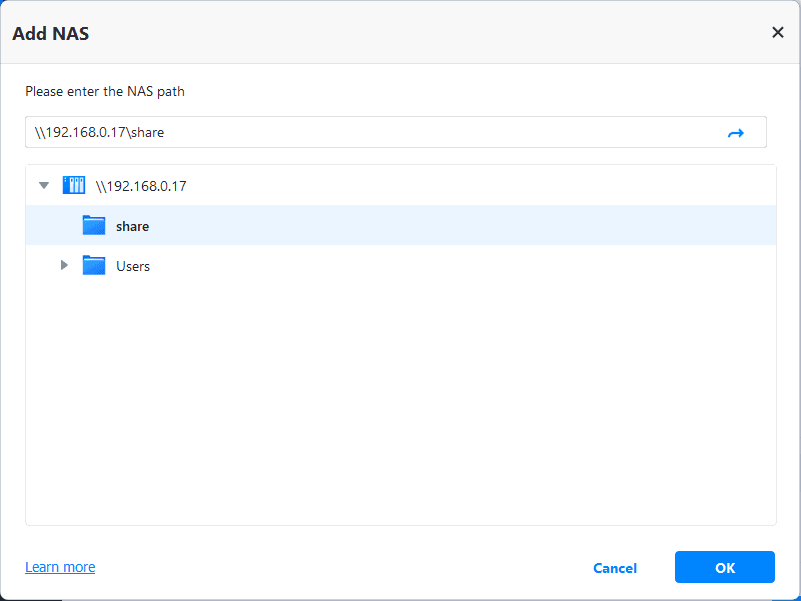
Step 5. After the IP address has been added, all network-shared folders under it will be listed. Choose one folder on the NAS as the destination path to store the backup image and click “OK”.
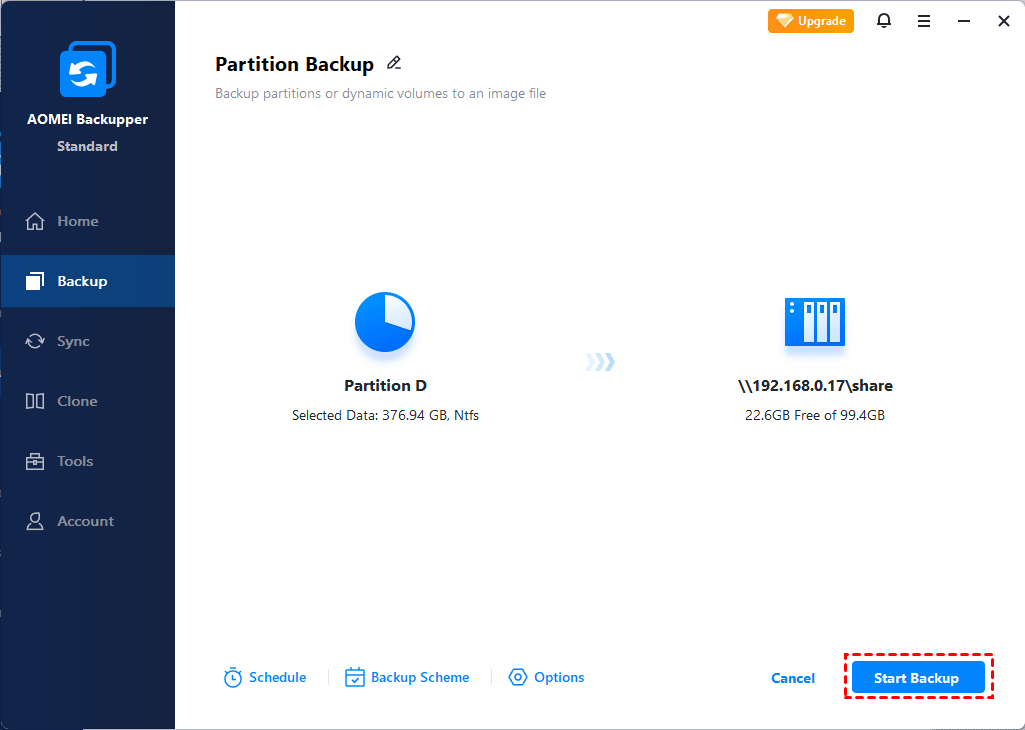
Step 6. Confirm the operation and click “Start Backup”.
>> Options: you can enable email notification, compress and split backup images, etc.
>> Scheme: it will delete old image files automatically to save disk space for you. You need to upgrade to AOMEI Backupper Professional or higher editions to enjoy this feature.В
Method 2: Backup Windows 10 to NAS via Windows built-in tool
Windows 10 has inherited the Backup and Restore tool from Windows 7. Follow the guidance below to run Windows 10 backup to Synology NAS using Backup and Restore (Windows 7):
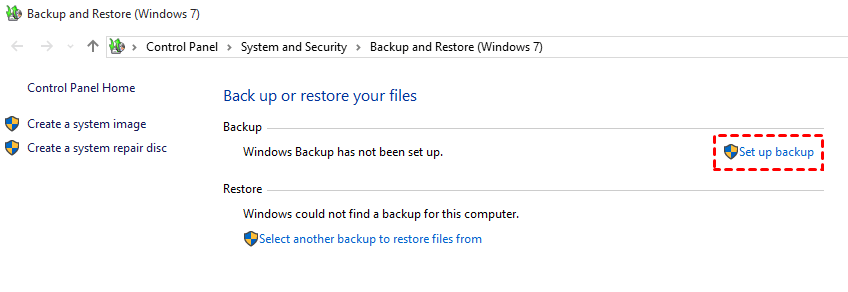
1. Tap the Search button on the taskbar and type “backup” in the search box. Select Backup and Restore (Windows 7) from the search results.
2. Click Set up backup.
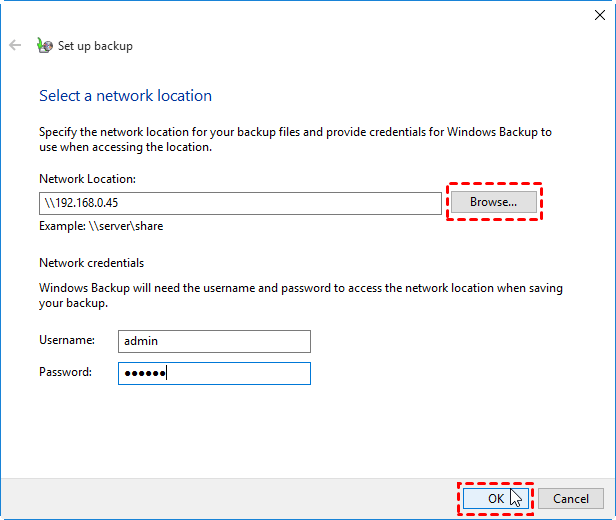
3. Click Save on a network.
4. Type the IP address of the Synology NAS and click Browse to select a folder as the destination path. Type username and password and click OK.
5. Select the newly-added network location and click Next.
6. Select Let Windows choose (recommended) so that Windows will select the files to be backed up for you. Click Next to continue.
7. Click Save settings and run backup to run your first backup.
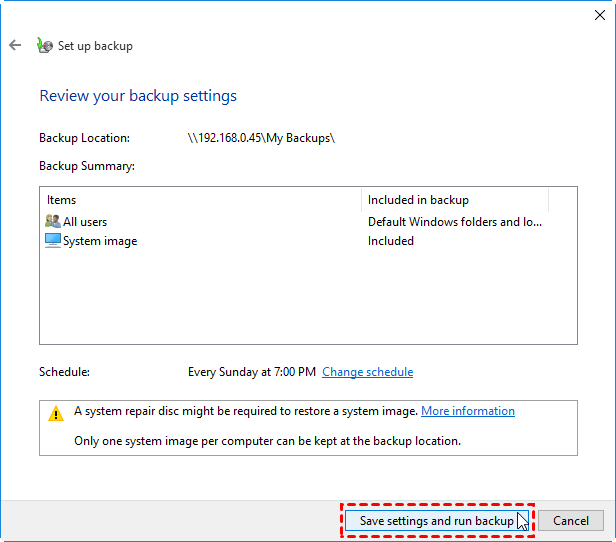
Tips: The default schedule is “Every Sunday at 7:00 PM”. You can change it by clicking “Change schedule” at Step 7.
Summary
Both AOMEI Backupper and Backup and Restore (Windows 7) can help you backup Windows 10 to NAS like Synology, QNAP, etc. However, AOMEI Backupper offers you more advanced features with flexible options. It enables you to compress or split the backup image, let alone it owns the clone feature. You can use AOMEI Backupper to clone NTFS drive, clone HDD to SSD, etc. Why not try it now?
Backup Windows Server to NAS
I have a Windows Server 2012 R2 that I want to backup to a synology NAS (412+) network share.
I’ve created a shared folder on the NAS.
In windows backup when I select «Backup Schedule. » and go through the wizard I select:
- Back up to a shared network folder
- I add «\nas\backup\etc. » under the Location: field (I can browse to that directory via windows exporer and create files in it).
- Then I press «Next» and I get Windows Security showing me a dialog to provide my credentials.
- I click «Finish» and then I get: «Creating backup schedule. «
- a few moments later: «The user name being used for accessing the remote share folder is not recognized by the local computer».
which fails the backup.
My nas is added to the domain (so I enter a domain user credentials, that has access to the folder)
I’ve also tried different ways to sign in (user, local server user, nas user, domain\user, user@domain, user@domain.local, domain.local\user, . ) everytime with the same message.
I’ve mapped a network drive but in Windows Backup I cannot select that mapped network drive (e.g. Z:\ ) to backup.
At synology support, I don’t know if they don’t care but their suggestions don’t work (and sometimes they think I want to backup my nas, instead of creating a backup of a server to a nas.).
Anyone who has more info to solve this? (I’ve also disabled SMB 2 and Large MTU)


