- How to make Windows 10 look like Mac [SUPER EASY]
- How to make your PC look like a mac?
- Download a Mac SkinPack
- Download the Mac OS Transformation Pack
- MAC-related features on Windows
- How to make your Mac look like Windows 10
- Start
- ActiveDock
- BetterSnapTool
- Witch
- XtraFinder
- Bonus tip: Sort folders on top in Finder
- How to make Windows 10 look like Mac
- Make Windows 10 look like Mac
- 1] Lightshot
- 2] Seer: Quick Look Tool
- 3] Quick Time Screen Recording
- 4] Universal Search using Cortana (WIN Q) or use WOX
- 5] WinLaunch
- Windows bar like mac
- Toolbar Items
- Appearance
- Layout
- Visibility
- Customization
- Behavior
How to make Windows 10 look like Mac [SUPER EASY]


If you like the Mac interface or if you used it before but you would like to also stay with your Windows 10 operating system, you now have the possibility to make your Windows 10 look like Mac with the help of a few apps.
In this manner, you’ll make your PC look like a Mac with just a couple of clicks and a Mac theme for Windows 10.
The desktop will look exactly like a Mac but your operating system will still function under Windows 10. Also, you can have access to all the Windows 10 features as you did before.
With no changes in the functionality department, you’ll just make Windows feel like Mac.
Making your Windows desktop look like Mac OS can be done very easily and in just a couple of minutes of your time.
You will only have to carefully follow the tutorial posted below and you will be ready to use your new apple theme for Windows 10.
How to make your PC look like a mac?
Download a Mac SkinPack
- You can download a Mac theme for Windows 10 by following the link below:
- Download Mac theme for Windows 10
Note 1: Before you download your Mac theme for Windows, check if you are downloading the pack for Windows 10. Be sure to look for a pack that is compatible with your Windows 10 system and also one that is either for a 32-bit system or a 64-bit system.
Note 2: Another thing you need to keep in mind is the System Restore feature. It would be highly recommended to create a system restore point before you download the skin packs just in case something goes wrong during the installation or if you cannot uninstall them.
- Download Mac theme for Windows 10
- To create a system restore on Windows 10, press and hold the “Windows” button and the “X” button and left click from that menu on “System”.
- On the left side-panel, in the “Find a setting” search box, type “restore” and click on Create a restore point.
- Now you should have a window with “System properties” in front of you. Left click on the “Create” button you are presented there and give a name to the restore session that you will create.
- Proceed with the system restore.
- You can go ahead with the installation of the Windows 10 Mac OS skin.
Note: During the installation, you will be asked what features you want to have from the mac interface. You can choose the features as you see fit. - After the skin pack finishes the installation you will have to restart your Windows 10 PC.
Note: If you have any issues after the restart of the Windows 10 PC, you can do a “Safe mode” boot and disable any of the features that are causing the issues.
Download the Mac OS Transformation Pack
You can also download and install the Mac OS transformation pack. With the help of this tool, you can make Windows feel like Mac.
The pack includes a great number of changes, but it’s easy to install and use. It brings Mac themes, wallpapers, as well as new OS X features to your Windows computer.
MAC-related features on Windows
There are other interesting MAC-related things that you can do on a Windows PC. We will show you the most popular and used MAC features on Windows PC’s. Here they are:
Now that you have your Windows 10 Mac OS skin up and running on your PC, you can start testing it and see if it fits your needs.
Don’t hesitate to write us below if you are unable to install the Mac theme for Windows on your PC, and we’ll be sure to help you succeed.
How to make your Mac look like Windows 10
Windows and Mac are very different operating systems. If you recently switched over to a Mac and are missing some of the key features and familiar aspects of Windows 10, there are ways to close the gap.
Some of the solutions we have rounded up in this article mimic Windows 10’s behavior closely, while others add Windows functionality while retaining the Mac’s Apple flavor. Either way, they all help make your Mac look and feel more like Windows.
Start

The Start menu is one of the best-loved and most distinctive features of Windows, so it would be natural to miss its presence if you have just switched to Mac. Apple’s operating system uses a variety of methods to launch apps, from Launchpad’s grid of app icons to Spotlight search. If you are using MacOS but prefer the Windows Start menu, try the aptly named Start on your Mac.
This Mac app adds a drop-down list to the Mac’s menu bar. It can list your installed apps just like the Windows equivalent, as well as files, folders, and even URLs. They are all categorized by type, and you can add tags and colors to help sort your items. If you miss the Windows Start menu, this is the app for you.

In the clash between the Mac dock and Windows 10’s taskbar, I’ve always preferred the latter. While MacOS merges your app icons and open windows into a single Dock button, Windows differentiates them, making app management a little bit easier. If you feel the same way, give uBar a go.
It brings a new level of customization to the Dock. You can keep things simple and add functionality to Apple’s default Dock, or replace it entirely with a Windows-style taskbar, complete with bars showing your currently open windows. It even adds window previews when you hover over open apps, just like in Windows.
ActiveDock

If uBar is not quite your style, ActiveDock is a good alternative. This keeps the Dock but adds a ton of customization, so you can style it up in a way that suits you. This ranges from visual tweaks to wide-ranging overhauls of how the Dock works, so it should come in handy no matter what you have in mind.
If you miss Windows 10’s look, two of the ActiveDock’s most useful features lets you add a Start menu to the Dock, as well as previews of open apps. These add some of Windows’ most useful functionality, while retaining the classic Mac visual style, making ActiveDock a good compromise between the two systems.
BetterSnapTool

One of my favorite Windows features is its in-built window snapping. Just drag a window to any edge of the screen and it will automatically snap to that side and fill the space accordingly. MacOS does not really have an equivalent — Split View gets halfway there, but is not nearly as good as what Windows has. BetterSnapTool can fill that void.
Like the Windows snapping feature, BetterSnapTool is incredibly simple to use. What makes it stand apart, though, is the wealth of customization options it offers. You can assign keyboard shortcuts, change how windows resize, and even alter what each window’s traffic light buttons do when you right-click or middle-click on them. All that for a mere $3 makes it a great bargain.
Witch

When I first switched from Windows to MacOS, the thing that took me the longest to get used to was app switching. On Windows, Alt+Tab cycles between the open windows of your apps. On MacOS, the similarly placed Command+Tab cycles between open apps; if you want to switch between your open windows, you need to use Command+`, which messes with your muscle memory.
Witch puts things right. This app does not just bring back the Windows method of app switching, but gives you a ton of extra options, down to the finest detail. You can use custom shortcuts to switch between apps, windows, and tabs, change the layout of the app switcher on your screen, switch apps using a Spotlight-style search or menu bar button, and much more.
XtraFinder

Windows 10’s File Explorer and MacOS’ Finder are fairly similar, but there are some small differences that can really trip you up. For instance, there’s no Cut option when you right-click a file in Finder — if you want to move a file, you have to copy it, then press Command+Option+V instead of the normal Command+V. Pressing Return in Windows opens a selected file; in MacOS, it lets you rename the file.
To get things like that back to the Windows way of working, use XtraFinder . It changes cutting and opening files to Windows’ style, and adds a ton of other helpful Finder tweaks, from an unlimited clipboard and custom labeling to a dual-panel view and extra menu commands. It is a great blend of the Microsoft and Apple worlds.
Bonus tip: Sort folders on top in Finder

When you sort files in the Windows File Explorer, folders float to the top of the pile. On MacOS, they are mixed in with files. But you do not need to download an app if you prefer the way Windows does things — you canjust quickly change a setting.
Click Finder > Preferences in your Mac’s menu bar, then click the Advanced tab. Under Keep folders on top, tick the checkbox named “In windows when sorting by name.” If you want folders on your desktop to automatically come above files too, tick the On Desktop checkbox.
How to make Windows 10 look like Mac
The macOS offers some inbuilt features that make the OS popular. The OS has been designed to make sure the creators get the maximum benefit and get their job done rather quickly. I used to admire the app launcher, but now I am ok with the taskbar and start menu combination. If you are looking for a way to get some Mac features on Windows 10 and make Windows 10 look like macOS, then you are in the right place.
Make Windows 10 look like Mac
While Windows 10 has evolved a lot, but there are features I would love to have on Windows. In this post, I have shared a few tools which bring in those functionalities to Windows 10. These will make Windows 10 look like Mac.
1] Lightshot
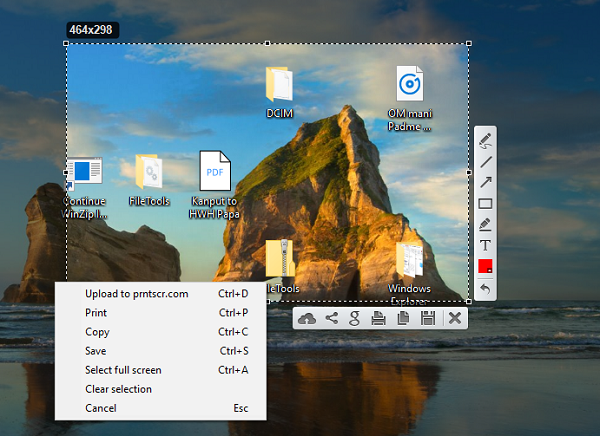
macOS has an inbuilt screen recorder and screenshot feature. It’s extensive and makes macOS a very user-friendly for creators. While Windows 10 has Snip and also a lot of third party tools for taking a screenshot, Lightshot wins by a great margin. Once you install it, use print screen to trigger it.
Then just like on macOS, Command-Shift-4, it reveals the selector. You can then select an area. It will instantly offer editing tools, annotate, highlight, option to share, save or print the screenshot.
2] Seer: Quick Look Tool
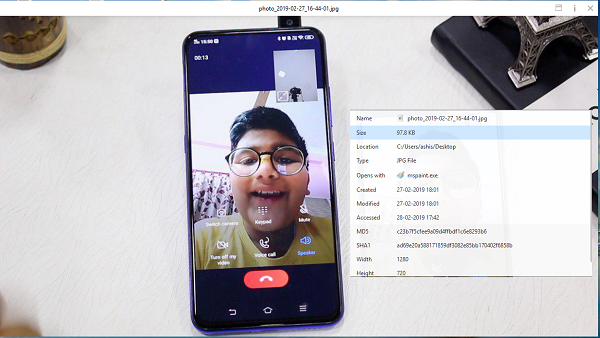
On macOS, when you select a file and hit the spacebar, it shows a preview of the file including the content. You don’t need to double click to open or right click to view properties. The best part is you can also customize Seer. To further customize, you can open settings and configure:
- Keyboard shortcuts
- Install Plugins to enhance its functionality like rename, ExifTool, and so on
- Font support
- Change Language
Apart from this software, you can also try the QuickLook app from Microsoft Store. It offers the following actions:
- Spacebar: Preview/Close Preview
- Esc: Close Preview
- Enter: Run & Close Preview
- Ctrl+Mouse Wheel: Zoom Images/Documents
- Mouse Wheel: Adjust Volume
Using these you can zoom into documents, switch between files by hitting the arrow key, and also choose which program to use to open different file types.
3] Quick Time Screen Recording
You can use the Xbox App to record a small video quickly. Also called as GAME DVR, it can record almost anything on Windows though it is primarily for recording Xbox Game clips. But since most of the third-party software is paid, this comes in handy to record without installing anything.
4] Universal Search using Cortana (WIN Q) or use WOX
macOS universal search tool is one of the best-inbuilt features. All you need to do is hit the spacebar, and it reveals a search box. You can use it to find almost anything. Windows offers a similar experience with Cortana search. All you need to do is invoke it by with Win + Q keyboard shortcut and start searching.
One small drawback of this is that it also displays search results from Bing. There is an equally good alternative–Wox. Once installed you can configure it to launch when you hit the space bar. It will pop up a search box where you can type to find what you want to see on Windows.
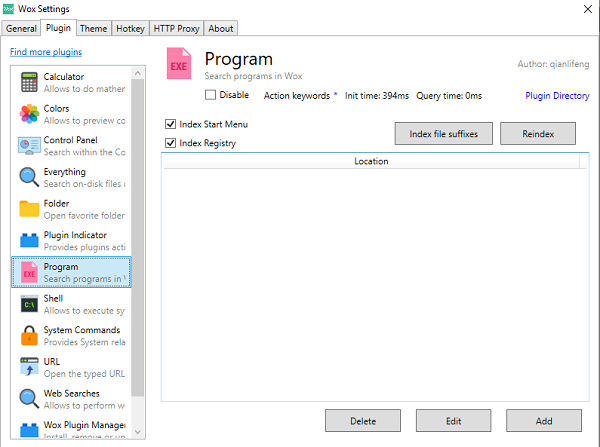
The best part of Wox is that its open source supports plugins, you can customize hotkeys, disable it on full screen, execute command line tools, search within the Control Panel, and it replaces your run prompt.
5] WinLaunch
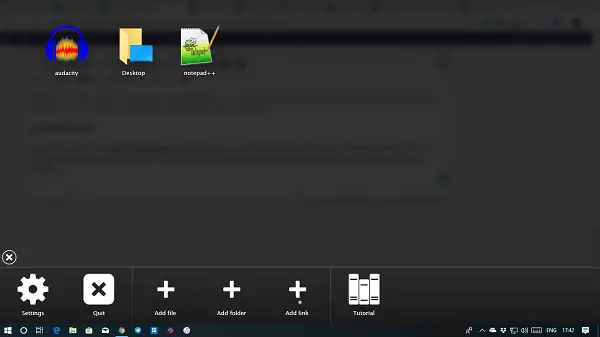
If you want to have macOS like launcher on Windows 10, you need to try WinLaunch. You can add programs, files, URLs to it. To launch all you need to do is hit SHIFT + TAB, and it will reveal the blurred background with the list of apps you added to the launcher.
As you can see here, we aren’t trying to convert your Windows completely into Mac. Instead, we are trying to bring only some useful features.
Windows bar like mac
A toolbar provides convenient access to frequently used commands and features, and resides in the frame at the top of a window, either below or integrated with the title bar. In Pages, for example, the toolbar includes the commands people use most often as they view, create, and collaborate on documents.

For developer guidance, see NSToolbar.
Toolbar Items
The elements within a toolbar are called toolbar items and consist of either image buttons or specific system controls that are optimized for use in the toolbar.

Provide toolbar items for the things people do most often. The purpose of the toolbar is to provide shortcuts to common tasks within the app or current window.
Include image buttons or system controls, but not both. Toolbars look best and are easiest to understand when they contain elements of the same type.
Use only toolbar-specific system control styles. In apps that run in macOS 10.15 and earlier, use only the following system control styles in the toolbar. Because these controls are designed to closely integrate with the toolbar’s appearance, they don’t belong in the main content area of a window.
| Control | Style | Control API | Style API |
|---|---|---|---|
| Push button | Textured and rounded | NSButton | NSTexturedRoundedBezelStyle |
| Segmented control | Textured and rounded | NSSegmentedControl | NSSegmentStyleTexturedRounded |
| Segmented control | Separated | NSSegmentedControl | NSSegmentStyleSeparated |
| Pop-up button | Textured and rounded | NSPopUpButton with pullsDown set to false | NSTexturedRoundedBezelStyle |
| Pull-down button | Textured and rounded | NSPopUpButton with pullsDown set to true | NSTexturedRoundedBezelStyle |
| Search field | N/A | NSSearchField | N/A |
Make every toolbar item available as a menu command. Since the toolbar is customizable and can be hidden, it shouldn’t be the only place to find a command. Conversely, it doesn’t make sense to provide toolbar items for every menu item because not all menu commands are important enough or used often enough to warrant inclusion.
Provide a short, descriptive label for every toolbar item. Users see these labels when they configure the toolbar to show icons and text, or text only. Write labels that consist of one or two words that describe the result of clicking the item. Use title-style capitalization, no ending punctuation, and prefer verbs and verb phrases like View, Insert, and Share.
For developer guidance, see NSToolbarItem.
Appearance
Make sure the meaning of each toolbar item is clear. People shouldn’t need to experiment or wait for a tooltip to figure out what an item does. Provide a simple, recognizable glyph and a short, descriptive label.
Prefer system-provided glyphs in toolbar items because they’re familiar. System glyphs automatically receive appropriate coloring and react to user interactions and vibrancy. See System Icons.
Prefer glyphs over text in toolbar items. In a customizable toolbar, labels appear beneath toolbar items when the user chooses to display them, so displaying control text above label text is redundant. If you create custom glyphs, use a maximum size of 19×19 pt (38x38px @2x).
If you need a full-color freestanding toolbar icon, don’t redesign a toolbar version of a well-known interface element. If you use a recognizable icon from elsewhere, don’t change its appearance or perspective. To create full-color freestanding toolbar icons, use the PNG format and provide @1x and @2x icons that measure 32×32 pt (64×64 px @2x).
If you must display text within a control, make sure it’s clear and concise. When describing an object, setting, or state, use a noun or noun phrase. When describing an action, use a verb or verb phrase. In all cases, use title-style capitalization.
Accurately reflect the current state of a control that toggles between two states. Sometimes, a toolbar item toggles an app state on and off. This type of item must clearly communicate its state to the user. You can accomplish this by changing the item’s color scheme and label. For example, Mail includes a toolbar item that toggles accounts online and offline. When an account is online, the item displays a blue icon and a Go Offline label; when it’s offline, the item displays a gray icon and a Go Online label.
Consider using translucency when content flows beneath a toolbar. Translucency creates a sense of depth and context. A toolbar automatically adopts translucency when placed above a scroll view or when the window is configured as a full-size content view. For developer guidance, see NSFullSizeContentViewWindowMask. For related design guidance, see Translucency.
Avoid giving a toolbar item a persistent selected appearance. Clicking a toolbar item results in an immediate action — such as opening a new window, switching to a different view, displaying a menu, or inserting (or removing) an object — so it doesn’t make sense to imply that there is also a change in state. The exception to this is a segmented control that shows a persistent selected appearance within the context of the control, such as the view controls in a Finder window toolbar.
Layout
Arrange toolbar items to support the main task people accomplish in your app. In general, use the leading end of the toolbar for commands that should have the highest visibility. “High visibility” can mean different things in different apps. In some apps, frequency of use should determine visibility. In other apps, it makes more sense to rank items by importance.
If appropriate, group related toolbar items. In some cases, you can define logical groups of toolbar items, such as one group for document manipulation tasks and another for text manipulation tasks. When you create a group, arrange its items according to importance or frequency of use. Use the same criteria to arrange groups themselves. The toolbar in Keynote includes several groups that are based on functionality, including one for presentation-level functions, one for playback functions, and one for object insertion.

Visibility
Let people show or hide the toolbar. A user might want to hide the toolbar to minimize distractions or reveal more content. Be sure to provide commands for hiding and revealing the toolbar in the View menu.
Consider automatically hiding the toolbar in full-screen mode to increase the focus on content. Although people usually rely on the presence of a toolbar, you can hide it in a full-screen window if it’s not needed to accomplish the focused task. For example, Preview hides the toolbar in a full-screen window because people are more likely to view content than to annotate it. If you hide the toolbar in a full-screen window, reveal it (along with the menu bar) when the pointer moves to the top of the screen.
Customization
Toolbars are often customizable. In a customizable toolbar, people can decide which items appear in the toolbar, and in many cases choose whether to show the items as icons, text, or icons and text combined. Some toolbars let the user choose whether large or small toolbar items are displayed. Apps often let people hide the toolbar entirely, for increased focus on content.

In general, let people customize the toolbar. People have different workflows and should ideally be able to customize the toolbar’s contents and appearance to support their individual working styles.
Provide useful default toolbar items. Not everyone customizes the toolbar so your default items should be commands that most people find useful. Ideally, toolbar commands also educate new users about the key features of your app.
If you allow customization, add the Customize Toolbar menu item to the View menu. See View Menu.
Behavior
Don’t add an app-specific contextual menu to the toolbar. A toolbar already has a contextual menu that’s used consistently across the system for customization. Additionally, title bars often let people Control-click to rename a document or reveal its path. If you require a set of commands that act on the selection, either add a contextual menu in the content area of the window, or add an action pop-up button in the toolbar. For related guidance, see Contextual Menus and Action Pop-Up Buttons.
Consider letting people click nondestructive toolbar items when a window is inactive. Usually, clicking the toolbar of an inactive window brings the window to the front. In some cases, it may be useful to let the user invoke a toolbar item without bringing the window to the front so they can stay focused on a task in a different window. The toolbar of the standard Fonts panel behaves this way.
Consider adding spring-loading support to toolbar items. On pressure-sensitive systems, such as systems with the Force Touch trackpad, spring loading lets a user activate a button or segmented control segment by dragging items over it and force clicking — that is, pressing harder — without dropping the items. The user can then continue dragging the items, possibly to perform additional actions. In Calendar, for example, people can drag an event over the day, week, month, or year segments in the toolbar. Force clicking a segment switches the calendar view without releasing the event, so people can drop the event at the desired location in the new calendar view.


