- /* steve jansen */
- // another day in paradise hacking code and more
- Guide to Windows Batch Scripting
- Why Windows?
- Why DOS-style Batch Files?
- Series Parts
- Comments
- Guides
- Recent Posts
- Social Stuff
- /* steve jansen */
- // another day in paradise hacking code and more
- Windows Batch Scripting: Getting Started
- Getting Started with Windows Batch Scripting
- Launching the Command Prompt
- Editing Batch Files
- Viewing Batch Files
- Batch File Names and File Extensions
- Saving Batch Files in Windows
- Running your Batch File
- Comments
- Silencing Display of Commands in Batch Files
- Debugging Your Scripts
- Comments
- Guides
- Recent Posts
- Social Stuff
- How to create and run batch file on Windows 10
- How to create a batch file on Windows 10
- Create basic batch file
- Create advanced batch file
- Create actionable batch file
- How to run a batch file on Windows 10
- Run batch file on-demand
- Command Prompt
- File Explorer
- Run batch file on schedule
- Run batch files on startup
- More Windows 10 resources
- The Dell XPS 15 is our choice for best 15-inch laptop
- Halo: MCC’s live service elements make it better, not worse
- Microsoft’s Surface Duo is not ‘failing up’
- These are the best PC sticks when you’re on the move
/* steve jansen */
// another day in paradise hacking code and more
Guide to Windows Batch Scripting
I love shell scripting – it’s the duct tape of programming to me. Low cost, high benefit. And it feels like art, where one can learn to do increasingly complex tasks with greater simplicity.
Sadly, I feel like it’s a developer skill on the decline. Maybe new developers feel it’s “not real programming”. Perhaps the growing dominance of Java as the lingua franca of academic comp sci courses has made shell scripting less relevant in university settings.
True, shell scripting feel a bit “vocational”, maybe even a bit unsexy compared to Python/Ruby/LISP/blah/blah/blah. Nevertheless, it’s a skill that becomes invaluable as you gain seniority and start doing more DevOps in you day job, or if you want to do some high-speed, low drag stuff to tailor your development environment like this.
Why Windows?
This series will share some of the tips and tricks I’ve picked up through the years of working with Windows professionally. I’ll be the first to admit the Unix shells of the world are far superior to the Windows command prompt (or even Windows PowerShell). Windows is a fact of life for most professionals writing code for coporate customers; this series aims to make life with Windows a little easier.
Why DOS-style Batch Files?
This series will share some conventions I picked up along the way for scripting in Windows via command prompt batch files. The Windows PowerShell is definitely sweet, but, I still like batch files for their portability and low friction. The Windows command line is very stable – no worrying about the PowerShell interpreter path, which version of PowerShell the server is running, etc.
Series Parts
Posted by Steve Jansen Mar 1 st , 2013 batch, scripting, shell, windows
Comments
Hi, I’m Steve. I’m a software developer loving life in Charlotte, NC, an (ISC) 2 CSSLP and an avid fan of Crossfit.
And, no, I’m not Steve Jansen the British jazz drummer, though that does sound like a sweet career.
Guides
Recent Posts
Social Stuff
- @steve-jansen on GitHub
- @steve-jansen on StackOverflow
- @steve-jansen ProTips on Coderwall
- @steve-jansen on Microsft Connect
- @steve-jansen on ASP.NET User Voice
- Subscribe via RSS
Copyright © 2015 — Steve Jansen — Powered by Octopress
/* steve jansen */
// another day in paradise hacking code and more
Windows Batch Scripting: Getting Started
Getting Started with Windows Batch Scripting
Windows batch scripting is incredibly accessible – it works on just about any modern Windows machine. You can create and modify batch scripts on just about any modern Windows machine. The tools come out of the box: the Windows command prompt and a text editor like Notepad.exe. It’s definitely far from the best shell scripting langauge, but, it gets the job done. It’s my “duct tape” for Windows.
Launching the Command Prompt
Windows gurus launch the command prompt using the keyboard shortcut Windows Logo Key + R (i.e., “Run”) > Type cmd.exe then Enter . This is way faster than navigating the Windows Start Menu to find the Command Prompt.
Editing Batch Files
The universal text editor for batch files is Notepad ( Windows Logo Key + R > Type notepad then Enter ). Since batch files are just ASCII text, you can probably use just about any text editor or word processor. Very few editors do anything special for Batch files like syntax highlighting or keyword support, so notepad is good enough fine and will likely be installed on just about every Windows system you encounter.
Viewing Batch Files
I would stick with Notepad for viewing the contents of a batch file. In Windows Explorer (aka, “My Computer”), you should be able to view a batch file in Notepad by right clicking the file and seleting Edit from the context menu. If you need to view the contents within a command prompt window itself, you can use a DOS command like TYPE myscript.cmd or MORE myscript.cmd or EDIT myscript.cmd
Batch File Names and File Extensions
Assuming you are using Windows XP or newer, I recommend saving your batch files with the file extension .cmd . Some seriously outdated Windows versions used .bat , though I recommend sticking with the more modern .cmd to avoid some rare side effects with .bat files.
With the .cmd file extension, you can use just about filename you like. I recommend avoiding spaces in filenames, as spaces only create headaches in shell scripting. Pascal casing your filenames is an easy way to avoid spaces (e.g., HelloWorld.cmd instead of Hello World.cmd ). You can also use punctuation characters like . or — or _ (e.g. Hello.World.cmd , Hello-World.cmd , Hello_World.cmd ).
Another thing with names to consider is avoiding names that use the same name of any built-in commands, system binaries, or popular programs. For example, I would avoid naming a script ping.cmd since there is a widely used system binary named ping.exe . Things might get very confusing if you try to run ping and inadvertently call ping.cmd when you really wanted ping.cmd . (Stay tuned for how this could happen.) I might called the script RemoteHeartbeat.cmd or something similar to add some context to the script’s name and also avoid any naming collisions with any other executable files. Of course, there could be a very unique circumstance in which you want to modify the default behavior of ping in which this naming suggestion would not apply.
Saving Batch Files in Windows
Notepad by default tries to save all files as plain jane text files. To get Notepad to save a file with a .cmd extension, you will need to change the “Save as type” to “All Files (.)”. See the screenshot below for an example of saving a script named “HelloWorld.cmd” in Notepad.
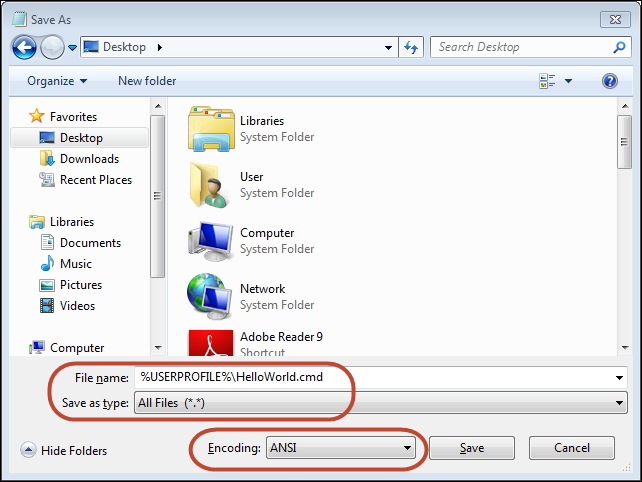
SIDEBAR: I’ve used a shortcut in this screenshot that you will learn more about later. I’ve saved the file to my “user profile folder” by naming the file %USERPROFILE%\HelloWorld.cmd . The %USERPROFILE% keyword is the Windows environmental variable for the full path to your user profile folder. On newer Windows systems, your user profile folder will typically be C:\Users\ . This shortcut saves a little bit of time because a new command prompt will generally default the “working directory” to your user profile folder. This lets you run HelloWorld.cmd in a new command prompt without changing directories beforehand or needing to specify the path to the script.
Running your Batch File
The easy way to run your batch file in Windows is to just double click the batch file in Windows Explorer (aka “My Computer”). Unfortunately, the command prompt will not give you much of a chance to see the output and any errors. The command prompt window for the script will disappear as soon as the script exits. (We will learn how to handle this problem in Part 10 – Advanced Tricks ).
When editing a new script, you will likely need to run the batch file in an existing command window. For newbies, I think the easiest foolproof way to run your script is to drag and drop the script into a command prompt window. The command prompt will enter the full path to your script on the command line, and will quote any paths containing spaces.
Some other tips to running batch files:
- You can recall previous commands using the up arrow and down arrow keys to navigate the command line history.
- I usually run the script as %COMPSPEC% /C /D «C:\Users\User\SomeScriptPath.cmd» Arg1 Arg2 Arg3 This runs your script in a new command prompt child process. The /C option instructs the child process to quit when your script quits. The /D disables any auto-run scripts (this is optional, but, I use auto-run scripts). The reason I do this is to keep the command prompt window from automatically closing should my script, or a called script, call the EXIT command. The EXIT command automatically closes the command prompt window unless the EXIT is called from a child command prompt process. This is annoying because you lose any messages printed by your script.
Comments
The official way to add a comment to a batch file is with the REM (Remark) keyword:
The power user method is to use :: , which is a hack to uses the the label operator : twice, which is almost always ignored.
Most power authors find the :: to be less distracting than REM . Be warned though there are a few places where :: will cause errors.
For example, a FOR loop will error out with :: style comments. Simply fall back to using REM if you think you have a situation like this.
Silencing Display of Commands in Batch Files
The first non-comment line of a batch file is usually a command to turn off printing (ECHO’ing) of each batch file line.
The @ is a special operator to suppress printing of the command line. Once we set ECHO’ing to off, we won’t need the @ operator again in our script commands.
You restore printing of commands in your script with:
Upon exit of your script, the command prompt will automatically restore ECHO to it’s previous state.
Debugging Your Scripts
Batch files invole a lot of trial and error coding. Sadly, I don’t know of any true debugger for Windows batch scripts. Worse yet, I don’t know of a way to put the command processor into a verbose state to help troubleshoot the script (this is the common technique for Unix/Linux scripts.) Printing custom ad-hoc debugging messages is about your only option using the ECHO command. Advanced script writers can do some trickery to selectively print debugging messages, though, I prefer to remove the debugging/instrumentation code once my script is functioning as desired.
Posted by Steve Jansen Mar 1 st , 2013 batch, scripting, shell, windows
Comments
Hi, I’m Steve. I’m a software developer loving life in Charlotte, NC, an (ISC) 2 CSSLP and an avid fan of Crossfit.
And, no, I’m not Steve Jansen the British jazz drummer, though that does sound like a sweet career.
Guides
Recent Posts
Social Stuff
- @steve-jansen on GitHub
- @steve-jansen on StackOverflow
- @steve-jansen ProTips on Coderwall
- @steve-jansen on Microsft Connect
- @steve-jansen on ASP.NET User Voice
- Subscribe via RSS
Copyright © 2015 — Steve Jansen — Powered by Octopress
How to create and run batch file on Windows 10
 Source: Windows Central
On Windows 10, a batch file is a special text file that typically has a .bat extension, and it includes one or more commands that Command Prompt can understand and run in sequence to perform various actions.
Usually, you can type commands manually to perform a particular task or change system settings on Windows 10. However, a batch file simplifies the work of retyping commands, saving you time and potentially irreversible mistakes.
You can also use other tools like PowerShell to write even more advanced scripts. However, using batch files with Command Prompt is a convenient option when you need to run commands to change settings, automate routines, and start apps or launch websites.
In this Windows 10 guide, we’ll walk you through the steps to create and run your first batch file on your device. Also, we’ll outline the steps to create advanced scripts and automate scripts using the Task Scheduler.
How to create a batch file on Windows 10
The process of creating a batch (script or batch script) file is simple. You only need a text editor and some basic knowledge typing Command Prompt native commands. In the instructions below, we’ll outline the steps for writing a basic and advanced batch file, as well as the steps to write a script to change the system settings on Windows 10.
Create basic batch file
To create a basic batch file on Windows 10, use these steps:
- Open Start.
- Search for Notepad and click the top result to open the app.
Type the following lines in the text file to create a batch file:
 Source: Windows Central
The above script outputs the phrase, «Congratulations! Your first batch file executed successfully» on the terminal screen.
 Source: Windows Central
- @ECHO OFF — Disables the display prompt to show only the message on a clean line. Usually, this line goes at the beginning of the file. (You can use this command without «@,» but the symbol hides the command being executed to create a cleaner return.)
- ECHO — Prints any text on the screen.
- PAUSE — Keeps the window open after executing the command. If you don’t use this command, the window will close automatically as soon as the script finishes running. You can use this command at the end of the script or after a specific command when running multiple tasks, and you want to pause between them.
Type a name for the script — for example, first_basic_batch.bat.
Quick note: While batch files typically use the .bat file extensions, you can also find scripts using the .cmd or .btm file extensions.
Once you complete the steps, you can double-click the file to run it, or you can use the steps below to learn the different ways to execute a batch file on Windows 10.
Create advanced batch file
To create an advanced batch file to execute multiple commands, use these steps:
- Open Start.
- Search for Notepad and click the top result to open the app.
Type the following lines in the text file to create a more advanced batch file:
 Source: Windows Central
The above script runs a series of commands to query different system information. Then it groups them into three different categories, including «WINDOWS INFO,» «HARDWARE INFO,» and «NETWORK INFO.» The «start» command will also open a Microsoft support website listing the official Windows 10 system requirements on your default web browser, which you can check against your information.
 Source: Windows Central
- @ECHO OFF — Disables the display prompt to show only the message on a clean line. Usually, this line goes at the beginning of the file. (You can use this command without «@,» but the symbol hides the command being executed for a cleaner return.)
- TITLE — Displays a custom name in the title bar of the window.
- :: — Allows you to write comments and documentation information. These details are ignored when the batch file runs.
- ECHO — Prints the exact text on the screen.
- START — Lets you launch an app or website with the default web browser.
- PAUSE — Keeps the window open after executing the command. If you don’t use this command, the window will close automatically as soon as the script finishes running. You can use this command at the end of the script or after a specific command when running multiple tasks, and you want to pause between them.
After you complete the steps, double-click the .bat file to run it, or you can use the steps below to learn the different ways to run a batch.
Create actionable batch file
In addition to executing and displaying content in a Command Prompt window, you can also write non-interactive batch scripts to perform virtually any task you need.
To create a batch file that runs a specific command without user interaction, use these steps:
- Open Start.
- Search for Notepad and click the top result to open the app.
Copy and paste the following command in the text file:
 Source: Windows Central
Quick note: In the screenshot, you’ll notice the «pause» command, but it’s not required. It was added in this example to take a screenshot of the terminal. If you’re accessing the files from another computer that uses a specific username and password, don’t forget to use the /user: option with the necessary credentials.
The above script includes a simple command to map a network folder as a drive inside File Explorer using the «Z» drive letter.
Source: Windows Central
Once you complete the steps, the batch file will map the network folder with the specified settings without opening a Command Prompt window. While we only used one command in this particular file, you can include as many commands as you like, as long as you write them one per line.
How to run a batch file on Windows 10
On Windows 10, you can run a batch file in at least three ways. You can run it on-demand using File Explorer or Command Prompt. You can create a task with Task Scheduler to run it on schedule. Or you can place the script in the «Startup» folder to run it every time you sign in to your Windows 10 account.
Run batch file on-demand
If you need to run a script on-demand, you have two choices, including Command Prompt or File Explorer.
Command Prompt
To run a batch file with Command Prompt, use these steps.
- Open Start.
- Search for Command Prompt, right-click the top result, and select the Run as administrator option.
Type the path and name of the batch file, and press Enter:
For example, the following command runs the batch file located in the «scripts» folder, inside the «Downloads» folder:
Source: Windows Central
After you complete the steps, the console will return the results, and the window won’t close even if the script doesn’t include the «PAUSE» command.
File Explorer
To run a batch file with File Explorer, use these steps:
- Open File Explorer.
- Browse to the folder with the script.
- Double-click the batch file to run it.
(Optional) If you execute a command that requires administrator privileges, you’ll need to run the script as an admin by right-clicking the batch file and selecting the Run as administrator option.
Source: Windows Central
Once you complete the steps, the batch will run each command in sequence displaying the results in the terminal.
Run batch file on schedule
To schedule a batch file on Windows 10, you can use the Task Scheduler with these steps:
- Open Start.
- Search for Task Scheduler and click the top result to open the app.
- Right-click the «Task Scheduler Library» branch and select the New Folder option.
Type a name for the folder — for example, MyScripts.
Quick note: It’s not a requirement to create a folder, but it’s recommended to keep tasks organized.
Select the Create Basic Task option.
 Source: Windows Central
In the «Name» field, type a descriptive name for the task — for example, SystemInfoBatch.
Source: Windows Central
Select the Monthly option.
Source: Windows Central
Quick note: On Windows 10, the Task Scheduler allows you to choose from different triggers, including a specific date, during startup, or when a user signs in to the device. In this case, we’re selecting the option to run a task every month, but you may need to configure additional parameters depending on your requirements.
Use the «Monthly» drop-down menu to pick the months of the year you want to run the task.
Source: Windows Central
Use the «Days» or «On» drop-down menu to confirm the days the task will run.
Source: Windows Central
Select the Start a program option to run the batch file.
Source: Windows Central
Select the batch file you created.
Source: Windows Central
Once you complete the steps, the task will save and run the script on a schedule.
These instructions cover the steps to create a basic task with Task Scheduler. If you want to create a more customizable task, use these instructions.
Run batch files on startup
If you want to execute a sequent of commands every time you sign in to your Windows 10 account, instead of using Task Scheduler, you can place the script in the «startup» folder to save the extra steps.
To run a script on startup on Windows 10, use these easy steps:
- Open File Explorer.
- Browse to the folder with the batch file.
- Right-click the batch file and select the Copy option.
- Use the Windows key + R keyboard shortcut to open the Run command.
Type the following command:
Source: Windows Central
Click the Paste option from the «Home» tab in the Startup folder. (Or Click the Paste shortcut button to create a shortcut to the batch file.)
Source: Windows Central
After you complete the steps, every time you sign in to Windows 10, the batch file will execute and run the included commands.
We’re focusing this guide on Windows 10, but the ability to run batch files has been around for a long time, which means that you can refer to these instructions if you are still on an older version, including Windows 8.1 or Windows 7.
More Windows 10 resources
For more helpful articles, coverage, and answers to common questions about Windows 10, visit the following resources:
![]()
The Dell XPS 15 is our choice for best 15-inch laptop
For a lot of people, a 15-inch laptop is a perfect size that offers enough screen for multitasking, and in a lot of cases, some extra performance from powerful hardware. We’ve rounded up the best of the best at this size.
![]()
Halo: MCC’s live service elements make it better, not worse
Halo: The Master Chief Collection is more popular than ever, but some fans don’t agree with the live service approach 343 Industries has taken with it. Here’s why those elements are, at the end of the day, great for the game and for Halo overall.
![]()
Microsoft’s Surface Duo is not ‘failing up’
Microsoft announced this week that it was expanding Surface Duo availability to nine new commercial markets. While Surface Duo is undoubtedly a work in progress, this is not a sign of a disaster. It’s also doesn’t mean that Surface Duo is selling a ton either. Instead, the reason for the expansion is a lot more straightforward.
![]()
These are the best PC sticks when you’re on the move
Instant computer — just add a screen. That’s the general idea behind the ultra-portable PC, but it can be hard to know which one you want. Relax, we have you covered!


