- Если приложению «Ассистент Boot Camp» не удается создать разделы диска
- Воспользуйтесь приложением «Дисковая утилита» для проверки ошибок
- Проверьте наличие свободного пространства
- Временно выключите Time Machine
- Резервное копирование раздела Boot Camp
- 5 ответов
- Install Windows on your newer Mac using Boot Camp
- What you need
- Before you begin
- Perform the installation
- Step 1: Check for software updates
- Step 2: Prepare your Mac for Windows
- Step 3: Install Windows
- Step 4: Install Boot Camp on Windows
- Install Windows on your newer Mac using Boot Camp
- What you need
- Before you begin
- Perform the installation
- Step 1: Check for software updates
- Step 2: Prepare your Mac for Windows
- Step 3: Install Windows
- Step 4: Install Boot Camp on Windows
Если приложению «Ассистент Boot Camp» не удается создать разделы диска
Приложение «Ассистент Boot Camp» может сообщить об ошибке при создании разделов диска для Windows.
При попытке создать разделы для Windows приложение «Ассистент Boot Camp» может выводить предупреждение «Не удалось разбить диск на разделы. Во время разбиения диска на разделы произошла ошибка. Запустите Первую помощь из приложения «Дисковая утилита» для проверки и исправления ошибок».
Воспользуйтесь приложением «Дисковая утилита» для проверки ошибок
- Установите последние обновления macOS.
- Восстановите загрузочный диск с помощью приложения «Дисковая утилита».
- Если приложение «Дисковая утилита» не обнаружило ошибок или исправило все ошибки, попробуйте снова установить ОС Windows с помощью приложения «Ассистент Boot Camp».
- Если приложение «Ассистент Boot Camp» по-прежнему выдает ошибку при создании разделов, выполните приведенные ниже действия.
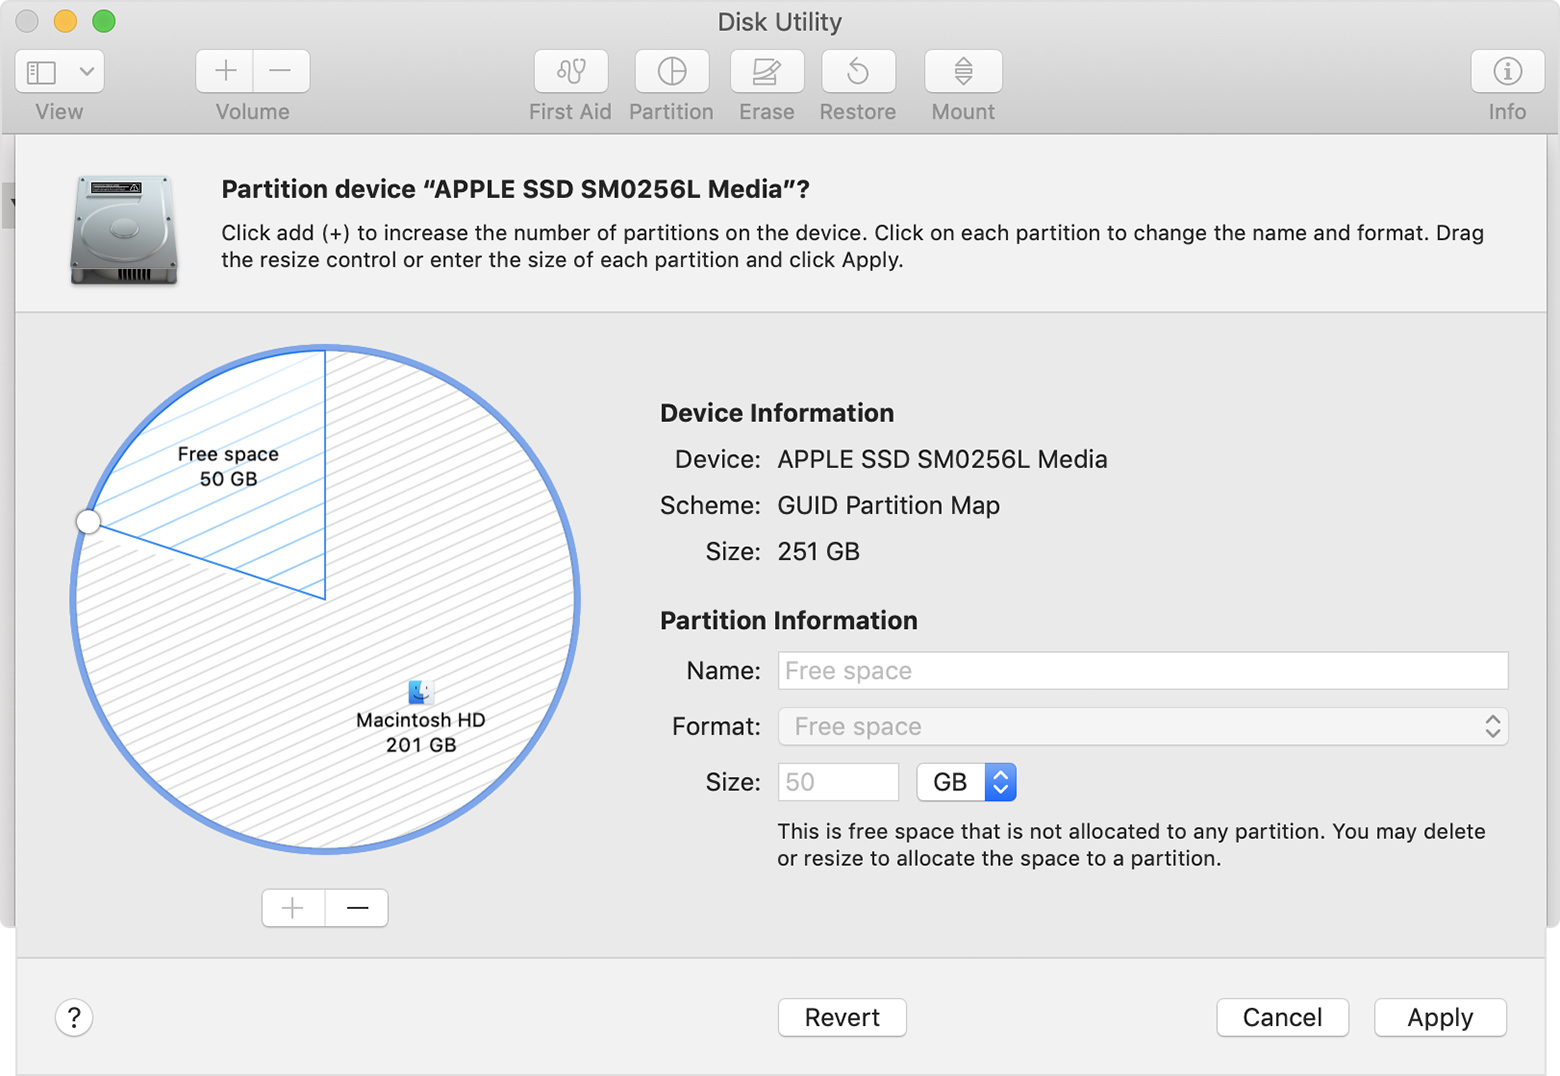
Проверьте наличие свободного пространства
- Запустите приложение «Дисковая утилита» (оно находится в подпапке «Утилиты» папки «Приложения»).
- На боковой панели приложения «Дисковая утилита» выберите имя внутреннего диска, контейнера или тома, например Macintosh HD.
- На панели инструментов щелкните «Раздел».
- Если появится сообщение о совместном использовании пространства файловой системы Apple File System, нажмите «Раздел» и подтвердите, что требуется создать раздел, а не добавить том.
- Если на круговой диаграмме показан раздел с надписью «Свободное пространство», выберите его щелчком. Надпись «Свободное пространство» теперь также должна появиться в информации о разделе справа.

- Выбрав раздел «Свободное пространство» на диаграмме, нажмите кнопку удаления (-) под ней. Если удалить это нераспределенное свободное пространство, оно снова станет доступным для использования. Затем нажмите кнопку «Применить» и выйдите из приложения «Дисковая утилита».
- Повторите попытку установить ОС Windows с помощью приложения «Ассистент Boot Camp».
- Если приложение «Ассистент Boot Camp» по-прежнему выдает эту ошибку при создании разделов, выполните приведенные ниже действия.
Временно выключите Time Machine
Если вы используете Time Machine с macOS Mojave или High Sierra, выполните обновление до macOS Catalina 10.15 или более поздней версии либо выполните приведенные ниже действия.
- Откройте настройки Time Machine с помощью меню Time Machine в строке меню. Также можно перейти в меню Apple () > «Системные настройки» и щелкнуть Time Machine.
- Отмените выбор параметра «Создавать резервные копии автоматически», чтобы выключить Time Machine.
- Подождите несколько минут, а затем повторите попытку установить ОС Windows с помощью приложения «Ассистент Boot Camp».
- После завершения установки можно снова включить Time Machine.
 в строке меню. Также можно перейти в меню Apple () > «Системные настройки» и щелкнуть Time Machine.
Резервное копирование раздела Boot Camp
Я вижу в параметрах Time Machine, что мой раздел Boot Camp исключен. Я даже не пытался удалить его из списка исключений, так как я прочитал, что Time Machine не будет работать с разделами NTFS. Предполагая, что Time Machine не будет работать с указанным разделом, какой самый простой способ создать резервную копию?
В идеале решение будет работать как Time Machine. Проблема, которую я ожидаю, заключается в том, что мне понадобится второй диск (отформатированный как NTFS) для хранения резервной копии Boot Camp — или, может быть, я мог бы также разделить мой внешний жесткий диск и сделать раздел NTFS для хранения резервной копии Boot Camp? Таким образом, мне не нужен второй физический диск, подключенный.
Что вы думаете о резервном копировании разделов Boot Camp? Спасибо.
5 ответов
Вы должны создать резервную копию своего раздела Windows при загрузке в Windows , используя совместимое с Windows программное обеспечение для резервного копирования, и вы должны выполнить резервное копирование на внешний диск, отформатированный в формате NTFS, будь то через Ethernet, USB , FireWire или что-то еще, что вы можете решить. Не пытайтесь использовать физический жесткий диск, который имеет один раздел, отформатированный для Mac или Time Machine, и другой раздел, отформатированный для NTFS. Используйте полностью отдельный жесткий диск.
Не пытайтесь восстановить систему BootCamp Windows с помощью операционной системы Mac OS X снаружи . Вы можете выяснить, как создать резервную копию некоторых файлов, но вы не сможете создать загрузочный образ «голое восстановление», как это называют люди в Windows-land.
Windows Vista и Windows 7 имеют встроенную утилиту резервного копирования, которая может полностью воспроизводить образ диска для полного восстановления, но только для жесткого диска с NTFS. Они также могут выполнять инкрементное /дифференциальное резервное копирование файлов в отдельной процедуре. И для Windows существует множество сторонних программных решений для резервного копирования, таких как Acronis.
Поверьте мне, вы не захотите делать это с помощью Apple Time Capsule или диска, на котором есть раздел, отформатированный для Apple Time Machine. Пару лет назад я на самом деле разработал процедуру для этого, используя неподдерживаемые функции в Time Capsule, и я пожалел об этом, потому что это сильно повлияло на мои файлы Mac Time Machine, когда мне нужно было выполнить полное восстановление в моем разделе Mac на мой MacBook Pro.
Mac OS X по умолчанию не может записываться в файловую систему NTFS (это не просто ограничение Time Machine), поэтому, даже если вы можете создать резервную копию, вы потеряете расширенные атрибуты, которые она хранит при копировании данных в файловую систему FAT32 , а также (что более важно) возможность восстановления.
Для полного восстановления системы существует бесплатная программа под названием Winclone, но она не находится в активной разработке и может быть предварительной Windows 7.
Если вы хотите создать резервную копию определенных областей, например, только папку «Документы и настройки», то вы можете обнаружить, что доступ к разделу bootcamp через Parallels или VMWare Fusion и т. д. позволит вам создавать резервные копии с использованием псевдопроводных дисков, которые они могут создавать для разрешить совместное использование файлов ОС.
мы использовали winclone довольно успешно, но, как видно из названия, он не делает инкрементных резервных копий.
Просто отформатируйте внешний накопитель на ExFat, это можно сделать в дисковой утилите в Mac OS, windows и mac могут оба читать запись на это, вы можете подумать, что это то же самое, что Fat32, но его НЕ, с fat32 вы ограничены максимальный размер файла 4gig на файл, ExFat не имеет ограничений, чтобы файлы свободно распространялись между окнами и Mac.
CarbonCopyCloner является бесплатным и может сделать резервную копию любого диска, включая Bootcamp.
Он не работает точно так же, как машина времени, вы не сможете увидеть каждую версию каждого файла, когда-либо созданного. Это хороший выбор для создания резервной копии почти любого диска.
Изменить: Как указано Alrescha, CCC не может создать загрузочную копию раздела Windows. Но он все равно сделает резервную копию всех ваших файлов на разделе Windows, так что это не совсем бесполезно.
Install Windows on your newer Mac using Boot Camp
You can use Boot Camp Assistant to install Windows 10 on your Intel-based Mac.
Newer Mac computers use a streamlined method to install Windows on your Mac. To find out whether your Mac uses this method, see the “Learn more” section in the Apple Support article Install Windows 10 on your Mac with Boot Camp Assistant. If your Mac is an older model that requires an external USB drive, follow the instructions in Install Windows on your older Mac using Boot Camp instead.
What you need
The keyboard and mouse or trackpad that came with your Mac. If they aren’t available, use a USB keyboard and mouse.
A full-installation, 64-bit version of Windows 10 on a disk image (ISO file) or other installation media.
Sufficient free storage space on your startup drive. For information about the amount of free space needed, see the Apple Support Article Install Windows 10 on your Mac with Boot Camp Assistant.
Before you begin
Before you install Windows, make sure you back up important files.
You can use Time Machine or any other method to back up your files. For information about backing up files, see Back up your files with Time Machine and Ways to back up or protect your files.
Perform the installation
On your Mac, do the following steps in order.
Step 1: Check for software updates
Before you install Windows, install all macOS updates.
On your Mac, log in as an administrator, quit all open apps, then log out any other users.
Choose Apple menu  > System Preferences, click Software Update, then install all available macOS updates.
If your Mac restarts after installing an update, open Software Update again to install any additional updates.
Step 2: Prepare your Mac for Windows
Boot Camp Assistant prepares your Mac by creating a new partition for Windows named BOOTCAMP and downloading the Boot Camp support software.
Important: If you’re using a Mac notebook computer, connect it to a power source before continuing.
On your Mac, open Boot Camp Assistant  , located in /Applications/Utilities.
At the Introduction screen, click Continue.
The system is checked for total available disk space. Older Time Machine snapshots and cached iCloud files are removed to make space for Boot Camp. This process may take a long time to complete (you can click the Stop button to skip this process).
If you have only one internal disk, choose the Windows ISO image, specify the partition size by dragging the divider between the macOS and Windows partitions, then click Install.
Important: You can’t resize the partition later.
If you have multiple internal disks, follow the onscreen instructions to select and format the disk you want to install Windows on and to choose the Windows ISO image.
If you select your startup disk: You can create an additional partition for Windows. Specify the partition size by dragging the divider between the macOS and Windows partitions.
If you select an APFS-formatted disk: You can either create an additional partition on the disk for Windows, or erase the entire disk and create a partition for Windows. If you choose to create an additional partition, specify the partition size by dragging the divider between the macOS and Windows partitions.
If you select a non-APFS-formatted disk: You can erase the entire disk and create a partition for Windows.
If Boot Camp is already present on the disk you select, you also have the option to uninstall it.
Important: You can’t resize the partition later.
When this step is complete, the Windows installer starts.
Step 3: Install Windows
In the Windows installer, follow the onscreen instructions.
When the installation is finished, your Mac automatically restarts using Windows.
Follow the onscreen instructions to set up Windows.
Step 4: Install Boot Camp on Windows
After installing Windows, Boot Camp drivers that support your Mac hardware start installing.
Note: If the support software doesn’t install automatically, you need to install it manually. For instructions, see the Apple Support article If the Boot Camp installer doesn’t open after using Boot Camp Assistant.
In the Boot Camp installer in Windows, follow the onscreen instructions.
Important: Do not click the Cancel button in any of the installer dialogs.
If a message appears that says the software you’re installing has not passed Windows Logo testing, click Continue Anyway.
You don’t need to respond to installer dialogs that appear only briefly during installation, but if a dialog asks you to install device software, click Install.
If nothing appears to be happening, there may be a hidden window that you must respond to. Look behind open windows.
When the installation is complete, click Finish.
After your Mac restarts, follow the instructions for any other installers that appear.
Install Windows on your newer Mac using Boot Camp
You can use Boot Camp Assistant to install Windows 10 on your Intel-based Mac.
Newer Mac computers use a streamlined method to install Windows on your Mac. To find out whether your Mac uses this method, see the “Learn more” section in the Apple Support article Install Windows 10 on your Mac with Boot Camp Assistant. If your Mac is an older model that requires an external USB drive, follow the instructions in Install Windows on your older Mac using Boot Camp instead.
What you need
The keyboard and mouse or trackpad that came with your Mac. If they aren’t available, use a USB keyboard and mouse.
A full-installation, 64-bit version of Windows 10 on a disk image (ISO file) or other installation media.
Sufficient free storage space on your startup drive. For information about the amount of free space needed, see the Apple Support Article Install Windows 10 on your Mac with Boot Camp Assistant.
Before you begin
Before you install Windows, make sure you back up important files.
You can use Time Machine or any other method to back up your files. For information about backing up files, see Back up your files with Time Machine and Ways to back up or protect your files.
Perform the installation
On your Mac, do the following steps in order.
Step 1: Check for software updates
Before you install Windows, install all macOS updates.
On your Mac, log in as an administrator, quit all open apps, then log out any other users.
Choose Apple menu > System Preferences, click Software Update, then install all available macOS updates.
If your Mac restarts after installing an update, open Software Update again to install any additional updates.
Step 2: Prepare your Mac for Windows
Boot Camp Assistant prepares your Mac by creating a new partition for Windows named BOOTCAMP and downloading the Boot Camp support software.
Important: If you’re using a Mac notebook computer, connect it to a power source before continuing.
On your Mac, open Boot Camp Assistant , located in /Applications/Utilities.
At the Introduction screen, click Continue.
The system is checked for total available disk space. Older Time Machine snapshots and cached iCloud files are removed to make space for Boot Camp. This process may take a long time to complete (you can click the Stop button to skip this process).
If you have only one internal disk, choose the Windows ISO image, specify the partition size by dragging the divider between the macOS and Windows partitions, then click Install.
Important: You can’t resize the partition later.
If you have multiple internal disks, follow the onscreen instructions to select and format the disk you want to install Windows on and to choose the Windows ISO image.
If you select your startup disk: You can create an additional partition for Windows. Specify the partition size by dragging the divider between the macOS and Windows partitions.
If you select an APFS-formatted disk: You can either create an additional partition on the disk for Windows, or erase the entire disk and create a partition for Windows. If you choose to create an additional partition, specify the partition size by dragging the divider between the macOS and Windows partitions.
If you select a non-APFS-formatted disk: You can erase the entire disk and create a partition for Windows.
If Boot Camp is already present on the disk you select, you also have the option to uninstall it.
Important: You can’t resize the partition later.
When this step is complete, the Windows installer starts.
Step 3: Install Windows
In the Windows installer, follow the onscreen instructions.
When the installation is finished, your Mac automatically restarts using Windows.
Follow the onscreen instructions to set up Windows.
Step 4: Install Boot Camp on Windows
After installing Windows, Boot Camp drivers that support your Mac hardware start installing.
Note: If the support software doesn’t install automatically, you need to install it manually. For instructions, see the Apple Support article If the Boot Camp installer doesn’t open after using Boot Camp Assistant.
In the Boot Camp installer in Windows, follow the onscreen instructions.
Important: Do not click the Cancel button in any of the installer dialogs.
If a message appears that says the software you’re installing has not passed Windows Logo testing, click Continue Anyway.
You don’t need to respond to installer dialogs that appear only briefly during installation, but if a dialog asks you to install device software, click Install.
If nothing appears to be happening, there may be a hidden window that you must respond to. Look behind open windows.
When the installation is complete, click Finish.
After your Mac restarts, follow the instructions for any other installers that appear.


