- Windows 10 Boot Repair: Fix UEFI Boot Issue on Windows 10/8/7
- Method 1. Use Startup Repair forВ Windows 10 Boot Repair
- 1. Boot Up Windows from Installation Media
- 2. Enable Automatic Repair Option
- Method 2. Use Diskpart to Fix UEFI Boot Error in Windows 10
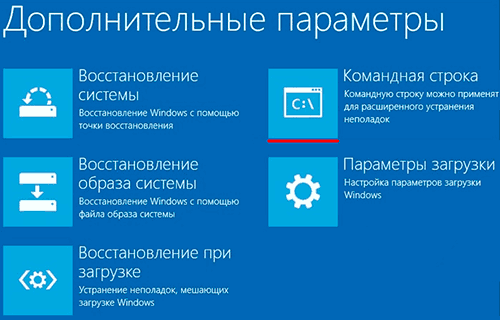
- 1. Enter Command Prompt from Advanced Options
- 2. Run Diskpart to Set Partition ID and Assign a Drive Letter
- 3. Repair the Boot Record
- 4. Rebuild the BCD Store
- Method 3. Change BIOS SettingsВ
- Method 4. Add Disk Driver toВ Repair Windows 10 Boot
- Method 5. Change the SATA Mode for Windows 10 Startup Repair
- To Sum Up
- Windows 10 Boot RepairВ FAQs
- Как восстановить загрузчик Windows
- Содержание:
- Причины неполадок загрузчика
- Восстановление при загрузке
- Восстановление работоспособности загрузчика Windows в командной строке
- Восстановление удаленных данных
- Часто задаваемые вопросы
Windows 10 Boot Repair: Fix UEFI Boot Issue on Windows 10/8/7
How to do Windows 10 boot repair? What are the most useful ways? Read this tutorial and see how to troubleshoot.
| Workable Solutions | Step-by-step Troubleshooting |
|---|---|
| Fix 1. Use Startup Repair | You can fix most Windows 10 UEFI boot problems using the Startup Repair tool. Boot Up Windows. Full steps |
| Fix 2. Use Command Prompt | If you are unable to perform a startup repair, then you can try using Windows 10 installation. Full steps |
| Fix 3. Change BIOS Settings | Windows 8, 8.1, and 10 were designed to install on the UEFI BIOS using the EFI bootloader and GPT. Full steps |
| Fix4. Add Disk Driver | Manually installing and adding the driver to the restored Windows image can repair UEFI boot. Full steps |
| Fix 5. Change the SATA Mode | You can change different SATA modes in different cases for Windows 10 boot repair. Full steps |
Sometimes, Windows 10 fails to boot because there is a problem with the master boot record. In these cases, the master boot record needs to be repaired to restart and run. When you want to do Windows 10 startup repair, you can use the Windows 10 recovery environment includes an automatic option to accomplish this task. If this does not work, you can do it manually with Diskpart command prompt and other effective solutions. In this article, you’ll find step-by-step methods to guide you to fix computer UEFI boot errors in Windows 10/8/7.В Read on to find out how.В Before you start, you can clone your boot drive to another drive with EaseUS Partition Master. Then, follow these steps to fixВ Windows 10 boot repair.
Method 1. Use Startup Repair forВ Windows 10 Boot Repair
Windows Automatic Repair is a built-in tool for users to apply and try to fix some normal errors on Windows PC. And you may also try this method to repair Windows 10, 8 or 7 UEFI/EFI boot error:
1. Boot Up Windows from Installation Media
Step 1. Insert Windows 10/8/7 installation disk or USB to your PC.
Step 2. Restart PC and boot from the disk or USB.
2. Enable Automatic Repair Option
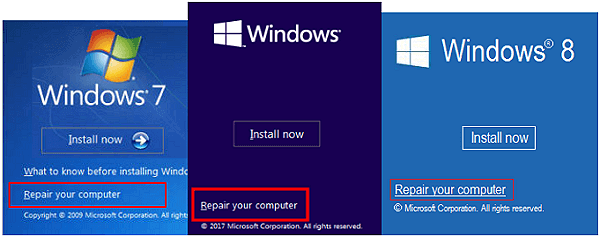
Step 1. Click «Repair your computer» at the Install now screen.
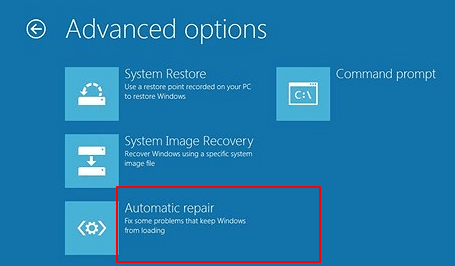
Step 2. Click «Troubleshoot» at choosing an option screen > click «Automatic repair».
Step 3. Choose an account from the list to continue at the Automatic Repair screen and wait for the process to finish.
When the process completes, you can restart your PC, and then you should be able to use your computer without any problems again.
Method 2. Use Diskpart to Fix UEFI Boot Error in Windows 10
If you are a Windows 10 or 8 user and you prefer free methods to fix UEFI boot error, you may follow below two solutions to solve this issue now:
1. Enter Command Prompt from Advanced Options
Step 1. Insert Windows 10/8/7 installation disk or installation USB into PC > boot from the disk or USB.
Step 2. Click «Repair your computer» or hit F8 at the install now screen.
Step 3. Click «Troubleshoot» > «Advanced options» > «Command Prompt».
2. Run Diskpart to Set Partition ID and Assign a Drive Letter
Step 1. Type below command and hit Enter each time:
- diskpart
- list disk
- sel disk 0
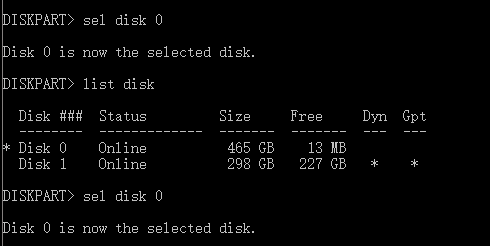
Step 2.В When the message «Disk 0 is now the selected disk» shows up, type list volВ and hit Enter.

Diskpart will now show the full list of volumes on your PC, find UEFI volume from the list: UEFI partition will be on Volume 2.
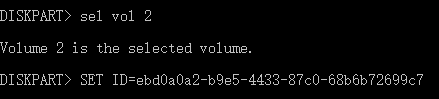
Step 3. Type below command and hit Enter each time:В
- sel vol 2
- set >

Step 4. Assign the drive letter by typing below command and click Enter:
- assign letter=G:В (Note: G shall be a unique drive letter which cannot be already used.)

3. Repair the Boot Record
- Step 1. Open Command Prompt as an administrator, enter below command:
- cd /d G:\EFI\Microsoft\Boot\ (Note: G is the drive letter you signed to UEFI partition and remember to replace G with UEFI’s partition letter)

- Enter exit when the process completes.
- Step 2.В To repair the Boot Record, open CMD and enter below command line:
- bootrec /fixboot

- Enter exit when the repair process completes.
4. Rebuild the BCD Store
Step 1. Type each command line and hit Enter each time:
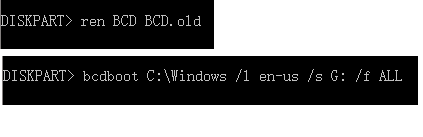
- ren BCD BCD.old
- bcdboot C:\Windows /1 en-us /s G: /f ALLВ (Note: c:\ is the drive where Windows 10/8.1/8 is installed on.)
Step 2. Type exit in Command Prompt when the process completes and then restart your PC.
Now UEFI boot is fixed, and Windows 10/8/7 can be boot up on your PC again.
Method 3. Change BIOS SettingsВ
You need to select the boot mode according to the type of disk on your system.В If you want to start an MBR system disk, you can select Legacy support instead of UEFI in boot mode.В To start a GPT system disk, you need to select UEFI.
How to access BIOS:В Common keys to enter the BIOS are F1, F2, F10, Delete, Esc, as well as key combinations like Ctrl + Alt + Esc or Ctrl + Alt + Delete, which are more common on older machines.В You can enter the BIOS interface by holding down any of these keys while booting up on your computer.
Method 4. Add Disk Driver toВ Repair Windows 10 Boot
When you replace the RAID with a different machine or replace the original SATA or IDE disk with a newer NVMe SSD, you may encounter problems starting up. You can use the following Windows command line to add the driver to the restored Windows image manually.
Dism /Image:X: /Add-Driver /Driver:»y:\z.inf»
Note: X: is the disk character of the restored Windows boot partition, and in double-quotes is the location of the driver. Inf file.
Method 5. Change the SATA Mode for Windows 10 Startup Repair
After the older XP system restores, a blue screen or cycle start may occur, you can change to IDE mode to try to start.
If you run into boot problems after upgrading from an older HDD to a newer SSD, check to see if the BIOS is set to boot for AHCI. If you set it up for RAID mode, make sure the correct RAID driver is added to the cloned system.
To Sum Up
Windows 10 boot repairВ is a rather complicated problem. There are different solutions for different causes and problems. The above approaches only apply to common UEFI boot issues. If none of them can repair UEFI boot error in Windows 10, you can contact our technical support team to get specialized services for system boot issues.
If you don’t want to risk losing or overwriting your important data during the fixes for Windows 10 boot repair, you can recover data from a PC/laptop hard drive that won’t bootВ with EaseUS Data Recovery Wizard, a renowned data recovery tool on the market.
Windows 10 Boot RepairВ FAQs
The following four questions are highly relevant to UEFI boot repair. Check the answers to get you through.
1.В How do you repair Windows 10 if it does not boot?
For Windows 10 UEFI boot repair, you can perform an automatic startup repair or using command prompt to complete. The step-by-step instructions are given each part, check the guides carefully.
2. How do I repair Win10?
To repair Windows 10 boot, you can use the Startup Repair tool. To access Windows 10 recovery environment, turn your computer on and off three times. While booting, ensure you turn off the computer when you see the Windows logo. After the third time, Windows 10 will boot into diagnostics mode. Click «Advanced options»В when the recovery screen appears. Then, choose «Startup Repair» and follow the on-screen institutions to do it.
3. How can I repair the Windows 10 UEFI bootloader?
To fix Windows 10 UEFI boot problem:
- Insert the Media (DVD/USB) in your PC and restart
- Boot from the media
- Select Repair Your Computer
- Select «Troubleshoot»В >В «Advanced Options»
- Choose Command Prompt from the menuВ and use the dispart command lines: Type and run the command: diskpart. Type and run the command: sel disk 0. Type and run the command: list vol
4. How do I fix a boot startup problem?
There are many effective solutions to fix Windows 10 startup issue and repair your EFI Bootloader. You can:
- Use the Startup Repair tool
- Use Diskpart in Command Prompt
- Fix BCD errors
- Add startup item
- Change BIOS settings
- Add disk driver
- Change SATA mode
- Fix MBR
- Restore and repair system partitions
- more fixes.
Как восстановить загрузчик Windows
Windows выдает ошибку во время загрузки и не запускается? Устранить неполадки с запуском операционной системы и восстановить функционал загрузчика можно при помощи командной строки.
Содержание:
Причины неполадок загрузчика
Проблемы с загрузкой Windows являются явным признаком повреждения файлов, отвечающих за загрузку ОС. Некорректный запуск системы может быть вызван многими причинами.
Самые частые из них :
- Установка дополнительных операционных систем, повреждающая файлы загрузки основной ОС.
- Повреждение или удаление загрузочных файлов вредоносными программами и вирусами.
- Потеря файлов из-за физических и программных неисправностей накопителя.
Восстановление при загрузке
«Битые» или отсутствующие файлы загрузчика ОС приводят к невозможности запуска и корректной работы компьютера. В таком случае необходимо прибегнуть к восстановлению загрузчика Windows следующим способом:
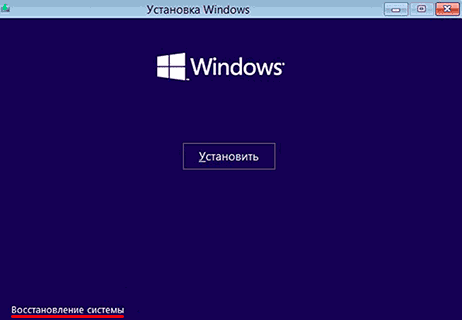
Шаг 1. Чтобы начать восстановление загрузки, понадобится диск восстановления Windows или загрузочная флешка. Важно: для корректной работы системы восстановления необходимо произвести загрузку в той же разрядности (32 или 64-bit), что и текущая ОС. В случае загрузки с установочного диска, на экране установки необходимо выбрать «Восстановление системы».
Шаг 2. На экране восстановления необходимо выбрать пункт «Диагностика».
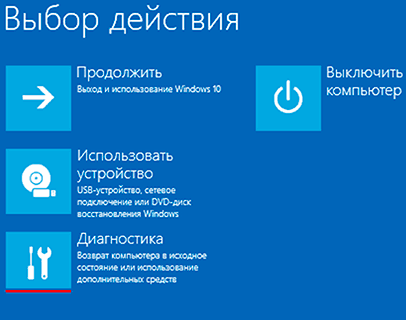
Шаг 3. В открывшемся окне следует выбрать «Восстановление при загрузке».
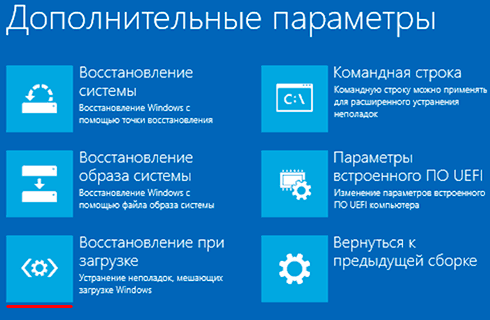
После этого будет активировано автоматическое восстановление и исправление неполадок, не позволяющих провести нормальную загрузку ОС.
К сожалению, автоматические методы восстановления не всегда помогают возобновить работоспособность ОС, поэтому иногда следует прибегнуть к ручному восстановлению при помощи командной строки.
Восстановление работоспособности загрузчика Windows в командной строке
Чтобы приступить к восстановлению загрузчика при помощи командной строки, прежде всего ее необходимо открыть. Это можно сделать, воспользовавшись загрузочной флешкой или меню восстановления и диагностики.
В случае использования загрузочного накопителя, необходимо нажать Sfit+F10 на экране выбора языка.
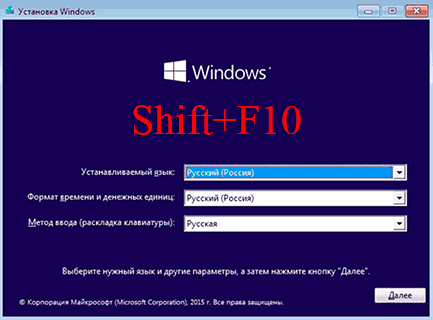
Зайти в командную строку через меню диагностики можно, нажав по соответствующей иконке.
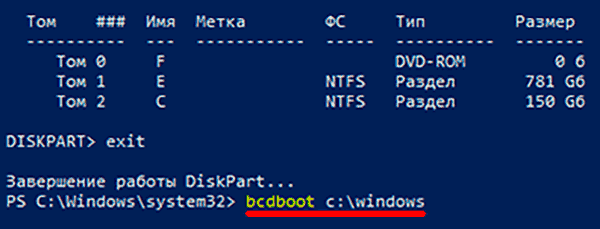
После открытия командной строки необходимо ввести следующие команды:
- Diskpart (встроенная утилита для работы с жесткими дисками)
- List volume (список подключенных носителей)
- Exit (завершение работы с утилитой)
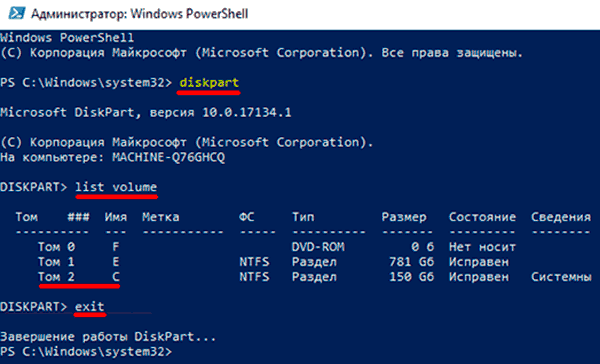
Введение каждой из команд необходимо подтверждать клавишей Enter.
Такой порядок позволит узнать, какой диск является системным (по умолчанию это диск С), и на основе этих знаний попытаться выполнить программное восстановление файлов загрузчика.
После этого необходимо ввести команду bcdboot c:\windows, исправляющую большинство проблем с загрузчиком.
Стоит отметить, что при наличии нескольких ОС, установленных на компьютере, данные действия следует проделать поочередно для каждой системы.
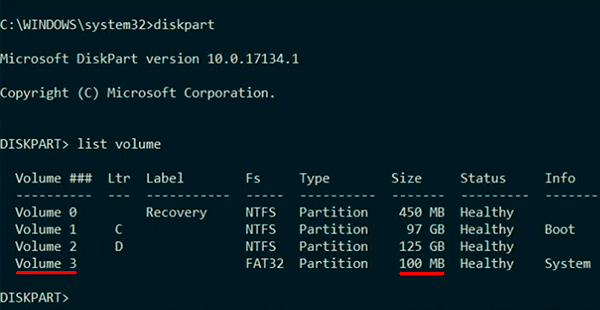
Если такой способ не сработал, можно полностью очистить загрузчик и создать его файлы по новой.
Для этого: открываем командную строку любым удобным способом. Вводим diskpart. Затем volume list. После чего находим скрытый диск с загрузчиком (как правило, это диск размером 100-500 мб, создаваемый системой по умолчанию в формате FAT32) и запоминаем букву данного раздела.
Теперь необходимо ввести ряд команд, удаляющих и создающих заново загрузчик.
- Выбираем том командой select volume 3 (вместо 3 может быть другое число).
- Форматируем том командой format fs=ntfs, или format fs=fat32, в зависимости от файловой системы диска.
- Присваиваем имя «Y» тому командой assign letter=Y
- Выходим из утилиты командой exit.
- Вводим команду bcdboot C:\Windows /s Y: /f ALL (буквы C и Y могут отличаться, в зависимости от системы и количества дисков). Если установлено несколько ОС, необходимо проделать данный шаг для всех томов с загрузчиками.
На этом восстановление загрузчика можно считать законченным.
Теперь необходимо удалить присвоенную букву тома. Это можно сделать в командной строке следующим образом:
- Вводим команду diskpart.
- Далее необходимо отобразить список носителей командой list volume.
- Выбираем том с именем Y командой select volume Y.
- Убираем имя командой remove letter =Y.
- Exit.
Теперь для нормальной загрузки ПК достаточно перезагрузить систему.
Восстановление удаленных данных
Некорректная работа операционной системы и проблемы с загрузчиком могут говорить о наличии вирусов, которые буквально уничтожают все файлы. Если вы обнаружили, что ваши важные данные исчезли, рекомендуем воспользоваться программой RS Partition Recovery, которая сможет быстро восстановить все удаленные данные, поврежденные вирусами или утерянные в случае случайного форматирования.
Также программа RS Partition Recovery позволяет восстанавливать фотографии, видеофайлы, текстовые документы и т.д. после удаления вплоть до нескольких месяцев назад. На сайте recovery-software.ru вы сможете ознакомится со всеми преимуществами и особенностями RS Partition Recovery, а также других продуктов от Recovery Software.
Часто задаваемые вопросы
Это сильно зависит от емкости вашего жесткого диска и производительности вашего компьютера. В основном, большинство операций восстановления жесткого диска можно выполнить примерно за 3-12 часов для жесткого диска объемом 1 ТБ в обычных условиях.
Если файл не открывается, это означает, что файл был поврежден или испорчен до восстановления.
Используйте функцию «Предварительного просмотра» для оценки качества восстанавливаемого файла.
Когда вы пытаетесь получить доступ к диску, то получаете сообщение диск «X: \ не доступен». или «Вам нужно отформатировать раздел на диске X:», структура каталога вашего диска может быть повреждена. В большинстве случаев данные, вероятно, все еще остаются доступными. Просто запустите программу для восстановления данных и отсканируйте нужный раздел, чтобы вернуть их.
Пожалуйста, используйте бесплатные версии программ, с которыми вы можете проанализировать носитель и просмотреть файлы, доступные для восстановления.
Сохранить их можно после регистрации программы – повторное сканирование для этого не потребуется.


