- Восстановление загрузчика Windows 7 вручную при помощи утилит bootrec.exe и bcdboot.exe
- Tutorial: Fix MBR From Command Prompt in Windows 10, 8, 7
- Overview of MBR (Master Boot Record)
- What happens if MBR is corrupted?
- Fix MBR from Command Prompt in Windows 10/8/7
- Tutorial 1. Fix MBR via CMD in Windows 7
- Tutorial 2. Fix MBR via Command Prompt Windows 8/8.1/10
- Free alternative to CMD: fix MBR without Windows CD/DVD
- Summary
Восстановление загрузчика Windows 7 вручную при помощи утилит bootrec.exe и bcdboot.exe

Много лет компания Microsoft улучшала систему восстановления операционной системы Windows, и в Windows 7 и Windows Vista она работает практически в автоматическом режиме. Если вы загрузитесь с установочного диска Windows 7 и щелкните «Восстановление системы» («Repair Computer»), система восстановления Windows будет запущена и самостоятельно попытается исправить все ошибки, которые она найдет. Она способна исправить большое количество проблем, однако, вполне вероятна ситуация, когда оказывается поврежден загрузчик, и с этой проблемой система восстановления не может справиться. В этом случае можно восстановить загрузчик вручную при помощи утилиты Bootrec.exe.
Приложение Bootrec.exe служит для исправления ошибок, связанных с повреждением загрузчика и, как следствие, невозможностью запуска операционных систем Windows 7 и Windows Vista.
Последовательность действий
- Настройте параметры BIOS таким образом, чтобы первым устройством загрузки был DVD-привод
- Вставьте установочный компакт-диск с Windows 7 и загрузитесь с него до этого окна:

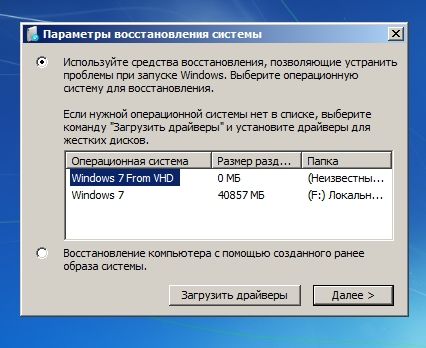
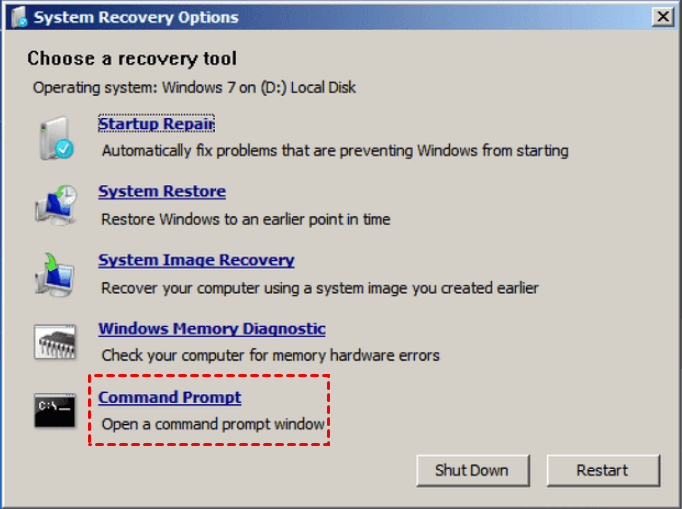
В окне «Параметры восстановления системы» («System Recovery Options») выберите пункт «Командная строка» («Command Prompt»)

Откроется окно интерпретатора командной строки cmd.exe, где следует ввести:
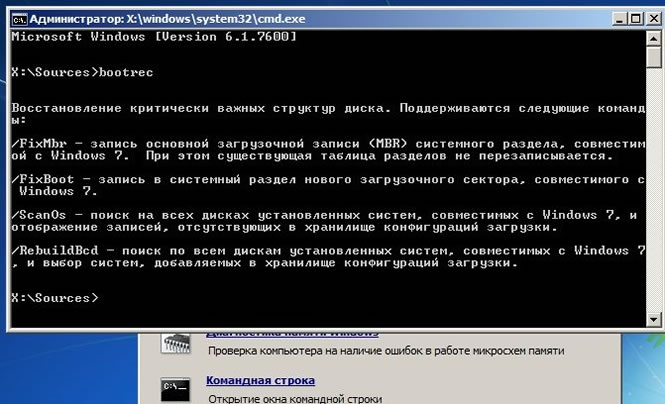
Утилита выведет справку по доступным ключам командной строки.
Описание ключей запуска утилиты Bootrec.exe
Bootrec.exe /FixMbr — Запущенная с ключом /FixMbr, утилита записывает совместимую с Windows 7 и Windows Vista главную загрузочную запись (Master Boot Record, MBR) в системный раздел. Используйте эту опцию для разрешения проблем, связанных с повреждением главной загрузочной записи, или если вы желаете удалить из неё нестандартный код. Существующая таблица разделов в этом случае не перезаписывается
Bootrec.exe /FixBoot — Запущенная с ключом /FixBoot, утилита записывает в системный раздел новый загрузочный сектор, совместимый с Windows 7 и Windows Vista. Использовать эту опцию нужно в следующих случаях:
- Загрузочный сектор Windows Vista или Windows 7 был заменен нестандартным.
- Загрузочный сектор поврежден.
- Была установлена предыдущая версия операционной системы Windows после установки Windows Vista или Windows 7. Например, если была установлена Windows XP, будет использоваться NTLDR (Windows NT Loader, загрузчик Windows NT), код штатного загрузчика NT 6 (Bootmgr) будет затерт программой установки Windows XP.
Следует отметить, что подобного эффекта можно добиться использованием утилиты bootsect.exe, также находящейся на загрузочном носителе Windows 7. Для этого необходимо запустить bootsect.exe со следующими параметрами:
bootsect /NT60 SYS — Загрузочный сектор системного раздела будет перезаписан кодом, совместимым с BOOTMGR. Подробней об использовании утилиты bootsect.exe можно узнать, запустив её с параметром /help.
Bootrec.exe /ScanOs — Запущенная с ключом /ScanOs, утилита сканирует все диски на предмет установленных операционных систем Windows Vista и Windows 7. Кроме того, при её использовании выводится список найденных систем, которые в данный момент не прописаны в хранилище данных конфигурации загрузки Windows (Boot Configuration Data (BCD) Store)
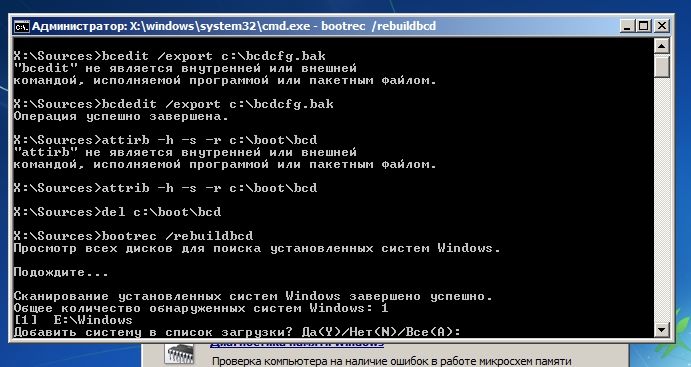
Bootrec.exe /RebuildBcd — Запущенная с этим ключом, утилита сканирует все диски на предмет наличия установленных операционных систем Windows Vista или Windows 7. Найденные ОС выводятся в список, из которого их можно добавить в хранилище данных конфигурации загрузки Windows (Boot Configuration Data Store). Используйте также эту опцию, если вы хотите полностью перестроить хранилище данных конфигурации загрузки. Перед этим необходимо удалить предыдущее хранилище. Набор команд при этом может быть таким:
bcdedit /export C:\BCDcfg.bak
attrib -s -h -r c:\boot\bcd
del c:\boot\bcd
bootrec /RebuildBcd
В вышеприведенном примере текущее хранилище конфигурации загрузки экспортируется в файл C:\BCDcfg.bak, с него снимаются атрибуты «системный», «скрытый» и «только для чтения», после чего оно удаляется командой DEL и заново перестраивается командной bootrec /RebuildBcd.
Конечно, утилита Bootrec.exe весьма функциональна, однако, она не поможет, если, например, файл загрузчика Windows bootmgr поврежден или физически отсутствует. В таком случае можно воспользоваться другой утилитой, также входящей в состав дистрибутивного носителя Windows 7 — bcdboot.exe.
Восстановление среды загрузки с помощью BCDboot.exe
BCDboot.exe — это средство, которое используется для создания или восстановления среды загрузки, расположенной в активном системном разделе. Утилита также может быть использована для переноса файлов загрузки с одного жесткого диска или раздела на другой.
Командная строка в данном случае может выглядеть таким образом:
Замените e:\windows на путь, соответствующий вашей системе. Эта операция восстановит поврежденную среду загрузки Windows, включая файлы хранилища конфигурации данных загрузки (BCD), в том числе упомянутый выше файл bootmgr.
Синтаксис параметров командной строки утилиты bcdboot
Утилита bcdboot.exe использует следующие параметры командной строки:
источник — Указывает расположение каталога Windows, используемого в качестве источника при копировании файлов среды загрузки.
/l — Необязательный параметр. Задает язык среды загрузки. По умолчанию используется английский (США).
/s — Необязательный параметр. Указывает букву диска системного раздела, куда будет установлены файлы среды загрузки. По умолчанию используется системный раздел, заданный микропрограммой BIOS.
/v — Необязательный параметр. Включает режим подробного протоколирования работы утилиты.
/m — Необязательный параметр. Объединяет параметры вновь созданной и уже имеющейся загрузочной записи хранилища и записывает их в новую загрузочную запись. Если GUID загрузчика операционной системы задан, для создания загрузочной записи объединяет объект загрузчика с шаблоном системы.
Tutorial: Fix MBR From Command Prompt in Windows 10, 8, 7
If MBR is damaged and OS cannot boot, here you can learn how to fix MBR from Command Prompt in Windows 10, 8, 7 step by step.

By Emily  / Last Updated February 26, 2021
Overview of MBR (Master Boot Record)
The Master Boot Record (MBR) is a boot sector of any hard disk that identifies how and where the operating system is located. It is created on the very first partition when you install Windows on your computer. It is the first 512 bytes of your hard disk. MBR holds significant information that enables your PC to find and identify the OS location and allows Windows to boot up successfully.
What happens if MBR is corrupted?
Now that you might have known the importance of MBR, but what will happen if the MBR is damaged because of a virus infection, drive failure, or an MBR overwrite? Generally, as a result, your computer may fail to boot and prompts one of the following error messages during OS initial:
Operating System not found;
Invalid partition table;
No bootable device found;
Fix MBR from Command Prompt in Windows 10/8/7
Thus, how to repair MBR so that you can boot the OS successfully? This part will illustrate how to fix MBR through Command Line step by step in Windows 10/8/7. Since Windows 7 and Windows 8/8.1/10 slightly differ in accessing to Command Prompt, we make two respective tutorials for your reference.
Tutorial 1. Fix MBR via CMD in Windows 7
To fix damaged MBR using Command Prompt, you have to use the Windows installation CD/DVD to boot your computer since it is unable to boot from the OS. If you don’t have one, you can download Windows ISO files from the official Microsoft website and create a bootable USB drive.
1. Boot computer from the Windows 7 installation CD/DVD.
2. At the “Press any key to boot from CD or DVD…”, press any key to boot PC from the inserted DVD.
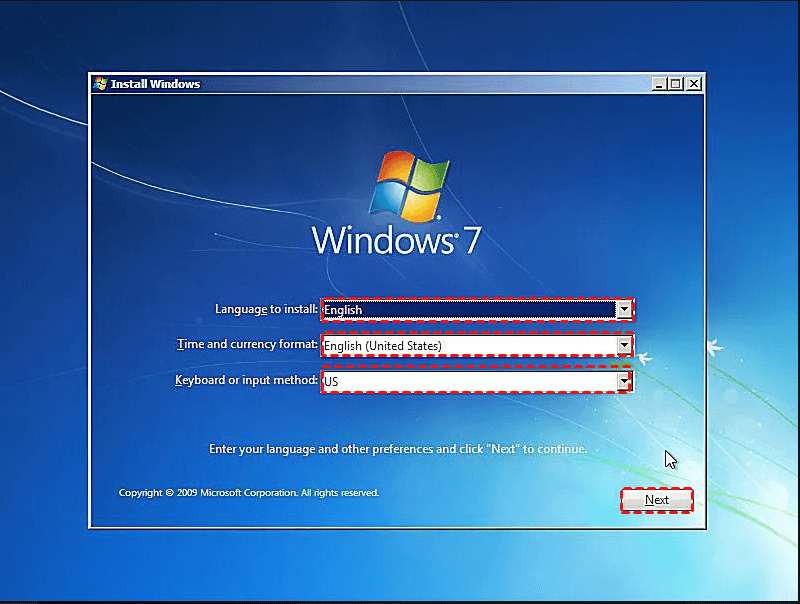
3. Select a language, keyboard layout and click “Next”.
4. Select the operating system and click “Next” and tick “Use recovery tools that can help fix problems starting Windows”.
5. At the “System Recovery Options” screen, click on “Command Prompt”.
6. When Command Prompt launches successfully, type the following command in the given order and hit on “Enter” after each one.
bootrec /fixmbr
bootrec /fixboot
bootrec /rebuildbcd
Then, you can remove the installation DVD from the disk tray and restart your computer to check if the boot MBR is fixed.
в–ё If the above commands do not work, do as below to restore the boot sector code in Windows 7:
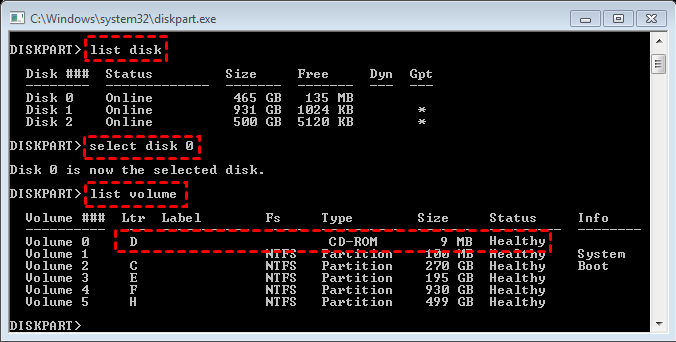
1. Check out the drive letter of your Windows 7 installation CD/DVD by running commands: “diskpart-> list disk->select disk 0 -> list volume”.
2. Find out the “CD-ROM” word in the “Type” column.Then check your CD/DVD installation drive letter. If the drive letter is d:\, type the command: “exit d: cd boot dir”.
3. Then type command: “bootsect /nt60 SYS /mbr” and hit on “Enter”.
4. Remove the CD/DVD from the disk tray, type“Exit” and press “Enter” to restart your PC.
Tutorial 2. Fix MBR via Command Prompt Windows 8/8.1/10
Likewise, you have to boot computer from Windows 8/8.1/10 original installation CD, or created bootable media.
1. Boot from Windows installation DVD or CD. At the Welcome screen, click “Repair your computer”.
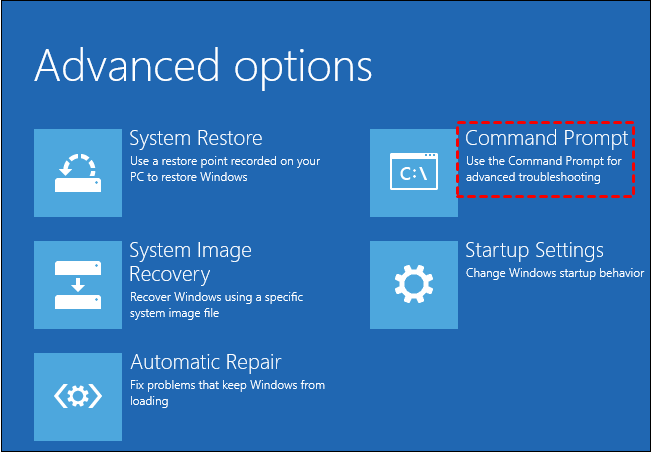
2. Choose “Troubleshoot”> “Advanced options” and then “Command Prompt”.
3. When the Command Prompt loads, execute the following commands in order:
bootrec /FixMbr
bootrec /FixBoot
bootrec /ScanOs
bootrec /RebuildBcd
4. Remove the DVD and restart your computer to check if it can boot up successfully.
в–ё If the above commands do not work, do as below to restore the boot sector code in Windows 10/8:
1. Type “diskpart-> list disk->select disk 0 -> list volume” to check for the EFI partition that was formatted to be FAT32 file system.
2. Check out the volume number of EFI partition. Supposing it is “2”, you need to type the command: “select volume 2”.
3. Type “assign letter= g” or other unused drive letters.
4. When Diskpart successfully assigned the drive letter, you need to type “exit” to close the Diskpart window.
5. Then run the below commands in the Command Prompt window:
cd /d g:\EFI\Microsoft\Boot\: replace “g” with the letter you assigned to the EFI partition.
bootrec /fixboot: repair the volume.
ren BCD BCD.backup: back up the old BCD and recreate a new one.
bcdboot c:\Windows /l en-us /s g: /f ALL: recreate the BCD.
At last, remove the DVD and reboot your PC.
If your Windows OS is not installed in C drive, please replace c:\ with your drive letter in above commands.
Free alternative to CMD: fix MBR without Windows CD/DVD
Above is all about how to fix MBR through Command Line using Windows installation CD or DVD. However, if you don’t have one, how can you make it done? Thus, you can switch to the free partition manager-AOMEI Partition Assistant Standard, which helps you to repair damaged MBR without using DVD or CD Instead, you can use this freeware to create a bootable media (USB flash drive) first, boot computer from it and then rebuild MBR in Windows PE environment.
1. Download, install and run AOMEI Partition Standard on a working Windows computer. And plug an empty USB flash drive (over 8GB) to this PC as well.
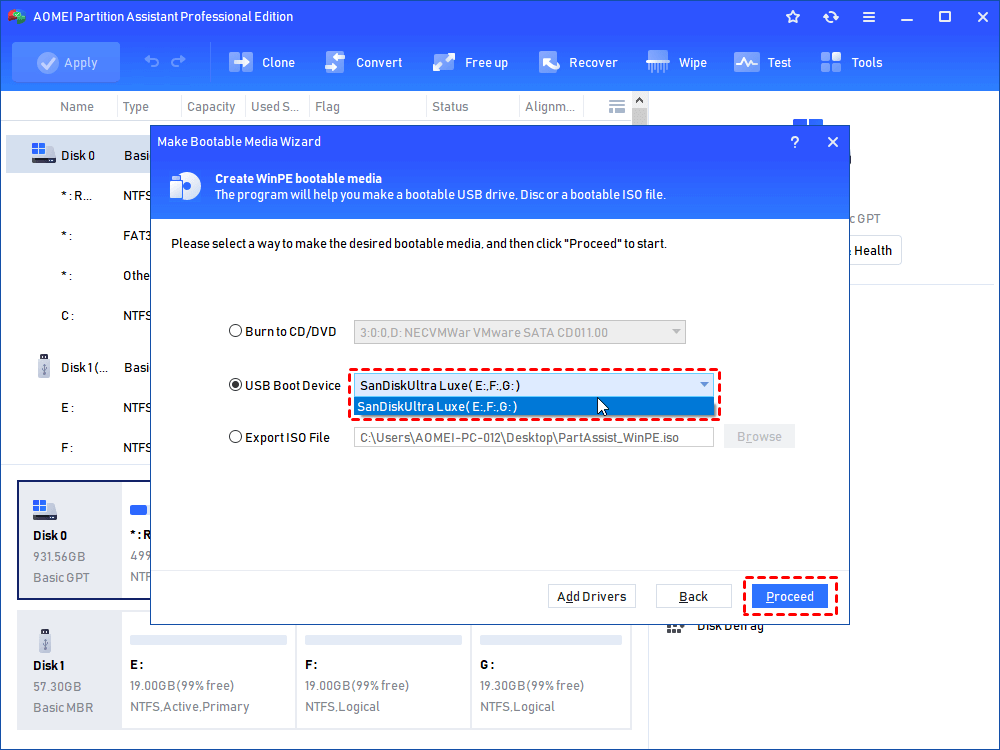
2. In the main interface, click “Make Bootable Media” and “Next”.

3. Choose your USB flash drive and click “Proceed”.
4. Wait for the process to be done. After that, connect the bootable USB flash drive into the computer which cannot boot due to damaged MBR. Reboot it and enter BIOS to change boot order to boot computer from the USB flash drive.
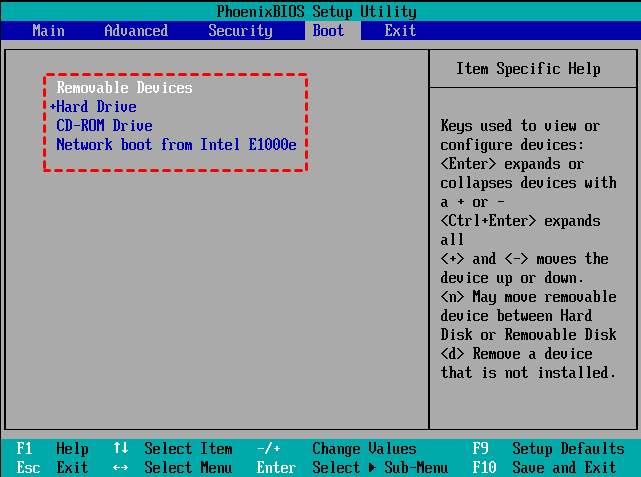
в–ёTo give a USB device boot sequence priority over the hard drive, do the following:
1. Move the hard drive device to the top of the boot sequence list.
2. Expand the hard drive device to display all hard drives.
3. Move the USB device to the top of the list of hard drives.
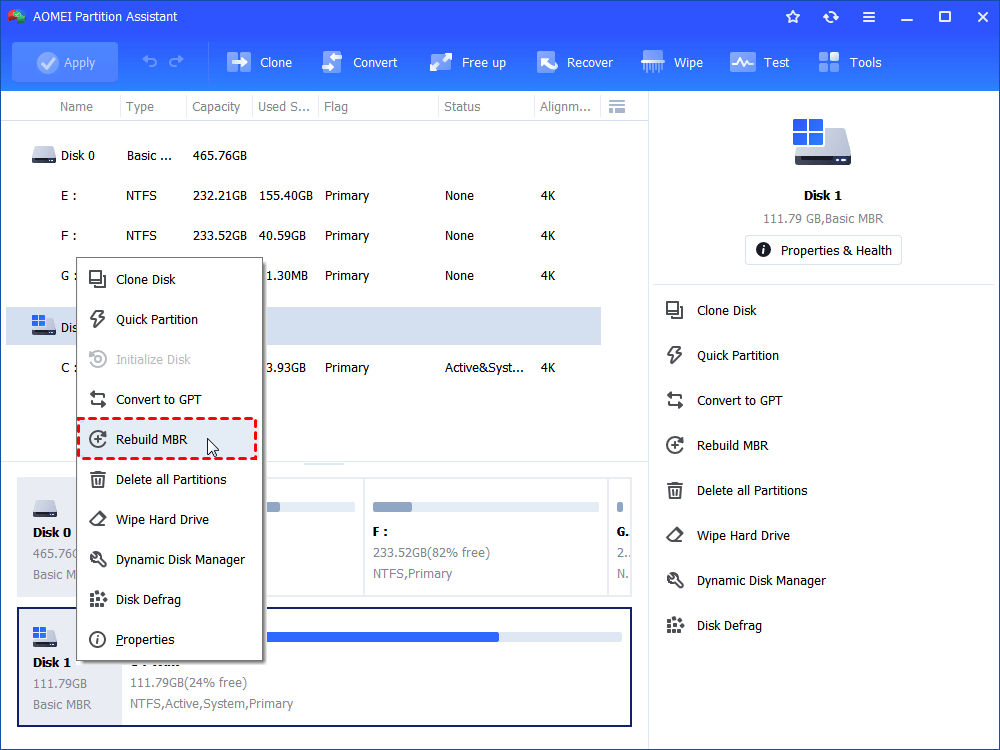
5. Once login, you will see AOMEI Partition Assistant Standard is running. Right click the system disk and select “Rebuild MBR”.
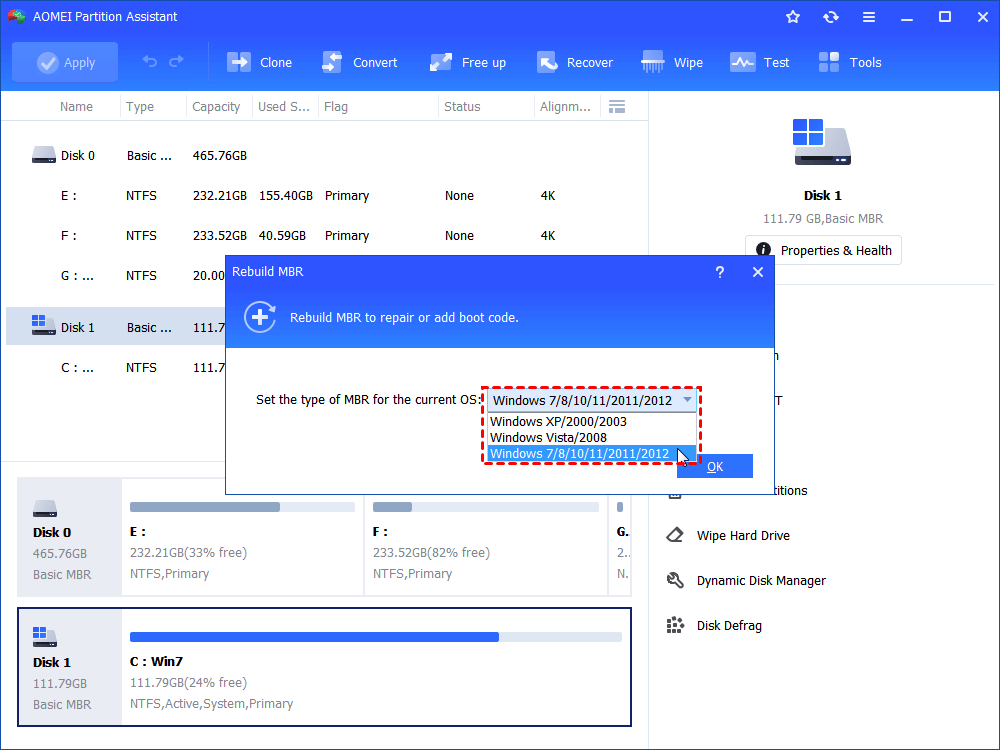
6. Choose a proper MBR type for your current operating system.
7. Click “Apply” and “Proceed” in the main interface to start rebuilding MBR.
After you have finished all steps, you can restart your computer to check whether your computer can boot normally.
Summary
As you can see, compared with fixing MBR via Command Prompt/DiskPart, AOMEI Partition Assistant Standard is much easier. Moreover, it can fix MBR without using Windows installation CD or DVD, a big bonus for users without enough computer knowledge. Besides, it also has other functions to better manage your disk and partitions such as merging partitions, copying partition to another drive, moving partition, cloning large HDD to smaller HDD/SSD etc.
If you upgrade to AOMEI Partition Assistant Professional, you can enjoy more amazing features including splitting partition, extending NTFS system partition without reboot, allocating free space from one partition to another.


