- Booting Windows 8 from a CD with ISO image
- Replies (4)
- How to boot from ISO disk to fix Windows boot issue
- Replies (6)
- Загрузка с ISO образа в Grub
- Что нам понадобится
- Загрузка с ISO образа в Grub
- Загрузка windows с iso образа в Grub
- Завершение настройки Grub
- Выводы
- How do I create a bootable usb drive with an iso image of Windows 7?
Booting Windows 8 from a CD with ISO image
Replies (4)
You want to boot to Windows 8 from a CD with ISO image. I will help you with this issue.
Windows 8 needs a dvd and not a cd. Please make sure that you have the iso image on a dvd.
You can create a bootable usb drive with Windows 8 iso image.
This applies to Windows 8 also.
Hope this helps.
Was this reply helpful?
Sorry this didn’t help.
Great! Thanks for your feedback.
How satisfied are you with this reply?
Thanks for your feedback, it helps us improve the site.
How satisfied are you with this reply?
Thanks for your feedback.
The Windows 8 .ISO image 2 GBs, too big for a CD which is about 700 MBs. You need a DVD drive or a USB thumb drive.
See the following for instructions about how to create a bootable USB thumb drive;
you will have to use a tool such as the Windows 7 USB/DVD Download Tool (http://store.microsoft.com/Help/ISO-Tool)
This simple tool will help you convert the same image file into to a USB thumb drive. For installation purposes, you should get a thumb drive that’s at least 4 GBs in size to store the installation files. Browse to where the Windows 8 ISO is stored, open it.
Select the USB device where you want to have the backup stored to for installation.
Once the USB device has been identified, click the Begin copying button.
And that’s it, the next step now is to boot your Computer from the thumb drive, make sure the thumb drive you will be installing Windows 8 from is plugged into the USB port. This might vary by manufacturer, but the usual one to try is F12, start your Computer and press F12 repeatedly until a screen is displayed giving you the option to boot from a USB Memory device, select that and press Enter on your keyboard.
Windows 8 will boot as it normally does into the setup environment
How to boot from ISO disk to fix Windows boot issue
How do you boot up from the iso disk that was created from another pc. trying to fix win10. Okay got to advanced options and there is not automatic repair option. system restore
Startup repair can not repair no operating system
Replies (6)
![]()
9 people found this reply helpful
Was this reply helpful?
Sorry this didn’t help.
Great! Thanks for your feedback.
How satisfied are you with this reply?
Thanks for your feedback, it helps us improve the site.
How satisfied are you with this reply?
Thanks for your feedback.
You need to first prepare the ISO file:
Prepare Windows 10 ISO file
After you have downloaded the Windows 10 ISO, you need prepare it, this is especially important for Windows 7 users..
After obtaining the .iso file you can use the built in Disc Image burning tool or Microsoft .iso to USB/DVD tool to create a bootable DVD or USB (requires a blank DVD or USB flash stick of at least 4 GB).
After downloading the .ISO file, right click it and click Burn disc image
Insert a blank DVD
Windows 8/8.1 users can mount the .ISO file and start the upgrade automatically. Learn more here

Important:
If you are creating a bootable USB thumb drive, make sure the thumb drive is first formatted as FAT32.
Connect the thumb drive
Right click thumbdrive
Make sure FAT32 is selected as the file system.
For UEFI based systems
If your computer is UEFI based, these are normally systems that come pre-loaded with Windows 8 or later, you will need to prepare the ISO file for such a configuration or you will receive an error message during setup. The thumbdrive needs to be formatted as FAT32 and use the GPT partitioning scheme. To do this, you need to use Rufus, a small tool you can download for free.

Rufus — credit: Pete Batard/Akeo
After you have installed Rufus:
- Launch it
- Select ISO Image
- Point to the Windows 10 ISO file
- Check off Create a bootable disk using
- Select GPT partitioning for EUFI firmware as the Partition scheme
- Choose FAT32 NOT NTFS as the File system
- Make sure your USB thumbdrive in the Device list box
- Click Start
- Close when complete
Once you have your Windows 10 installation media ready, all you need to do is boot from the disc or USB thumb drive to begin setup.
To learn how to change your BIOS options to boot from the DVD drive, see the following tutorial:

Once your computer is set to boot from the DVD, you should see this option.
If you are installing from a thumb drive, see the following instructions how to prepare your computer to boot from one:
Загрузка с ISO образа в Grub
Есть не так уж много вариантов использования нескольких дистрибутивов Linux на одной машине. Вы можете установить их все на жесткий диск, на виртуальную машину или сохранить в виде ISO образа и загружаться в реальном времени.
Первый и второй способы не очень выгодны так как требуют очень много места на жестком диске, с другой стороны, для третьего способа нужно иметь CD диск или USB флешку для хранения образа и загрузчика. Но есть еще один вариант — хранить ISO образ на жестком диске, и загружаться с него по мере надобности. Здесь не нужно столько дискового пространства как при установке, и не нужен внешний носитель информации. В этой статье будет рассмотрена загрузка с ISO образа в Grub.
Что нам понадобится
В этой статье мы будем использовать загрузчик Grub, впрочем, он и так используется в большинстве дистрибутивов Linux. Также нам понадобится ISO образ, с которого будем загружаться и вы должны знать на каком разделе он размещён. Удобнее всего разместить его на загрузочном разделе. Чтобы узнать какой раздел диска у вас загрузочный выполните:

Загрузочный раздел будет помечен знаком * в колонке Загрузочный или Boot. Например, у меня /dev/sda2 или как пишется в Grub hd0,2 — загрузочный.
Разделы /dev/sda1 и /dev/sdb3 будут называться в Grub hd0,1 и hd1,3 соответственно. В синтаксисе Grub именование дисков начинается с нуля, а именование разделов с единицы.
Загрузка с ISO образа в Grub
Сначала откройте файл /etc/default/grub и закомментируйте там эту строку если она там есть:
Перед строчкой должна стоять решетка. Сохраните изменения, а затем откройте файл /etc/grub.d/40_custom. Здесь мы добавим пункт для загрузки с образа, синтаксис выглядит следующим образом:
menuentry «Заголовок пункта» <
set isofile = «Адрес ISO файла»
loopback loop Раздел в форме записи Grub на котором расположен ISO $isofile
Параметры загрузки ядра
>
Перед тем, как переходить к настройке Grub надо выяснить ещё один момент. Как в оригинальном образе выполняется загрузка дистрибутива. Обычно в каждом загрузочном образе есть папка Grub в которой можно посмотреть файл grub.cfg или другой подобный, например loopback.cfg и узнать какими строками там загружается ядро:

Только перед путями к файлам надо добавить адрес (loop). Путь к образу надо указывать от начала того диска, на котором он расположен. Например, если диск расположен в корне загрузочного раздела, который монтируется в /boot, то и путь будет /файл.iso, а не /boot/файл.iso. Теперь можно переходить к примеру, запись для загрузки Puppy Linux будет выглядеть вот так:
menuentry «Puppy 20.04 Live» <
set isofile=»/puppylinux.iso»
loopback loop (hd0,2)$isofile
linux (loop)/vmlinuz pfix=fsck pmedia=cd findiso=»/puppylinux.iso»
initrd (loop)/initrd.gz
>

Каждый дистрибутив индивидуален и надо с каждым разбираться отдельно. Если вы хотите запускать Gparted:
menuentry «GParted Live amd64» <
set isofile=»/gparted-live-0.18.0-2-amd64.iso»
loopback loop (hd0,2)$isofile
loopback loop $isofile
linux (loop)/live/vmlinuz boot=live config union=aufs noswap noprompt ip=frommedia toram=filesystem.squashfs findiso=$
initrd (loop)/live/initrd.img
>
Или даже Fedora Linux:
menuentry «Fedora Live» <
set isofile=»/Fedora.iso»
loopback loop (hd0,2)$isofile
loopback loop $isofile
linux (loop)/isolinux/vmlinuz0 root=live:CDLABEL=Fedora-Live rootfstype=auto ro rd.live.image quiet rhgb rd.luks=0 rd.md=0 rd.dm=0 iso-scan/filename=$
initrd (loop)/isolinux/initrd0.img
>
Обратите внимание, что опции будут меняться в зависимости от дистрибутива и расположения в нем загрузочных файлов. Кроме того, важно то где размещен ISO образ, если ваш домашний каталог зашифрован лучше его хранить на загрузочном разделе, как в примерах выше.
Хотите больше? Можно загрузится с ISO для автоматического выполнения каких-либо действий. Например, если вы параноик и хотите иметь возможность быстро стереть свой жесткий диск можно использовать DBAN. Но будьте осторожны так как это сотрет все данные без возможности восстановления.
menuentry «Darik’s Boot and Nuke» <
set isofile=»/dban.iso»
loopback loop (hd0,1)$isofile
linux (loop)/dban.bzi nuke=»dwipe» silent
>
Есть еще много вещей, которые можно сделать с помощью загрузки ISO образа в Grub, неважно хотите ли вы очень быструю Live систему или иметь возможность уничтожить все кончиком пальца.
Загрузка windows с iso образа в Grub
Если вам нужна загрузка Windows с ISO образа Grub, то это делается тоже не очень сложно, но немного по другому. Сначала нужно скачать syslinux и извлечь оттуда memdisk в папку /boot/. Это должна быть папка, куда установлены файлы Grub. Дальше добавьте в конфигурационный файл 40-grub.conf такие строки:
menuentry «Boot Windows» <
search -f «—set-root /Windows.iso»
insmod memdisk
linux16 /boot/memdisk iso
initrd16 /Windows.iso
>
Образ Windows должен лежать в корне одного из разделов и называться Windows.iso, дальше команда search автоматически найдет этот раздел и установит его в качестве корня. Потом останется только загрузка windows с iso образа grub.
Завершение настройки Grub
Мы все подготовили, теперь остается обновить конфигурацию загрузчика Grub, чтобы новые пункты добавились в /boot/grub/grub.cfg и появились в меню загрузки. Для Ubuntu команда будет выглядеть вот так:
В других дистрибутивах может понадобится команда:
sudo grub-mkconfig -o /boot/grub/grub.cfg
Затем можно перезагрузиться и посмотреть что получилось:
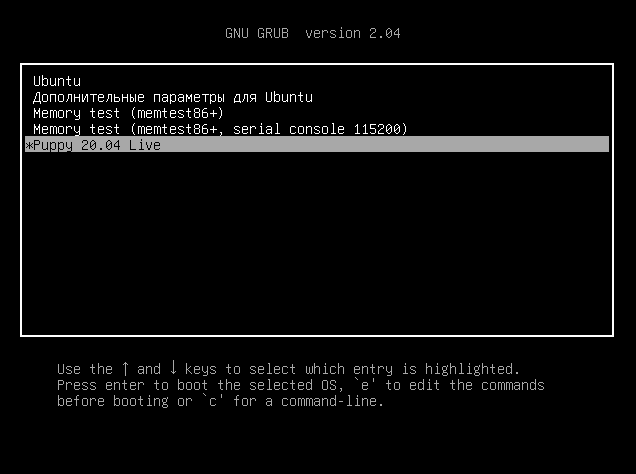
Если что-то пошло не так, вы можете нажать клавишу E и редактировать этот пункт меню чтобы попытаться исправить проблему прямо в загрузчике.
Выводы
Теперь вы знаете как выполняется загрузка iso образа grub, здесь нет ничего сложного, но зато это очень полезная возможность получить несколько систем на своем компьютере, затратив при этом минимум памяти и времени на их установки. Если у вас остались вопросы, спрашивайте в комментариях!
How do I create a bootable usb drive with an iso image of Windows 7?
Which web site is this?
You need to convert those three files into a bootable .ISO file, the following article will show you how:
After you have converted it to a .ISO file, you need to burn it to a blank DVD disc as a disc image, then proceed to install:
ImgBurn — In addtion to supporting the creation of CD’s from .ISO files,
it supports a wide range of other image file formats, and it’s free.
(BIN, CUE, DI, DVD, GI, IMG, MDS, NRG, PDI and ISO)
Download and install Gear ISO burn (Free):
Note: Always use the slowest burn speed (4x or 2x) if offered a choice.
You should have the option to download the .ISO file from the Microsoft Store and simply burn it to a blank DVD as a disc image. Much easier to work with than the box files.
If you downloaded your copy of Windows 7 from the Microsoft Store, try redownloading it again:
1. Login to your Microsoft Store account ( http://store.microsoft.com ) to view your purchase history
2. Look for your Windows 7 purchase.
3. Next to Windows 7, there is an «Additional download options» drop-down menu.
4. In the drop-down menu, select «32 or 64-bit ISO.»
Download the ISO Image of Windows 7
Windows 7 Professional x64 (64-bit)
Windows 7 Professional x86 (32-bit)
Windows 7 Home Premium x64 (64-bit)
ImgBurn — In addtion to supporting the creation of CD’s from .ISO files,
it supports a wide range of other image file formats, and it’s free.
(BIN, CUE, DI, DVD, GI, IMG, MDS, NRG, PDI and ISO)
http://www.imgburn.com/
Note: Always use the slowest burn speed (4x or 2x) if offered a choice.
How to make a bootable USB thumb drive:
you will have to use a tool such as the Windows 7 USB/DVD Download Tool (http://store.microsoft.com/Help/ISO-Tool)
This simple tool will help you convert the same image file into to a USB thumb drive. For installation purposes, you should get a thumb drive that’s at least 4 GBs in size to store the installation files. Browse to where the Windows 7 Image is stored, open it.
Select the USB device where you want to have the backup stored to for installation.
Once the USB device has been identified, click the Begin copying button.
And that’s it, the next step now is to boot your computer, from the thumb drive, make sure the thumb drive you will be installing Windows 7 from is plugged into the USB port. This might vary by manufacturer, but the usual one to try is F12, start your computer and press F12 repeatedly until a screen is displayed giving you the option to boot from a USB Memory device, select that and press Enter on your keyboard.


