- Install Windows from a USB Flash Drive
- What you need
- Step 1 — Format the drive and set the primary partition as active
- Step 2 — Copy Windows Setup to the USB flash drive
- Step 3 — Install Windows to the new PC
- If your Windows image is larger than 4GB
- How to Boot From a USB Device
- Make your PC boot from a USB flash drive or external hard drive
- How to Boot From a USB Device
- What to Do When the USB Device Won’t Boot
- Windows 7/8/10 Won’t Boot from USB Flash Drive! How to Fix?
- Part 1: Check If Your PC Supports USB Booting
- Part 2: Re-Make A New Bootable USB with WizBurn
- Part 3: Set up Your PC for USB Boot
- Part 4: Check If Your USB Drive Is Actually Bootable
- Conclusion
Install Windows from a USB Flash Drive
Here’s how to create a bootable Windows installation USB drive starting with a Windows .iso file or a Windows Setup DVD.
If you’re looking for an easy way to create a bootable USB Windows installation drive, use the media creation tool.
What you need
- Windows 10 install .iso or DVD
- USB flash drive with at least 5GB free space. This drive will be formatted, so make sure it doesn’t have any important files on it.
- Technician PC — Windows PC that you’ll use to format the USB flash drive
- Destination PC — A PC that you’ll install Windows on
Step 1 — Format the drive and set the primary partition as active
Connect the USB flash drive to your technician PC.
Open Disk Management: Right-click on Start and choose Disk Management.
Format the partition: Right-click the USB drive partition and choose Format. Select the FAT32 file system to be able to boot either BIOS-based or UEFI-based PCs.
Set the partition as active: Right-click the USB drive partition and click Mark Partition as Active.
If Mark Partition as Active isn’t available, you can instead use diskpart to select the partition and mark it active.
Step 2 — Copy Windows Setup to the USB flash drive
Use File Explorer to copy and paste the entire contents of the Windows product DVD or ISO to the USB flash drive.
Optional: add an unattend file to automate the installation process. For more information, see Automate Windows Setup.
Step 3 — Install Windows to the new PC
Connect the USB flash drive to a new PC.
Turn on the PC and press the key that opens the boot-device selection menu for the computer, such as the Esc/F10/F12 keys. Select the option that boots the PC from the USB flash drive.
Windows Setup starts. Follow the instructions to install Windows.
Remove the USB flash drive.
If your Windows image is larger than 4GB
Windows USB install drives are formatted as FAT32, which has a 4GB filesize limit. If your image is larger than the filesize limit:
Copy everything except the Windows image file (sources\install.wim) to the USB drive (either drag and drop, or use this command, where D: is the mounted ISO and E: is the USB flash drive.)
Split the Windows image file into smaller files, and put the smaller files onto the USB drive:
How to Boot From a USB Device
Make your PC boot from a USB flash drive or external hard drive
:max_bytes(150000):strip_icc()/tim-fisher-5820c8345f9b581c0b5a63cf.jpg)
:max_bytes(150000):strip_icc()/ryanperiansquare-de5f69cde760457facb17deac949263e-180a645bf10845498a859fbbcda36d46.jpg)
There are lots of reasons you might want to boot from a USB device, like an external hard drive or a flash drive, but it’s usually so you can run special kinds of software.
When you boot from a USB device, what you’re doing is running your computer with the operating system installed on the USB device. When you start your computer normally, you’re running it with the operating system installed on your internal hard drive—Windows, Linux, etc.
Time Required: Booting from a USB device usually takes 10–20 minutes, but it depends a lot on if you have to make changes to how your computer starts up.
How to Boot From a USB Device
Follow these easy steps to boot from a flash drive, an external hard drive, or some other bootable USB device.
:max_bytes(150000):strip_icc()/how-to-boot-from-a-usb-device-2626091-D-v1-5b1183bd04d1cf00371e7aeb.png)
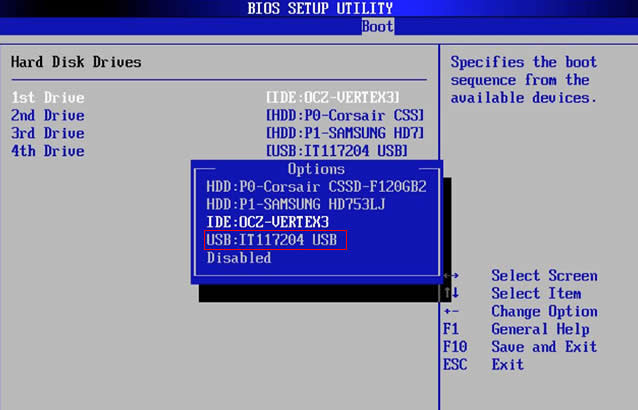
If the USB boot option is not first in the boot order, your PC will start «normally» (i.e., boot from your hard drive) without even looking at any boot information that might be on your USB device.
The BIOS on most computers lists the USB boot option as USB or Removable Devices, but some confusingly list it as a Hard Drive option, so be sure to dig around if you’re having trouble finding the right one to choose.
After setting your USB device as the first boot device, your computer will check it for boot information each time your computer starts. Leaving your computer configured this way shouldn’t cause problems unless you plan on leaving the bootable USB device attached all the time.
Attach the USB device to your computer via any available USB port.
:max_bytes(150000):strip_icc()/usb-plug-5c433f4546e0fb0001f804f1.jpg)
Creating a bootable flash drive or configuring an external hard drive as bootable is a task in itself. Chances are you made it to these instructions here because you know whatever USB device you have should be bootable after properly configuring BIOS.
See our How to Burn an ISO File to a USB Drive tutorial for general instructions on doing exactly that, which tends to be the reason most people need to figure out how to boot from one.
Since you’re not actually inside of the operating system at this point, restarting isn’t the same as using normal restart buttons. Instead, BIOS should explain which key to press—such as F10—to save the boot order changes and restart the computer.
Watch for a Press any key to boot from external device. message.
:max_bytes(150000):strip_icc()/boot-from-usb-message-57c76dae3df78c71b65d7c9e.png)
You may be prompted with a message to press a key on some bootable devices before the computer boots from the flash drive or another USB device.
If this happens, and you do nothing, your computer will check for boot information on the next boot device in the list in BIOS (see Step 1), which will probably be your hard drive.
Most of the time, when trying to boot from a USB device, there is no key-press prompt. The USB boot process usually starts immediately.
Your computer should now boot from the flash drive or USB based external hard drive.
What happens now depends on what the bootable USB device was intended for. If you’re booting from Windows 10, Windows 8, or Windows 7 installation files on a flash drive, the operating system setup will begin. If you’re booting from a DBAN flash drive you created, it will start. You get the idea.
What to Do When the USB Device Won’t Boot
If you tried the above steps, but your computer didn’t boot from the USB device, check out some of the tips below. There are several places that this process can get hung up at.
Recheck the boot order in BIOS (Step 1). The number one reason a bootable flash drive or another USB device won’t boot is that BIOS isn’t configured to check the USB port first.
Didn’t find a «USB Device» boot order listing in BIOS? If your computer was manufactured around 2001 or before, it might not have this ability.
If your computer is newer, check for some other ways that the USB option might be worded. In some BIOS versions, it’s called «Removable Devices» or «External Devices.»
Remove other USB devices. Other connected USB devices, like printers, external media card readers, etc., could be consuming too much power or causing some other problem, preventing the computer from booting from a flash drive or another device. Unplug all other USB devices and try again.
Or, if you have multiple bootable devices plugged in at once, the computer might simply be booting to the wrong device, in which case the easiest fix would be to remove all USB storage devices but the one you want to use right now.
Copy the files to the USB device again. If you created the bootable flash drive or external hard drive yourself, which you probably did, repeat whatever steps you took again. You may have made a mistake during the process.
See How to Burn an ISO File to USB if you started with an ISO image. Getting an ISO file onto a USB drive, like a flash drive, isn’t as easy as just expanding or copying the file there.
Switch to another USB port. The BIOS on some motherboards only checks the first few USB ports. Switch to another USB port and restart your computer.
Update your motherboard’s BIOS. If your computer is ancient, the BIOS version running on the motherboard may not support booting directly from a USB device. Try flashing the BIOS and checking again for this feature.
Windows 7/8/10 Won’t Boot from USB Flash Drive! How to Fix?
Many computers do not have the external CD/DVD drive and thus you need the bootable USB drive to install Windows. Creating a bootable USB is fairly easy and all thanks to some really good freeware programs available for this purpose. But, what if the computer wouldn’t boot from the USB drive? If you have run into such a problem, here are some solutions for you.
Part 1: Check If Your PC Supports USB Booting
Your computer will boot from the USB bootable drive only if it supports this type of boot. Not all the computers support USB boot. While most modern computers today support USB booting, there are some that do not. In order to find whether your computer is USB bootable or not, you will need to check the BIOS setup. The steps may vary across computer models but remain more or less the same for all PCs:
Step 1. Restart the computer or if it is shut down, power it on.
Step 2. When the PC starts to run, on the first screen it will display the key you need to press in order to enter the BIOS setup. Usually, it is the ‘Delete’ or ‘Del’ key
Note: If you have previously set the BIOS password you will need to provide the password to enter BIOS setup. If you forgot BIOS password, you will need to reset it by taking out the CMOS battery from the motherboard. In case you haven’t done this before, it is best to take the help of a technician. If you forgot Windows login password, try to reset your Windows 10 password with PC Unlocker software.
Step 3. You will need to explore a bit and find the ‘Boot Options’ (or something like that). Once you are there you can set the Boot Priority
If you do not see the USB boot option, it means that your motherboard does not support it. You will need to boot using some other method.
Part 2: Re-Make A New Bootable USB with WizBurn
In most cases, you need to reexamineВ if the ISO burning software is the right one for you? As we know there are many free ISO burning tools out there, like Rufus, RMPrepUSBВ , Windows USB/DVD Download Tool or ISO to USB, etc. These free burning tools can’t be updated continuously and provide any support service, even some tools don’t support UEFI BIOS! Eventually, the generated USB disk cannot normally boot the computers. But only a small part of computers can boot win8/Win7 except Win10. These computer will generally display «NTLDR is missing», for this problem there is no good solution currently.
If your computer won’t boot from USB, the only solution is try to re-make a new bootable USB disk with professional ISO burning software. We recommend iSeePassword Dr.Boot tool.
Step 1. Click the «Download» button to get the latest version of Dr.Boot software, then install it on another working computer.
Step 2. After installation, launch it and you will see the main interface below. Easy to use and user-friendlyВ interface.
Step 3. Click «Browse» button to import local ISO file and add it to progarm.
Step 4. Now insert an USB drive to the computer and select the drive name from the list undert «Create A Bootable USB».
NOTE: For Win 10 ISO file, if your computer is UEFI, then just select «UEFI boot» from Partition Style.
Step 5. After settings, click «Burn» button to start make a bootable USB disk. It may take around 10 minutes. After making a boot disk, insert it to your computer and boot from USB.
Part 3: Set up Your PC for USB Boot
Even if your computer supports USB booting, remember that USB is not always the first boot priority. It is also possible that your computer has not been set up to boot from the USB at all even though it is supported. So, what you need to do is change the BIOS settings so that your computer accepts USB boot. Follow the simple steps below:
Step 1. Restart your PC or if it is already shut down, turn it back on.
Step 2. When the PC starts to run, on the first screen you will see the key you need to press in order to enter the BIOS setup. More often than not it is the ‘F2’, ‘Del’ or whichever is the appropriate key for your computer. It may vary depending upon your computer model. For example, Dell computer has different ways to enter BIOS setup, see how to get into BIOS on a Dell computer.
Step 3. Find the ‘Boot Options’ or something similar to it (the steps may vary across computers but it is easy to find).
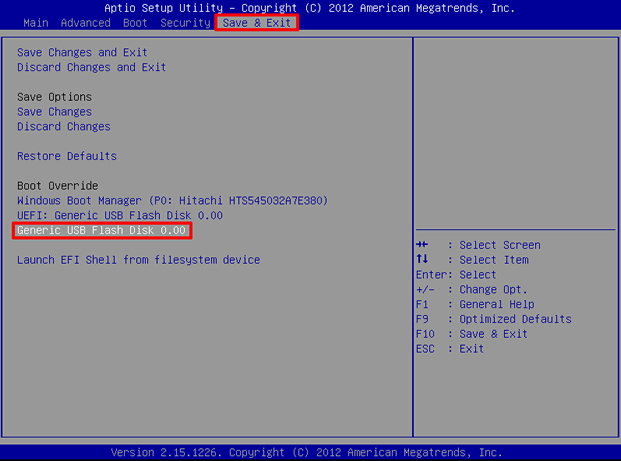
Step 4. Once you are in the Boot section of the BIOS, you can select the ‘First Boot Device’. Select the appropriate option from the Boot Menu.
This will instruct the computer to prioritize the boot and select USB drive as the first option, and insert the bootable USB drive and restart your computer.
Part 4: Check If Your USB Drive Is Actually Bootable
If the USB bootable drive has not been created the right way or if it is corrupt, you will not be able to install Windows with it. You need to make sure that USB drive has been prepared using the right tools and the right method. You will be able to boot Windows only if the drive is bootable.
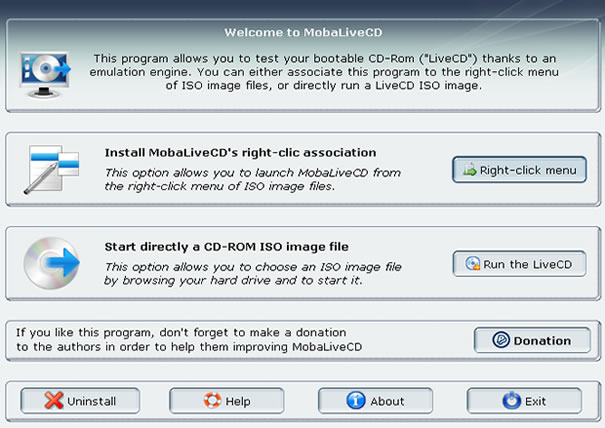
This is why it would be worth your while to check if the drive is actually bootable. For this you will need to install a portable application called MobaLiveCD, which uses QEMU emulator to determine if the drive is bootable. Here are the steps:
Step 1. Download the application from http://www.mobatek.net/ (you don’t need to install it as it is a portable app for Windows)
Step 2. Launch the app and click ‘Run the LiveUSB’ button on the screen.
Step 3. You don’t need to create any virtual disk image. You can test the validity of the drive by clicking NO when the next confirmation dialogue box appears:
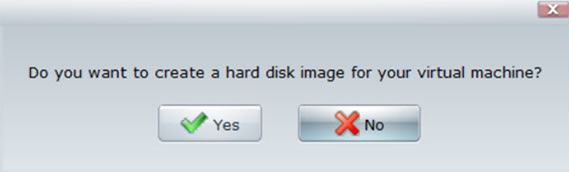
Step 4. The QEMU emulator runs and if the drive is bootable, you will see ‘Press any key to boot from CD or DVD. ‘

Step 5. If the drive isn’t bootable it will ask you to insert a bootable device.
If the USB drive is not bootable, you will need to create the proper bootable drive first. Different versions of Windows use different file systems. If you are trying to use the NTFS formatted bootable drive to install the Windows in the legacy-BIOS or UEFI mode, it will not work. If you are not sure what this is all about, you may contact Microsoft support for more help.
Conclusion
There are a number of factors that may prevent USB bootable from working. You need to make sure that USB drive is actually bootable and has been formatted using the correct file system, make sure that your computer supports USB boot. You will also need enter the BIOS setup to configure your computer to accept USB bootable drive. Hope these methods would be helpful if your laptop can’t boot from USB drive.

Vicky is a professional Windows technology author with many experience, focusing on computer technology. She’s very much enjoy helping people find solutions to their problems. Her knowledge and passion always drive her to discover everything about technology.


