- Как исправить код ошибки 0xC0000225 в Windows 10
- Создайте установочный диск Windows 10
- Автоматический ремонт Windows
- Запустите проверку системных файлов и жесткого диска
- Восстановить BCD
- Установите активный раздел
- Troubleshoot Windows Boot Manager error — 0xC0000225 «Status not found»
- Symptoms
- Drivers, OS Related or Third Party
- No File
- Registry File
- Causes
- Missing Binary
- BCD Corruption or Improper VHD Migration
- Registry Hive Corruption
- Solution
- Process Overview
- Create and Access a Repair VM
- Select a Solution
- Repair the System File
- Add the OSDEVICE Variable
- Contact Support
- Enable the Serial Console and memory dump collection
Как исправить код ошибки 0xC0000225 в Windows 10
Видите ошибку 0xc0000225 в Microsoft Windows 10 при попытке загрузить ваш компьютер? Эта распространенная ошибка и огромная головная боль, потому что она вообще не позволяет компьютеру загружаться. Windows отображает ошибку с сообщением «вашему пк не удалось правильно загрузиться и он нуждается в восстановлении» «Произошла непредвиденная ошибка» или «требуемое устройство не подключено или недоступно«. Система Windows показывает эту ошибку, если не удается найти правильные системные файлы для загрузки в Boot Configuration Data (BCD). Когда вы включаете компьютер, BCD сообщает Windows, как правильно загружаться.
Эта ошибка чаще встречается на дисках, которые используют более новую спецификацию UEFI с использованием схемы разделов GPT. Поскольку эта ошибка связана с поврежденными системными файлами, она часто появляется после обновления ОС, например, с Windows 7 до Windows 10. Это также может произойти, если ваш компьютер отключается во время важного обновления, от вредоносных программ, атакующих системные файлы или даже от неисправного оборудования. Давайте разберем, как исправить ошибку с кодом 0xC0000225 в Windows 10. Следуйте по порядку пунктам.
Создайте установочный диск Windows 10
Как и другие ошибки при загрузке, вы не можете устранить эту проблему изнутри Windows. Таким образом, вам понадобится удобный установочный диск Windows 10, чтобы вы могли запускать инструменты для ремонта. Следуйте моим инструкциям по созданию установочного носителя Windows 10 . Вам понадобится флэш-накопитель объемом не менее 8 ГБ или DVD. Создав установочную флешку, вставьте её в свой компьютер. Далее Вам потребуется поставить загрузку с флешки. Рекомендую обратится к руководству, как зайти в BIOS и Поставить загрузку с флешки .
Автоматический ремонт Windows
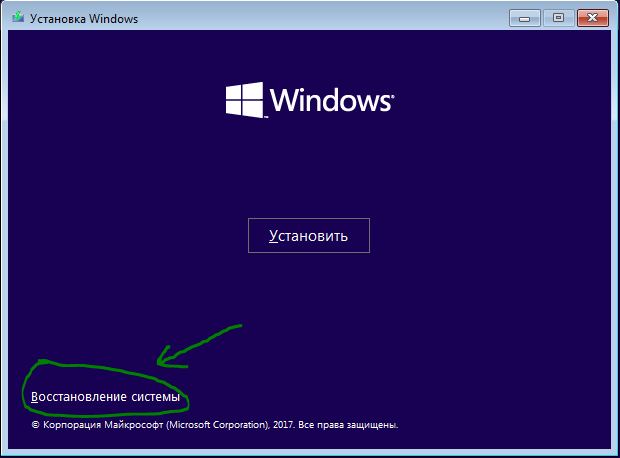
Шаг 1. После загрузки с установочного диска Windows 10, подождите, пока вы не увидите экран установки Windows. Подтвердите параметры своего языка, затем нажмите «Далее«. Когда вы увидите экран «Установить«, нажмите снизу ссылку «Восстановление системы».
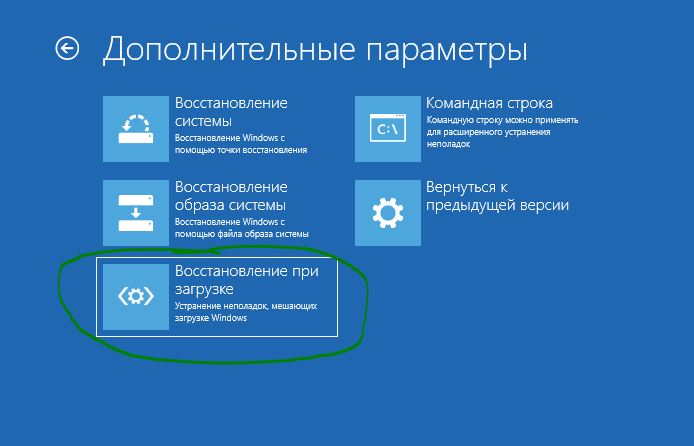
Шаг 2. Далее Вы увидите меню опций; выберите «Поиск и устранение неисправностей«, затем «Дополнительные параметры» и «Восстановление при загрузке«. Позвольте процессу завершиться, а затем перезагрузите компьютер.
Ша 3. Попробуйте нормально загрузиться. Если код ошибки 0xc0000225 не появляется, то вы исправили проблему!
Запустите проверку системных файлов и жесткого диска
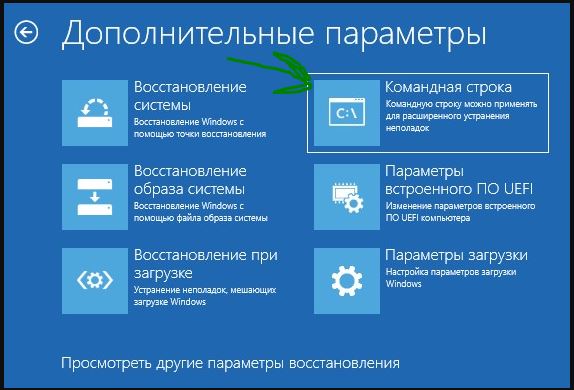
Шаг 1. Если автоматический ремонт Windows не сработал, вы можете попробовать несколько важных системных сканирований самостоятельно. Для этого повторите описанный выше процесс, чтобы попасть в восстановление системы с установочной флешки и выберите «Командная строка«. (Поиск и устранение неисправностей > Дополнительные параметры > Командная строка.)
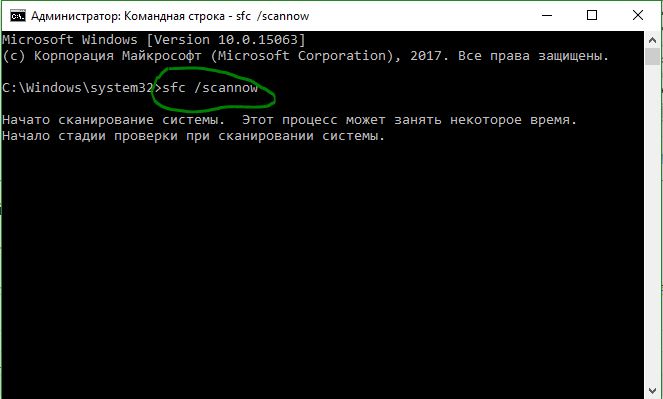
Шаг 2. Запустите команду проверки системных файлов (SFC) , которая проверяет наличие поврежденных или отсутствующих системных файлов Windows и пытается их восстановить. Задайте команду в командную строку: sfc /scannow и дождитесь окончания процесса. Не закрывайте командную строку и не перезагружайте ПК, а перейдите ниже к шагу 3.
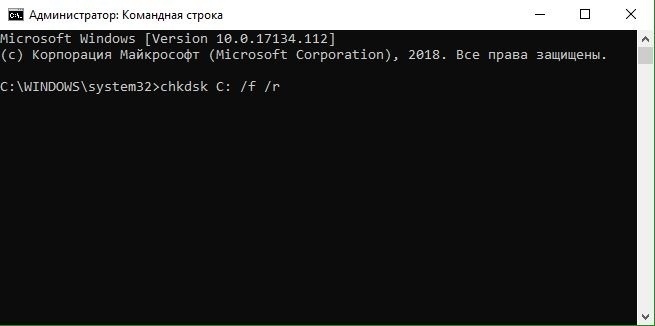
Шаг 3. Запустите проверку диска, чтобы проверить наличие ошибок на вашем жестком диске . Используйте следующую команду chkdsk C: /f /r , где C: — это локальный диск на котором установлена система Windows.
Шаг 4. Как только вы запустите оба этих сканирования, перезагрузитесь и попробуйте снова загрузить ваш компьютер. Надеюсь, что ошибка больше не появится.
Восстановить BCD
Если у вас все еще есть проблемы, следующим шагом, который вы можете попробовать, является команда по восстановлению главной загрузочной записи MBR . Снова загрузитесь с установочного носителя Windows 10 и откройте меню «Дополнительные параметры». На этот раз также выберите «Командная строка» и задайте следующие команды одну за одной нажимая Enter после каждой:
bootrec /scanos
bootrec /fixmbr
bootrec /fixboot
bootrec /rebuildbcd
Первая команда сканирует ваш диск для совместимых установок, что может помочь найти отсутствующую установку Windows. Команды два и три записывают новый MBR и загрузочный сектор на ваш диск. Последняя команда снова сканирует установки Windows после исправлений. Перезагрузите компьютер еще раз и проверьте, появляется ли сообщение с ошибкой 0xc0000225.
Установите активный раздел
Иногда активный раздел может сбиваться или работать некорректно. Windows позволяет вам изменять активный раздел, чтобы вы могли указать систему с которой нужно загрузиться. Запустите «Командную строку» с установочной флешки, как проделывали выше способами и вводите следующие команды по одной, нажимая Enetr, внимательно читая и смотрите картинку ниже.
diskpart — Запуск инструмента Disk Partition.
list disk — Список подключенных жестких дисков и флешек. Запомните цифру вашего диска. В моем случае подключен один Диск «0«.
select disk 0 — Нужно выбрать жесткий диск на котором Windows. Выше командой мы узнали что это в моем случае 0. Если у вас другой, то замените.
list partition — Список разделов на жестком диске. Вам нужно запомнить цифру раздела с типом «основной» и на котором установлена Windows. Так как у меня два типа «Основной», я примерно знаю сколько занимает Гб диск на котором Windows и запоминаю раздел с цифрой 1.
select partition 1 — Выбираю раздел, который запомнил выше, и на котором Windows.
active — Делаю активным раздел.
Выйдите из командной строки, перезагрузитесь ПК, и проверьте, исправлена ли ваша проблема.
Troubleshoot Windows Boot Manager error — 0xC0000225 «Status not found»
This article provides steps to resolve issues where error code 0xC0000225 occurs in an Azure VM. This error states that the status or object is not found.
Symptoms
When you use Boot diagnostics to view the screenshot of the VM, you will see that the screenshot displays a Windows failed to start error with the Status code 0xc0000225.
The file associated with this error code will inform you which steps to take in order to resolve the issue. Locate the File: section’s text to determine the appropriate course of action.
Drivers, OS Related or Third Party
If the file is present but refers to a driver (as is shown) or is OS related or third party, follow the steps under the section Repair the System File.
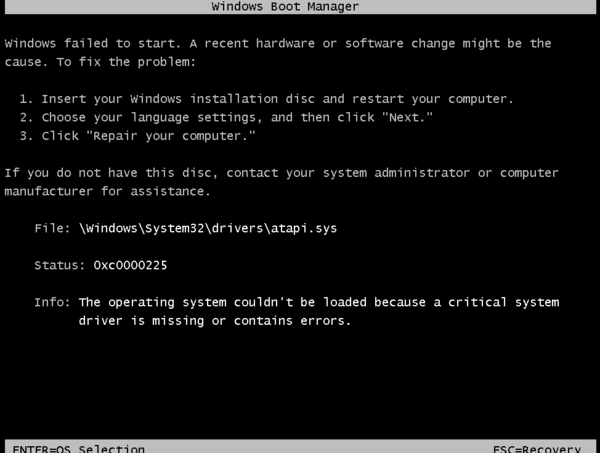
In the following image, Windows Boot Manager states «Windows failed to start. A recent hardware or software change might be the cause.» The image also shows the Status as «0xc0000225», File: as \windows\System32\drivers\atapi.sys , and Info: as «The operating system couldn’t be loaded because a critical system driver is missing or contains errors.»
No File
If presented with the Status code, but no file is shown, follow the steps under the section Add the OSDEVICE Variable.
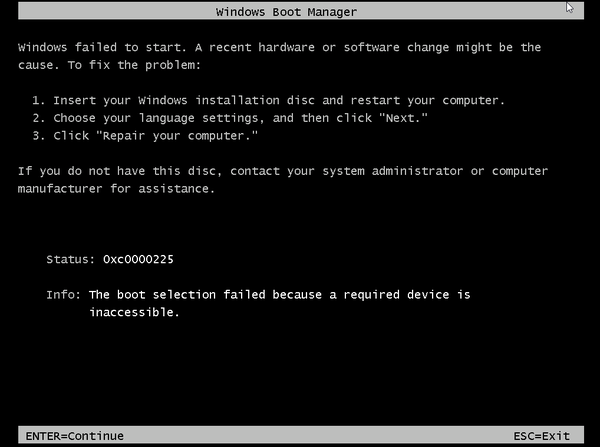
In the following image, Windows Boot Manager states «Windows failed to start. A recent hardware or software change might be the cause.» The image also shows the Status as «0xc0000225», and Info: as «The boot selection failed because a required device is inaccessible.»
Registry File
If it refers to any of the registry files, such as \windows\system32\config\system, follow the steps under the section Create a Support Ticket.
In the following image, Windows Boot Manager states «Windows failed to start. A recent hardware or software change might be the cause.» The image also shows the Status as «0xc0000225», the File as \windows\System32\config\system , and Info: as «The operating system couldn’t be loaded because the system registry file is missing or contains errors.»

In the following image, the recovery screen states «Your PC/Device needs to be repaired. The operating system couldn’t be loaded because the system registry file is missing or contains errors.» The image also shows the Error code as «0xc0000225» and the File as \windows\System32\config\system .

Causes
Missing Binary
You may be encountering missing or corrupted binary on your System (.sys) file.
BCD Corruption or Improper VHD Migration
In this case, either the Boot Configuration Data (BCD) is corrupted, or the virtual hard drive (VHD) was migrated from on-premises, but wasn’t properly prepared. The result is that the OSDEVICE variable is missing and will need to be added.
Registry Hive Corruption
A registry hive corruption could be due to:
- The Hive fails
- The Hive mounts, but is empty
- The Hive was not closed properly
Solution
Process Overview
If you have a recent backup of the VM, you may try restoring the VM from the backup to fix the boot problem.
- Create and access a Repair VM.
- Select a Solution:
- Repair the System File
- Add the OSDevice Variable
- Create a Support Ticket
- Enable serial console and memory dump collection.
- Rebuild the VM.
Create and Access a Repair VM
- Use steps 1-3 of the VM Repair Commands to prepare a Repair VM.
- Using Remote Desktop Connection, connect to the Repair VM.
Select a Solution
- Open an elevated command prompt.
- Based on the symptom that you identified earlier, follow the steps in the corresponding solution. You may skip the steps in the other solutions, as they won’t apply to your issue:
- Repair the System File
- Add the OSDevice Variable
- Create a Support Ticket
Repair the System File
Using the attached VHD, navigate to the file location of the binary shown in your virtual machine (VM) screenshot.
Right-click the file, select Properties, and then select the Details tab to see information on the file.
Note the version of the file, as shown in the image below:

Rename the file to .old, replacing with the name of the file.
For the image in the step above, the file cng.sys would be renamed to cng.sys.old
If you try to rename the file and receive the message «The file is corrupted and unreadable», contact support for assistance, as this solution will not work.
Now that the corrupt file is renamed, fix the file by restoring it from its internal repository.
Launch a CMD session.
Navigate to \windows\winsxs.
Search for the binary located at the beginning of this section using the following command:
This command will list all versions of the file that the machine has, giving you the path history of that component.
For example, dir cng.sys would be renamed dir cng.sys /s
Choose the latest version of the file on the list (or any that you prefer) and copy the file to the windows\system32 folder using previous path and the following command:
copy :\Windows\WinSxS\ \ :\Windows\System32\Drivers\
If the latest binary didn’t work, try a version before that one, or any of which you know there is a stable file, such as a version before a patch.
For example, if the binary you are looking for is cmimcext.sys, the faulty drive is drive F:, and you just ran a search for the latest version, you would see the following image, where a query in command prompt of dir cmim* /s locates the latest version of the cmimcext.sys file.

In the example image above, the query was performed on C:, whereas the drive letter should be that of the faulty drive, F:, which is the OS disk attached as a data disk on the repair VM.
The resulting command to copy the file would be: copy F:\Windows\WinSxS\amd64_xxxxxx\cmimcext.sys F:\Windows\System32\Drivers .
Add the OSDEVICE Variable
Collect the current booting setup information and note the identifier on the active partition. You will then use this information to add the OSDEVICE variable, following the directions for the generation of your VM.
If this information collection gives an error where there’s no \boot\bcd file, then use the instructions in Repair the System File instead.
For Generation 1 VMs, open an elevated command prompt as an Administrator and enter the following command:
bcdedit /store :\boot\bcd /enum
This image shows Windows Boot Loader in a Generation 1 VM, with the identifier attribute highlighted. The identifier attribute highlighted shows a unique alphanumeric string.

Note the identifier of the Windows Boot Loader, whose path is \windows\system32\winload.exe.
For Generation 2 VMs, verify both that the OS disk is online, and that its partition drive letters have been assigned. When this has been verified, collect the boot setup information.
- In Windows search, type Disk Management and open the disk management console. Use this console to identify the disk number attached on your repair VM and the Extensible Firmware Interface (EFI) partition which holds the BCD store.
In the following image, Disk 2 is the disk number attached to the Repair VM. The image also shows the EFI System Partition on Disk 2, which is 100MB in size and doesn’t have an assigned letter.

- Open an elevated command prompt as an Administrator and enter the following commands:
- The bootable folder for Generation 1 VMs is (\boot\bcd folder).
- The bootable folder for Generation 2 VMs is EFI\Microsoft\boot\bcd.
- The bootable folder for Generation 1 VMs is (\boot\bcd folder).
- The bootable folder for Generation 2 VMs is EFI\Microsoft\boot\bcd.
Open the DISKPART TOOL using the command diskpart .
List all disks, then select the attached disk identified in the previous step:
The following image shows the results of listing and selecting a disk. Disk 0 (127 GB / Online), Disk 1 (32 GB / Online), and Disk 2 (127 GB / Online) are listed, with Disk 2 being selected using the command sel disk 2 .

List the partitions and select the EFI system partition identified in the previous step:
The following image shows the results of listing and selecting a partition. Partition 1 (Reserved / 16MB), Partition 2 (System / 100MB), and Partition 3 (Primary / 126 GB) are listed, with Partition 2 being selected using the command sel part 2 .

Assign a letter to the EFI partition using the command assign .
In the following image, the assign command and the new drive SYSTEM (F:) are both viewable in File Explorer.

List the BCD store data using the following command:
bcdedit /store :EFI\Microsoft\boot\bcd /enum
In the following image, Windows Boot Loader is in a generation 2 VM with the identifier attribute highlighted. The highlighted identifier attribute has a value of .

Note the identifier of the Windows Boot Loader, whose path is \windows\system32\winload.efi.
Notice that the OSDEVICE variable on the active partition is missing:

In this image, Windows Boot Manager and Windows Boot Loader’s attributes are listed in the command prompt, but the OSDEVICE attribute is missing.
Add the OSDEVICE variable based on the following information:
For single partitions OS disks, add BOOT .
The boot-able folder will be on the same partition as the windows folder \windows folder.
For Generation 1 VMs, enter the following command:
bcdedit /store :\boot\bcd /set < >OSDEVICE BOOT
For Generation 2 VMs, enter the following command:
bcdedit /store :EFI\Microsoft\boot\bcd /set < >OSDEVICE BOOT
For multiple partition OS disks, add PARTITION= : .
The boot-able folder will most likely be on a different partition than the windows folder \windows folder.
For Generation 1 VMs, enter the following command:
bcdedit /store :\boot\bcd /set < >OSDEVICE partition= :
For Generation 2 VMs, enter the following command:
bcdedit /store :EFI\Microsoft\boot\bcd /set < >OSDEVICE partition= :
Contact Support
The Registry File error has a solution, but you will need to create a support ticket for further assistance.
Enable the Serial Console and memory dump collection
Recommended: Before you rebuild the VM, enable the Serial Console and memory dump collection by running the following script:
Open an elevated command prompt session as an Administrator.
Run the following commands:
Enable the Serial Console:
Verify that the free space on the OS disk is larger than the memory size (RAM) on the VM.
If there’s not enough space on the OS disk, change the location where the memory dump file will be created, and refer that location to any data disk attached to the VM that has enough free space. To change the location, replace %SystemRoot% with the drive letter of the data disk, such as F:, in the following commands.
Suggested configuration to enable OS Dump:
Load Registry Hive from the broken OS Disk:


