- What Is Windows Boot Manager and How to Enable/Disable It [MiniTool Wiki]
- Quick Navigation :
- What Is Windows Boot Manager
- How to Enable/Disable Windows 10 Boot Manager
- Method 1: Utilize Command Prompt
- Method 2: Change System Properties
- Extra Information about BootMGR
- Join for Exclusives
- Changing the Friendly Name of a Boot Entry
- Using BCDEdit
- Using Bootcfg
- Editing the Boot.ini File
- Advanced troubleshooting for Windows boot problems
- Summary
- BIOS phase
- Boot loader phase
- Method 1: Startup Repair tool
- Method 2: Repair Boot Codes
- Method 3: Fix BCD errors
- Method 4: Replace Bootmgr
- Method 5: Restore System Hive
- Kernel Phase
- Clean boot
What Is Windows Boot Manager and How to Enable/Disable It [MiniTool Wiki]
Quick Navigation :
What Is Windows Boot Manager
Windows Boot Manager (BOOTMGR), a small piece of software, is loaded from the volume boot code that is a part of the volume boot record. It enables you to boot Windows 10/8/7 or Windows Vista operating system. Besides, MiniTool will offer more information to you.
The configuration data that BOOTMGR requires can be found in the Boot Configuration Data (BCD) store, which is a registry-like database. The database replaces the boot.ini file used in old Windows versions like Windows XP.
The BOOTMGR file itself is both read-only and hidden, which is located in the root directory of the partition. It is marked as “Active” in Disk Management. In most Windows PCs, this partition is labelled as “System Reserved” without hard drive letter.
If there’s no the “System Reserved” partition, probably the BOOTMGR is located on the primary hard drive (in most cases it’s C drive). The boot manager will execute winload.exe, which is the system loader that is used to continue the Windows boot process.
How to Enable/Disable Windows 10 Boot Manager
Based on the above description, you can know that Windows boot manager Windows 10 is beneficial to your computer. Additionally, if you have multiple operating systems, you can choose the target operating system and enable Windows Manager when booting your computer.
However, as it can unnecessarily slow down the boot process when it waits to ask you which operating system to boot to, you may want to disable it.
Actually, you are unable to delete Windows boot manager. What you can do is to reduce the time that it waits on the screen for your answer which operating system you would like to start. You can utilize the given methods to enable/disable Windows 10 boot manager.
Method 1: Utilize Command Prompt
To enable/disable BOOTMGR via Command Prompt, you need to have administrator privilege to perform. If you don’t have this access, it is suggested that you use Renee PassNow to create one before following the steps below.
Step 1: Type cmd in the search box, and then right click Command Prompt and choose Run as administrator.
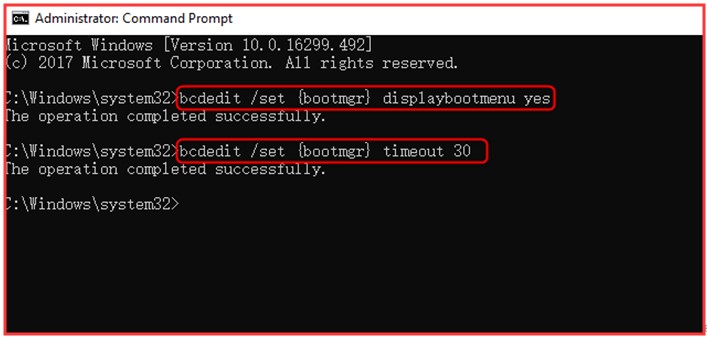
Step 2: Type the following commands in the Prompt and hit the Enter key after typing each one command.
- bcdedit / set
displaybootmenu yes - bcdedit / set
timeout 30
Step 3: If you want to disable Windows Boot Manager, you need to type bcdedit / set
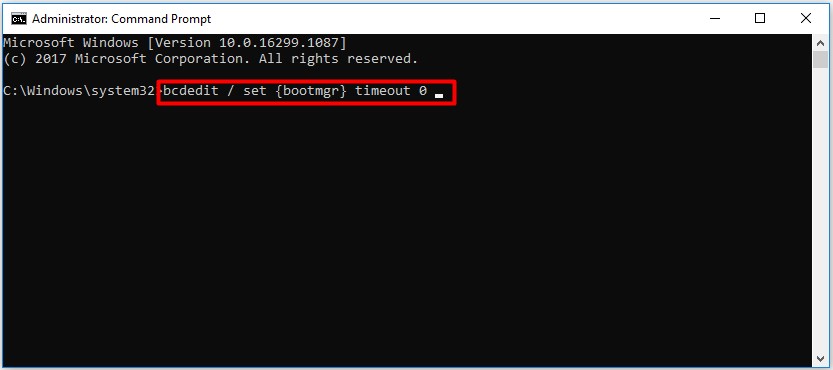
You can also use the bcdedit / set
Method 2: Change System Properties
Alternatively, you can change System Properties to enable or disable Windows Boot Manager. Here are steps for you.
Step 1: Open the Run dialog window by pressing Win plus R keys.
Step 2: Type sysdm.cpl and click OK to continue.

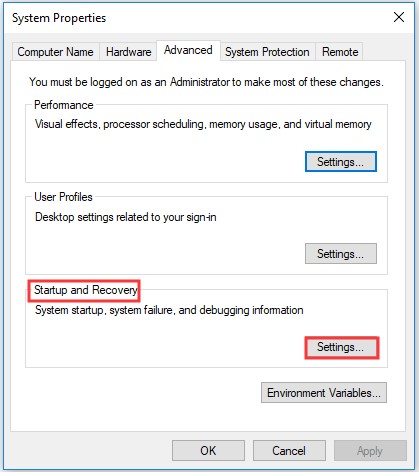
Step 3: When the System Properties window pops up, choose the Advanced option. Then click on the Settings under the Startup and Recovery option.
Step 4: In the pop-up window, select the Time to display list of operating systems box and set the time value. After that, click OK to save the changes.
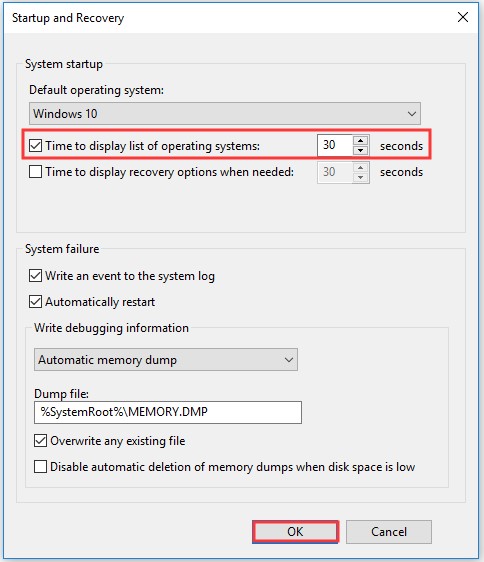
Step 5: If you want to disable BOOTMGR, cancel Time to display list of operating systems box or set the time value as 0 and click OK to finish the operation.

Extra Information about BootMGR
The common boot error in Windows is the BOOTMGR is missing error. The Boot Configuration Data store is safer than the boot options in previous. That is because it enables users who are in Administrator group to lock the BCD store partition and gives some rights to other users to decide which ones can manage boot options.
Only if you are in the Administrators group, you can edit the boot options in Windows Vista and more advanced Windows versions utilizing BCDEdit.exe tool included in those versions of Windows. On the contrary, if you’re using older versions of Windows, use the Bootcfg and NvrBoot tools instead.
Join for Exclusives
Connect with us for giveaways, exclusive promotions and latest news!
Changing the Friendly Name of a Boot Entry
In Windows, the items that appear in the Windows Boot Manager are the descriptions of each boot entry.
Typically, after you copy a boot entry, you change the friendly name of the newly created entry to distinguish it from the original.
You can also change the friendly name to make it easier to recognize customized boot entries. A string that precisely describes the entry can save significant time and effort.
For example, the following friendly name strings add little value.
However, more precise strings, such as the ones that follow, make the boot choice much easier.
NoteВ В When a boot entry is configured for debugging (/debug /debugport) or for Emergency Management Services (EMS) (/redirect) on an x86- or an x64-based system, the boot loader appends a bracketed phrase ([debugger enabled] or [ems enabled]) to the friendly name that appears in the boot menu. However, the boot loader omits the bracketed phrase from the boot menu when the friendly name and the bracketed phrase together exceed 70 characters. To restore the bracketed phrase, shorten the friendly name.
To change the friendly name of a boot entry in a Boot.ini file, you can use Bootcfg or edit the Boot.ini file in Notepad. On systems that store boot options in EFI NVRAM, use Bootcfg.
To change the friendly name of a boot entry for Windows, use BCDEdit.
Administrative privileges are required to update the boot configuration. Changing some boot entry options could render your computer inoperable.
Using BCDEdit
To change the description of a boot entry as it appears on the boot menu, you can use the /set IDdescription option. The command uses the following syntax. The ID is the GUID that is associated with the boot entry (or one of the well-known identifiers, for example,
If you are using Windows PowerShell, you must use quotes around the boot entry identifier, for example: «<49916baf-0e08-11db-9af4-000bdbd316a0>« or «
To change the description of the boot entry that corresponds to the operating system that is currently running, use the following example:
You can also change the description when you copy an existing boot entry using the /d option.
Using Bootcfg
With Bootcfg, you can change the friendly name of a boot entry only while copying the entry. Use the Bootcfg /copy switch to copy the entry and change its friendly name.
The following Bootcfg command copies the first boot entry to create a new entry. The /ID switch specifies the line number of the entry being copied. The /d (description) switch specifies the friendly name of the newly-created entry.
For complete instructions for using Bootcfg, see Help and Support Services. For examples, see Using Boot Parameters.
Editing the Boot.ini File
In the Boot.ini file, the friendly name of a boot entry appears in the boot entry in quotation marks.
For example, the following sample from a Boot.ini file has duplicate boot entries for Microsoft Windows 10 Professional.
To change the friendly name of a boot entry, type over the quoted string in the boot entry. In the following example, because the first entry will be customized for debugging, the name is changed to Windows 10 Debug.
Advanced troubleshooting for Windows boot problems
This article is intended for use by support agents and IT professionals. If you’re looking for more general information about recovery options, see Recovery options in Windows 10.
Summary
There are several reasons why a Windows-based computer may have problems during startup. To troubleshoot boot problems, first determine in which of the following phases the computer gets stuck:
| Phase | Boot Process | BIOS | UEFI |
|---|---|---|---|
| 1 | PreBoot | MBR/PBR (Bootstrap Code) | UEFI Firmware |
| 2 | Windows Boot Manager | %SystemDrive%\bootmgr | \EFI\Microsoft\Boot\bootmgfw.efi |
| 3 | Windows OS Loader | %SystemRoot%\system32\winload.exe | %SystemRoot%\system32\winload.efi |
| 4 | Windows NT OS Kernel | %SystemRoot%\system32\ntoskrnl.exe |
1. PreBoot
The PC’s firmware initiates a Power-On Self Test (POST) and loads firmware settings. This pre-boot process ends when a valid system disk is detected. Firmware reads the master boot record (MBR), and then starts Windows Boot Manager.
2. Windows Boot Manager
Windows Boot Manager finds and starts the Windows loader (Winload.exe) on the Windows boot partition.
3. Windows operating system loader
Essential drivers required to start the Windows kernel are loaded and the kernel starts to run.
4. Windows NT OS Kernel
The kernel loads into memory the system registry hive and additional drivers that are marked as BOOT_START.
The kernel passes control to the session manager process (Smss.exe) which initializes the system session, and loads and starts the devices and drivers that are not marked BOOT_START.
Here is a summary of the boot sequence, what will be seen on the display, and typical boot problems at that point in the sequence. Before starting troubleshooting, you have to understand the outline of the boot process and display status to ensure that the issue is properly identified at the beginning of the engagement.

Click to enlarge
Each phase has a different approach to troubleshooting. This article provides troubleshooting techniques for problems that occur during the first three phases.
If the computer repeatedly boots to the recovery options, run the following command at a command prompt to break the cycle:
Bcdedit /set
If the F8 options don’t work, run the following command:
Bcdedit /set
BIOS phase
To determine whether the system has passed the BIOS phase, follow these steps:
- If there are any external peripherals connected to the computer, disconnect them.
- Check whether the hard disk drive light on the physical computer is working. If it is not working, this indicates that the startup process is stuck at the BIOS phase.
- Press the NumLock key to see whether the indicator light toggles on and off. If it does not, this indicates that the startup process is stuck at BIOS.
If the system is stuck at the BIOS phase, there may be a hardware problem.
Boot loader phase
If the screen is completely black except for a blinking cursor, or if you receive one of the following error codes, this indicates that the boot process is stuck in the Boot Loader phase:
- Boot Configuration Data (BCD) missing or corrupted
- Boot file or MBR corrupted
- Operating system Missing
- Boot sector missing or corrupted
- Bootmgr missing or corrupted
- Unable to boot due to system hive missing or corrupted
To troubleshoot this problem, use Windows installation media to start the computer, press Shift+F10 for a command prompt, and then use any of the following methods.
Method 1: Startup Repair tool
The Startup Repair tool automatically fixes many common problems. The tool also lets you quickly diagnose and repair more complex startup problems. When the computer detects a startup problem, the computer starts the Startup Repair tool. When the tool starts, it performs diagnostics. These diagnostics include analyzing startup log files to determine the cause of the problem. When the Startup Repair tool determines the cause, the tool tries to fix the problem automatically.
To do this, follow theseВ steps.
For additional methods to start WinRE, see Windows Recovery Environment (Windows RE).
Start the system to the installation media for the installed version of Windows. For more information, see Create installation media for Windows.
On the Install Windows screen, select Next > Repair your computer.
On the System Recovery Options screen, select Next > Command Prompt.
After Startup Repair, select Shutdown, then turn on your PC to see if Windows can boot properly.
The Startup Repair tool generates a log file to help you understand the startup problems and the repairs that were made. You can find the log file in the following location:
%windir%\System32\LogFiles\Srt\Srttrail.txt
Method 2: Repair Boot Codes
To repair boot codes, run the following command:
To repair the boot sector, run the following command:
Running BOOTREC together with Fixmbr overwrites only the master boot code. If the corruption in the MBR affects the partition table, running Fixmbr may not fix the problem.
Method 3: Fix BCD errors
If you receive BCD-related errors, follow these steps:
Scan for all the systems that are installed. To do this, run the following command:
Restart the computer to check whether the problem is fixed.
If the problem is not fixed, run the following command:
You might receive one of the following outputs:
If the output shows windows installation: 0, run the following commands:
After you run the command, you receive the following output:
- Try restarting the system.
Method 4: Replace Bootmgr
If methods 1, 2 and 3 do not fix the problem, replace the Bootmgr file from drive C to the System Reserved partition. To do this, follow these steps:
At a command prompt, change the directory to the System Reserved partition.
Run the attrib command to unhide the file:
Run the same attrib command on the Windows (system drive):
Rename the Bootmgr file as Bootmgr.old:
Navigate to the system drive.
Copy the Bootmgr file, and then paste it to the System Reserved partition.
Restart the computer.
Method 5: Restore System Hive
If Windows cannot load the system registry hive into memory, you must restore the system hive. To do this, use the Windows Recovery Environment or use Emergency Repair Disk (ERD) to copy the files from the C:\Windows\System32\config\RegBack to C:\Windows\System32\config.
If the problem persists, you may want to restore the system state backup to an alternative location, and then retrieve the registry hives to be replaced.
Starting in Windows 10, version 1803, Windows no longer automatically backs up the system registry to the RegBack folder.This change is by design, and is intended to help reduce the overall disk footprint size of Windows. To recover a system with a corrupt registry hive, Microsoft recommends that you use a system restore point. For more details, check this article.
Kernel Phase
If the system gets stuck during the kernel phase, you experience multiple symptoms or receive multiple error messages. These include, but are not limited to, the following:
A Stop error appears after the splash screen (Windows Logo screen).
Specific error code is displayed. For example, «0x00000C2» , «0x0000007B» , «inaccessible boot device» and so on.
The screen is stuck at the «spinning wheel» (rolling dots) «system busy» icon.
A black screen appears after the splash screen.
To troubleshoot these problems, try the following recovery boot options one at a time.
Scenario 1: Try to start the computer in Safe mode or Last Known Good Configuration
On the Advanced Boot Options screen, try to start the computer in Safe Mode or Safe Mode with Networking. If either of these options works, use Event Viewer to help identify and diagnose the cause of the boot problem. To view events that are recorded in the event logs, follow these steps:
Use one of the following methods to open Event Viewer:
Click Start, point to Administrative Tools, and then click Event Viewer.
Start the Event Viewer snap-in in Microsoft Management Console (MMC).
In the console tree, expand Event Viewer, and then click the log that you want to view. For example, click System log or Application log.
In the details pane, double-click the event that you want to view.
On the Edit menu, click Copy, open a new document in the program in which you want to paste the event (for example, Microsoft Word), and then click Paste.
Use the Up Arrow or Down Arrow keyВ to view the descriptionВ of the previous or next event.
Clean boot
To troubleshoot problems that affect services, do a clean boot by using System Configuration (msconfig). Select Selective startup to test the services one at a time to determine which one is causing the problem. If you cannot find the cause, try including system services. However, in most cases, the problematic service is third-party.
Disable any service that you find to be faulty, and try to start the computer again by selecting Normal startup.
If the computer starts in Disable Driver Signature mode, start the computer in Disable Driver Signature Enforcement mode, and then follow the steps that are documented in the following article to determine which drivers or files require driver signature enforcement: Troubleshooting boot problem caused byВ missing driver signature (x64)
If the computer is a domain controller, try Directory Services Restore mode (DSRM).
This method is an important step if you encounter Stop error «0xC00002E1» or «0xC00002E2»
Examples
Serious problems might occur if you modify the registry incorrectly by using Registry Editor or by using another method. These problems might require that you reinstall the operating system. Microsoft cannot guarantee that these problems can be solved. Modify the registry at your own risk.
Error code INACCESSIBLE_BOOT_DEVICE (STOP 0x7B)
To troubleshoot this Stop error, follow these steps to filter the drivers:
Go to Window Recovery Environment (WinRE) by putting an ISO disk of the system in the disk drive. The ISO should be of same version of Windows or a later version.
Open the registry.
Load the system hive, and name it as «test.»
Under the following registry subkey, check for lower filter and upper filter items for Non-Microsoft Drivers:
HKEY_LOCAL_MACHINE\SYSTEM\ControlSet001\Control\Class
For each third-party driver that you locate, click the upper or lower filter, and then delete the value data.
Search through the whole registry for similar items. Process as an appropriate, and then unload the registry hive.
Restart the server in Normal mode.
For additional troubleshooting steps, see the following articles:
To fix problems that occur after you install Windows updates, check for pending updates by using these steps:
Open a Command Prompt window in WinRE.
Run the command:
If there are any pending updates, uninstall them by running the following commands:
Try to start the computer.
If the computer does not start, follow these steps:
Open A Command Prompt window in WinRE, and start a text editor, such as Notepad.
Navigate to the system drive, and search for windows\winsxs\pending.xml.
If the Pending.xml file is found, rename the file as Pending.xml.old.
Open the registry, and then load the component hive in HKEY_LOCAL_MACHINE as a test.
Highlight the loaded test hive, and then search for the pendingxmlidentifier value.
If the pendingxmlidentifier value exists, delete the value.
Unload the test hive.
Load the system hive, name it as «test».
Navigate to the following subkey:
HKEY_LOCAL_MACHINE\SYSTEM\ControlSet001\Services\TrustedInstaller
Change the Start value from 1 to 4
Unload the hive.
Try to start the computer.
If the Stop error occurs late in the startup process, or if the Stop error is still being generated, you can capture a memory dump. A good memory dump can help determine the root cause of the Stop error. For details, see the following articles:
For more information about page file problems in Windows 10 or Windows Server 2016, see the following:
For more information about Stop errors, see the following Knowledge Base article:
If the dump file shows an error that is related to a driver (for example, windows\system32\drivers\stcvsm.sys is missing or corrupted), follow these guidelines:
Check the functionality that is provided by the driver. If the driver is a third-party boot driver, make sure that you understand what it does.
If the driver is not important and has no dependencies, load the system hive, and then disable the driver.
If the stop error indicates system file corruption, run the system file checker in offline mode.
To do this, open WinRE, open a command prompt, and then run the following command:
If there is disk corruption, run the check disk command:
If the Stop error indicates general registry corruption, or if you believe that new drivers or services were installed, follow these steps:
- Start WinRE, and open a Command Prompt window.
- Start a text editor, such as Notepad.
- Navigate to C:\Windows\System32\Config.
- Rename the all five hives by appending «.old» to the name.
- Copy all the hives from the Regback folder, paste them in the Config folder, and then try to start the computer in Normal mode.


