- Advanced troubleshooting for Stop error 7B or Inaccessible_Boot_Device
- Causes of the Inaccessible_Boot_Device Stop error
- Troubleshoot this error
- Verify that the boot disk is connected and accessible
- Step 1
- Step 2
- Verify the integrity of Boot Configuration Database
- Troubleshooting if this issue occurs after a Windows Update installation
- Verifying boot critical drivers and services
- Check services
- Check upper and lower filter drivers
- Running SFC and Chkdsk
- Windows Boot Manager: что это? Основные понятия, ошибки и методы их исправления
- Windows Boot Manager: что это?
- Основные функции Boot Manager Windows 7, 8, 10
- Типы загрузчиков
- Ошибки загрузки
- Простейшие методы исправления
- Заключение
Advanced troubleshooting for Stop error 7B or Inaccessible_Boot_Device
This article provides steps to troubleshoot Stop error 7B: Inaccessible_Boot_Device. This error might occur after some changes are made to the computer, or immediately after you deploy Windows on the computer.
Causes of the Inaccessible_Boot_Device Stop error
Any one of the following factors might cause the stop error:
Missing, corrupted, or misbehaving filter drivers that are related to the storage stack
File system corruption
Changes to the storage controller mode or settings in the BIOS
Using a different storage controller than the one that was used when Windows was installed
Moving the hard disk to a different computer that has a different controller
A faulty motherboard or storage controller, or faulty hardware
In unusual cases, the failure of the TrustedInstaller service to commit newly installed updates is because of component-based store corruptions
Corrupted files in the Boot partition (for example, corruption in the volume that’s labeled SYSTEM when you run the diskpart > list vol command)
If there is a blank GPT entry before the entry of the Boot partition
Troubleshoot this error
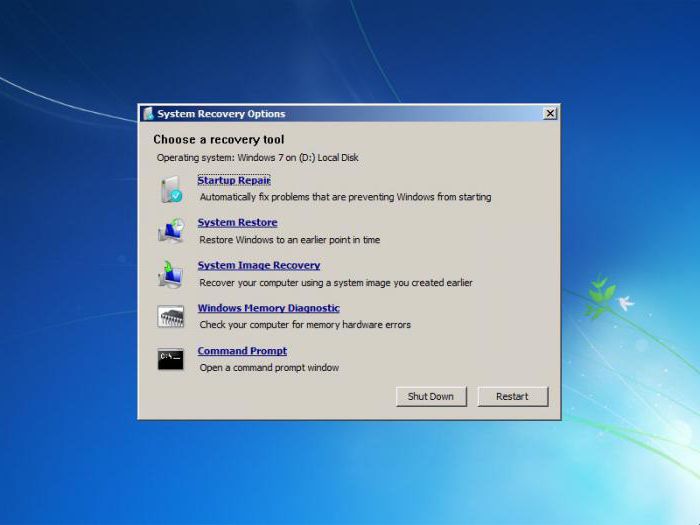
Start the computer in Windows Recovery Mode (WinRE). To do this, follow these steps.
On the Install Windows screen, select Next > Repair your computer.
On the System Recovery Options screen, select Next > Command Prompt.
Verify that the boot disk is connected and accessible
Step 1
At the WinRE Command prompt, run diskpart , and then run list disk .
A list of the physical disks that are attached to the computer should be displayed and resemble the following display:
If the computer uses a Unified Extensible Firmware Interface (UEFI) startup interface, there will be an asterisk () in the *GPT column.
If the computer uses a basic input/output system (BIOS) interface, there won’t be an asterisk in the Dyn column.
Step 2
If the list disk command lists the OS disks correctly, run the list vol command in diskpart .
list vol generates an output that resembles the following display:
If the disk that contains the OS isn’t listed in the output, you’ll have to engage the OEM or virtualization manufacturer.
Verify the integrity of Boot Configuration Database
Check whether the Boot Configuration Database (BCD) has all the correct entries. To do this, run bcdedit at the WinRE command prompt.
To verify the BCD entries:
Examine the Windows Boot Manager section that has the identifier. Make sure that the device and path entries point to the correct device and boot loader file.
If the computer is UEFI-based, here’s example output:
If the machine is BIOS-based, here’s example output:
This output might not contain a path.
In the Windows Boot Loader that has the identifier, make sure that device, path, osdevice, and systemroot point to the correct device or partition, winload file, OS partition or device, and OS folder.
If the computer is UEFI-based, the file path value that’s specified in the path parameter of and contains an .efi extension.

If any of the information is wrong or missing, we recommend that you create a backup of the BCD store. To do this, run bcdedit /export C:\temp\bcdbackup . This command creates a backup in C:\temp\ that’s named bcdbackup. To restore the backup, run bcdedit /import C:\temp\bcdbackup . This command overwrites all BCD settings by using the settings in bcdbackup.
After the backup completes, run the following command to make the changes:
For example, if the device under
If you want to completely re-create the BCD, or if you get a message that states that «The boot configuration data store could not be opened. The system could not find the file specified, » run bootrec /rebuildbcd .
If the BCD has the correct entries, check whether the winload and bootmgr entries exist in the correct location, which is in the specified path in the bcdedit command. By default, bootmgr in the BIOS partition is in the root of the SYSTEM partition. To see the file, run Attrib -s -h -r .
If the files are missing, and you want to rebuild the boot files, follow these steps:
Copy all the contents under the SYSTEM partition to another location. Alternatively, you can use the command prompt to navigate to the OS drive, create a new folder, and then copy all the files and folders from the SYSTEM volume, like shown here:
If you’re using Windows 10, or if you’re troubleshooting by using a Windows 10 ISO at the Windows Pre-Installation Environment command prompt, you can use the bcdboot command to re-create the boot files, like shown here:
For example, if we assign the (WinRE drive) the letter R and the is the letter D, the following is the command that we would use:
The ALL part of the bcdboot command writes all the boot files (both UEFI and BIOS) to their respective locations.
If you don’t have a Windows 10 ISO, format the partition and copy bootmgr from another working computer that has a similar Windows build. To do this, follow these steps:
Start Notepad.
Navigate to the system partition (in this example, it’s R).
Right-click the partition, and then format it.
Troubleshooting if this issue occurs after a Windows Update installation
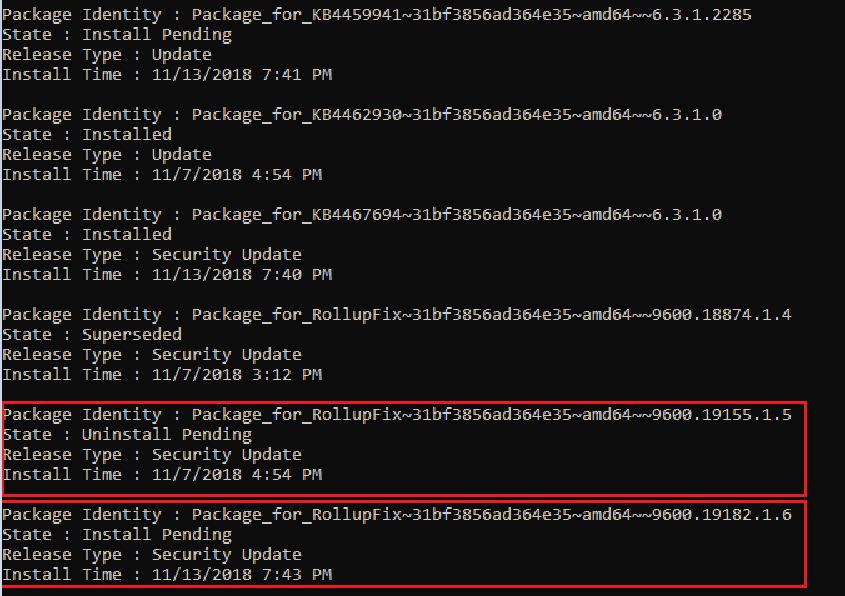
Run the following command to verify the Windows update installation and dates:
After you run this command, you’ll see the Install pending and Uninstall Pending packages:
Run the dism /Image:C:\ /Cleanup-Image /RevertPendingActions command. Replace C: with the system partition for your computer.

Navigate to OSdriveLetter:\Windows\WinSxS, and then check whether the pending.xml file exists. If it does, rename it to pending.xml.old.
To revert the registry changes, type regedit at the command prompt to open Registry Editor.
Select HKEY_LOCAL_MACHINE, and then go to File > Load Hive.
Navigate to OSdriveLetter:\Windows\System32\config, select the file that’s named COMPONENT (with no extension), and then select Open. When you’re prompted, enter the name OfflineComponentHive for the new hive.

Expand HKEY_LOCAL_MACHINE\OfflineComponentHive, and check whether the PendingXmlIdentifier key exists. Create a backup of the OfflineComponentHive key, and then delete the PendingXmlIdentifier key.
Unload the hive. To do this, highlight OfflineComponentHive, and then select File > Unload hive.


Select HKEY_LOCAL_MACHINE, go to File > Load Hive, navigate to OSdriveLetter:\Windows\System32\config, select the file that’s named SYSTEM (with no extension), and then select Open. When you’re prompted, enter the name OfflineSystemHive for the new hive.
Expand HKEY_LOCAL_MACHINE\OfflineSystemHive, and then select the Select key. Check the data for the Default value.
If the data in HKEY_LOCAL_MACHINE\OfflineSystemHive\Select\Default is 1, expand HKEY_LOCAL_MACHINE\OfflineHive\ControlSet001. If it’s 2, expand HKEY_LOCAL_MACHINE\OfflineHive\ControlSet002, and so on.
Expand Control\Session Manager. Check whether the PendingFileRenameOperations key exists. If it does, back up the SessionManager key, and then delete the PendingFileRenameOperations key.
Verifying boot critical drivers and services
Check services
Follow steps 1-10 in the «Troubleshooting if this issue occurs after a Windows Update installation» section. (Step 11 doesn’t apply to this procedure.)
Expand Services.
Make sure that the following registry keys exist under Services:
If these keys exist, check each one to make sure that it has a value that’s named Start, and that it’s set to 0. If it’s not, set the value to 0.
If any of these keys don’t exist, you can try to replace the current registry hive by using the hive from RegBack. To do this, run the following commands:
Check upper and lower filter drivers
Check whether there are any non-Microsoft upper and lower filter drivers on the computer and that they don’t exist on another, similar working computer. If they do exist, remove the upper and lower filter drivers:
Expand HKEY_LOCAL_MACHINE\OfflineHive\ControlSet001\Control.
Look for any UpperFilters or LowerFilters entries.
These filters are mainly related to storage. After you expand the Control key in the registry, you can search for UpperFilters and LowerFilters.
You might find these filter drivers in some of the following registry entries. These entries are under ControlSet and are designated as Default:
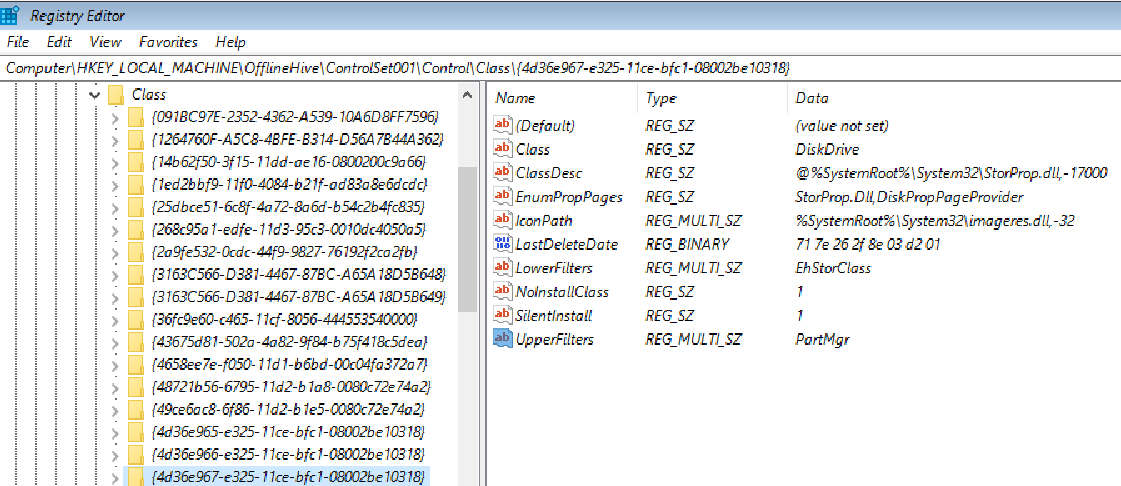
If an UpperFilters or LowerFilters entry is non-standard (for example, it’s not a Windows default filter driver, such as PartMgr), remove the entry. To remove it, double-click it in the right pane, and then delete only that value.
There could be multiple entries.
These entries might affect us because there might be an entry in the Services branch that has a START type set to 0 or 1, which means that it’s loaded at the Boot or Automatic part of the boot process. Also, either the file that’s referred to is missing or corrupted, or it might be named differently than what’s listed in the entry.
If there’s a service that’s set to 0 or 1 that corresponds to an UpperFilters or LowerFilters entry, setting the service to disabled in the Services registry (as discussed in steps 2 and 3 of the Check services section) without removing the Filter Driver entry causes the computer to crash and generate a 0x7b Stop error.
Running SFC and Chkdsk
If the computer still doesn’t start, you can try to run a chkdisk process on the system drive, and then also run System File Checker. To do this, run the following commands at a WinRE command prompt:
chkdsk /f /r OsDrive:

sfc /scannow /offbootdir=OsDrive:\ /offwindir=OsDrive:\Windows
Windows Boot Manager: что это? Основные понятия, ошибки и методы их исправления
Сегодня абсолютно все люди, работающие с компьютерами, знают, что без операционной системы взаимодействие между машиной и пользователем невозможно. Само собой разумеется, что «операционка» сначала должна загрузиться, а только потом можно будет использовать все ее функции. В связи с этим часто и возникает вопрос, связанный с компонентом Windows Boot Manger. Что это такое, мы и попытаемся разобраться. Заодно посмотрим на некоторые самые распространенные типы ошибок, которые могут появляться во время старта системы.
Windows Boot Manager: что это?
Начнем, пожалуй, с азов. Для начала рассмотрим сам термин Windows Boot Manager. Что это, нетрудно догадаться, если просто перевести данное словосочетание с английского на русский – «менеджер загрузки Windows».
Иными словами, это системные программы, которые позволяют загрузить все необходимые компоненты какой-либо ОС для обеспечения не только взаимодействия ее с пользователем через собственный интерфейс, но и организовать правильную работу всех «железных» компонентов путем их предварительной идентификации и настройки.
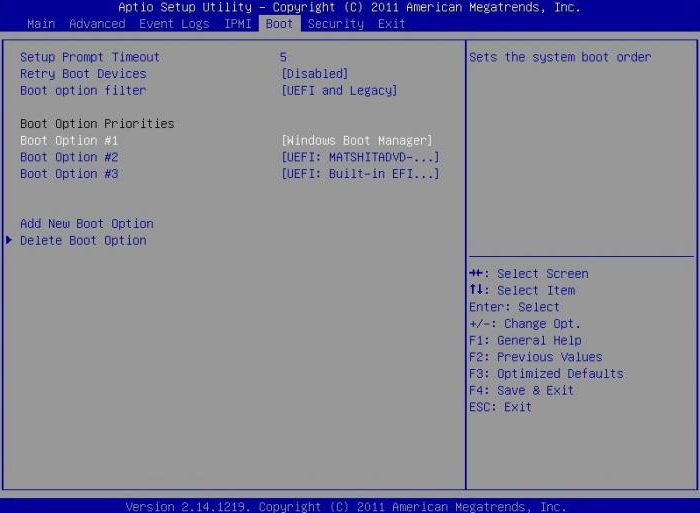
Что касается Windows Boot Manager (Windows 8, 7 или 10), такие загрузчики в архитектуре компьютеров IBM PC представляют собой ПО, содержащееся в BIOS, и записанное в компьютерную систему ПЗУ. Чтобы было понятнее, рассмотрим основные функции загрузчиков и определимся с тем, как они работают.
Основные функции Boot Manager Windows 7, 8, 10
Если кто не знает, загрузка операционной системы не всегда может производиться только с жесткого диска. Самым простым примером могут стать сетевые ОС, в которых запуск всех компонентов «операционки» даже на терминалы, не имеющие собственных винчестеров, может осуществляться через локальную сеть, когда основная «материнская) ОС находится на удаленном сервере.
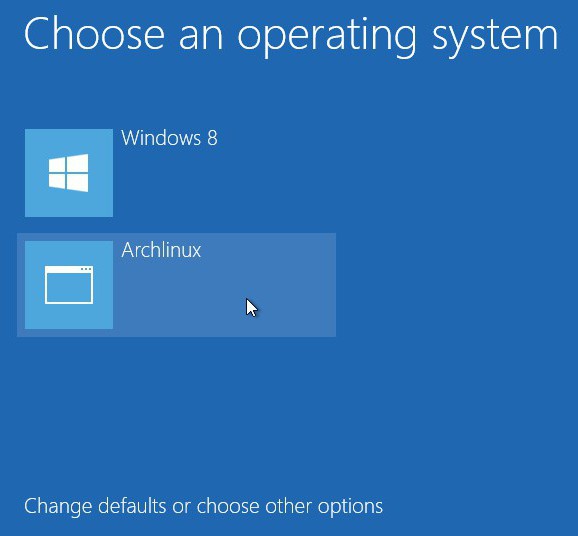
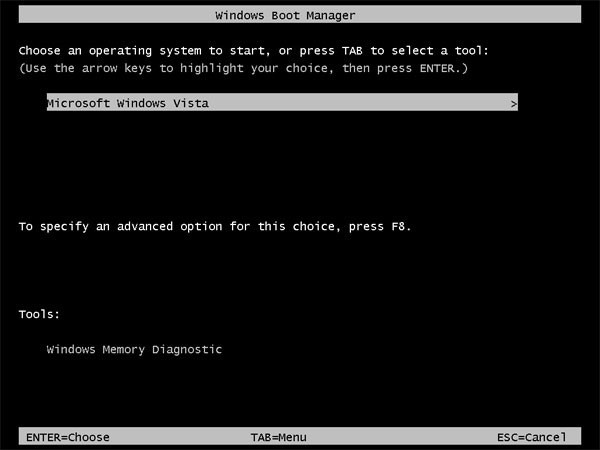
Если говорить об основном назначении загрузчика и его функциях, сразу можно отметить, что он при запуске компьютера позволяет выбрать тип желаемой ОС (если их установлено несколько), привести «железные» компоненты терминала в состояние, необходимое для старта, загружает ядро системы в оперативную память (ОЗУ), а в случае старта по сети – в ПЗУ устройства, осуществляет формирование основных параметров ядра, после чего передает ему управление системой.
Типы загрузчиков
Сегодня известно достаточно много разновидностей менеджеров загрузки операционных систем. Например, для сетевых «операционок» на основе Windows NT это служба NTLDR (загрузчик ядра), собственно, сам Windows Boot Manager (загрузчик ядра систем, начиная с Vista, в виде файлов winload.exe и bootmgr.exe), LILO (система загрузки ядра Linux), BootX (загрузчик для систем Mac OS X), SILO (в основном применяется к системам Solaris с поддержкой архитектуры SPARC), Bootman (менеджер для BeOS) и т.д.
Поскольку мы рассматриваем ОС Windows, Boot Manager (что это такое, наверное, уже немного понятно) взаимодействует с процессом загрузки не только на аппаратном уровне BIOS, но и через системные файлы. К примеру, пути загрузки операционных систем с указанием некоторых основных параметров содержатся в конфигурации многим знакомого файла boot.ini (инициализатор загрузки).
Ошибки загрузки
К сожалению, очень часто встречаются ситуации, когда загрузчик, мягко говоря, «вылетает». Наиболее распространенной ошибкой является проблема его инициализации (сообщение типа Windows Boot Manager boot failed).

В некоторых случаях можно встретить сообщения вроде BOOTMGR is compressed или BOOTMGR is missing с предложением последующего рестарта с применением стандартного сочетания Ctrl + Alt + Del.
Простейшие методы исправления
Теперь давайте посмотрим, что можно сделать, чтобы исправить такую нелицеприятную ситуацию.
Итак, имеем ошибку Windows Boot Manager. Что делать в данном случае? Прежде всего, можно использовать простейшие методы, позволяющие восстановить загрузчик. В самом простом варианте можно просто загрузиться с установочного диска с системой или использовать что-то вроде Live CD.
Здесь нужно просто перейти к консоли и выбрать для начала восстановление системы с последующим указанием контрольной точки. Если это не помогло, в той же консоли выбираем раздел восстановления загрузки. Во многих случаях, в частности, если сбои связаны с программной частью, а не с физическим повреждением винчестера, это помогает.
Иногда проблемы могут возникать из-за того, что системный диск был сжат для экономии места, чего делать вообще не рекомендуется. В этом случае после загрузки с того же Live CD заходим в «Проводник», а затем в свойствах системного раздела снимаем «птичку» с параметра сжатия, после чего в меню консоли выбираем командную строку, а после этого нужно будет последовательно ввести несколько команд.
Если системный диск обозначен литерой «C», порядок будет выглядеть следующим образом: c:, затем expand bootmgr temp, после этого attrib bootmgr -s -r –h, теперь del bootmgr, далее ren temp bootmgr и наконец attrib bootmgr -a +s +r +h.
После каждой команды, как уже понятно, нажимается клавиша ввода. Результаты действия этих команд не приводятся специально, чтобы рядовому пользователю, как говорится, просто не загружать мозги. Достаточно того, что они работают и восстанавливают загрузчик.
Если и это не помогает, используем кардинальные методы в виде команд bootrec.exe /FixMbr, bootrec.exe /FixBoot и bootrec.exe /RebuildBcd. Но этот метод лучше применять только в том случае, если все вышеописанное не помогло.
Заключение
Вот, собственно, и все, что можно рассказать очень кратко о том, что такое Windows Boot Manager. Что это, читателю наверняка стало ясно после прочтения материала. Естественно, проблем и ошибок, равно как и методов их исправления, может быть больше, нежели описано в данной статье, тем не менее именно самые распространенные были описаны. Напоследок хочется обратить внимание пользователей на тот момент, что если по каким-либо причинам загрузочная область винчестера была повреждена или же удалена системная папка «операционки» (да-да, встречается и такое), в большинстве случаев ни один из вышеприведенных методов не поможет. Придется либо тестировать жесткий диск, либо переустанавливать систему заново.


