- What Is Windows Boot Manager and How to Enable/Disable It [MiniTool Wiki]
- Quick Navigation :
- What Is Windows Boot Manager
- How to Enable/Disable Windows 10 Boot Manager
- Method 1: Utilize Command Prompt
- Method 2: Change System Properties
- Extra Information about BootMGR
- Join for Exclusives
- BCD System Store Settings for UEFI
- Windows Boot Manager Settings for UEFI
- Device Setting
- Path Setting
- Other Settings
- Windows Boot Loader Settings
- Device and OSDevice Settings
- Path Setting
- Windows Memory Tester Settings
- Device Setting
- Path Setting
- Windows Boot Manager — что это такое, как найти
- Windows Boot Manager — что это такое
- Как найти Windows Boot Manager
- Как настроить Windows Boot Manager
- Почему Windows загружается с Windows Boot Manager, а не с диска с системой
- Описание процесса удаления Windows Boot Manager
- Через меню «Конфигурация системы»
- При помощи настроек BIOS или UEFI
What Is Windows Boot Manager and How to Enable/Disable It [MiniTool Wiki]
Quick Navigation :
What Is Windows Boot Manager
Windows Boot Manager (BOOTMGR), a small piece of software, is loaded from the volume boot code that is a part of the volume boot record. It enables you to boot Windows 10/8/7 or Windows Vista operating system. Besides, MiniTool will offer more information to you.
The configuration data that BOOTMGR requires can be found in the Boot Configuration Data (BCD) store, which is a registry-like database. The database replaces the boot.ini file used in old Windows versions like Windows XP.
The BOOTMGR file itself is both read-only and hidden, which is located in the root directory of the partition. It is marked as “Active” in Disk Management. In most Windows PCs, this partition is labelled as “System Reserved” without hard drive letter.
If there’s no the “System Reserved” partition, probably the BOOTMGR is located on the primary hard drive (in most cases it’s C drive). The boot manager will execute winload.exe, which is the system loader that is used to continue the Windows boot process.
How to Enable/Disable Windows 10 Boot Manager
Based on the above description, you can know that Windows boot manager Windows 10 is beneficial to your computer. Additionally, if you have multiple operating systems, you can choose the target operating system and enable Windows Manager when booting your computer.
However, as it can unnecessarily slow down the boot process when it waits to ask you which operating system to boot to, you may want to disable it.
Actually, you are unable to delete Windows boot manager. What you can do is to reduce the time that it waits on the screen for your answer which operating system you would like to start. You can utilize the given methods to enable/disable Windows 10 boot manager.
Method 1: Utilize Command Prompt
To enable/disable BOOTMGR via Command Prompt, you need to have administrator privilege to perform. If you don’t have this access, it is suggested that you use Renee PassNow to create one before following the steps below.
Step 1: Type cmd in the search box, and then right click Command Prompt and choose Run as administrator.
Step 2: Type the following commands in the Prompt and hit the Enter key after typing each one command.
- bcdedit / set
displaybootmenu yes - bcdedit / set
timeout 30
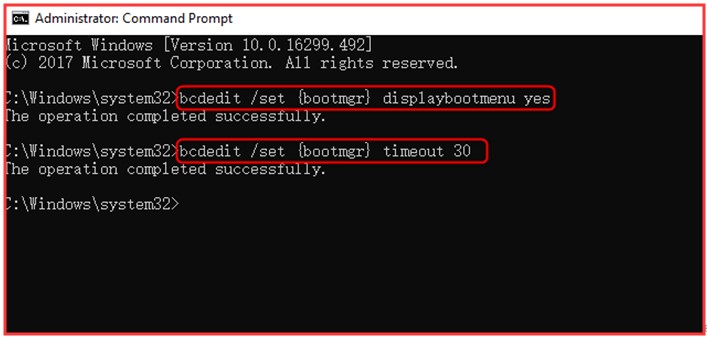
Step 3: If you want to disable Windows Boot Manager, you need to type bcdedit / set
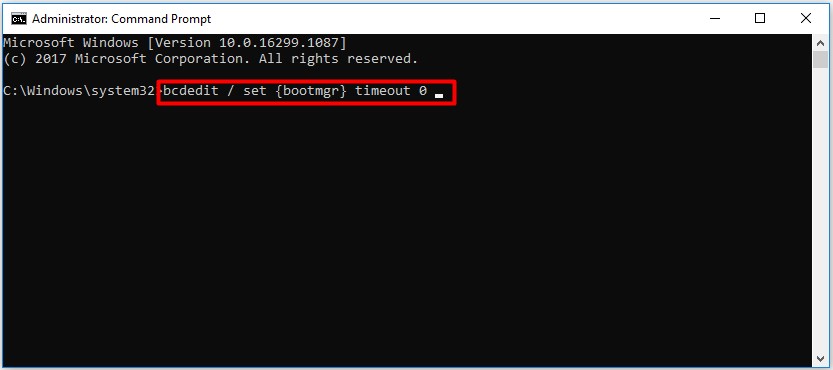
You can also use the bcdedit / set
Method 2: Change System Properties
Alternatively, you can change System Properties to enable or disable Windows Boot Manager. Here are steps for you.
Step 1: Open the Run dialog window by pressing Win plus R keys.
Step 2: Type sysdm.cpl and click OK to continue.

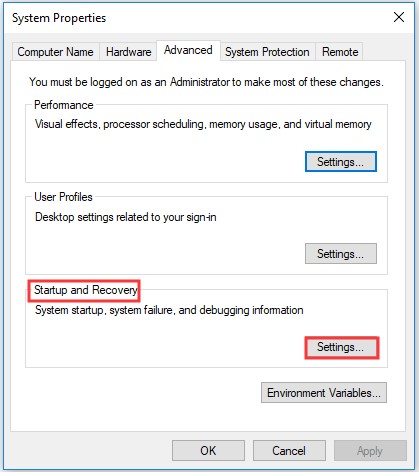
Step 3: When the System Properties window pops up, choose the Advanced option. Then click on the Settings under the Startup and Recovery option.
Step 4: In the pop-up window, select the Time to display list of operating systems box and set the time value. After that, click OK to save the changes.
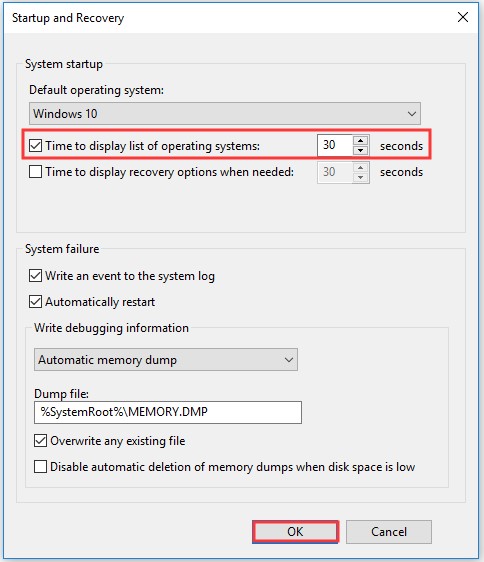
Step 5: If you want to disable BOOTMGR, cancel Time to display list of operating systems box or set the time value as 0 and click OK to finish the operation.

Extra Information about BootMGR
The common boot error in Windows is the BOOTMGR is missing error. The Boot Configuration Data store is safer than the boot options in previous. That is because it enables users who are in Administrator group to lock the BCD store partition and gives some rights to other users to decide which ones can manage boot options.
Only if you are in the Administrators group, you can edit the boot options in Windows Vista and more advanced Windows versions utilizing BCDEdit.exe tool included in those versions of Windows. On the contrary, if you’re using older versions of Windows, use the Bootcfg and NvrBoot tools instead.
Join for Exclusives
Connect with us for giveaways, exclusive promotions and latest news!
BCD System Store Settings for UEFI
For a typical deployment scenario, you do not need to modify the BCD store. This topic discusses the various BCD settings in the BCD store that you can modify. On UEFI systems, this includes settings for the following boot applications:
The following sections describe the available settings for each of these boot applications in detail and how to modify each application for UEFI systems.
For simplicity, the BCDEdit examples in this section modify the BCD system store. To modify another store, such as a copy of the BCD-template, include the store name in the command line.
Windows Boot Manager Settings for UEFI
Windows Boot Manager (
The BCD settings for the device and path elements in Windows Boot Manager indicate the firmware boot manager. The template that is named BCD-template for Windows includes the following settings for Windows Boot Manager.
Device Setting
The device element specifies the volume that contains Windows Boot Manager. For UEFI systems, the device element for Windows Boot Manager is set to the system partition volume letter. To determine the correct volume letter, use the Diskpart tool to view the disk partitions. The following example assumes that the system has a single hard drive that has multiple partitions, including a system partition that has been assigned a drive letter of S.
The following Diskpart commands select disk 0 and then list the details of the volumes on that disk, including their drive letters. It shows volume 2 as the system partition.
If the system partition does not have an assigned drive letter, assign one by using the Diskpart assign command. The following example assumes that the system partition is volume 2 and assigns it S as the drive letter.
After you have determined the system partition volume, set the device element for Windows Boot Manager to the corresponding drive letter. The following example sets device to drive S.
Path Setting
The path element specifies the location of the Windows Boot Manager application on that volume. For UEFI systems, path indicates the firmware boot manager, whose path is \EFI\Microsoft\Boot\Bootmgfw.efi.
You can confirm that BCD-template has the correct path by enumerating the values in the store, as follows:
To explicitly set path to \EFI\Microsoft\Boot\Bootmgfw.efi, use the following command.
Other Settings
You should set Windows Boot Manager to be the first item in the display order of the UEFI firmware, as shown in the following example.
You should also specify the topmost Windows boot loader application in the Windows Boot Manager display order. The following example shows how to put a specified Windows boot loader at the top of the display order.
In the preceding example, is the identifier for the specified Windows boot loader object. The next section discusses this identifier in greater detail.
NoteВ В A multiboot system that has multiple installed operating systems has multiple instances of the Windows boot loader. Each instance of the Windows boot loader has its own identifier. You can set the default Windows boot loader (
Windows Boot Loader Settings
A BCD store has at least one instance, and optionally multiple instances, of the Windows boot loader. A separate BCD object represents each instance. Each instance loads one of the installed versions of Windows that has a configuration that the object’s elements have specified. Each Windows boot loader object has its own identifier, and the object’s device and path settings indicate the correct partition and boot application.
BCD-template for Windows has a single Windows boot loader object that has the following settings.
The identifier for this Windows boot loader is <9f25ee7a-e7b7-11db-94b5-f7e662935912>. You can use this GUID on your system or let the BCDEdit tool generate a new GUID for you.
To simplify BCDEdit commands, you can specify one of the Windows boot loaders in the BCD system store as the default loader. You can then use the standard identifier (
Device and OSDevice Settings
The following elements specify key locations:
The device element specifies the partition that contains the boot application.
The osdevice element specifies the partition that contains the system root.
For the Windows boot loader for EFI, both elements are usually set to the drive letter of the Windows system partition. However, if BitLocker is enabled or a computer has multiple installed versions of Windows, osdevice and device might be set to different partitions.BCD-template sets both elements to drive C, which is the typical value. You can also explicitly set the osdevice and device values, as shown in the following example. The example also assumes that you have specified the Windows boot loader for EFI as the default boot-loader object.
Path Setting
The path element of a Windows boot loader specifies the location of the boot loader on that volume. For UEFI systems, path indicates the Windows boot loader for EFI, whose path is \Windows\System32\Winload.efi.
You can confirm that BCD-template has the correct path value by enumerating the values in the store. You can also explicitly set the path value, as shown in the following example.
Windows Memory Tester Settings
The Windows memory tester (
NoteВ В Note: Intel Itanium computers do not include a Windows memory tester and do not require
BCD-template for Windows has the following settings.
Device Setting
For UEFI systems, the device element for the Windows memory tester is set to the system partition drive letter. The following example assumes that the system partition is drive S, as used in earlier examples.
Path Setting
The path element specifies the location of Windows Test Manager on the volume that the device element has specified. For UEFI systems, path indicates the EFI version of the application (\EFI\Microsoft\Boot\Memtest.efi).
You can confirm that BCD-template has the correct path value by enumerating the values in the store. You can also use the BCDEdit tool to explicitly set the path value, as shown in the following example.
Windows Boot Manager — что это такое, как найти
Любое взаимодействие с компьютером начинается с загрузки операционной системы. Для правильного запуска ОС и контроля за процессом ее инициации существует служба Windows Boot Manager, название которой в переводе значит «Менеджер загрузки виндовс».
Windows Boot Manager — что это такое
Пользователи зачастую пугаются, когда вместо привычного процесса загрузки ОС видят какое-либо сообщение от Windows Boot Manager, что это такое многим неизвестно, и кажется, что с компьютером случилось что-то непоправимое. На самом деле виндовс бут менеджер — это просто комплекс программ и команд, которые контролируют включение операционной системы, загрузку всех компонентов, необходимых для ее полноценного функционирования и инициализацию аппаратных составляющих компьютера.
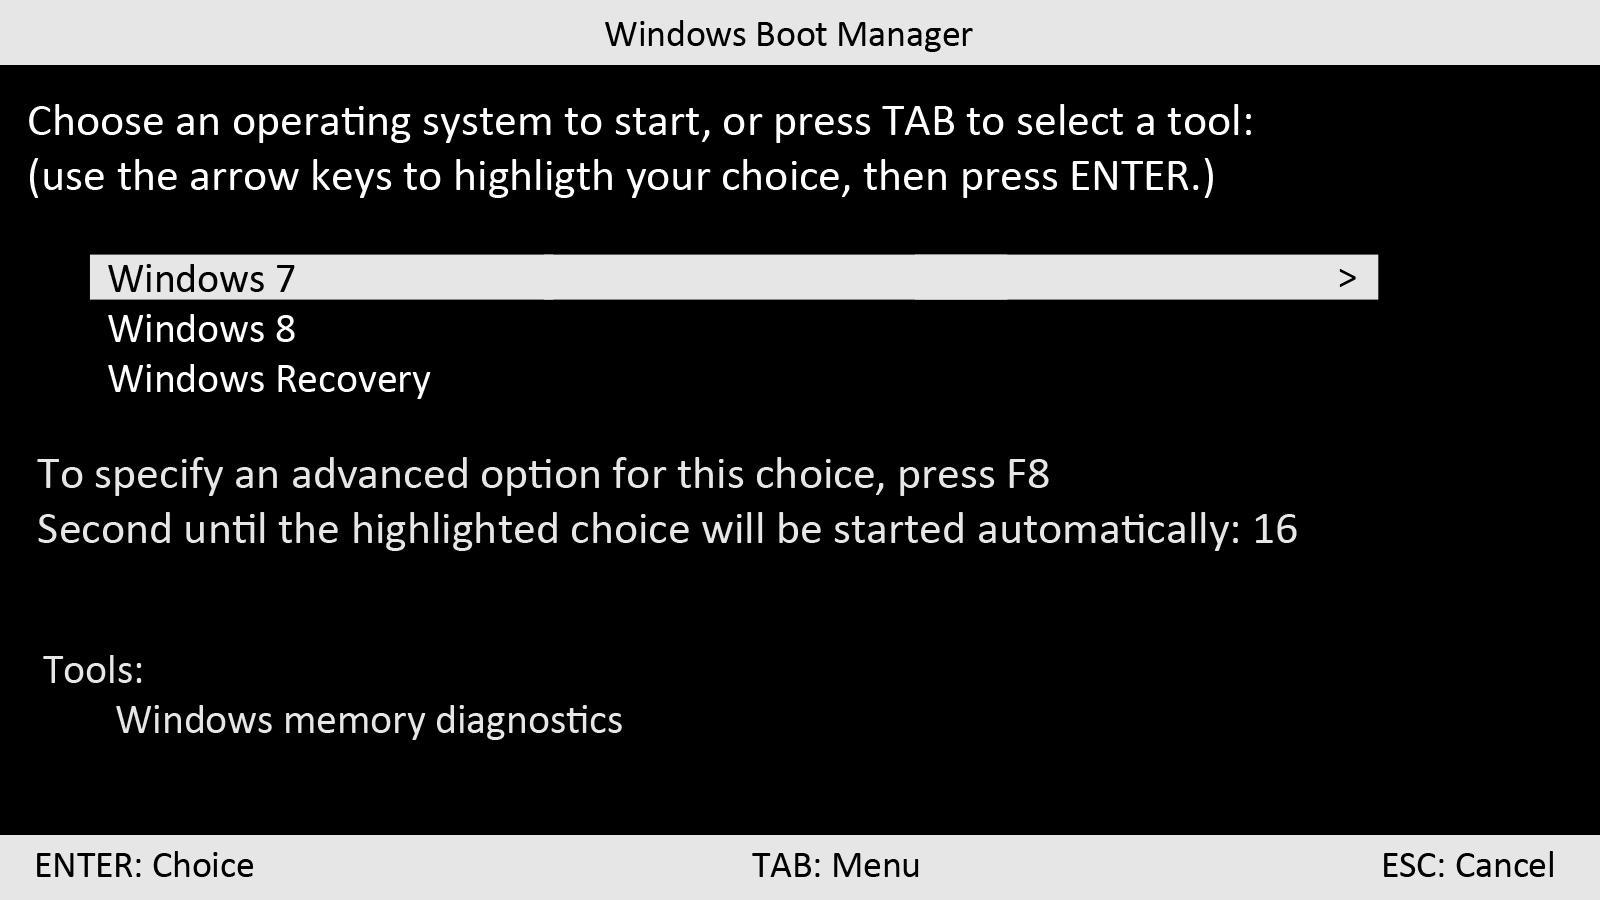
BootManager отвечает за выбор текущей операционной системы, если их установлено несколько
На всех ОС семейства виндовс программное обеспечение Windows Boot Manager находится в БИОС (на более новых версиях в UEFI) и хранится в ПЗУ (энергонезависимой постоянной памяти, расположенной на материнской плате). При загрузке компьютера или ноутбука эта служба сохраняет в его оперативной памяти ядро системы, которое начинает контролировать всю оболочку Windows.
Обратите внимание! Boot Manager функционирует только на устройствах с Windows Vista и выше, загрузчик прежних версий операционных систем работает совсем по другому принципу.
При включении компьютера первым делом запускается БИОС, он инициализирует все необходимые для загрузки компоненты, в том числе и Windows Boot Manager, а также возможность машины воспринимать команды от пользователя. После этого в работу вступает сам виндовс бут менеджер, который запускает остальные системные утилиты, берущие на себя управление ОС. После этого менеджер загрузки уходит в режим ожидания и инициализируется только при следующем включении ПК.
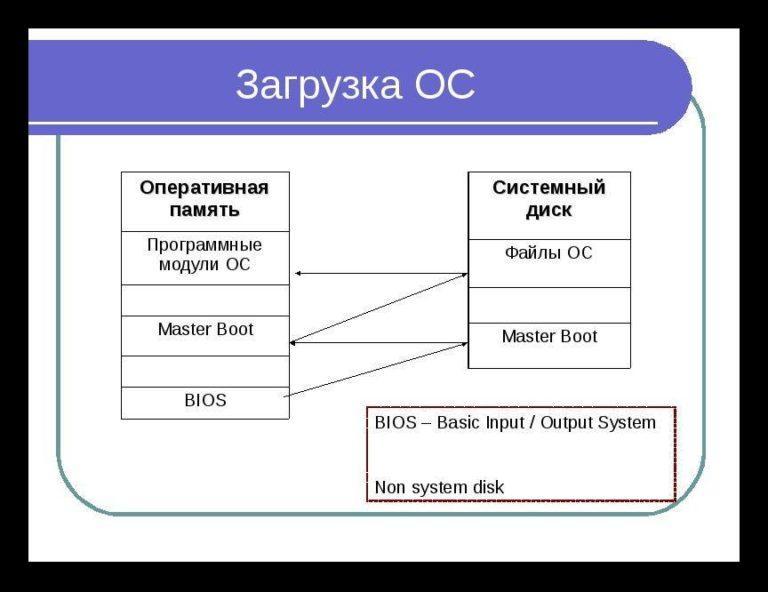
Принцип загрузки ОС семейства виндовс
Действия Windows Boot Manager при загрузке операционной системы:
- Запуск утилит, необходимых для работы ОС.
- Идентификация и первоначальная настройка аппаратной части ПК.
- Запись ядра операционной системы в ОЗУ.
- Первоначальная настройка ядра системы.
- Передача контроля над всеми процессами ядру.
- Уход в режим ожидания до следующего включения компьютера.
К сведению! Для продолжения процесса включения виндовс используется системный загрузчик winload.exe, который также вызывается при помощи Boot Manager.
Как найти Windows Boot Manager
Поскольку Boot Manager — это не одна конкретная утилита, а комплекс нескольких программ и процессов, то открыть его напрямую невозможно. Информация службы находится в BCD — хранилище данных конфигурации загрузки (аналоге файла boot.ini из прежних версий виндовс).
Файл bootmgr (скрытый и доступный только для чтения) хранится в корневом каталоге раздела, который в «Управлении дисками» отмечен как «Активный» (на большей части компьютеров под управлением виндовс он не имеет собственной буквы диска и обозначается как «Зарезервированный системой»).

Загрузочный раздел диска, зарезервированный системой
Обратите внимание! Если системный раздел не выделен, то искомый файл находится в основной директории диска С.
Как настроить Windows Boot Manager
Чтобы изменить настройки bootmgr (включить или, наоборот, отключить модули конфигуратора запуска) используется служба «Конфигурация системы». Вызвать приложение можно при помощи службы «Выполнить» (вызывается горячими клавишами «Win + R»), в окно которой вводится команда «msconfig». Искомая служба находится во вкладке «Загрузка».
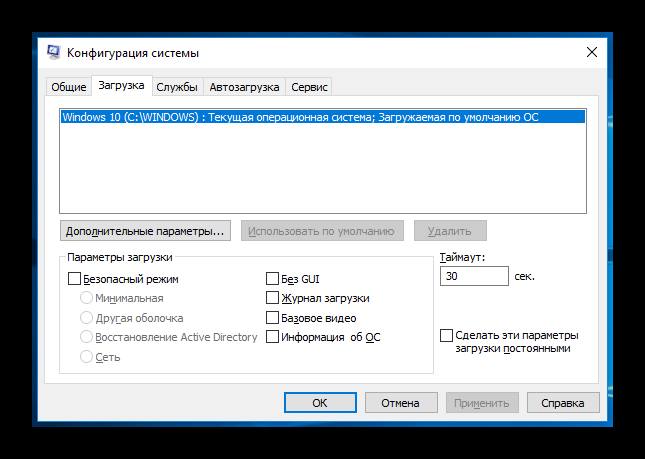
Раздел «Загрузка» в меню «Конфигурация системы»
Иногда при установке ОС с флешки может возникнуть ошибка «Bootmgr is Missing», которая обозначает, что флешка не сделана загрузочной (не имеет пометки boot), либо в БИОС не выставлен приоритет загрузки USB HDD.
Обратите внимание! Чтобы исправить ошибку, первым делом следует поменять настройки BIOS/UEFI, а если это не поможет, то делать заново флешку с правильными значениями.
Почему Windows загружается с Windows Boot Manager, а не с диска с системой
Операционные системы семейства виндовс, начиная с висты, созданы так, что для их полноценной загрузки нужна служба виндовс бут менеджер. Если по каким-либо причинам принцип инициализации требуется изменить, следует отключить Windows Boot Manager в настройках конфигурации системы или выбрать другой загрузочный диск в BIOS (или на устройствах с более новыми материнскими платами UEFI).
Описание процесса удаления Windows Boot Manager
Полностью удалить Windows Boot Manager невозможно, реально только отключить. Это можно сделать двумя способами.
Через меню «Конфигурация системы»
Чтобы операционная система запускалась, минуя загрузчик, нужно выставить время, отведенное на инициацию ОС на минимум (в зависимости от версии это 0 или 3 сек.). Для этого:
- Сочетанием клавиш «Win + R» вызывают службу «Выполнить».
- В окно запроса вводят команду для вызова меню конфигурации «msconfig».
- Подтверждают действие нажатием «Enter».
- В открывшемся меню «Конфигурация системы» выбирают вкладку «Загрузка».
- В окошке возле значения «Таймаут» пишут «0» или другое минимально доступное число.
Обратите внимание! Изменения вступят в силу при следующей загрузке компьютера или ноутбука.
При помощи настроек BIOS или UEFI
Windows Boot Manager не будет запускаться, если в настройках BIOS (или UEFI) поменять диск, с которого происходит загрузка ОС. Чтобы это сделать, нужно:
- Перегрузить компьютер или ноутбук и войти в БИОС (обычно это делается нажатием «F12» или «Delete», информация о необходимой клавише находится в строке «Press… to enter setup»).
- Найти пункт меню «First Boot Device» либо подобный в зависимости от модификации BIOS/UEFI или материнской платы.
- Убрать выделение с текущего значения и выбрать другой системный диск, с которого будет загружаться виндовс.
- Применить изменения и закрыть БИОС.
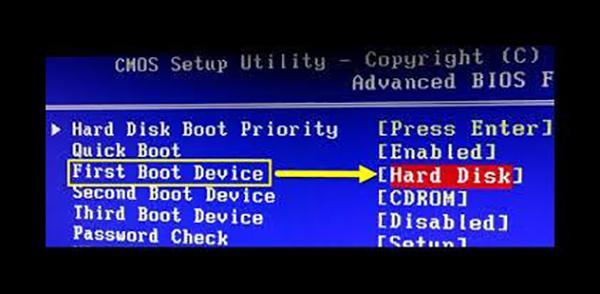
Выбор приоритета загрузки в меню БИОС
После следующей перезагрузки устройства изменения начнут действовать.
Важно! Менеджер загрузки в новых версиях Windows — достаточно стабильная и функциональная служба, поэтому отключать его без необходимости, равно как и вмешиваться в работу виндовс, не имея достаточной квалификации, не стоит.
При сбоях в работе менеджера загрузки во время включения компьютера возможно появление ошибки «Bootmgr is Missing». Для ее исправления нужно выбрать правильный загрузочный диск в БИОС либо запустить службу «Восстановление системы» Windows.


