- Windows Setup: Installing using the MBR or GPT partition style
- Why should I convert my drive?
- Reformatting the drive using a different partition style
- Make sure Windows Setup boots to the correct firmware mode
- Не получается установить Windows на диск GPT или MBR. Исправляем
- Не получается поставить ОС на GPT-диск. Решения, которые помогут
- Настоящее (UEFI и GPT) и прошлое (BIOS и MBR)
- Выбор метода
- Помните:
- BIOS или UEFI
- Чаще всего не получается установить Windows 7
- Преобразование GPT в MBR
- Невозможно поставить ОС на диск с MBR-разделами
- Преобразование MBR в GPT. Вся информация будет удалена
- Как не потерять данные при преобразовании
- Как обойтись без преобразования
- UEFI/GPT-based hard drive partitions
- Partition Requirements
- System partition
- Microsoft reserved partition (MSR)
- Other utility partitions
- To set partitions as utility partitions
- To verify that system and utility partitions exist
- Windows partition
- Recovery tools partition
- Data partitions
- Partition layout
- Sample files: configure drive partitions by using WindowsВ PE and DiskPart scripts
- To partition hard drives and prepare to apply images
- Next steps
Windows Setup: Installing using the MBR or GPT partition style
When installing Windows on UEFI-based PCs using Windows Setup, your hard drive partition style must be set up to support either UEFI mode or legacy BIOS-compatibility mode.
For example, if you receive the error message: “Windows cannot be installed to this disk. The selected disk is not of the GPT partition style”, it’s because your PC is booted in UEFI mode, but your hard drive is not configured for UEFI mode. You’ve got a few options:
Reboot the PC in legacy BIOS-compatibility mode. This option lets you keep the existing partition style. For more info, see Boot to UEFI Mode or Legacy BIOS mode.
Configure your drive for UEFI by using the GPT partition style. This option lets you use the PC’s UEFI firmware features.
You can preserve your data and convert the drive using the MBR2GPT tool. You can also choose to reformat the drive using the instructions below. Reformatting will erase all the data on the drive.
Why should I convert my drive?
Many PCs now include the ability to use the UEFI version of BIOS, which can speed up boot and shutdown times and can provide additional security advantages. To boot your PC in UEFI mode, you’ll need to use a drive formatted using the GPT drive format.
Many PCs are ready to use UEFI, but include a compatibility support module (CSM) that is set up to use the legacy version of BIOS. This version of BIOS was developed in the 1970s and provides compatibility to a variety of older equipment and network configurations, and requires a drive that uses the MBR drive format.
However, the basic MBR drive format does not support drives over 4TB. It’s also difficult to set up more than four partitions. The GPT drive format lets you set up drives that are larger than 4 terabytes (TB), and lets you easily set up as many partitions as you need.
Reformatting the drive using a different partition style
To wipe and convert the drive by using Windows Setup
Turn off the PC, and put in the Windows installation DVD or USB key.
Boot the PC to the DVD or USB key in UEFI mode. For more info, see Boot to UEFI Mode or Legacy BIOS mode.
When choosing an installation type, select Custom.
On the Where do you want to install Windows? screen, select each of the partitions on the drive, and select Delete. The drive will show a single area of unallocated space.
Select the unallocated space and click Next. Windows detects that the PC was booted into UEFI mode, and reformats the drive using the GPT drive format, and begins the installation.
To manually wipe a drive and convert it to GPT:
Turn off the PC, and put in the Windows installation DVD or USB key.
Boot the PC to the DVD or USB key in UEFI mode. For more info, see Boot to UEFI Mode or Legacy BIOS mode.
From inside Windows Setup, press Shift+F10 to open a command prompt window.
Open the diskpart tool:
Identify the drive to reformat:
Select the drive, and reformat it:
Close the command prompt window.
Continue the Windows Setup installation.
When choosing an installation type, select Custom. The drive will appear as a single area of unallocated space.
Select the unallocated space and click Next. Windows begins the installation.
Make sure Windows Setup boots to the correct firmware mode
To automate this process, you’ll need to run Windows Setup through Windows PE, and use a script to detect which mode you’re in before installing Windows. For more info, see WinPE: Boot in UEFI or legacy BIOS mode.
Не получается установить Windows на диск GPT или MBR. Исправляем
Поскольку ПК приобретается раз в несколько лет, а его комплектующие периодически заменяются, программные и аппаратные компоненты порой плохо соответствуют друг другу. Сам ПК может быть достаточно старым, но вы укомплектовали его современным SSD. Уже не первый год доступна Windows 10, а вы до сих пор отдаете предпочтение привычной «семерке».
Помимо таких заметных каждому вещей, как производительность процессора и интерфейс ПО, есть значимые характеристики, которые начинают представлять интерес только в тех случаях, когда становятся причиной сбоев.
К ним относится и формат таблиц разделов HDD или SSD. Вы могли и не слышать о существовании характеристики накопителя, которая неожиданно огорчила, препятствуя установке Windows 7, 10 или 8.
ПК «говорит», что установка Windows невозможна. Причина: таблица разделов диска — GPT или MBR. Увы, технологии прошлого не всегда «дружат» с современными. К счастью, это легко исправимо.

Не получается поставить ОС на GPT-диск. Решения, которые помогут
Существуют две возможности:
- Установка ОС на диск GPT.
- Преобразование в MBR.
Настоящее (UEFI и GPT) и прошлое (BIOS и MBR)
Раньше материнская плата ПК оснащалась ПО BIOS. Оно осуществляло диагностику и анализ железа, а затем загружало ОС, опираясь на загрузочную запись раздела MBR.

В более современных моделях роль BIOS выполняет UEFI. Загружается быстрее и поддерживает:
- Безопасную загрузку.
- HDD, зашифрованные на аппаратном уровне.
- Драйвера UEFI.
- GPT-диски.

GPT превосходит MBR по важным параметрам:
- Работает с HDD большего объема.
- Большее число разделов на HDD.
Выбор метода
Пытаться все же установить систему на «несовместимый HDD» или преобразовать его в MBR и тем самым сделать так, что ошибка больше появляться не будет. В каждом случае решение зависит от ряда факторов:
- Для старого ПК со старомодным BIOS и 32-битным процессором оптимальным решением будет преобразование GPT в MBR.
- Обладателям ПК с 64-битным процессором и UEFI предпочтительно установить систему на GPT-диск.
Помните:
- Предельный объем MBR-диска — 2 терабайта.
- Возможность создания на MBR-диске более четырех разделов затруднено.
BIOS или UEFI
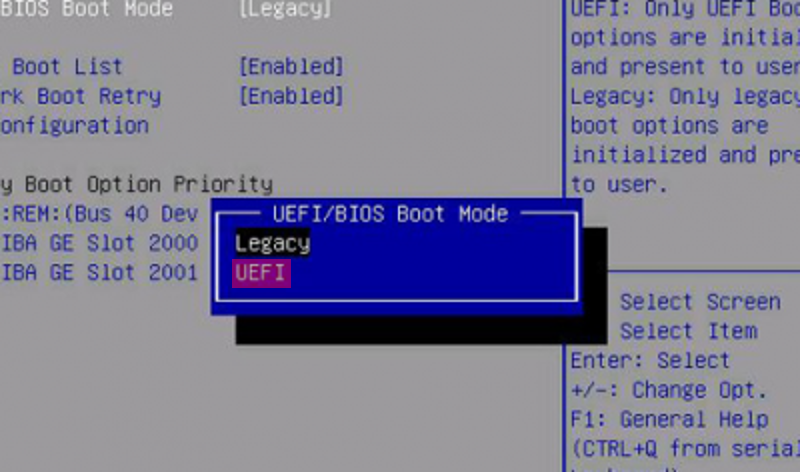
Когда вы заходите в BIOS и видите старомодный синий экран — перед вами традиционный BIOS. Если интерфейс с современной графикой и поддержкой мыши — это UEFI.
Чаще всего не получается установить Windows 7
Сложности с установкой системы на GPT-диск с большей вероятностью возникают у пользователей, которые предпочитают Windows 7.
Для установки Windows на диск со стилем разделов GPT необходимо соблюсти два условия:
- 64-битная ОС.
- Загрузка в режиме EFI.
Исхожу из того, что вы устанавливаете 64-битную версию Windows. Это означает, что сообщение об ошибке появляется по причине несоответствия второму требованию.
Не исключено, что будет достаточно поменять настройки BIOS. Зайдите в него, нажав предусмотренную для этого клавишу. Вы увидите, какую клавишу нажимать в процессе загрузки компьютера. В ноутбуках чаще всего применяется F2, в настольных моделях — Delete.
Поменяйте загрузку CSM (Compatibility Support Mode) на UEFI.
Ищите в разделах «BIOS Setup», «BIOS Features» или подобных по смыслу. В SATA определите режим AHCI, а не IDE.

Для седьмой (и еще более древних) версий Windows нужно также выключить Secure Boot.

BIOS вашей модели компьютера может выглядеть иначе. Названия пунктов меню также могут быть другими. Но смысл всегда сохраняется.
После изменения и сохранения вами новых параметров BIOS у вас появится возможность установки системы на GPT-диск. Если вы устанавливаете ОС с DVD, то сообщение об ошибке при повторной попытке установки, скорее всего, не появится.
В случае установки с USB-накопителя сообщение может отобразиться опять. В этой ситуации необходимо пересоздать установочную флешку таким образом, чтобы она поддерживала загрузку UEFI.
Если накопителем поддерживаются два метода загрузки, удалите файл «bootmgr» в корневой директории флешки. Тем самым вы предотвратите возможность загрузки в режиме BIOS. Если нужна загрузка в режиме BIOS, удалите каталог «efi». Не делайте этого в тех случаях, когда есть хоть малейшие сомнения. Можно повредить дистрибутив.
Преобразование GPT в MBR
Если вы располагаете ПК с классическим BIOS и собираетесь поставить Windows 7, этот вариант будет лучшим (и, возможно, единственным). В процессе преобразования вся информация с накопителя будет удалена.
Во время работы мастера установки ОС нажмите F10 и Shift. В некоторых моделях ноутбуков — F10, Fn и Shift. В открывшейся командной строке последовательно введите такие команды:
— diskpart
— list disk (запишите номер подлежащего преобразованию диска)
— select disk N (вместо N — записанный номер)
— clean (команда очистит диск)
— convert mbr
— create partition primary
— active
— format fs=ntfs quick (быстрое форматирование в файловой системе NTFS)
— assign
— exit

Невозможно поставить ОС на диск с MBR-разделами
Вероятна обратная ситуация. Появляется ошибка:
«Установка Windows на данный диск невозможна. На выбранном диске находится таблица MBR-разделов. В системах EFI Windows можно установить только на GPT-диск»
Она означает, что вы пытаетесь установить систему с DVD или USB-накопителя в режиме EFI. Таблица разделов HDD или SSD старая — MBR. В этом случае вы можете:
- Преобразовать SSD или HDD в GPT.
- В UEFI или BIOS поменять установленный способ загрузки с Legacy на EFI.
Первый вариант предпочтительнее, поскольку проще и быстрее. Помните, что информация со всех разделов накопителя будет полностью потеряна.
Преобразование MBR в GPT. Вся информация будет удалена
В установщике системы запустите командную строку:
- F10 и Shift (на настольных ПК).
- F10, Fn и Shift (на некоторых ноутбуках).
В открывшемся окне:
- Последовательно вводите показанные команды.
- Нажимайте Enter после ввода каждой из них.
— diskpart
— list disk (запишите номер подлежащего преобразованию диска)
— select disk N (вместо N — записанный номер)
— clean (команда очистит диск)
— convert gpt
— exit

Когда команды применены:
- Закройте окно командной строки.
- Нажмите «Обновить» в окне выбора разделов.
- Нажмите «Создать» для формирования нескольких разделов на HDD или SSD.
- Выберите свободное пространство и запустите установку ОС.

Более простой способ преобразования с потерей информации на накопителе:
- Удалите все разделы на HDD или SSD.
- Выберите свободное пространство.
- Нажмите «Далее».
Результатом ваших действий станет автоматическое преобразование в GPT. Следующим шагом стартует установка ОС.
Как не потерять данные при преобразовании
Используйте стороннюю утилиту Minitool Partition Wizard Bootable. Скачайте ISO-образ и запишите его на флешку, отформатированную в FAT32. Необходимые условия:
- Используется загрузка EFI.
- В BIOS выключена функция «Secure Boot».
Загрузите ПК с созданного вами накопителя. В окне программного инструмента:
- Выберите HDD или SSD таблицу разделов которого нужно преобразовать.
- В левой части окна программы выберите пункт «Convert MBR Disk to GPT Disk».
- Примените изменения нажатием кнопки «Apply».
- Дайте положительный ответ на предупреждение утилиты.
- Ждите завершения преобразования. Время, которое потребуется, зависит от объема накопителя и занятого пространства на нем.

Если диск системный, может появиться сообщение о том, что его преобразование невозможно. Чтобы все же преобразовать его:
- Выберите раздел загрузчика ОС, который располагается в самом начале.
- Удалите его, нажав «Delete» и подтвердив действие кнопкой «Apply». Вместо него вы можете тут же создать новый раздел загрузчика, но уже в файловой системе FAT32.
- Повторите действия для преобразования таблицы разделов.
Как обойтись без преобразования
Зайдите в BIOS и установите режим загрузки CSM (Compatibility Support Mode) или Legacy, отключив EFI. Отключите «Secure Boot».
Ранее я подробно рассмотрел процессы чистой установки Windows 10 и Windows 7.
Какие другие затруднения возникали у вас при установке Windows?
Авторизуясь, вы даете согласие на обработку персональных данных.
UEFI/GPT-based hard drive partitions
Create custom partition layouts for your hard disk drives (HDDs), solid-state drives (SSDs), and other drives when deploying Windows to Unified Extensible Firmware Interface (UEFI)–based devices.
If you use a custom partition layout on WindowsВ 10 for desktop editions (Home, Pro, Enterprise, and Education), update the push-button recovery script so the recovery tools can recreate the custom partition layout when needed.
Partition Requirements
When you deploy Windows to a UEFI-based device, you must format the hard drive that includes the Windows partition by using a GUID partition table (GPT) file system. Additional drives may use either the GPT or the master boot record (MBR) file format.
A GPT drive may have up to 128 partitions.
Each partition can have a maximum of 18 exabytes (
18.8 million terabytes) of space.
System partition
The device must contain a system partition. On GPT drives, this is known as the EFI System Partition, or the ESP. This partition is usually stored on the primary hard drive. The device boots to this partition.
The minimum size of this partition is 100 MB, and must be formatted using the FAT32 file format.
This partition is managed by the operating system, and should not contain any other files, including Windows RE tools.
For Advanced Format 4K Native drives (4-KB-per-sector) drives, the minimum size is 260 MB, due to a limitation of the FAT32 file format. The minimum partition size of FAT32 drives is calculated as sector size (4KB) x 65527 = 256 MB.
Advanced Format 512e drives are not affected by this limitation, because their emulated sector size is 512 bytes. 512 bytes x 65527 = 32 MB, which is less than the 100 MB minimum size for this partition.
Microsoft reserved partition (MSR)
In WindowsВ 10, the size of the MSR is 16 MB.
Add an MSR to each GPT drive to help with partition management. The MSR is a reserved partition that does not receive a partition ID. It cannot store user data.
Other utility partitions
Any other utility partitions not managed by Windows must be located before the Windows, data, and recovery image partitions. This allows end users to perform actions such as resizing the Windows partition without affecting system utilities.
Protect end users from accidentally modifying utility partitions by identifying them using a GPT attribute. This prevents these partitions from appearing in File Explorer.
To set partitions as utility partitions
- When you’re deploying Windows by using DiskPart, use the attributes volume set GPT_ATTRIBUTE_PLATFORM_REQUIRED command after you create the partition to identify the partition as a utility partition. For more information, see the MSDN topic: PARTITION_INFORMATION_GPT structure.
To verify that system and utility partitions exist
- Click Start, right-click This PC, and then click Manage. The Computer Management window opens.
- Click Disk Management. The list of available drives and partitions appears.
- In the list of drives and partitions, confirm that the system and utility partitions are present and are not assigned a drive letter.
Windows partition
- The partition must have at least 20 gigabytes (GB) of drive space for 64-bit versions, or 16 GB for 32-bit versions.
- The Windows partition must be formatted using the NTFS file format.
- The Windows partition must have 16 GB of free space after the user has completed the Out Of Box Experience (OOBE) and Automatic Maintenance has completed.
Recovery tools partition
This partition must be at least 300 MB.
The Windows Recovery Environment (Windows RE) tools require additional free space:
- A minimum of 52 MB is required but 250 MB is recommended, to accomodate future updates, especially with custom partition layouts.
When calculating free space, note:
- The recovery image, winre.wim, is typically between 250-300MB, depending on what drivers, languages, and customizations you add.
- The file system itself can take up additional space. For example, NTFS may reserve 5-15MB or more on a 750MB partition.
This partition must use the Type ID: DE94BBA4-06D1-4D40-A16A-BFD50179D6AC.
The recovery tools should be in a separate partition than the Windows partition to support automatic failover and to support booting partitions encrypted with WindowsВ BitLocker Drive Encryption.
We recommend that you place this partition immediately after the Windows partition. This allows Windows to modify and recreate the partition later if future updates require a larger recovery image.
Data partitions
The recommended partition layout for WindowsВ 10 does not include data partitions. However, if data partitions are required, they should be placed after the Windows RE partition. This allows future updates to Windows RE to grow the Windows RE partition by shrinking the Windows partition.
This layout makes it more difficult for end users to remove the data partition and merge the space with the Windows partition. To do so, the Windows RE partition must be moved to the end of the unused space reclaimed from the data partition, so that the Windows partition can be extended.
WindowsВ 10 does not include functionality or utility to facilitate this process. However, manufacturers can develop and provide such a utility if PCs are shipped with data partitions.
Partition layout
The default partition layout for UEFI-based PCs is: a system partition, an MSR, a Windows partition, and a recovery tools partition.

This layout lets you use WindowsВ BitLocker Drive Encryption through both Windows and through the Windows Recovery Environment.
Sample files: configure drive partitions by using WindowsВ PE and DiskPart scripts
For image-based deployment, boot the PC to Windows PE, and then use the DiskPart tool to create the partition structures on your destination PCs.
In these DiskPart examples, the partitions are assigned the letters: System=S, Windows=W, and Recovery=R. The MSR partition does not receive a drive letter.
Change the Windows drive letter to a letter that’s near the end of the alphabet, such as W, to avoid drive letter conflicts. Do not use X, because this drive letter is reserved for Windows PE. After the device reboots, the Windows partition is assigned the letter C, and the other partitions don’t receive drive letters.
If you reboot, WindowsВ PE reassigns disk letters alphabetically, starting with the letter C, without regard to the configuration in Windows Setup. This configuration can change based on the presence of different drives, such as USB flash drives.
The following steps describe how to partition your hard drives and prepare to apply images. You can use the code in the sections that follow to complete these steps.
To partition hard drives and prepare to apply images
Copy and save the CreatePartitions-UEFI.txt file to a USB flash drive.
Use WindowsВ PE to boot the destination PC.
Clean and partition the drive. In this example, F is the letter of the USB flash drive.
- If you use a custom partition layout on WindowsВ 10 for desktop editions, update the push-button recovery script so the recovery tools can recreate the custom partition layout when needed.
To avoid bare metal recovery boot issues due to partition size, manufacturers should allow the bare metal recovery feature’s auto generation script to create the partition used for the recovery WIM. If manufacturer’s want to use a custom DISKPART script to create partitions, the recommended minimum partition size is 990MB with a minimum of 250MB of free space.
Next steps
Use a deployment script to apply the Windows images on the newly created partitions. For more information, see Capture and Apply Windows, System, and Recovery Partitions.


