- Windows Boot Manager — что это такое, как найти
- Windows Boot Manager — что это такое
- Как найти Windows Boot Manager
- Как настроить Windows Boot Manager
- Почему Windows загружается с Windows Boot Manager, а не с диска с системой
- Описание процесса удаления Windows Boot Manager
- Через меню «Конфигурация системы»
- При помощи настроек BIOS или UEFI
- Windows Boot Manager. Что это и зачем отключать?
- Что такое Windows Boot Manager?
- Отключение Windows Boot Manager
- Способ 1. Командная строка
- Способ 2. BIOS
- Advanced troubleshooting for Windows boot problems
- Summary
- BIOS phase
- Boot loader phase
- Method 1: Startup Repair tool
- Method 2: Repair Boot Codes
- Method 3: Fix BCD errors
- Method 4: Replace Bootmgr
- Method 5: Restore System Hive
- Kernel Phase
- Clean boot
Windows Boot Manager — что это такое, как найти
Любое взаимодействие с компьютером начинается с загрузки операционной системы. Для правильного запуска ОС и контроля за процессом ее инициации существует служба Windows Boot Manager, название которой в переводе значит «Менеджер загрузки виндовс».
Windows Boot Manager — что это такое
Пользователи зачастую пугаются, когда вместо привычного процесса загрузки ОС видят какое-либо сообщение от Windows Boot Manager, что это такое многим неизвестно, и кажется, что с компьютером случилось что-то непоправимое. На самом деле виндовс бут менеджер — это просто комплекс программ и команд, которые контролируют включение операционной системы, загрузку всех компонентов, необходимых для ее полноценного функционирования и инициализацию аппаратных составляющих компьютера.
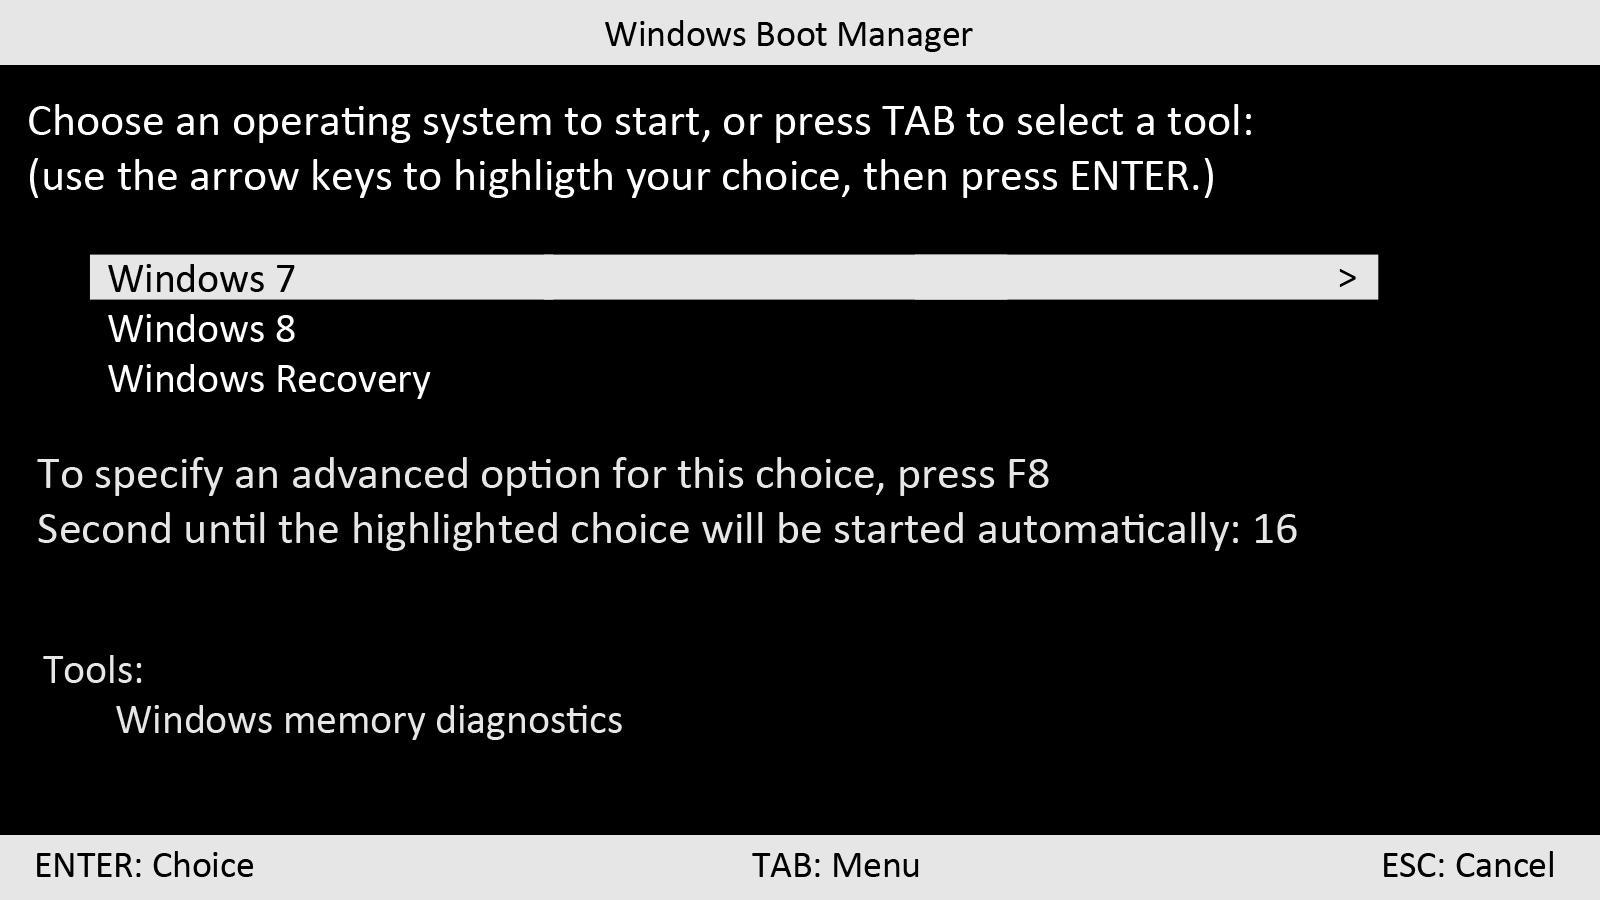
BootManager отвечает за выбор текущей операционной системы, если их установлено несколько
На всех ОС семейства виндовс программное обеспечение Windows Boot Manager находится в БИОС (на более новых версиях в UEFI) и хранится в ПЗУ (энергонезависимой постоянной памяти, расположенной на материнской плате). При загрузке компьютера или ноутбука эта служба сохраняет в его оперативной памяти ядро системы, которое начинает контролировать всю оболочку Windows.
Обратите внимание! Boot Manager функционирует только на устройствах с Windows Vista и выше, загрузчик прежних версий операционных систем работает совсем по другому принципу.
При включении компьютера первым делом запускается БИОС, он инициализирует все необходимые для загрузки компоненты, в том числе и Windows Boot Manager, а также возможность машины воспринимать команды от пользователя. После этого в работу вступает сам виндовс бут менеджер, который запускает остальные системные утилиты, берущие на себя управление ОС. После этого менеджер загрузки уходит в режим ожидания и инициализируется только при следующем включении ПК.
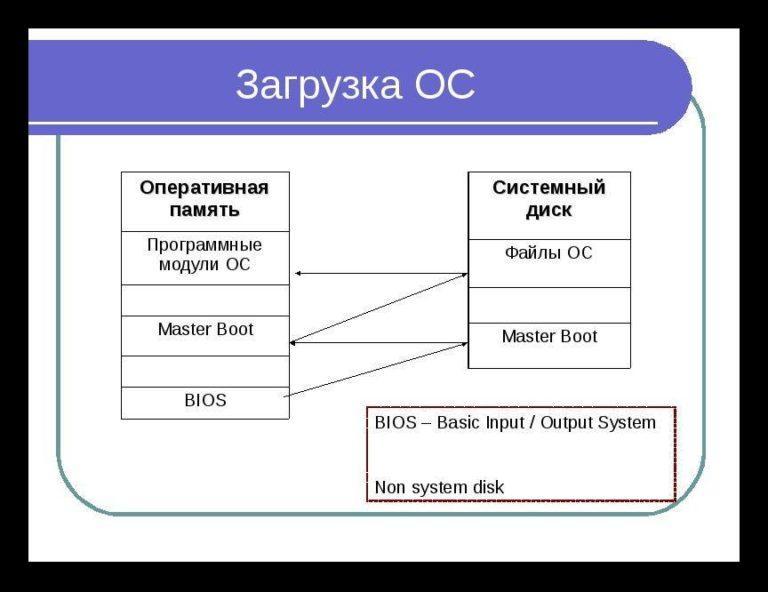
Принцип загрузки ОС семейства виндовс
Действия Windows Boot Manager при загрузке операционной системы:
- Запуск утилит, необходимых для работы ОС.
- Идентификация и первоначальная настройка аппаратной части ПК.
- Запись ядра операционной системы в ОЗУ.
- Первоначальная настройка ядра системы.
- Передача контроля над всеми процессами ядру.
- Уход в режим ожидания до следующего включения компьютера.
К сведению! Для продолжения процесса включения виндовс используется системный загрузчик winload.exe, который также вызывается при помощи Boot Manager.
Как найти Windows Boot Manager
Поскольку Boot Manager — это не одна конкретная утилита, а комплекс нескольких программ и процессов, то открыть его напрямую невозможно. Информация службы находится в BCD — хранилище данных конфигурации загрузки (аналоге файла boot.ini из прежних версий виндовс).
Файл bootmgr (скрытый и доступный только для чтения) хранится в корневом каталоге раздела, который в «Управлении дисками» отмечен как «Активный» (на большей части компьютеров под управлением виндовс он не имеет собственной буквы диска и обозначается как «Зарезервированный системой»).

Загрузочный раздел диска, зарезервированный системой
Обратите внимание! Если системный раздел не выделен, то искомый файл находится в основной директории диска С.
Как настроить Windows Boot Manager
Чтобы изменить настройки bootmgr (включить или, наоборот, отключить модули конфигуратора запуска) используется служба «Конфигурация системы». Вызвать приложение можно при помощи службы «Выполнить» (вызывается горячими клавишами «Win + R»), в окно которой вводится команда «msconfig». Искомая служба находится во вкладке «Загрузка».
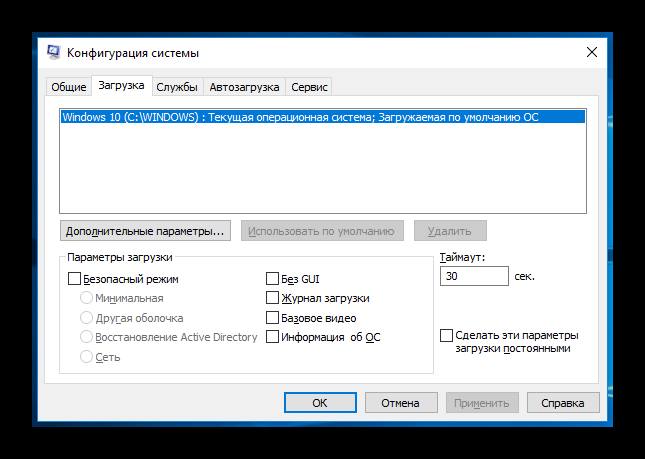
Раздел «Загрузка» в меню «Конфигурация системы»
Иногда при установке ОС с флешки может возникнуть ошибка «Bootmgr is Missing», которая обозначает, что флешка не сделана загрузочной (не имеет пометки boot), либо в БИОС не выставлен приоритет загрузки USB HDD.
Обратите внимание! Чтобы исправить ошибку, первым делом следует поменять настройки BIOS/UEFI, а если это не поможет, то делать заново флешку с правильными значениями.
Почему Windows загружается с Windows Boot Manager, а не с диска с системой
Операционные системы семейства виндовс, начиная с висты, созданы так, что для их полноценной загрузки нужна служба виндовс бут менеджер. Если по каким-либо причинам принцип инициализации требуется изменить, следует отключить Windows Boot Manager в настройках конфигурации системы или выбрать другой загрузочный диск в BIOS (или на устройствах с более новыми материнскими платами UEFI).
Описание процесса удаления Windows Boot Manager
Полностью удалить Windows Boot Manager невозможно, реально только отключить. Это можно сделать двумя способами.
Через меню «Конфигурация системы»
Чтобы операционная система запускалась, минуя загрузчик, нужно выставить время, отведенное на инициацию ОС на минимум (в зависимости от версии это 0 или 3 сек.). Для этого:
- Сочетанием клавиш «Win + R» вызывают службу «Выполнить».
- В окно запроса вводят команду для вызова меню конфигурации «msconfig».
- Подтверждают действие нажатием «Enter».
- В открывшемся меню «Конфигурация системы» выбирают вкладку «Загрузка».
- В окошке возле значения «Таймаут» пишут «0» или другое минимально доступное число.
Обратите внимание! Изменения вступят в силу при следующей загрузке компьютера или ноутбука.
При помощи настроек BIOS или UEFI
Windows Boot Manager не будет запускаться, если в настройках BIOS (или UEFI) поменять диск, с которого происходит загрузка ОС. Чтобы это сделать, нужно:
- Перегрузить компьютер или ноутбук и войти в БИОС (обычно это делается нажатием «F12» или «Delete», информация о необходимой клавише находится в строке «Press… to enter setup»).
- Найти пункт меню «First Boot Device» либо подобный в зависимости от модификации BIOS/UEFI или материнской платы.
- Убрать выделение с текущего значения и выбрать другой системный диск, с которого будет загружаться виндовс.
- Применить изменения и закрыть БИОС.
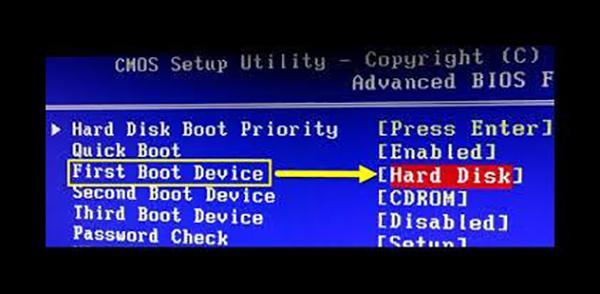
Выбор приоритета загрузки в меню БИОС
После следующей перезагрузки устройства изменения начнут действовать.
Важно! Менеджер загрузки в новых версиях Windows — достаточно стабильная и функциональная служба, поэтому отключать его без необходимости, равно как и вмешиваться в работу виндовс, не имея достаточной квалификации, не стоит.
При сбоях в работе менеджера загрузки во время включения компьютера возможно появление ошибки «Bootmgr is Missing». Для ее исправления нужно выбрать правильный загрузочный диск в БИОС либо запустить службу «Восстановление системы» Windows.
Windows Boot Manager. Что это и зачем отключать?
Что такое Windows Boot Manager?
Windows Boot Manager (BOOTMGR, Диспетчер Загрузки Windows) является частью ПО Windows, отвечающая за загрузку OS Windows в оперативную память. При включении компьютера BIOS производит тесты системы и передаёт управление MBR, где и находится диспетчер загрузки Windows.
Особенно данная служба знакома тем пользователям, которые используют две OS на одном компьютере. Как только проходит подготовка компьютера, Windows Boot Manager предлагает пользователю выбрать необходимую OS. Для того, чтобы не тратить время на лишние ожидание, мы хотим изменить положение.
Отключение Windows Boot Manager
Способ 1. Командная строка
1. Для начала следует открыть программу » Выполнить » при помощи комбинации клавиш Win+R .
2. Затем следует ввести команду cmd .
3. В открывшемся окне следует ввести команду msconfig и нажать Enter .
4. Затем следует открыть раздел » Загрузка » и изменить значение параметра » Таймаут » на 0 или другое минимальное доступное число.
6. Затем следует применить внесённые изменения и закрыть программу.
Отныне Windows Boot Manager на Вашем устройстве либо отключен либо не заставит Вас ждать 30 секунд, чтобы проверить работу системы. Пожалуйста, перезапустите компьютер.
Способ 2. BIOS
Данный способ будет загружать систему с одного конкретного диска.
1. Для начала следует завершить работу компьютера.
2. При включении компьютера следует зайти в BIOS .
3. В BIOS необходимо найти параметр First Boot Device и указать нужный системный диск.
4. После проделанной работы следует закрыть BIOS и перезапустить компьютер.
По завершению описанных выше действий Менеджер ЗАгрузки Windows более не должен Вас беспокоить.
Если данная статья была Вам интересна, то ставьте лайк, делайте репост и подписывайтесь на наш канал.
Возможно Вам также будут интересны и другие наши статьи:
Advanced troubleshooting for Windows boot problems
This article is intended for use by support agents and IT professionals. If you’re looking for more general information about recovery options, see Recovery options in Windows 10.
Summary
There are several reasons why a Windows-based computer may have problems during startup. To troubleshoot boot problems, first determine in which of the following phases the computer gets stuck:
| Phase | Boot Process | BIOS | UEFI |
|---|---|---|---|
| 1 | PreBoot | MBR/PBR (Bootstrap Code) | UEFI Firmware |
| 2 | Windows Boot Manager | %SystemDrive%\bootmgr | \EFI\Microsoft\Boot\bootmgfw.efi |
| 3 | Windows OS Loader | %SystemRoot%\system32\winload.exe | %SystemRoot%\system32\winload.efi |
| 4 | Windows NT OS Kernel | %SystemRoot%\system32\ntoskrnl.exe |
1. PreBoot
The PC’s firmware initiates a Power-On Self Test (POST) and loads firmware settings. This pre-boot process ends when a valid system disk is detected. Firmware reads the master boot record (MBR), and then starts Windows Boot Manager.
2. Windows Boot Manager
Windows Boot Manager finds and starts the Windows loader (Winload.exe) on the Windows boot partition.
3. Windows operating system loader
Essential drivers required to start the Windows kernel are loaded and the kernel starts to run.
4. Windows NT OS Kernel
The kernel loads into memory the system registry hive and additional drivers that are marked as BOOT_START.
The kernel passes control to the session manager process (Smss.exe) which initializes the system session, and loads and starts the devices and drivers that are not marked BOOT_START.
Here is a summary of the boot sequence, what will be seen on the display, and typical boot problems at that point in the sequence. Before starting troubleshooting, you have to understand the outline of the boot process and display status to ensure that the issue is properly identified at the beginning of the engagement.

Click to enlarge
Each phase has a different approach to troubleshooting. This article provides troubleshooting techniques for problems that occur during the first three phases.
If the computer repeatedly boots to the recovery options, run the following command at a command prompt to break the cycle:
Bcdedit /set
If the F8 options don’t work, run the following command:
Bcdedit /set
BIOS phase
To determine whether the system has passed the BIOS phase, follow these steps:
- If there are any external peripherals connected to the computer, disconnect them.
- Check whether the hard disk drive light on the physical computer is working. If it is not working, this indicates that the startup process is stuck at the BIOS phase.
- Press the NumLock key to see whether the indicator light toggles on and off. If it does not, this indicates that the startup process is stuck at BIOS.
If the system is stuck at the BIOS phase, there may be a hardware problem.
Boot loader phase
If the screen is completely black except for a blinking cursor, or if you receive one of the following error codes, this indicates that the boot process is stuck in the Boot Loader phase:
- Boot Configuration Data (BCD) missing or corrupted
- Boot file or MBR corrupted
- Operating system Missing
- Boot sector missing or corrupted
- Bootmgr missing or corrupted
- Unable to boot due to system hive missing or corrupted
To troubleshoot this problem, use Windows installation media to start the computer, press Shift+F10 for a command prompt, and then use any of the following methods.
Method 1: Startup Repair tool
The Startup Repair tool automatically fixes many common problems. The tool also lets you quickly diagnose and repair more complex startup problems. When the computer detects a startup problem, the computer starts the Startup Repair tool. When the tool starts, it performs diagnostics. These diagnostics include analyzing startup log files to determine the cause of the problem. When the Startup Repair tool determines the cause, the tool tries to fix the problem automatically.
To do this, follow theseВ steps.
For additional methods to start WinRE, see Windows Recovery Environment (Windows RE).
Start the system to the installation media for the installed version of Windows. For more information, see Create installation media for Windows.
On the Install Windows screen, select Next > Repair your computer.
On the System Recovery Options screen, select Next > Command Prompt.
After Startup Repair, select Shutdown, then turn on your PC to see if Windows can boot properly.
The Startup Repair tool generates a log file to help you understand the startup problems and the repairs that were made. You can find the log file in the following location:
%windir%\System32\LogFiles\Srt\Srttrail.txt
Method 2: Repair Boot Codes
To repair boot codes, run the following command:
To repair the boot sector, run the following command:
Running BOOTREC together with Fixmbr overwrites only the master boot code. If the corruption in the MBR affects the partition table, running Fixmbr may not fix the problem.
Method 3: Fix BCD errors
If you receive BCD-related errors, follow these steps:
Scan for all the systems that are installed. To do this, run the following command:
Restart the computer to check whether the problem is fixed.
If the problem is not fixed, run the following command:
You might receive one of the following outputs:
If the output shows windows installation: 0, run the following commands:
After you run the command, you receive the following output:
- Try restarting the system.
Method 4: Replace Bootmgr
If methods 1, 2 and 3 do not fix the problem, replace the Bootmgr file from drive C to the System Reserved partition. To do this, follow these steps:
At a command prompt, change the directory to the System Reserved partition.
Run the attrib command to unhide the file:
Run the same attrib command on the Windows (system drive):
Rename the Bootmgr file as Bootmgr.old:
Navigate to the system drive.
Copy the Bootmgr file, and then paste it to the System Reserved partition.
Restart the computer.
Method 5: Restore System Hive
If Windows cannot load the system registry hive into memory, you must restore the system hive. To do this, use the Windows Recovery Environment or use Emergency Repair Disk (ERD) to copy the files from the C:\Windows\System32\config\RegBack to C:\Windows\System32\config.
If the problem persists, you may want to restore the system state backup to an alternative location, and then retrieve the registry hives to be replaced.
Starting in Windows 10, version 1803, Windows no longer automatically backs up the system registry to the RegBack folder.This change is by design, and is intended to help reduce the overall disk footprint size of Windows. To recover a system with a corrupt registry hive, Microsoft recommends that you use a system restore point. For more details, check this article.
Kernel Phase
If the system gets stuck during the kernel phase, you experience multiple symptoms or receive multiple error messages. These include, but are not limited to, the following:
A Stop error appears after the splash screen (Windows Logo screen).
Specific error code is displayed. For example, «0x00000C2» , «0x0000007B» , «inaccessible boot device» and so on.
The screen is stuck at the «spinning wheel» (rolling dots) «system busy» icon.
A black screen appears after the splash screen.
To troubleshoot these problems, try the following recovery boot options one at a time.
Scenario 1: Try to start the computer in Safe mode or Last Known Good Configuration
On the Advanced Boot Options screen, try to start the computer in Safe Mode or Safe Mode with Networking. If either of these options works, use Event Viewer to help identify and diagnose the cause of the boot problem. To view events that are recorded in the event logs, follow these steps:
Use one of the following methods to open Event Viewer:
Click Start, point to Administrative Tools, and then click Event Viewer.
Start the Event Viewer snap-in in Microsoft Management Console (MMC).
In the console tree, expand Event Viewer, and then click the log that you want to view. For example, click System log or Application log.
In the details pane, double-click the event that you want to view.
On the Edit menu, click Copy, open a new document in the program in which you want to paste the event (for example, Microsoft Word), and then click Paste.
Use the Up Arrow or Down Arrow keyВ to view the descriptionВ of the previous or next event.
Clean boot
To troubleshoot problems that affect services, do a clean boot by using System Configuration (msconfig). Select Selective startup to test the services one at a time to determine which one is causing the problem. If you cannot find the cause, try including system services. However, in most cases, the problematic service is third-party.
Disable any service that you find to be faulty, and try to start the computer again by selecting Normal startup.
If the computer starts in Disable Driver Signature mode, start the computer in Disable Driver Signature Enforcement mode, and then follow the steps that are documented in the following article to determine which drivers or files require driver signature enforcement: Troubleshooting boot problem caused byВ missing driver signature (x64)
If the computer is a domain controller, try Directory Services Restore mode (DSRM).
This method is an important step if you encounter Stop error «0xC00002E1» or «0xC00002E2»
Examples
Serious problems might occur if you modify the registry incorrectly by using Registry Editor or by using another method. These problems might require that you reinstall the operating system. Microsoft cannot guarantee that these problems can be solved. Modify the registry at your own risk.
Error code INACCESSIBLE_BOOT_DEVICE (STOP 0x7B)
To troubleshoot this Stop error, follow these steps to filter the drivers:
Go to Window Recovery Environment (WinRE) by putting an ISO disk of the system in the disk drive. The ISO should be of same version of Windows or a later version.
Open the registry.
Load the system hive, and name it as «test.»
Under the following registry subkey, check for lower filter and upper filter items for Non-Microsoft Drivers:
HKEY_LOCAL_MACHINE\SYSTEM\ControlSet001\Control\Class
For each third-party driver that you locate, click the upper or lower filter, and then delete the value data.
Search through the whole registry for similar items. Process as an appropriate, and then unload the registry hive.
Restart the server in Normal mode.
For additional troubleshooting steps, see the following articles:
To fix problems that occur after you install Windows updates, check for pending updates by using these steps:
Open a Command Prompt window in WinRE.
Run the command:
If there are any pending updates, uninstall them by running the following commands:
Try to start the computer.
If the computer does not start, follow these steps:
Open A Command Prompt window in WinRE, and start a text editor, such as Notepad.
Navigate to the system drive, and search for windows\winsxs\pending.xml.
If the Pending.xml file is found, rename the file as Pending.xml.old.
Open the registry, and then load the component hive in HKEY_LOCAL_MACHINE as a test.
Highlight the loaded test hive, and then search for the pendingxmlidentifier value.
If the pendingxmlidentifier value exists, delete the value.
Unload the test hive.
Load the system hive, name it as «test».
Navigate to the following subkey:
HKEY_LOCAL_MACHINE\SYSTEM\ControlSet001\Services\TrustedInstaller
Change the Start value from 1 to 4
Unload the hive.
Try to start the computer.
If the Stop error occurs late in the startup process, or if the Stop error is still being generated, you can capture a memory dump. A good memory dump can help determine the root cause of the Stop error. For details, see the following articles:
For more information about page file problems in Windows 10 or Windows Server 2016, see the following:
For more information about Stop errors, see the following Knowledge Base article:
If the dump file shows an error that is related to a driver (for example, windows\system32\drivers\stcvsm.sys is missing or corrupted), follow these guidelines:
Check the functionality that is provided by the driver. If the driver is a third-party boot driver, make sure that you understand what it does.
If the driver is not important and has no dependencies, load the system hive, and then disable the driver.
If the stop error indicates system file corruption, run the system file checker in offline mode.
To do this, open WinRE, open a command prompt, and then run the following command:
If there is disk corruption, run the check disk command:
If the Stop error indicates general registry corruption, or if you believe that new drivers or services were installed, follow these steps:
- Start WinRE, and open a Command Prompt window.
- Start a text editor, such as Notepad.
- Navigate to C:\Windows\System32\Config.
- Rename the all five hives by appending «.old» to the name.
- Copy all the hives from the Regback folder, paste them in the Config folder, and then try to start the computer in Normal mode.


