- How to check your computer uptime on Windows 10
- How to check PC uptime using Task Manager
- How to check PC uptime using Control Panel
- How to check PC uptime using Command Prompt
- Using WMIC
- Using System Information
- How to check PC uptime using PowerShell
- More Windows 10 resources
- Halo: MCC’s live service elements make it better, not worse
- Microsoft’s Surface Duo is not ‘failing up’
- Here’s what you can do if Windows 10 update KB5001330 is causing issues
- These are the best PC sticks when you’re on the move
- Measure Boot Time in Windows 10 with Windows Boot Timer
- Measure Windows Boot Time
- Free software to measure Boot or Startup Time in Windows 10
- Measure Startup or Boot Time in Windows 10
- FIX: Windows 10 slow boot issue [Simple Guide]
- How can I fix a slow boot time in Windows 10?
- 1. Use the Windows 10 Startup Manager
- 2. Update your BIOS
- 3. Update your graphics card drivers
- DriverFix
- 4. Run the Windows Update Troubleshooter
- 5. Consider getting an SSD and tweak the BIOS settings
- 6. Install the latest updates
- 7. Delete all files from WDI directory
- 8. Install the Intel Rapid Store Technology driver
- 9. Enable/disable Fast Startup
How to check your computer uptime on Windows 10

On Windows 10, understanding how long a device has been up and running can be useful information in a number of scenarios. For example, when troubleshooting problems, you may want to know if a reboot was recently applied, or if your computer is acting up while working on an important project, and you suspect a restart is required.
Whatever the reason, Windows 10 doesn’t make it obvious to see your system uptime, but it’s not impossible to find either, as you can deduce this information using Task Manager, Control Panel, Command Prompt, and PowerShell.
In this Windows 10 guide, we walk you through four simple ways to check your device uptime without involving scripts or restarting.
How to check PC uptime using Task Manager
Perhaps the easiest way to check your device uptime is using Task Manager with these steps:
- Open Start.
Search for Task Manager and click the top result to open the experience.
Quick Tip: You can also open Task Manager using the Ctrl + Shift + Esc keyboard shortcut, or by right-clicking the taskbar and selecting Task Manager from the menu.
Select the CPU section.

Once you complete these steps, you’ll see your device uptime on the right side, at the bottom of the page.
How to check PC uptime using Control Panel
Another easy way to determine your system uptime is to check your network adapter status with these steps:
- Open Start.
- Search for Control Panel and click the top result to open the experience.
Click on Network and Internet.

Click on Network and Sharing Center.
Click the Change adapter settings option in the left pane.
Double-click the network adapter connected to the internet.
After completing the steps, you can deduce your computer uptime using the «Duration» information, which indicates the uptime from the network connection that resets every time the device starts. (Of course, these methods work as long as you didn’t reset your network connection since the last time you booted the device.)
How to check PC uptime using Command Prompt
If you want to use Command Prompt to check your device uptime, you have at least two ways to do it.
Using WMIC
To check your computer uptime using Command Prompt, use these steps:
- Open Start.
- Search for Command Prompt, right-click the top result, and click the Run as administrator option.
Type the following command to query the device’s last boot time and press Enter:
wmic path Win32_OperatingSystem get LastBootUpTime

Once you complete these steps, you’ll notice an output that can look intimidating, but it’s not difficult to decode so you can understand your device uptime.
For example, the LastBootUpTime 20181219104602.500000-300 can be broken down using the info below.
- Year: 2018.
- Month: 12.
- Day: 19.
- Hour: 10.
- Minutes: 46.
- Seconds: 02.
- Milliseconds: 500000.
- GMT: -300 (5 hours ahead of GMT).
This means that the computer has been up and running since December 19, 2018, at 10:46 AM. If you want to be more specific, just subtract the last boot time with the current time to deduce the number of days, hours, and minutes the device has been in operation.
Using System Information
You can also see your system uptime with a more user-friendly format using the System Information tool with these steps:
- Open Start.
- Search for Command Prompt, right-click the top result, and click the Run as administrator option.
Type the following command to query the device’s last boot time and press Enter:
systeminfo | find «System Boot Time»
Using the System Information tool, you can quickly find out the last time your system rebooted in an easy-to-read format. Also, like the wmic command, you can subtract the last boot time with the current time to determine the number of days, hours, and minutes the device has been running.
How to check PC uptime using PowerShell
It’s also possible to check your device uptime using PowerShell with these steps:
- Open Start.
- Search for Command Prompt, right-click the top result, and click the Run as administrator option.
Type the following command to query the device uptime and press Enter:
(get-date) — (gcim Win32_OperatingSystem).LastBootUpTime
After completing these steps, you’ll get the uptime information on a list format with the days, hours, and minutes.
This guide outlines several ways to check your device uptime, but it’s important to note that there are many other methods to find the same information using Command Prompt and PowerShell scripts. However, these are the most straightforward methods.
In addition, while these instructions are focused on Windows 10, these methods have been around for a long time, which means they’ll also work on Windows 8.1 and Windows 7.
More Windows 10 resources
For more helpful articles, coverage, and answers to common questions about Windows 10, visit the following resources:
![]()
Halo: MCC’s live service elements make it better, not worse
Halo: The Master Chief Collection is more popular than ever, but some fans don’t agree with the live service approach 343 Industries has taken with it. Here’s why those elements are, at the end of the day, great for the game and for Halo overall.
![]()
Microsoft’s Surface Duo is not ‘failing up’
Microsoft announced this week that it was expanding Surface Duo availability to nine new commercial markets. While Surface Duo is undoubtedly a work in progress, this is not a sign of a disaster. It’s also doesn’t mean that Surface Duo is selling a ton either. Instead, the reason for the expansion is a lot more straightforward.
![]()
Here’s what you can do if Windows 10 update KB5001330 is causing issues
In this guide, we’ll show you the steps to get rid of the update KB5001330 to fix profile, gaming, and BSoD problems with the Windows 10 October 2020 Update and May 2020 Update.
![]()
These are the best PC sticks when you’re on the move
Instant computer — just add a screen. That’s the general idea behind the ultra-portable PC, but it can be hard to know which one you want. Relax, we have you covered!
Measure Boot Time in Windows 10 with Windows Boot Timer
Have you ever measured your PC’s boot time? I guess, not! Well, here’s a simple utility called Windows Boot Timer that may interest you. Windows Boot time utility is a useful boot timer utility that loads itself into memory when you start your computer and measures total system boot time.
After all system processes have loaded, the utility removes itself from the system memory and displays the total boot time. No installation is required. All you need to do is double-click on the executable & upon restart; it will display the time taken by your computer to load windows. It does not count the time taken to go through BIOS or BIOS boot up a password.
Sadly, the program without your consent takes you to the developer’s site for feedback and product endorsements.
Measure Windows Boot Time
Download Boot Timer from here. It works with Windows 10, Windows 8, Windows 7 & Windows Vista too! Save all you work and then use this utility.
Run the downloaded utility. It will ask for permission to reboot. Click OK. On reboot, you will first get a message asking you to not use the mouse or keyboard for some time. So please adhere to it. Soon you will get a dialog box telling you your Windows Boot up time.
Here is my regular startup time.
And here are the readings after I removed the start-up entry. My computer was able to shave off a little time.
BootRacer is another tool that helps you measure boot tie.
AppTimer is a freeware that will run an executable, a pre-set number of times and then measure the time it takes to start-up each time.
Soluto will not only measure your boot time but also help you optimize boot time further.
Free software to measure Boot or Startup Time in Windows 10
Over a period of time, you install several programs on your Windows computer. Many of these programs add entries to the startup items and add Services to Windows, which need to start when Windows starts. This results in the slowing down of your Windows PC, in terms of boot times as well as performance, because too many programs want to run.
You can use the built-in MSConfig Utility, or some nice freeware like WinPatrol or CCleaner, to remove, disable, or manage your startup programs. But if you need to measure the boot time or the time your Windows 10/8/7 takes to start up, you will need to use Windows Assessment and Deployment Toolkit, or you can check out some of these free software that let you do so easily.
Measure Startup or Boot Time in Windows 10
We will take a look at the following free software that will help you measure the boot or stauptime in Windows 10/8/7:
- Windows Boot Timer
- BootRacer
- AppTimer
- Soluto
- MaaS360 Boot Analyze.
Windows Boot Timer loads itself into memory when you start your computer and measures total system boot time. After all system processes have loaded, the utility removes itself from the system memory and displays the total boot time. No installation is required. All you need to do is double-click on the executable & upon restart; it will display the time taken by your computer to load windows. It does not count the time taken to go through BIOS or BIOS boot up a password.
BootRacer will let you measure the time required for your Windows computer to boot. The main function of BootRacer is total control over Windows boot time.
3] AppTimer
AppTimer is a freeware that will run an executable, a pre-set number of times and then measure the time it takes to start-up each time. It measures the time up to the state where user input is being accepted before exiting the application. After each run AppTimer will close the application in an automated fashion, before restarting it again.
4] Soluto
Soluto will not only measure your boot time but also help you optimize boot time further. It employs innovative low-level Windows kernel technologies to identify what users are asking their PC to do, and what their PC does in return. It can delay the loading of programs or services that aren’t necessary when the computer is booting and readying itself for use. This way, such programs and services are launched a little later, thus making your computer that much earlier and ready for you to use.
3] Boot Analyzer
MaaS360 Boot Analyzer will give you detailed information s about the boot activity of your computer. It has a clean and easy-to-understand interface. The main window displays a graph with details about the date and time when the boot mode was enabled. While measuring boot times, it lets you mention the number of boots. It also maintains a history of your previous boot times. Go get it here.
FIX: Windows 10 slow boot issue [Simple Guide]

- If your Windows 10 PC is booting slowly, there might be problems with your hardware or software.
- Use the Windows 10 Startup Manager to disable the apps that might cause the W indows 10 slow startup issues.
- Many users claimed that they solved the Windows 10 slow boot problem by updating their BIOS.
- You should also make sure that your GPU drivers are up to date. We recommend using a driver updater tool.
Just like Windows 8, Windows 10 was intended to improve hardware performance and speed up your computer, and most users are satisfied with their performance on Windows 10.
Sadly, not all users have similar experience, and some of them are claiming that booting routine takes up a long time on Windows 10.
A slow booting Windows 10 can be a big problem, and in this article we’re going to cover the following issues:
- Slow boot SSD, hard drive
- According to users, both SSD and hard drive owners have experienced slow boot issues. However, you should be able to fix this problem by using one of our solutions.
- Windows 10 slow boot black screen
- Users reported that they are stuck on a black screen during the boot. This is an annoying problem and it’s usually caused by your graphics card drivers.
- Windows 10 slow boot after Creators Update
- Many users reported this problem after the Creators Update. This is a big problem, and it’s most likely caused by an incompatible driver or software.
- Slow boot Windows 10 AMD, Nvidia
- Your graphics card can be the cause for slow boot, and both AMD and Nvidia owners reported this issue. To fix the problem, you just have to reinstall or update your drivers.
- Slow boot even in Safe Mode
- If you’re having issues with slow boot in Safe Mode, the problem might be your hardware or BIOS configuration.
- Slow startup time windows 10
- This is a variation of this problem, and if you have problems with slow startup time, you might be able to fix it using one of our solutions.
Long boot times on Windows operating systems are usually caused by third-party apps that you install, and since most of them start automatically with Windows 10, they tend to make your booting routine slow.
How can I fix a slow boot time in Windows 10?
1. Use the Windows 10 Startup Manager
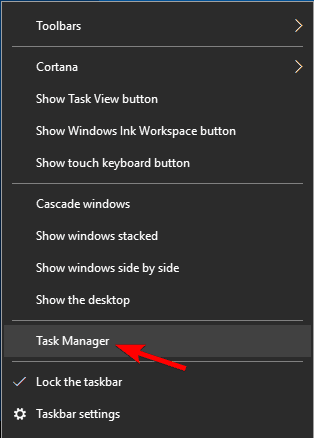
- Open Task Manager by right-clicking the Taskbar and selecting Task Manager from the menu.
- In addition, you can use Ctrl + Shift + Escape to open the Task Manager directly or Ctrl + Alt + Delete and select Task Manager from the list.

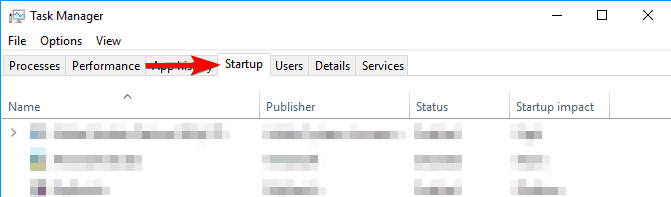
- Click the More details button and then go to the Startup tab.
- In the Startup tab, you’ll see the startup impact of each program that starts with Windows 10.
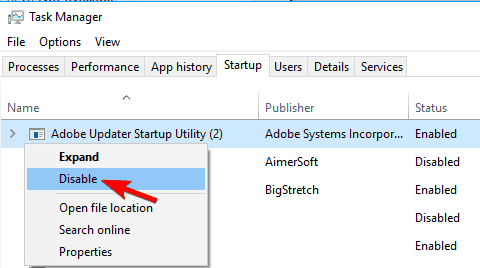

The key is to choose the right apps to disable, for example, you want to keep your Antivirus running, but you might want to disable Skype or driver update software from starting with your Windows 10.
Of course, you can manually start these services at any time if you need them.
If you’re interested in additional info on how to add or remove startup apps on Windows 10, check out this simple guide.
2. Update your BIOS

Several users reported that they fixed the slow boot problems in Windows 10 by updating their BIOS. BIOS update is an advanced and potentially dangerous procedure, so use it at your own risk.
After updating your BIOS, check if the issue is resolved. If you already have the latest version of BIOS, you might want to reflash it and install the same version again.
Few users reported that installing the same version of BIOS fixed the problem for them, so you might want to try that.
If you need more information about updating your BIOS, check out this useful guide dedicated to the matter.
3. Update your graphics card drivers
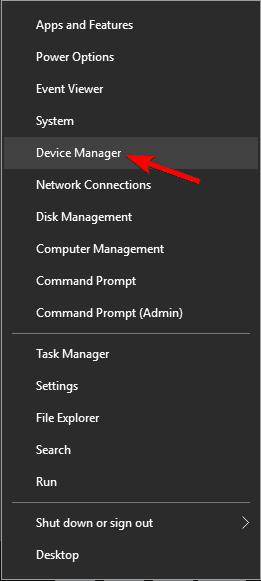
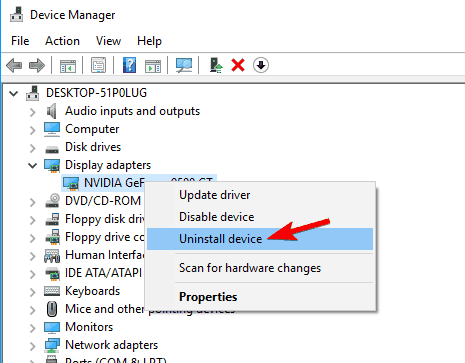
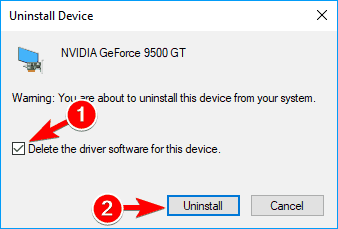
- Press Windows Key + X to open Win + X menu and choose Device Manager from the list.
- When Device Manager opens, locate your graphics card driver, right-click it and choose Uninstall device.
- Check Delete this driver software for this device and click on Uninstall.
If you’re having slow boot problems in Windows 10 followed by a black screen, the issue might be related to your drivers. According to users, they fixed this problem simply by updating their Nvidia drivers.
Updating your graphics card drivers is relatively simple, but if you don’t know how to do it, we wrote a short guide on how to update your graphics card drivers.
In some cases, you might have to uninstall your drivers and reinstall them again. You can easily do that right from Device Manager by following the aforementioned steps.
After the driver is uninstalled, simply download the latest driver and check if the issue is resolved. If you want to completely remove your driver along with all of its associated files, be sure to check our guide on how to use Display Driver Uninstaller.
Update your drivers automatically
Updating your drivers manually isn’t that easy, especially for those who have no background knowledge. Having to find out your hardware’s model number and searching for the latest driver can be tedious.
Thankfully, there are programs that will make your life easier by automatically scanning your hardware for new driver versions, and updating them accordingly.
DriverFix
4. Run the Windows Update Troubleshooter
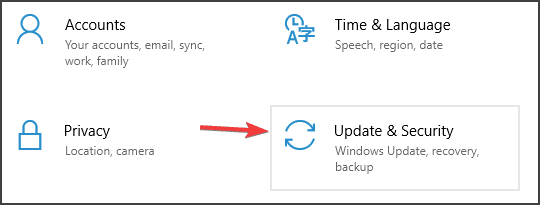
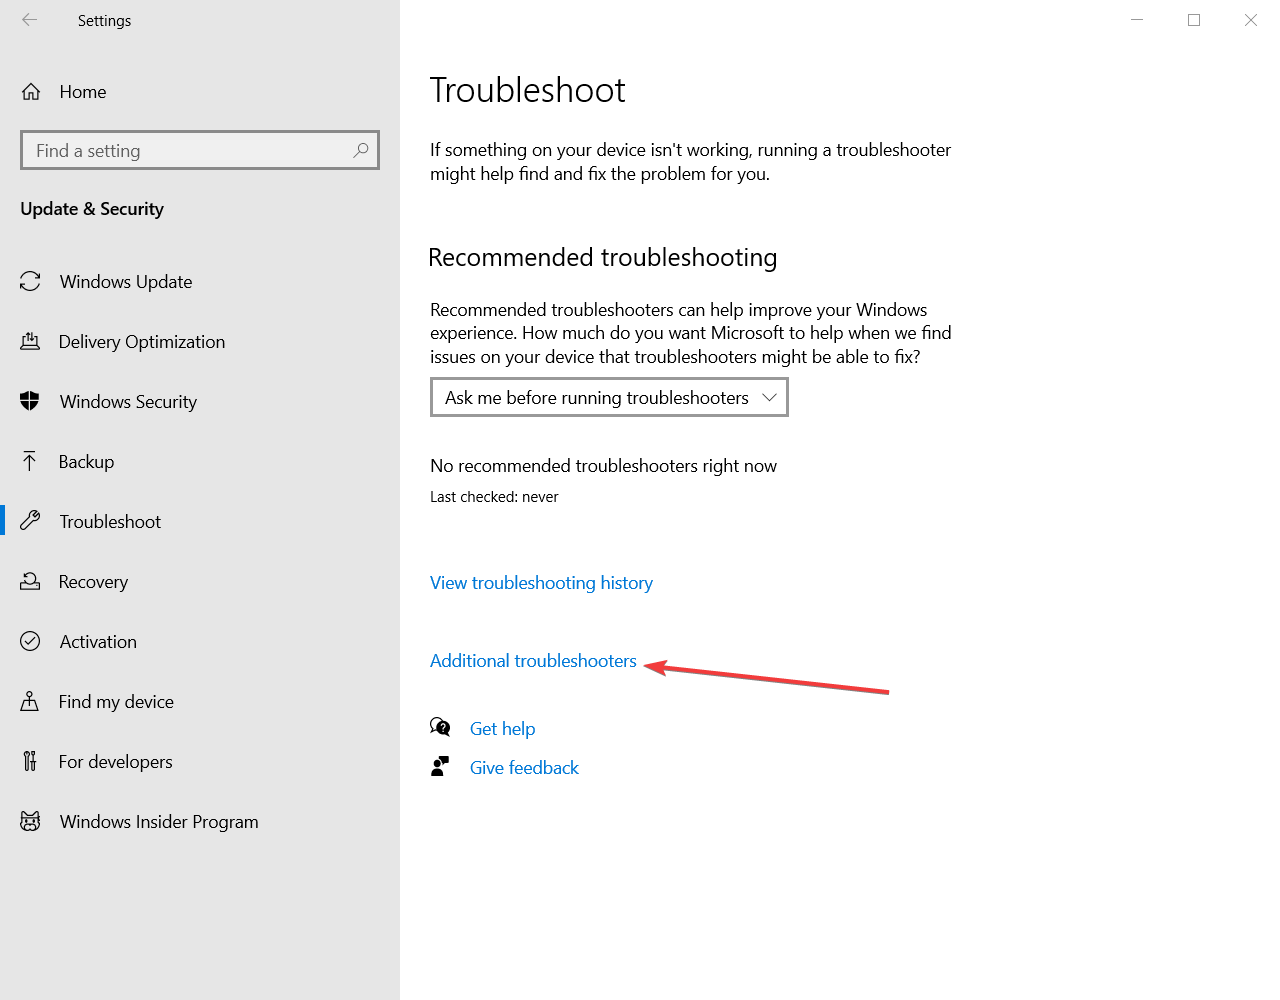
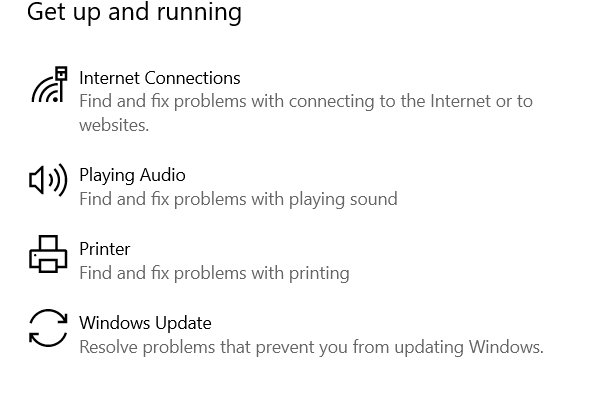
- Press the Windows Key + S and search for Settings.
- In the Settings menu, choose Update & Security.
- Then, select Troubleshoot, and Additional troubleshooters.
- Inside the new window, under Get up and running, select Windows Update.
- Next, click on Run the troubleshooter.
Many users reported slow boot problems in Windows 10, and according to users, this issue is caused by a corrupted Windows Update file. To fix this problem, you just need to use the Windows troubleshooter.
Once you start the tool, it should automatically fix any issues and corrupted files. After the troubleshooter is finished, check if the problem is resolved.
If your Windows Troubleshooter stops before completing the process, you can easily fix it with our great guide.
5. Consider getting an SSD and tweak the BIOS settings

Solid State Drives are great for your PC in terms of speed, and if you can afford one, maybe you should consider getting one in the future.
If you can’t afford it, you might want to tweak some BIOS settings to improve your booting routine. For example, you can disable BIOS checking your DVD drive or network locations each time you boot and reduce boot time.
Few users reported that this problem occurs due to the USB Storage Function in BIOS. This feature is used to boot your PC from a flash drive, and if you don’t want to do that, you can just disable it.
To see how to find and disable this feature in BIOS, we advise you to check your motherboard manual.
If you’re in the market for a fast SSD, don’t waste another minute and check this article to get the biggest ones available right now.
6. Install the latest updates
- Press Windows Key + I to open the Settings app.
- When Settings app opens, go to Update & security section.
- Go to the Windows Update section, and click on Check for updates.
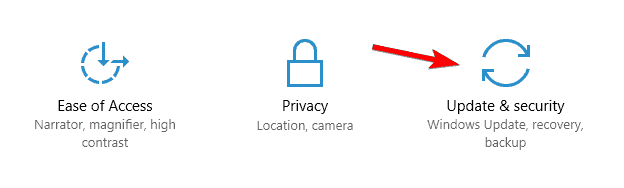
Sometimes you can fix the slow boot problems simply by installing the latest updates. Windows 10 usually downloads the necessary updates in the background.
Take a closer look at this quick article about Windows updates if you’re not sure when your OS is installing new updates.
If any updates are available, they will be downloaded automatically and installed once you restart your PC. However, if your PC is already up to date, you might want to try a different solution.
Is the Windows Settings app giving you trouble? Follow the steps from this detailed article to solve the issue. Additionally, here’s another detailed guide dedicated to solving Windows problems.
7. Delete all files from WDI directory
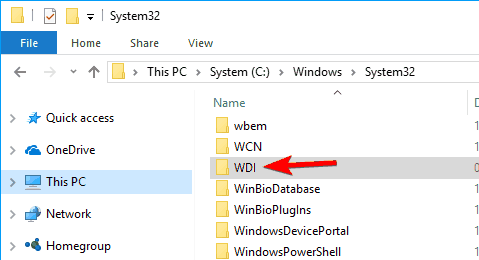
- Open File Explorer and navigate to the following directory: C:/Windows/System32/
- Now go to the WDI directory.
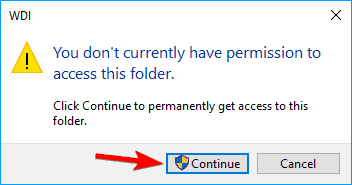
- If you get a security prompt, click on Continue to proceed.
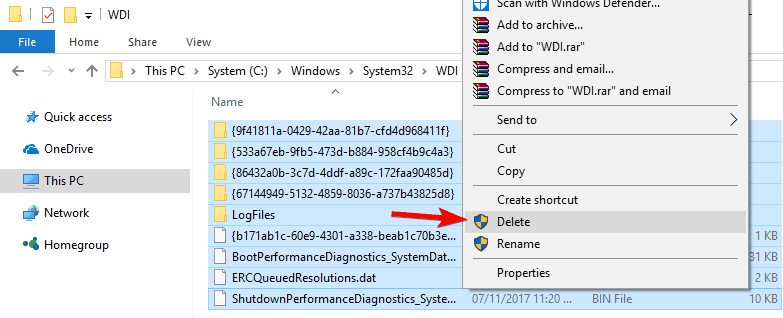
- Select all files from the WDI directory, right-click them and choose Delete.
If you’re having slow boot issues, you might be able to fix the problem by deleting the contents of the WDI directory as instructed in the steps above.
After removing the contents of the WDI directory, the Windows 10 slow startup issue will be fixed.
Here’s a comprehensive guide dedicated to fixing File Explorer issues that will make sure it won’t give you any problems in the future.
8. Install the Intel Rapid Store Technology driver
To fix the problems with slow boot, you just need to install Intel Rapid Store Technology driver on your PC. Many users reported that this driver isn’t the latest, and that’s causing the issue to appear.
To fix the problem, just download and install the latest version of the Intel Rapid Store Technology driver from their official website and check if the problem is resolved.
If you’re unable to install drivers on your Windows 10 PC, you’ll find all the causes and solutions for your issues in this great guide.
9. Enable/disable Fast Startup
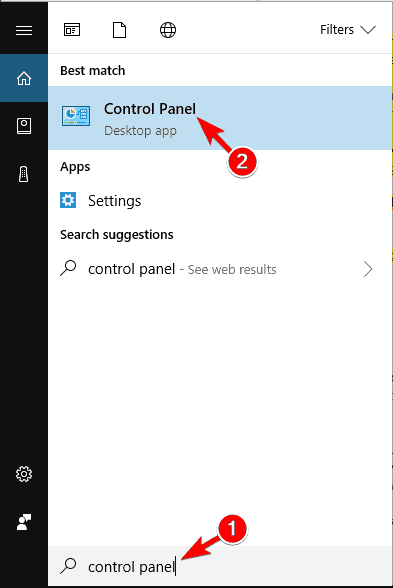
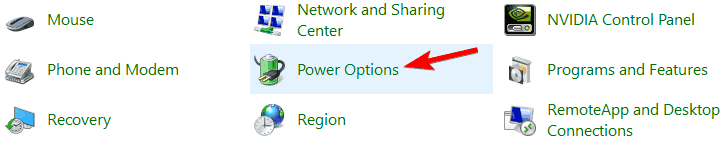
- Press Windows Key + S and enter Control Panel.
- Select Control Panel from the list.
- When Control Panel opens, select Power Options from the menu.
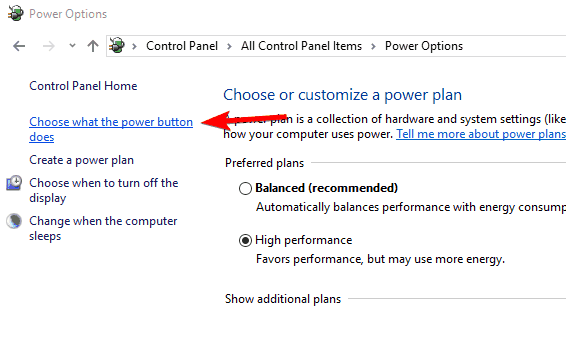
- The Power Options window will now appear.
- Click on Choose what the power button does from the menu on the left.
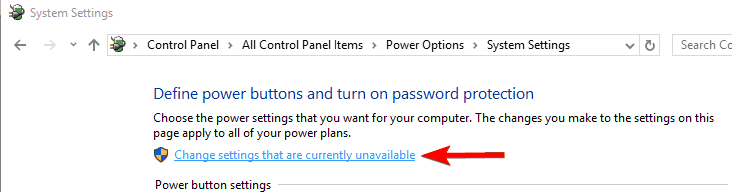
- Click on Change settings that are currently unavailable.
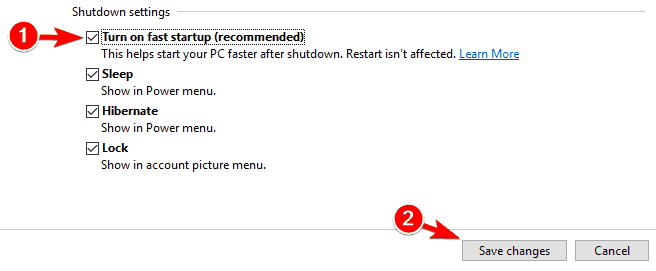
- If Turn on fast startup is checked, disable it.
- If this feature is not enabled, check it.
- Now click on the Save changes button.
Sometimes the fast startup feature can cause this problem, but you can disable/enable it by following our method above. After disabling or enabling fast startup, the issue should be resolved.
If you can’t open Control Panel on Windows 10, take a look at this step-by-step guide to find a solution.
Moreover, you can also give a read to this useful guide dedicated to Fast Startup issues if you want to learn how to solve them quickly.
That’s it. If none of these solutions helped you to solve the problem with the Windows 10 slow startup problem, check out the solutions from our article about slowed down computers in Windows 10.
If you have any comments or suggestions, tell us in the comment section below. Also, if you have any other Windows 10-related issues you can check for the solution in our dedicated Windows 10 section.


