- Install Windows from a USB Flash Drive
- What you need
- Step 1 — Format the drive and set the primary partition as active
- Step 2 — Copy Windows Setup to the USB flash drive
- Step 3 — Install Windows to the new PC
- If your Windows image is larger than 4GB
- How to Create a Bootable USB Stick on Windows 10, 8, 7?
- Why make a bootable USB stick on Windows?
- How to create a bootable USB on Windows 10/8/7?
- Part 1. Create bootable Windows installation USB media via CMD
- Part 2. Create a bootable USB drive for Windows repair
- Part 3. Create a bootable USB drive for portable Windows device
- Final words
- Windows bootable from usb stick
- 2. Requirements
- 3. USB selection
- 4. Boot selection and Partition scheme
- 5. Select the Ubuntu ISO file
- 6. Write the ISO
- 7. Additional downloads
- 8. Write warnings
- 9. Writing the ISO
- 10. Installation complete
Install Windows from a USB Flash Drive
Here’s how to create a bootable Windows installation USB drive starting with a Windows .iso file or a Windows Setup DVD.
If you’re looking for an easy way to create a bootable USB Windows installation drive, use the media creation tool.
What you need
- Windows 10 install .iso or DVD
- USB flash drive with at least 5GB free space. This drive will be formatted, so make sure it doesn’t have any important files on it.
- Technician PC — Windows PC that you’ll use to format the USB flash drive
- Destination PC — A PC that you’ll install Windows on
Step 1 — Format the drive and set the primary partition as active
Connect the USB flash drive to your technician PC.
Open Disk Management: Right-click on Start and choose Disk Management.
Format the partition: Right-click the USB drive partition and choose Format. Select the FAT32 file system to be able to boot either BIOS-based or UEFI-based PCs.
Set the partition as active: Right-click the USB drive partition and click Mark Partition as Active.
If Mark Partition as Active isn’t available, you can instead use diskpart to select the partition and mark it active.
Step 2 — Copy Windows Setup to the USB flash drive
Use File Explorer to copy and paste the entire contents of the Windows product DVD or ISO to the USB flash drive.
Optional: add an unattend file to automate the installation process. For more information, see Automate Windows Setup.
Step 3 — Install Windows to the new PC
Connect the USB flash drive to a new PC.
Turn on the PC and press the key that opens the boot-device selection menu for the computer, such as the Esc/F10/F12 keys. Select the option that boots the PC from the USB flash drive.
Windows Setup starts. Follow the instructions to install Windows.
Remove the USB flash drive.
If your Windows image is larger than 4GB
Windows USB install drives are formatted as FAT32, which has a 4GB filesize limit. If your image is larger than the filesize limit:
Copy everything except the Windows image file (sources\install.wim) to the USB drive (either drag and drop, or use this command, where D: is the mounted ISO and E: is the USB flash drive.)
Split the Windows image file into smaller files, and put the smaller files onto the USB drive:
How to Create a Bootable USB Stick on Windows 10, 8, 7?
If you need to create a bootable USB stick on Windows, you can read through this page. It explains how to create a bootable Windows USB via CMD or a piece of free software.

By Emily  / Last Updated April 15, 2021
Why make a bootable USB stick on Windows?
A bootable USB drive is an external hard drive that contains the operating system and can be used to boot a computer or laptop. Most users plan to create a bootable USB drive in Windows for the following three different purposes.
в—†Repair Windows PC: the most important one should be saving the PC when it cannot boot successfully due to a virus, serious system failure, defective hard drive, or other disk errors. With the bootable USB drive, you can reboot the computer and repair it accordingly.
в—†Clean install OS: it can be used as an external installation media to clean install the operating system. This is much quicker and easier than installing OS from CD or DVD-ROM.
в—†Bring your familiar OS everywhere: the bootable USB drive can also be a portable Windows device, which you can take everywhere and enjoy the familiar OS environment on other computers, even the brand-new one without OS installed.
How to create a bootable USB on Windows 10/8/7?
As listed above, the bootable Windows USB drive can be used under different situations, so the process of creating a bootable USB stick on Windows will also differ slightly. But don’t worry, this article will outline how to make a bootable USB device for the above 3 purposes on Windows 10/8/7.
Part 1. Create bootable Windows installation USB media via CMD
First of all, we will show you how to create a bootable USB drive for installing the OS.
Tips:
в—Џ The USB drive should be at least 4GB of storage (for a 32-bit operating system) or at least 8GB (for a 64-bit system).
в—Џ Back up files you have stored on the USB drive because the drive will be formatted during this process and all files on it will be erased.
Step 1. Open Command Prompt windows: click “Start” button, input “cmd” in the Search box and press “Enter”. Right click the “Command Prompt” icon and select “Run as administrator”.
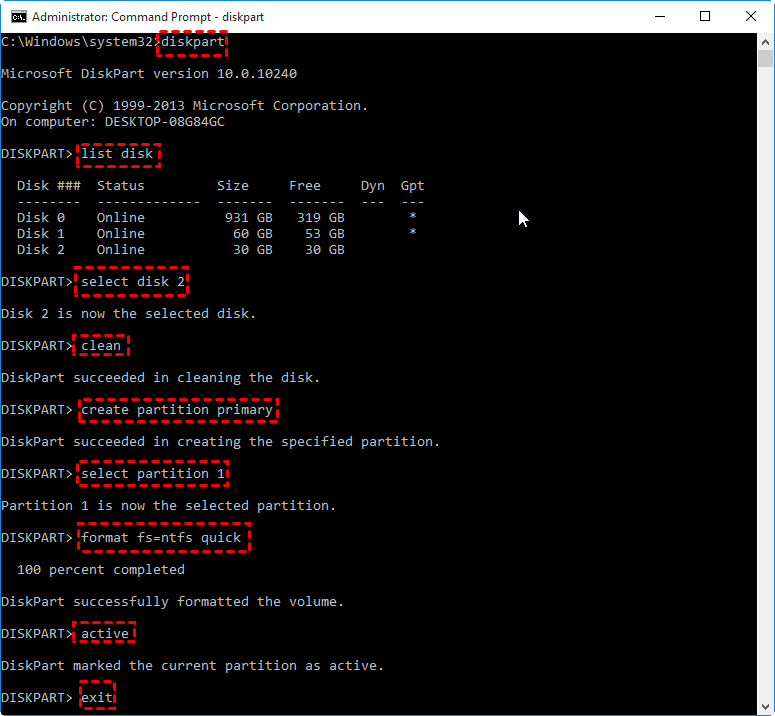
Step 2. In the pop-out Command Prompt window, type “diskpart” and press “Enter” to launch Diskpart utility. Inside the Diskpart window, input the following commands in turn and press “Enter” after each one.
list disk
select disk #
clean
create partition primary
select partition 1
format fs=ntfs quick (if you plan to create UEFI bootable USB using Diskpart, type “format fs=fat32 quick” instead to format it into FAT32 file system)
active
exit
Don’t close the Command Prompt. You can minimize it for a little bit since the process is not finished yet. Now, put the Windows DVD into your computer’s DVD drive. Open Windows File Explorer to check out the drive letter of the Windows DVD drive and the USB drive.
Then, go back to the CMD window and type in “D: CD BOOT” (replace D: with your DVD drive letter) and press Enter. Type “CD BOOT” again and press Enter. Lastly, type “BOOTSECT.EXE /NT60 H: “ (replace your USB flash drive letter for H:) and press Enter.
At last, copy all the files and folders of the Windows DVD to your USB flash drive in File Explorer. Now, you can plug the bootable USB flash drive into the target computer to start installing OS.
Part 2. Create a bootable USB drive for Windows repair
If your Windows computer cannot boot due to hard drive failure, you can create a bootable USB drive as a Windows repair tool. In this case, you can use the free AOMEI Partition Assistant Standard .
Apart from creating a bootable USB stick on Windows computer for a PC emergency, it also offers related functions to repair boot issues such as rebuilding MBR, checking and fixing bad sectors on the system drive.В Now you can free download it and learn how to create a bootable USB stick on Windows 10/8/7 for Windows repair.
Step 1. Connect the USB drive to a working Windows computer, install and run AOMEI Partition Assistant Standard. Click “Make Bootable Media” and hit on “Next” to proceed.

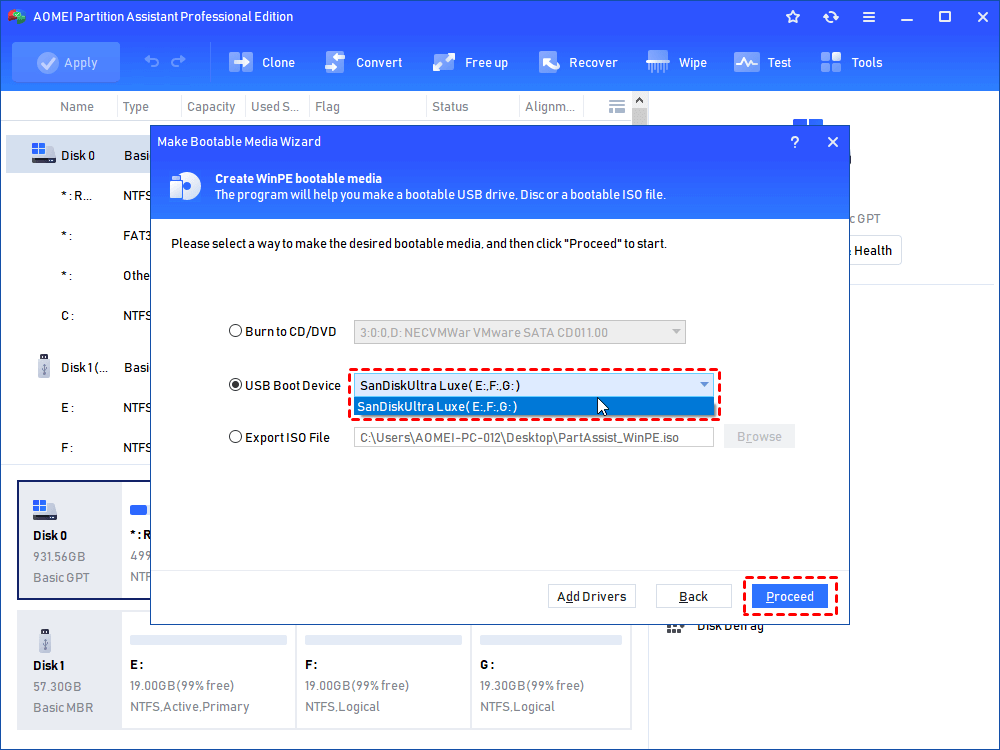
Step 2. Choose the right USB drive under “USB Boot Device” and click “Proceed”.
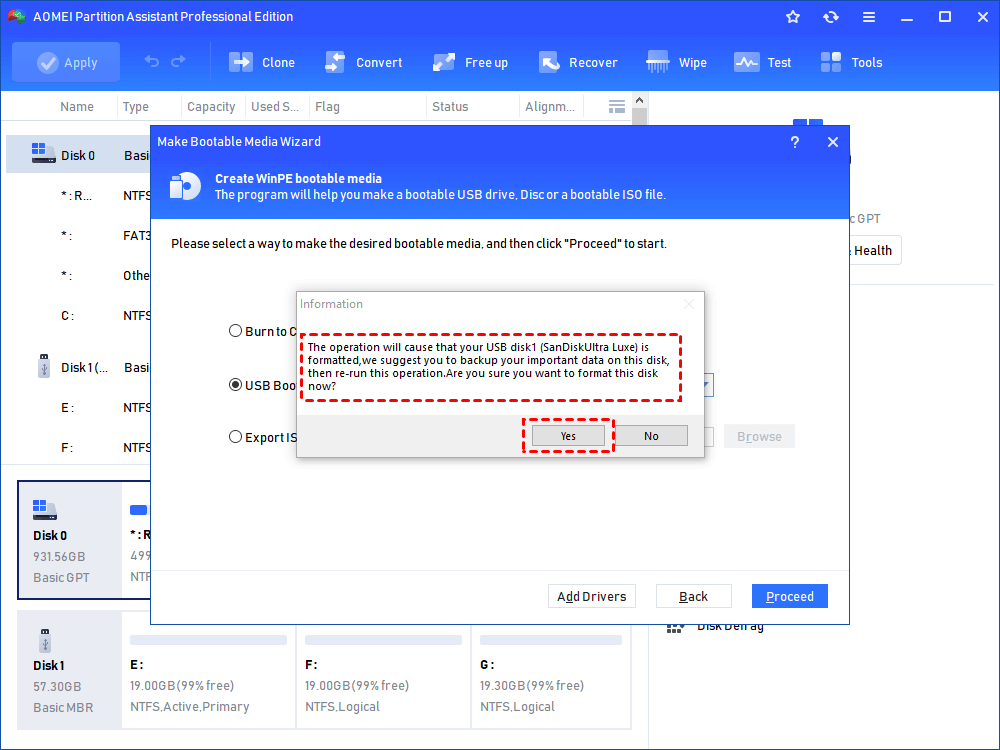
Step 3. Then you will be told the USB will be formatted, please back up important data. If you have done that, click “Yes”.
Step 4. Then wait for the process to be completed.
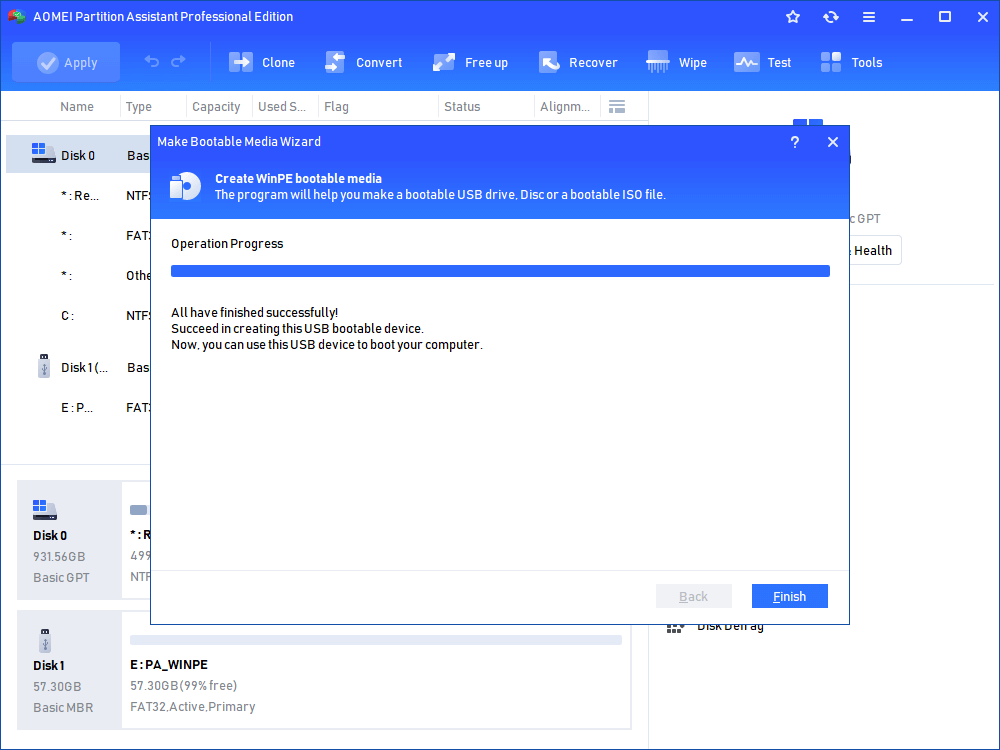
Note: the bootable USB drive contains the pre-installed AOMEI Partition Assistant Standard.
When the process is done, insert the bootable USB drive into the computer with boot issues, change boot order in Boot menu to make it boot from the bootable USB stick. Then you can rebuild MBR on the system primary hard drive.
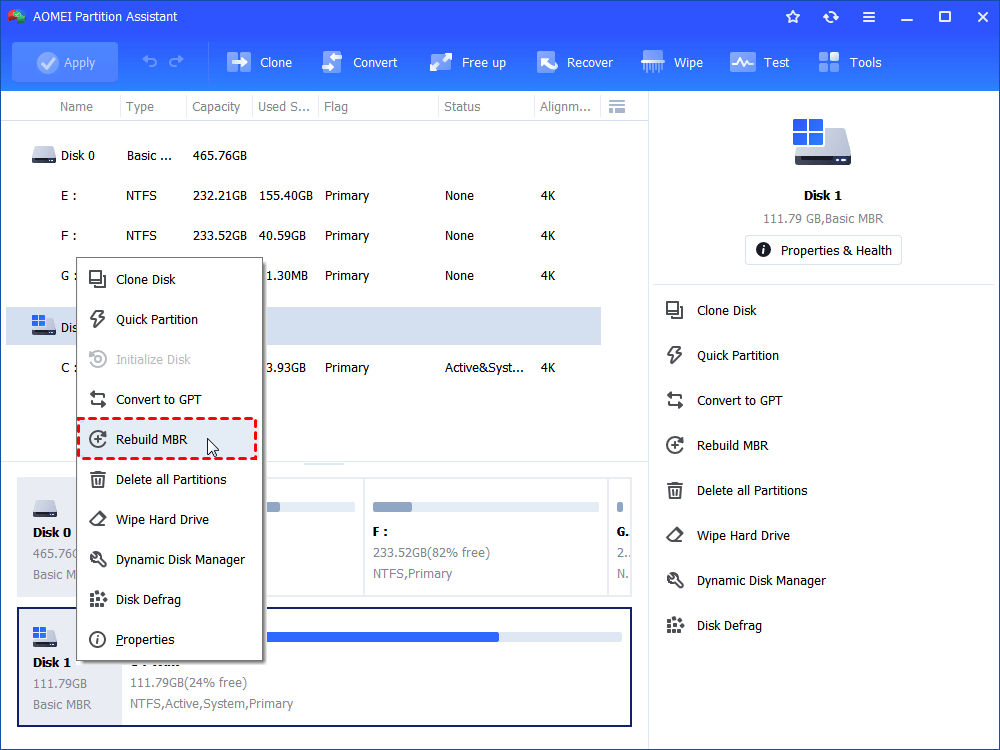
Or you can right-click the system partition to check whether there are some bad sectors on the partition and fix them if necessary. Those two functions are most commonly used functions to repair Windows boot failures.
Part 3. Create a bootable USB drive for portable Windows device
In addition to the above two purposes of uses, some users want to create a bootable USB stick on Windows to get a portable Windows USB drive. For this task, you can upgrade to Professional. It offers the “Windows To Go Creator” feature. Much like “Windows To Go” developed by Microsoft, but it is much more powerful and flexible.
It supports both certified and non-certified USB drive. It can create any edition of Windows 10/8/7 bootable USB no matter it is Enterprise, Education, Home or Professional. Besides, it allows you to make Windows 10/8/7 portable USB drive with and without Windows ISO files. Moreover, it does not a USB drive over 32GB, instead, 13GB is enough in most cases.
Step 1. Install and run AOMEI Partition Assistant Pro on your PC. Click “All Tools” > “Windows To Go Creator” on the left side.

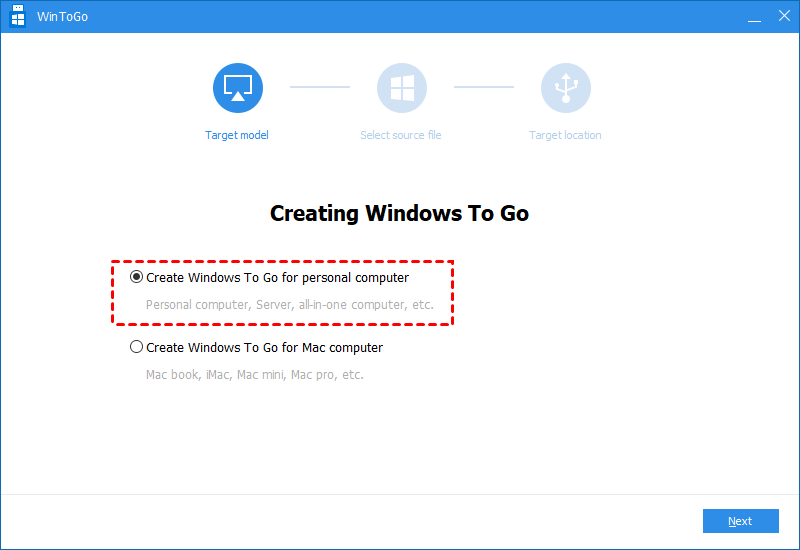
Step 2. Select «Create Windows ToGo for personal computer». PS.: if you want toВ run Windows from USB on Mac, you can use the seond option.
Step 3. Choose «Create Windows ToGo with system disc/ISO» and click on «Next».
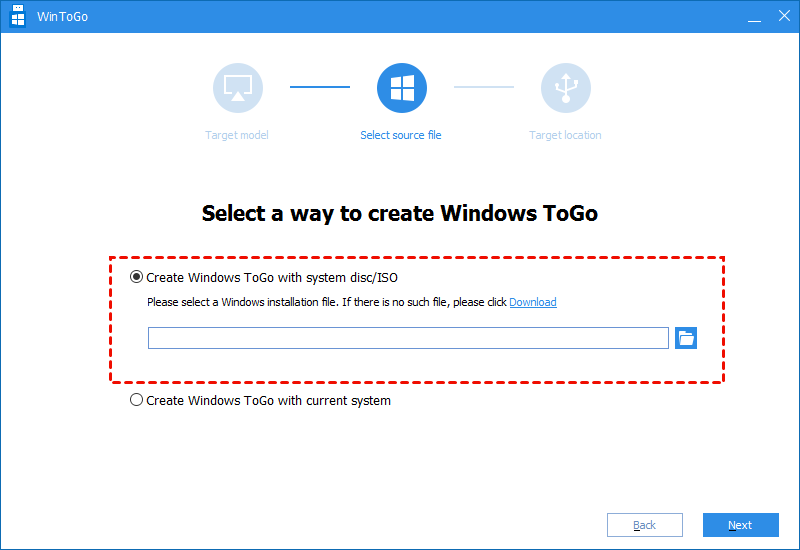
Step 4. Choose Windows ISO file in this window. Click “Next”.
Note: If you don’t have Windows ISO files, go for the second method to create Windows bootable USB with current system .

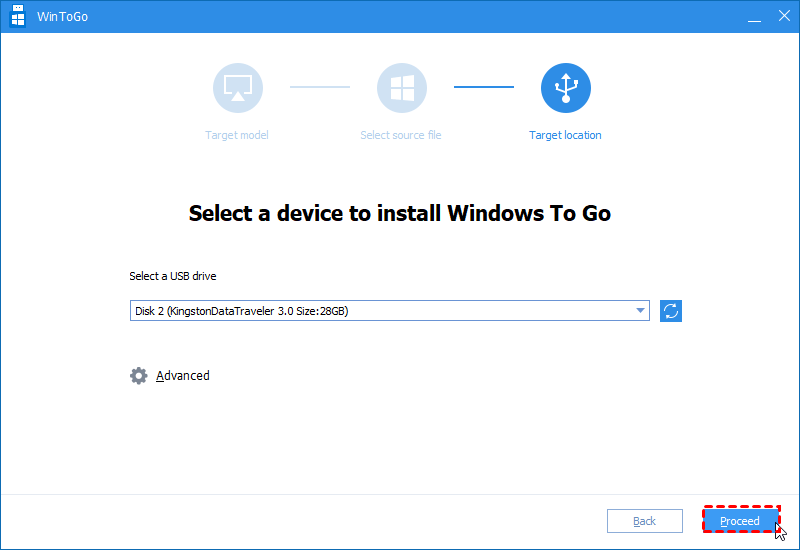
Step 5. Select USB drive and c lick on “Proceed” to start creating a bootable USB drive in Windows computer.
Final words
This article has shown how to create a bootable USB stick on Windows 10/8/7 for different usages. Be clear about your requirements and choose the right method. If you want to create a Server bootable USB drive for repairing Server computer or enjoying the customized Windows Server environment, you can try AOMEI Partition Assistant Server.
Windows bootable from usb stick
With a bootable Ubuntu USB stick, you can:
- Install or upgrade Ubuntu
- Test out the Ubuntu desktop experience without touching your PC configuration
- Boot into Ubuntu on a borrowed machine or from an internet cafe
- Use tools installed by default on the USB stick to repair or fix a broken configuration
Creating a bootable Ubuntu USB stick from Microsoft Windows is very simple and we’re going to cover the process in the next few steps.
Alternatively, we also have tutorials to help you create a bootable USB stick from both Ubuntu and Apple macOS.

2. Requirements
- A 4GB or larger USB stick/flash drive
- Microsoft Windows XP or later
- Rufus, a free and open source USB stick writing tool
- An Ubuntu ISO file. See Get Ubuntu for download links

Take note of where your browser saves downloads: this is normally a directory called ‘Downloads’ on your Windows PC. Don’t download the ISO image directly to the USB stick! If using Windows XP or Vista, download version 2.18 of Rufus.
3. USB selection
Perform the following to configure your USB device in Rufus:
- Launch Rufus
- Insert your USB stick
- Rufus will update to set the device within the Device field
- If the Device selected is incorrect (perhaps you have multiple USB storage devices), select the correct one from the device field’s drop-down menu

You can avoid the hassle of selecting from a list of USB devices by ensuring no other devices are connected.
4. Boot selection and Partition scheme
Now choose the Boot selection. Choices will be Non bootable and FreeDOS. Since you are creating a bootable Ubuntu device select FreeDOS.
The default selections for Partition scheme (MBR) and Target system (BIOS (or UEFI-CSM)) are appropriate (and are the only options available).

5. Select the Ubuntu ISO file
To select the Ubuntu ISO file you downloaded previously, click the SELECT to the right of “Boot selection”. If this is the only ISO file present in the Downloads folder you will only see one file listed.
Select the appropriate ISO file and click on Open.

6. Write the ISO
The Volume label will be updated to reflect the ISO selected.
Leave all other parameters with their default values and click START to initiate the write process.

7. Additional downloads
You may be alerted that Rufus requires additional files to complete writing the ISO. If this dialog box appears, select Yes to continue.

8. Write warnings
You will then be alerted that Rufus has detected that the Ubuntu ISO is an ISOHybrid image. This means the same image file can be used as the source for both a DVD and a USB stick without requiring conversion.
Keep Write in ISO Image mode selected and click on OK to continue.

Rufus will also warn you that all data on your selected USB device is about to be destroyed. This is a good moment to double check you’ve selected the correct device before clicking OK when you’re confident you have.

If your USB stick contains multiple partitions Rufus will warn you in a separate pane that these will also be destroyed.
9. Writing the ISO
The ISO will now be written to your USB stick, and the progress bar in Rufus will give you some indication of where you are in the process. With a reasonably modern machine, this should take around 10 minutes. Total elapsed time is shown in the lower right corner of the Rufus window.

10. Installation complete
When Rufus has finished writing the USB device, the Status bar will be green filled and the word READY will appear in the center. Select CLOSE to complete the write process.

Congratulations! You now have Ubuntu on a USB stick, bootable and ready to go.
If you want to install Ubuntu, take a look at our install Ubuntu desktop tutorial.


