- How To Fix Missing Desktop On Windows 10?
- Desktop Is Missing On Windows 10. How To Easily Fix It?
- Start Explorer Process
- Disable Tablet Mode
- Enable «Show desktop icons» Option
- Run System File Checker
- Restore Your System Using Restore Points
- Video Showing How To Fix Missing Desktop On Windows 10:
- CCBoot Wiki Database
- Client Diskless Boot Failed
- 1. Failure of booting from network
- 2. Stops at DHCP
- 3. Stops at the TFTP
- 4. Stops at www.ccboot.com
- 5. No more network devices/iSCSI boot 192.168.0.1::3260:: error occurs
- 6. Stop at Windows Logo
- 7. Blue screen when the client boots
- 8. Automatic restart
- 9. Stops at NTLDR is missing
- 10. Stops at the PXE-MOF Exiting PXE ROM
- 11. Diskless Boot Failed with Two NICs
- 12. Error Message of «Database server security does not have a computer account for the trust relationship with this workstation»
- 13. Connect Host Failed
- 14. PXE Boot Windows 8 Failed
- 15. «Failed to Start TFTP» and» Failed to Start DHCP»
- 16. After windows activation
- 17. Hardware Failure
How To Fix Missing Desktop On Windows 10?
Desktop Is Missing On Windows 10. How To Easily Fix It?
In computing, a desktop (or a desktop environment) is an implementation of the desktop metaphor, a system unit made of a bundle of programs running above a computer operating system, which share a common GUI (Graphical User Interface), sometimes described as a graphical shell. The desktop environment was first seen predominantly on personal computers, before the rise of mobile computing. Desktop GUIs help users to easily access and edit files, but generally do not provide access to all features found in the underlying operating system.
When the computer is turned on, it loads the Windows operating system and then displays a picture or image referred to as a Desktop. The Desktop environment typically consists of icons, windows, toolbars, folders, wallpapers, and desktop widgets. A GUI might also provide drag-and-drop functionality and other features that make the desktop more complete. A desktop environment aims to be an intuitive way for the user to interact with the computer using concepts that are similar to those used when interacting with the physical world, such as buttons and windows. Just as you may have a desk that you use at home with assorted papers, pencils, a stapler, or tape dispensers on it, so the Desktop of a computer has similarly useful items. It can vary from person-to-person depending on individual working habits and styles.
But no operating system is perfect, and sometimes various problems might occur. In this article, we address the ‘missing desktop’ issue, which can be annoying and frustration, especially if material on your system has seemingly disappeared. This problem results in missing desktop icons and even missing background/wallpaper. This may seem like a serious problem, but it is often just a system glitch. Another reason for this occurrence is that you might have accidentally changed some system settings. There are several solutions to the Desktop problem (or just for the missing icons) depending on the cause. Below, we show a number of possibilities of how to return your Desktop and icons.
Table of Contents:
It is recommended to run a free scan with Malwarebytes — a tool to detect malware and fix computer errors. You will need to purchase the full version to remove infections and eliminate computer errors. Free trial available.
Start Explorer Process
File Explorer (formerly known as Windows Explorer) displays the hierarchical structure of files, folders, and drives on the computer. It also shows any network drives that have been mapped to drive letters. Using Windows Explorer, you can copy, move, rename, and search for files and folders. According to some users, starting File Explorer fixes the missing desktop/icons problem on their Windows operating systems. To try this, you will need to run Task Manager.
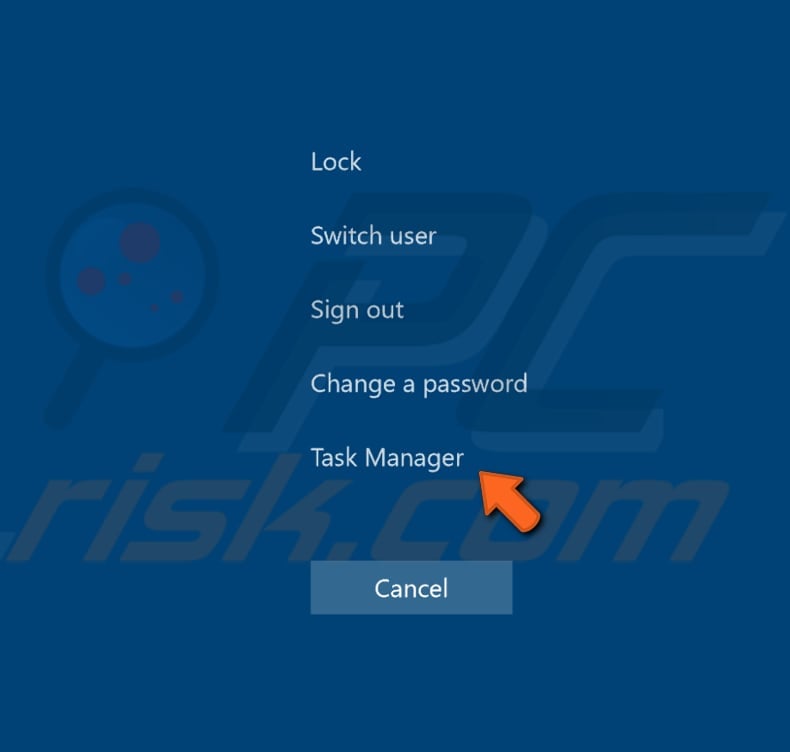
Task manager is a system monitor program used to provide information about the processes and programs running on a computer, as well as the general status of the system. Some implementations can also be used to terminate processes and programs, and change processes’ priorities. To open Task Manager, click Ctrl + Shift + Esc keys on your keyboard, or press Ctrl + Alt + Delete, and then select Task Manager from the Windows Security Screen menu.
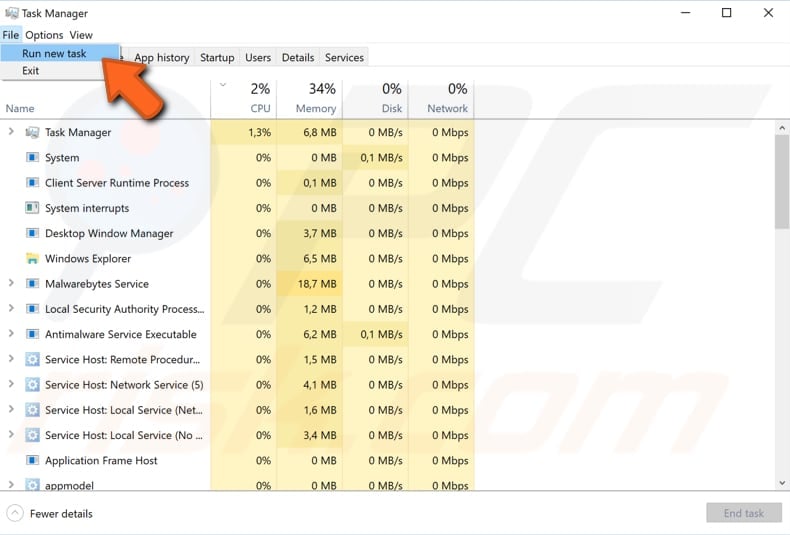
In the Task Manager window, click «More details» if needed, and then click «File» and select «Run new task».
In the «Create new task» box, type «explorer» and press Enter on your keyboard or click «OK».
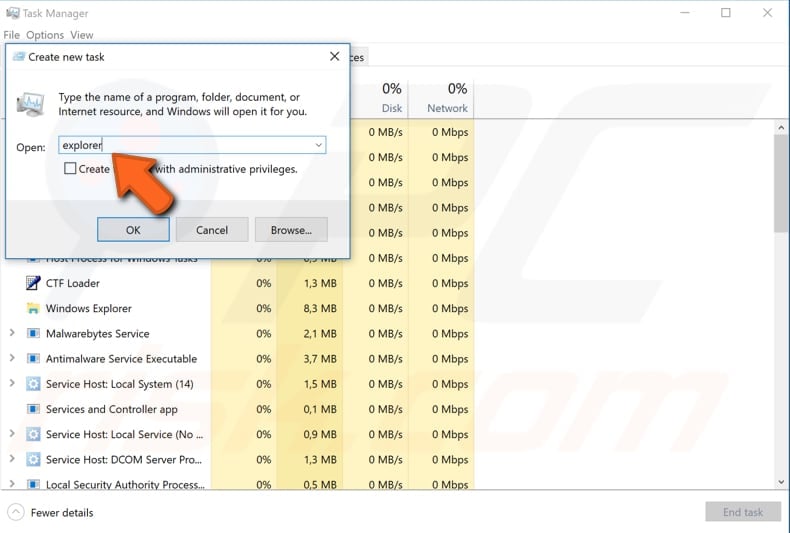
Now the explorer.exe process should start and your desktop with all icons should reappear.
Disable Tablet Mode
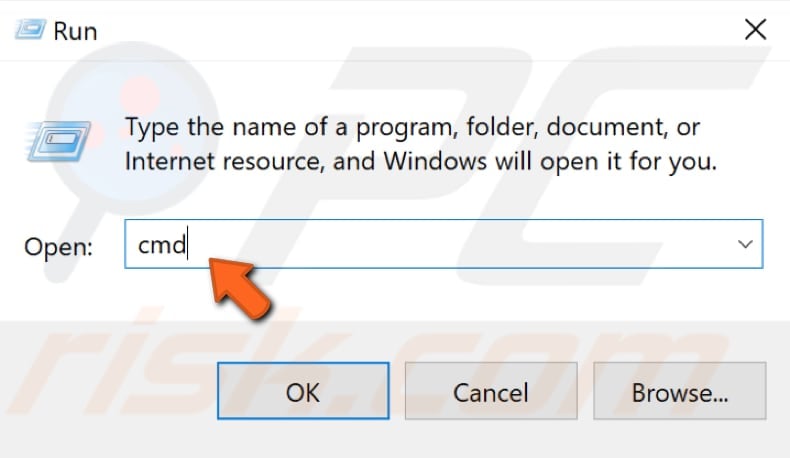
In Windows 8, the Start screen and apps from the Microsoft Store might run in full-screen mode, even if you do not use a tablet or a device with ‘touch’. In Windows 10, Microsoft developed Tablet Mode, which is not enforced on all users, as it was in Windows 8. Sometimes Windows becomes seemingly confused between when to enable or disable Tablet Mode. Windows 10 will actively notify you of Tablet Mode only if you have a device with touch. If, however, Tablet Mode is enabled on the Windows 10 operating system, it might cause issues with missing desktop/icons — disabling Tablet Mode might fix this problem. To check if Tablet Mode is enabled (and to disable it if that is the case), press the Windows key + R keys on your keyboard to open a Run dialog box. Type «cmd» and press Enter or click «OK» to open Command Prompt.
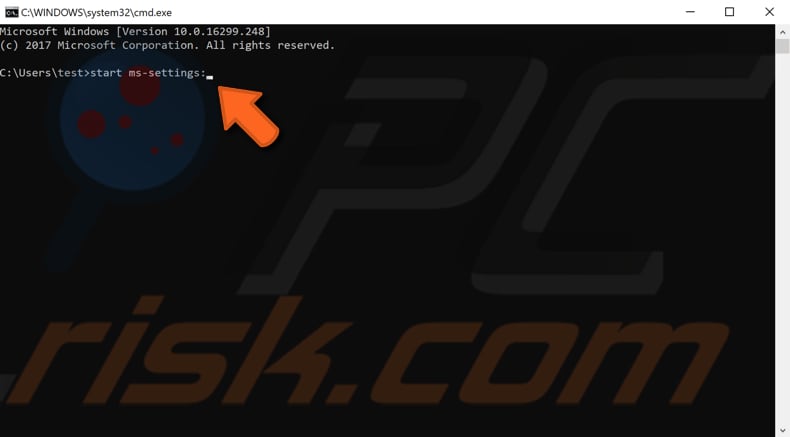
Command Prompt is the input field in a text-based user interface screen, a command line interpreter application available in most Windows operating systems. It is used to execute entered commands. Most of these commands are used to automate tasks through scripts and batch files, perform advanced administrative functions, troubleshoot and solve certain types of Windows issues. To use Command Prompt, you must enter a valid command with any optional parameters. Then, it executes the command as entered and performs whatever task or function it was designed for. To open Windows Settings, type the «start ms-settings:» command and press Enter on your keyboard to execute it and to open Settings.
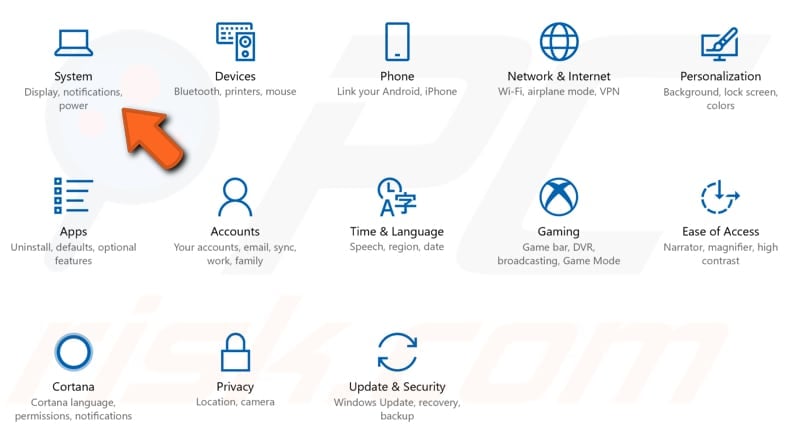
Now, click the «System» icon.
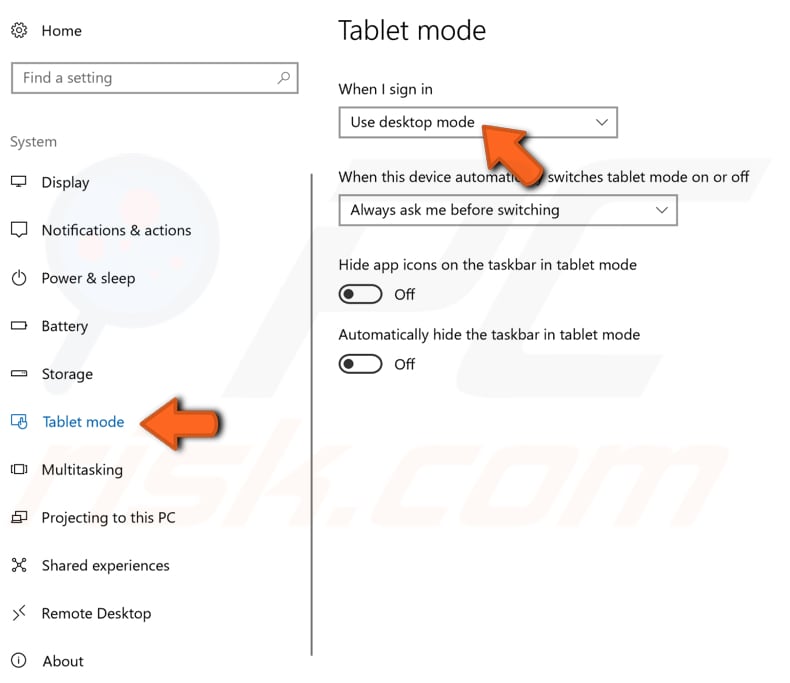
Select «Tablet mode» on the left pane, and under «When I sing in», choose the «Use desktop mode» option. You can also disable the «Hide app icons on the taskbar in tablet mode» and «Automatically hide the taskbar in tablet mode» options by toggling the switch to «Off» position. Restart the computer and see if this solves the missing desktop problem.
Enable «Show desktop icons» Option
If there are no icons on your desktop but all other desktop components (such as Taskbar) are present, you might have accidentally turned off the «Show desktop options» feature. If this is the case, you can retrieve your icons in just a few mouse clicks. Simply right-click on the Desktop and select «View». Then click the «Show desktop icons». If this option is enabled, you should see the check icon next to it. See if this returns the desktop icons. Some users claim that enabling the «Auto arrange icons» option solved the problem, so we suggest you to try this too.

Run System File Checker
If none of the methods mentioned above solve the problem, there might be corrupted system files in the Windows operating system — these will need to be repaired using System File Checker.
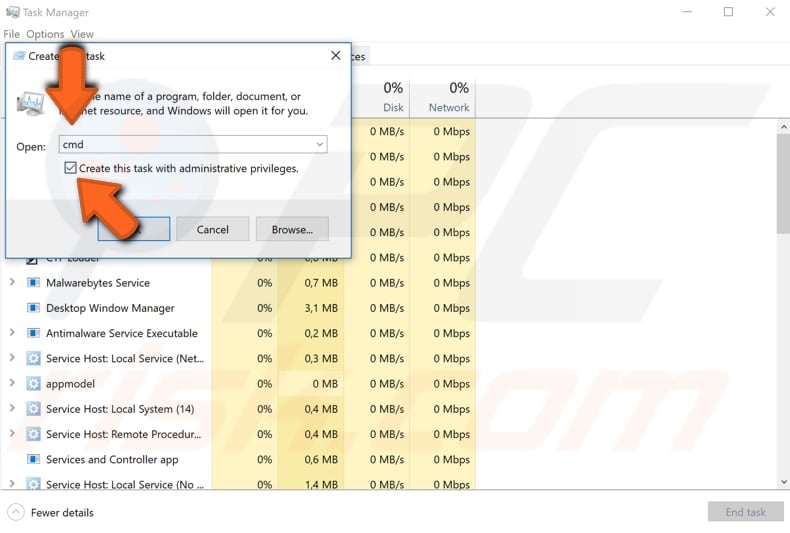
System File Checker (SFC) is a utility in Windows that allows users to scan for corruptions in Windows system files and restore corrupted files. This guide describes how to run the System File Checker tool (SFC.exe) to scan the system files and repair any missing or corrupted ones (including .DLL files). If a Windows Resource Protection (WRP) file is missing or is corrupted, Windows might not behave as expected. For example, some Windows functions will not work or crash. The «sfc scannow» option is one of several specific switches available with the sfc command, the Command Prompt command used to run System File Checker. To run it, first open Command Prompt. To open it with an empty Desktop, use the Ctrl + Shift + Esc keyboard shortcut to open Task Manager. In Task Manager, click «File» and select «Run new task». In «Create new task» Open box, type «cmd» and mark the «Create this task with administrative privileges.» checkbox to start elevated Command Prompt.
Now, type the «sfc /scannow» command and press Enter. This will start the System File Checker. When the scan has finished, restart the computer and see if this solves the missing desktop issue.

Restore Your System Using Restore Points
The System Restore tool creates restore points. A restore point is a collection of important system files stored by System Restore on a given date and time. System Restore reverts everything to a saved restore point, but first, you must have one recorded. If a restore point does not exist on your computer, System Restore has nothing to revert to. To use this tool, you must have created restore points. With a created restore point, this feature will bring your system back to the previous working state, without affecting your files and data.
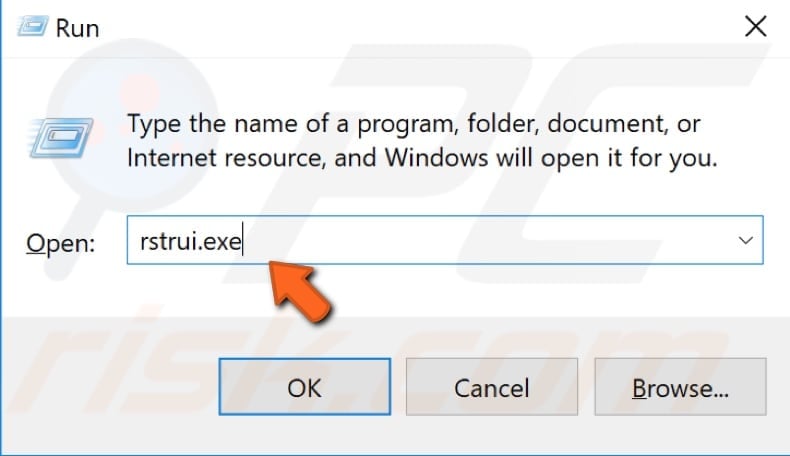
This solution is a last resort — try it only if nothing else solves the problem. If you have any system restore points that were created before you started experiencing issues with the missing Desktop (or its icons) you might be able to fix the problem by performing a System Restore. To restore your system, launch Run. To start it, press the Windows Key + R and type «rstrui.exe». In the Run dialog box, press Enter or click «OK».
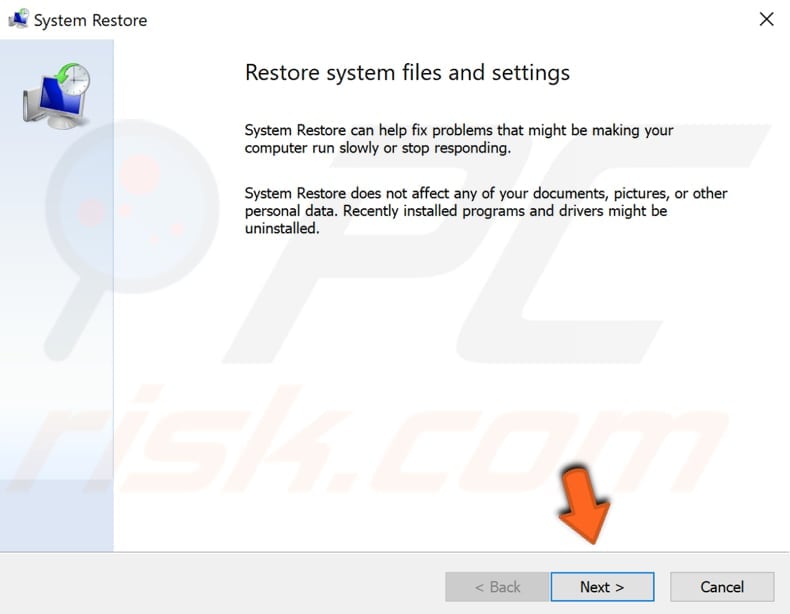
In the System Restore window, click «Next».
If there are restore points created, you will see a list of them. Mark the «Show more restore points» checkbox and it should display more restore points. Select the restore point that suits you best (depending on the time created, etc.) and click «Next». Do not select a Restore Point at a time when the issue with missing desktop was already present — you certainly do not want to revert to that state.

Confirm your restore point. Your computer will be restored to the state prior to the event detailed in the «Description» field. If you are happy with your choice, click «Finish» and the system restore process will begin.

We hope that the solutions above returned your desktop and icons. If there is another workaround that solves the missing desktop problem and we have not mentioned it, do not hesitate to leave a comment in our comments section below.
Video Showing How To Fix Missing Desktop On Windows 10:
CCBoot Wiki Database
Client Diskless Boot Failed
1. Failure of booting from network
1) The first booting item in the BIOS is not «boot from network».
2) The electricity in the BIOS battery is not enough.
3) The BIOS setup is in a mess, please reset up the BIOS.
4) Because of the humid climate, the connection between the RAM and main board is not good. Please wipe the gold fingers in the RAM.
5) The network cable is not well plugged.
6) Sometime the client do not boot, even after checking all possibility in server. This means issue is with network switch, you need to power cycle the switch (turn off/ on) once. After that clients will boot fine. If this happens frequently. We recommend replacing the switch with a better one.
7) Client will fail to boot if the IP address of client PC is conflicted with another PC or device (Wifi Extender, router, or mobile devices). If this happens please change the IP of the devices and reboot the client.
2. Stops at DHCP
The client stops at DHCP when booting and the address of the sever IP can’t be obtained.
1) Problem of the network: testing method, use one computer to PING server and use the server to PING the computer.
2) Problem of the switch. Solution: check the main switch and the sub switch to see whether the power supply is normal.
3) Problem of network cable. Solution: Check whether there is a problem for the client network cable and the server network cable and make sure they have been connected to a LAN.
4) Problem of the firewall. Solution: Shutdown the firewall of the server.
5) The CCBoot service stops. Solution: Click the «start» button in the main interface of CCBoot, start the CCBoot service.
6) The server port needed by DHCP is blocked. Solution: open port 67 on the server.
7) The client is not added to the user list of CCBoot and the server of CCBoot hasn’t enabled the «auto add client» option.
3. Stops at the TFTP
In the process of booting of the client, DHCP can obtain the IP address of the server, but it stops at location of «TFTP» and the error of TFTP occurs.
1) CCBoot hasn’t started the TFTP service.
2) The firewall of the server system does’t open TFTP port, solution: to open the port 69 in the firewall.
3) Reset up TFTP. Solution: in the tool bar of the main interface of CCBoot, click «Options» button. In the popup dialogue box of «CCBoot Setting», choose the «DHCP Setting» tab, and unselect the «TFTP» check box. Click the «Yes» button, and reselect the check box of the «TFTP».
4) On new motherboards, sometimes «gpxe.pxe» and «gpxex.pxe » will take much time to start windows booting. In this case you can use «ipxe.pxe».

4. Stops at www.ccboot.com
1) PXE’s loading file problem. The default PXE file doesn’t support some special network card.
Solution: Change PXE file, take the examples of PC101, the concrete procedures are as follows:
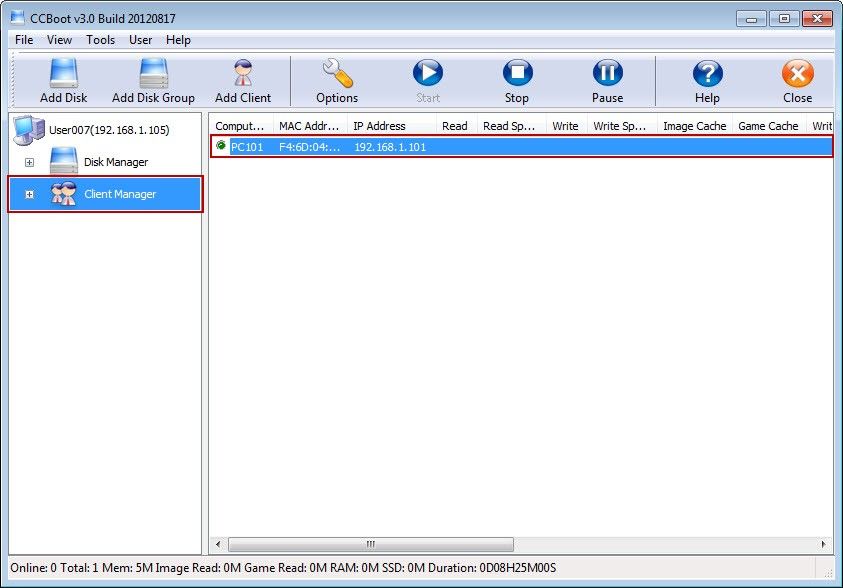
a. In the main interface of the CCBoot, click «Client Manager» and double click «PC101» in the right detail box.

b. The «CCBoot Client» dialogue box pops up, changes the default «gpxe.pxe» in the editing box into «gpxex.pxe» and click «save» button.
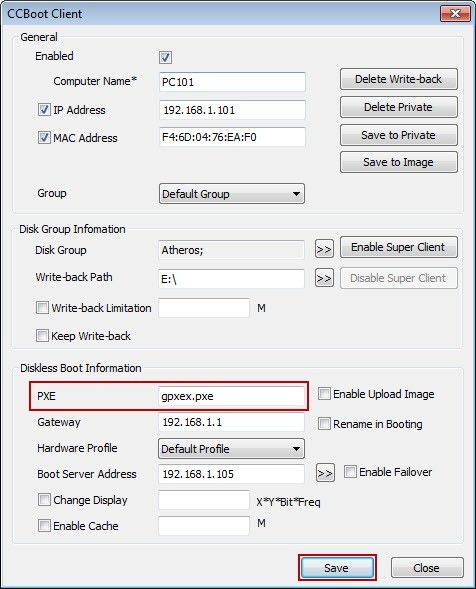
Note: It would be better to use «gpxe.pxe», but if you cannot diskless boot the client via using «gpxe.pxe», you can try to change the PXE value to «gpxe0.pxe». If this doesn’t work, please modify the value to «gpxex.pxe». If you can successfully use “gpxe.pxe» in CCBoot 20120817, but failed to use it in the new build, please try ”gpxe1.pxe». From CCBoot v3.0 Build 20130710, «gpxe1.pxe» means «gpxe.pxe» of 20120817. If Realtek 8111E NIC has blue screen problem, you can try to change the PXE value to «ipxe.pxe».
2) If your disk sorting is wrong, the client will only read 1k and stop, please find the solution as below.
a. In the left side of the CCBoot form, click the «Disk Manager» node on the directory tree , and select the game disk group node, you’ll find the image disk is on the bottom of this disk group (Figure 1-3).
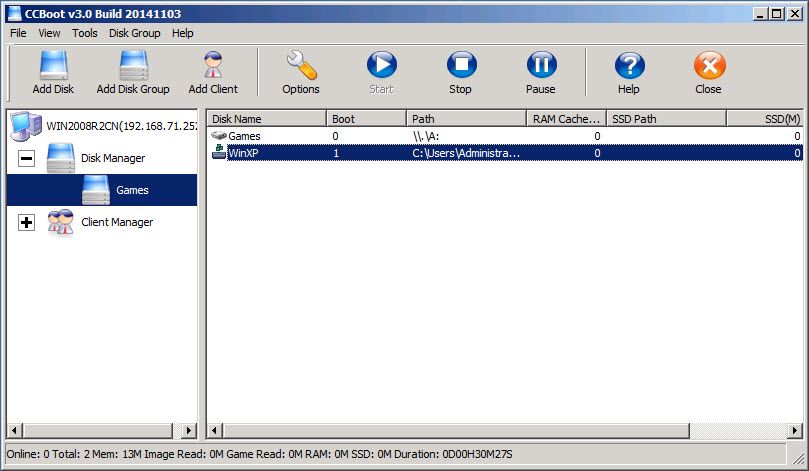
b. Right click the image disk and click the «Move Disk Up» button (Figure 1-4).

Note: Please select the «Bootable» check box in the image disk properties.
5. No more network devices/iSCSI boot 192.168.0.1::3260:: error occurs
When booting the client, the error of «iSCSI boot 192.168.0.1: 3260: No more net work devices» occurs.
The reasons of error and the solution are as follows:
1) Format writeback disk if you see «No more network devices» and «Not supported».
2) The trial version of CCBoot only supports 5 users, if the number exceeds 5, it will stop at «iSCSI boot 192.168.0.1: 3260». Solution: Purchase the serial number and register.
3) The registered number has been exceeded. Solution: Add license number.
4) In the 32 operation system, the single process shall not exceed 1.6 G. When the CCBoot process reaches 1.6 G, the CCBoot server can no longer allocate memory and then error occurs. Solution: Change the server into the 64 bit operation system.
5) The router has opened DHCP and it has disturbed the normal operation of the client. Solution: shut down the inbuilt DHCP of the router.
6) In the LAN, other software has opened DHCP functions. Solution: temporarily shut this software and reboot it after client is in normal startling.
7) The disturbing of the DHCP for CCBoot. For example: in the same LAN, there are two CCBoot servers, two servers are prepared for the load balance (please check the «CCBoot load balance» chapters for details). The server A has deleted the client PC 101, when the client PC101 reboots, it stops at the «No more network devices». Solution: open the installation folder of the server B, copy the «db.xml» file to the installation folder of server A and replace the file of the same name.
8) In «CCBoot Client» dialog box, the «Disk Group» hadn’t been assigned. Please select a disk group.
9) Maybe the BIOS battery has no power.
10) The image has problems.
11) The client of the CCBoot property doesn’t set the «Boot Server Address».
12) Haven’t set correct writeback path in the CCBoot client properties.
6. Stop at Windows Logo
For details, please refer to «Stop at Windows Logo».
7. Blue screen when the client boots
Cause and solution are as follows:
1) The physical RAM of client has problems. Solution: Change the client physical RAMS.
2) The network driver has problems. Solution: change other versions of network card driver.
3) Software conflict (for example, billing software). Solution: uninstall some software which can cause conflicts.
4) The problem of images package. Solution: Remade image package.
8. Automatic restart
Before the client boots to desktop and reboot automatically, the causes and solutions are as follows:
1) When the client writes cache setting of the client is too big, the client will start automatically. Solution: Adjust the size of client write cache.
2) Problem of network card driver. Solution: Change other versions of network card driver.
9. Stops at NTLDR is missing
The client boots with hardware profile image (Please refer to the «CCBoot single image package+ multiple settings PnP» for details). Then the client will stop at the picture shown.

There are the following reasons for the phenomenon above:
Setting error of hardware configuration
In the properties of the client, there’s no correctly written hardware ID. Solution: input the correct hardware ID.
Problem of the CCBoot version
If using the CCBoot2.1 version for setting multiple configurations of hardware, there’s certain possibility for the phenomenon above. Solution: updates to the CCBoot3.0 version.
10. Stops at the PXE-MOF Exiting PXE ROM
Problem of PXE loading file
The PXE loading files of CCBoot doesn’t support the diskless boot of the client. Solution: Change the PXE loading files.
Solution: Change PXE file, take the examples of PC101, the concrete procedures are as follows:
1) In the main interface of CCBoot, click «Client Manager» and double click «PC101» in the right detailed box.
2) The «CCBoot Client» dialogue box will popup and change the default «gpxe.pxe» in the edit box into «gpxex.pxe» and click «Save» button.

Note: If this problem still cannot be solved by using the above method, please try to update the BIOS ROM to the latest version.
11. Diskless Boot Failed with Two NICs
Problem:
If you have two NICs on the client, one is Realtek and the other is the built-in wireless card. Sometimes, after uploading image, you can not diskless boot the client successfully.
Solutions:
1) As CCBoot can not diskless boot with wireless card. You should disable the wireless card on the client first; otherwise, CCBoot will treat the wireless card as the boot NIC. You can disable the wireless card in Device Manager.
2) Install «CCBootClient» program.
4) Diskless boot the client.
Note:
If you want to use the disabled NIC in the future, after diskless booted the client successfully, you can enable super client for this PC, and then go to Device Manager to enable that NIC. Finally, disable super client. For details, please refer to «Create Client Image with Dual NICs».
12. Error Message of «Database server security does not have a computer account for the trust relationship with this workstation»
If you encountered an error message of «Database server security does not have a computer account for the trust relationship with this workstation» when diskless booting CCBoot v3.0, there may be two reasons for this problem.
Reason 1 It may because that you haven’t added the computer name on CCBoot AD.
Please follow the following steps.
1) Open the CCBoot installation directory, copy «CCBootAD.exe» files to the domain server.
2) Run the «CCBootAD.exe» program on the domain server.
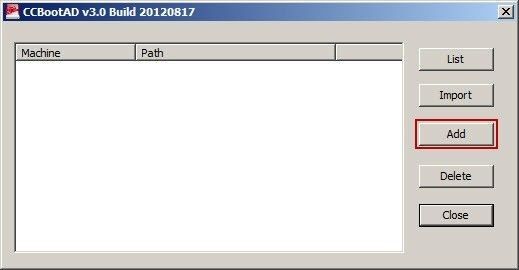
3) Click the «Add» button in the popup «CCBoot AD» dialog box.
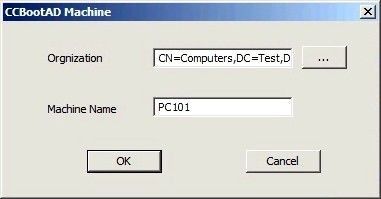
4) Click the «. » button in the popup «CCBootAD Machine» dialog box to select domain «Computers», type PC101 into the «Machine Name» edit box, and click the «OK» button, then the operation is completed.
5) If you want other clients to join the domain as well, you can repeat the above operation steps.
6) Add a domain user of User001.
7) Add other domain users.
Reason 2 It may because that you haven’t added «joindomain».
Please follow the following steps.
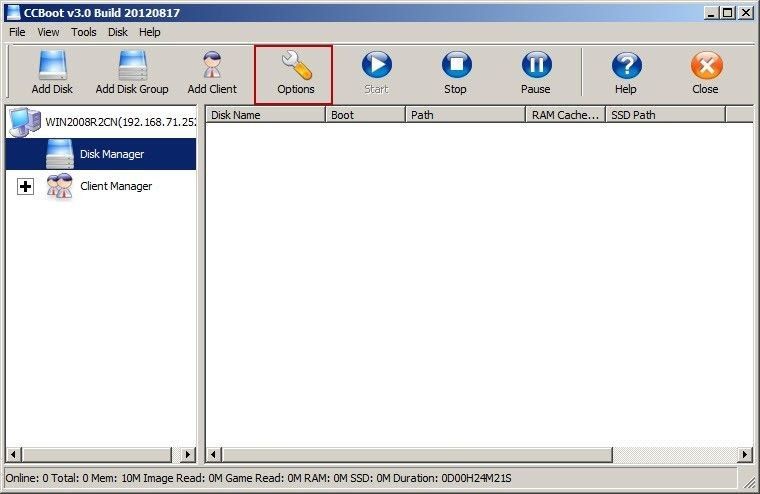
1) Click the «Options» button on the toolbar of CCBoot main interface.
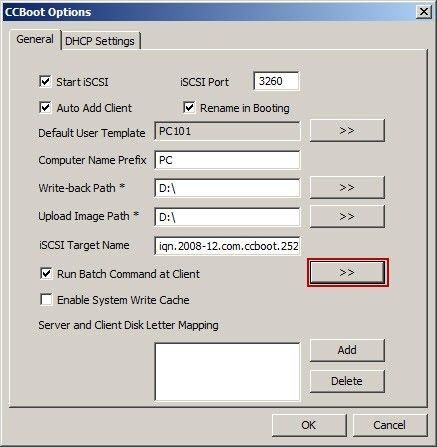
2) In the popup «CCBoot Options» dialog box, click the «General» tab, select the «Run Batch Command at Client» check box, then click the «>>» button in the right side of the «Run Batch Command at Client».
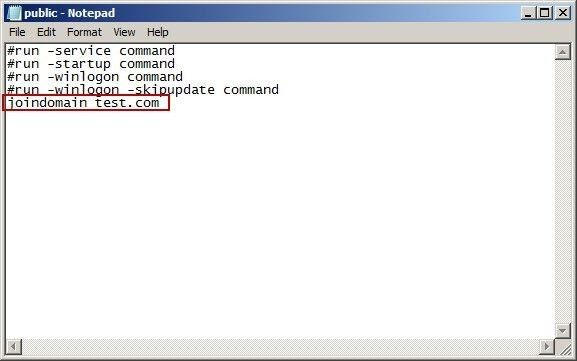
3) Add an order of «joindomain domain name» at the bottom of the popup «public — Notepad» (E.g. «joindomain test.com»), and enable clients to join the «test.com» domain.
Note: You can also watch the video of «How to Use CCBoot in Windows Domain» (about 06:55).
13. Connect Host Failed
Please check whether the client and server can ping each other successfully or not. Also, you can try to change the client IP address, and delete the old client on CCBoot server, and then auto scan the new changed IP. Besides, please check whether the Windows firewall has been turned off.
14. PXE Boot Windows 8 Failed
15. «Failed to Start TFTP» and» Failed to Start DHCP»
If the server IP address was changed, it will report the error of «Failed to Start TFTP» and «Failed to Start DHCP». You can solve this problem according to the following steps.
1) On CCBoot main interface, click the «Options» button.
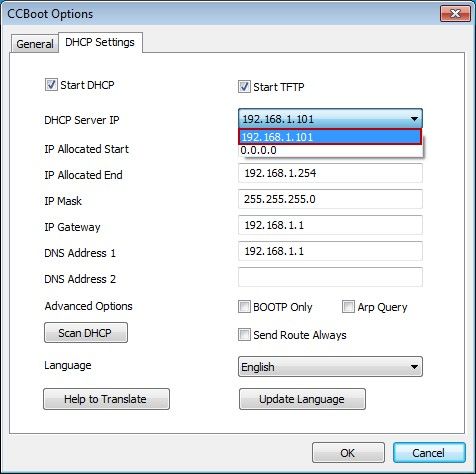
2) In the pop up «CCBoot Options» dialog box, click the «DHCP Settings» tab, and then click the «DHCP Server IP» combo box, and select the right IP address.
16. After windows activation
17. Hardware Failure
If you still cannot diskless boot your client properly then the issue is in client hardware.
Sometime bad parts or components cause the client to fail to boot.
The main culprit for this is usually CPU or RAM and sometime NIC as well.
So check then by replacing them with working PCs components.


