- Stay protected with Windows Security
- Important security info
- Understand and customize Windows Security features
- Status icons indicate your level of safety:
- Run a malware scan manually
- Run a quick scan in Windows Security
- Run an advanced scan in Windows Security
- Schedule your own scan
- Schedule a scan
- Turn Microsoft Defender Antivirus real-time protection on or off
- Turn real-time protection off temporarily
- FAQ about Internet Explorer Enhanced Security Configuration (ESC)
- Internet Explorer Enhanced Security Configuration
- The default setting for Internet Explorer ESC
- The effects of enabling Internet Explorer ESC
- How to turn off Internet Explorer ESC on Windows servers
- How to disable Internet Explorer ESC by using a script
- Contents of the batch file
- How to manage the IEHarden Setting for users by using Group Policy Preferences (GPP)
- Internet Explorer doesn’t seem to work after you disable ESC by using Server Manager
- Change security and privacy settings for Internet Explorer 11
- Privacy settings
- Security zones
Stay protected with Windows Security
Windows 10 includes Windows Security, which provides the latest antivirus protection. Your device will be actively protected from the moment you start Windows 10. Windows Security continually scans for malware (malicious software), viruses, and security threats. In addition to this real-time protection, updates are downloaded automatically to help keep your device safe and protect it from threats.
Windows 10 in S mode
Some features will be a little different if you’re running Windows 10 in S mode. Because this mode is streamlined for tighter security, the Virus & threat protection area has fewer options. But don’t worry—the built-in security of this mode automatically prevents viruses and other threats from running on your device, and you’ll receive security updates automatically. For more info, see Windows 10 in S mode FAQ.
Important security info
Windows Security is built-in to Windows 10 and includes an antirvirus program called Microsoft Defender Antivirus. (In previous versions of Windows 10, Windows Security is called Windows Defender Security Center).
If you have another antivirus app installed and turned on, Microsoft Defender Antivirus will turn off automatically. If you uninstall the other app, Microsoft Defender Antivirus will turn back on automatically.
If you’re having problems receiving Windows Security updates, see Fix Windows Update errors and the Windows Update FAQ.
For info on how to uninstall an app, see Repair or remove an app in Windows 10.
To change your user account to an admin account, see Create a local user or administrator account in Windows 10.
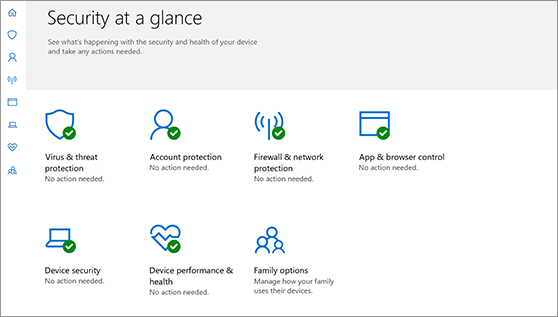
Understand and customize Windows Security features
Windows Security is your home to manage the tools that protect your device and your data:
Virus & threat protection. Monitor threats to your device, run scans, and get updates to help detect the latest threats. (Some of these options are unavailable if you’re running Windows 10 in S mode.)
Account protection. Access sign-in options and account settings, including Windows Hello and dynamic lock.
Firewall & network protection. Manage firewall settings and monitor what’s happening with your networks and internet connections.
App & browser control. Update settings for Microsoft Defender SmartScreen to help protect your device against potentially dangerous apps, files, sites, and downloads. You’ll have exploit protection and you can customize protection settings for your devices.
Device security. Review built-in security options to help protect your device from attacks by malicious software.
Device performance & health. View status info about your device’s performance health, and keep your device clean and up to date with the latest version of Windows 10.
Family options. Keep track of your kids’ online activity and the devices in your household.
You can customize how your device is protected with these Windows Security features. To access them, select Start > Settings > Update & Security > Windows Security . Then select the feature you want to explore.
Open Windows Security settings
Status icons indicate your level of safety:
Green means your device is sufficiently protected and there aren’t any recommended actions.
Yellow means there is a safety recommendation for you.
Red is a warning that something needs your immediate attention.
Run a malware scan manually
When you’re concerned about risks to a specific file or folder, you can right-click the file or folder in File Explorer, then select Scan with Microsoft Defender.
If you suspect there’s malware or a virus on your device, you should immediately run a quick scan. This is much faster than running a full scan on all your files and folders.
Run a quick scan in Windows Security
Select Start > Settings > Update & Security > Windows Security and then Virus & threat protection.
Open Windows Security settings
Under Current threats, select Quick scan (or in previous versions of Windows 10, under Threat history, select Scan now).
If the scan doesn’t find any issues, but you’re still concerned, you may want to check your device more thoroughly.
Run an advanced scan in Windows Security
Select Start > Settings > Update & Security > Windows Security and then Virus & threat protection.
Under Current threats, select Scan options (or in previous versions of Windows 10, under Threat history, select Run a new advanced scan).
Select one of the scan options:
Full scan (check files and programs currently running on your device)
Custom scan (scan specific files or folders)
Microsoft Defender Offline scan (run this scan if your device has been, or could potentially be, infected by a virus or malware). Learn more about Microsoft Defender Offline
Select Scan now.
Note: Because of streamlined security, this process isn’t available if you’re running Windows 10 in S mode.
Schedule your own scan
Even though Windows Security is regularly scanning your device to keep it safe, you can also set when and how often the scans occur.
Schedule a scan
Select the Start button, type schedule tasks in the Search box, and in the list of results, select Task Scheduler.
In the left pane, select the arrow (>) next to Task Scheduler Library to expand it, do the same with Microsoft > Windows, and then scroll down and select the Windows Defender folder.
In the top-center pane, select Windows Defender Scheduled Scan. (Point to the choices to see the full names.)
In the Actions pane on the right, scroll down and then select Properties.
In the window that opens, select the Triggers tab, and then select New.
Set your preferred time and frequency, and then select OK.
Review the schedule and select OK.
Note: Because of streamlined security, this process isn’t available if you’re running Windows 10 in S mode.
Turn Microsoft Defender Antivirus real-time protection on or off
Sometimes you may need to briefly stop running real-time protection. While real-time protection is off, files you open or download won’t be scanned for threats. However, real-time protection will soon turn on automatically again to protect your device.
Turn real-time protection off temporarily
Select Start > Settings > Update & Security > Windows Security and then Virus & threat protection > Manage settings. (In previous versions of Windows 10, select Virus & threat protection > Virus & threat protection settings.)
Open Windows Security settings
Switch the Real-time protection setting to Off and choose Yes to verify.
Note: Because of streamlined security, this process isn’t available if you’re running Windows 10 in S mode.
FAQ about Internet Explorer Enhanced Security Configuration (ESC)
Internet Explorer Enhanced Security Configuration
Internet Explorer Enhanced Security Configuration (ESC) establishes security settings that define how users browse the internet and intranet websites. These settings also reduce the exposure of servers to websites that might present a security risk. This process is also known as IEHarden. For more information, see Internet Explorer: Enhanced Security Configuration.
Original product version: В Internet Explorer
Original KB number: В 4551931
The default setting for Internet Explorer ESC
This feature is enabled by default on servers.
The effects of enabling Internet Explorer ESC
Internet Explorer ESC adjusts the Internet Explorer extensibility and security settings to reduce exposure to possible future security threats. These settings are on the Advanced tab of Internet Options in Control Panel. The following table describes the settings.
| Feature | Entry | Setting | Result |
|---|---|---|---|
| Browsing | Display Enhanced Security Configuration dialog box. | On | Displays a dialog box to notify you when an internet site tries to use scripting or ActiveX Controls. |
| Browsing | Enable Browser Extensions. | Off | Disables features that you installed for use together with Internet Explorer that are created by companies other than Microsoft. |
| Browsing | Enable Install on Demand (Internet Explorer). | Off | Disables installing Internet Explorer components on demand, if required by a webpage. |
| Browsing | Enable Install on Demand (Other). | Off | Disables installing web components on demand, if required by a webpage. |
| Microsoft VM | Just-in-time (JIT) compiler for virtual machine enabled (requires restart). | Off | Disables the Microsoft VM compiler. |
| Multimedia | Do not display online content in the media bar. | On | Disables playback of media content in the Internet Explorer media bar. |
| Multimedia | Do not display online content in the media bar. | On | Disables playback of media content in the Internet Explorer media bar. |
| Multimedia | Play animations in webpages. | Off | Disables animations. |
| Multimedia | Play videos in webpages. | Off | Disables video clips. |
| Security | Check for server certificate revocation (requires restart). | On | Automatically checks a website’s certificate to see whether the certificate has been revoked before accepting the certificate as valid. |
| Security | Check for signatures on downloaded programs. | On | Automatically verifies and displays the identity of programs that you download. |
| Security | Do not save encrypted pages to disk. | On | Disables saving secured information in your Temporary Internet Files folder. |
| Security | Empty Temporary Internet Files folder when browser is closed. | On | Automatically clears the Temporary Internet Files folder when you close the browser. |
These changes reduce the functionality in webpages, web-based applications, local network resources, and applications that use a browser to display online help, support, and general user assistance.
How to turn off Internet Explorer ESC on Windows servers
To turn off Internet Explorer ESC, follow these steps:
Enter Server Manager in Windows search to start Server manager application.
Select Local Server.
Navigate to the IE Enhanced Security Configuration property, select the current setting to open the property page, select the Off option button for the desired users, and then select OK.
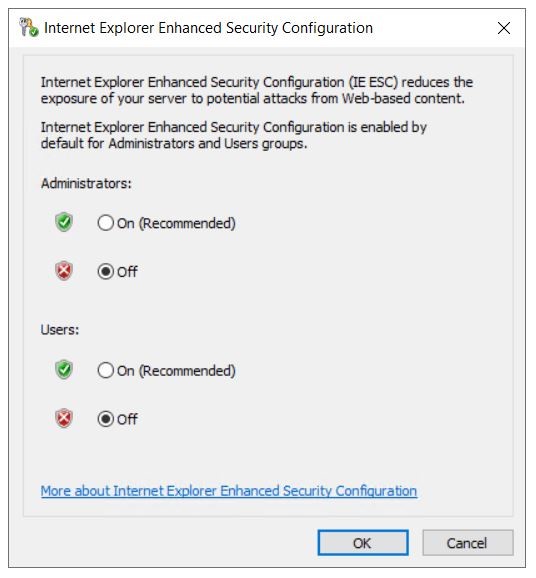
Select the Refresh icon on the Server Manager toolbar to see the new settings reflected in the server manager.

The following video demonstrates this procedure:
How to disable Internet Explorer ESC by using a script
Extract IEHArden_V5.bat from the compressed (.zip) file, and then run it either at an administrative command prompt or as part of log-in script by using the procedure that is documented at How to assign user logon scripts.
Contents of the batch file
How to manage the IEHarden Setting for users by using Group Policy Preferences (GPP)
To change the IEHarden setting for users by using Group Policy Preferences Registry configuration, follow these steps:
Open the GPMCM.msc console, and then navigate to User Configuration > Preferences > Windows Settings.
In the navigation pane, right-click the Registry object, and then select New > Registry Item.

In IEHarden Properties, specify the following settings:
Location: HKEY_CURRENT_USER\Software\Microsoft\Windows\CurrentVersion\Internet Settings\ZoneMap
Value name: IEHarden
Value Type: REG_DWORD
Value data: 0 or 00000000

Select Apply and OK to complete this GPP configuration.
You may also want to check the following registry subkeys if this value does not resolve the problem. In most cases, this is not necessary.
- HKEY_CURRENT_USER\Software\Microsoft\Windows\CurrentVersion\Internet Settings\ZoneMap
- HKEY_LOCAL_MACHINE\Software\Microsoft\Windows\CurrentVersion\Internet Settings\ZoneMap
- HKEY_CURRENT_USER\Software\Wow6432Node\Microsoft\Windows\CurrentVersion\Internet Settings\ZoneMap
Internet Explorer doesn’t seem to work after you disable ESC by using Server Manager
To troubleshoot this scenario, refer to Standard users can’t turn off Internet Explorer Enhanced Security feature on a Windows Server 2003-based terminal server or a later version. Basically, you may have to enable or disable ESC again. Targeting the registry may be the easiest way to resolve this problem.
Change security and privacy settings for Internet Explorer 11
The new browser recommended by Microsoft is here
Get speed, security, and privacy with the new Microsoft Edge .
Privacy settings
By adjusting Internet Explorer’s privacy settings, you can affect how websites monitor your online activity. For example, you can decide which cookies are stored, choose how and when sites can use your location info, and block unwanted pop-ups.
Cookies are small files that websites put on your PC to store information about you and your preferences. Cookies can make your browsing experience better by letting sites remember your preferences or letting you avoid signing in each time you visit certain sites. However, some cookies might put your privacy at risk by tracking sites that you visit. For more info, see Delete and manage cookies in Internet Explorer.
When Do Not Track is turned on, Internet Explorer will send a Do Not Track request to the sites you visit and to the third parties whose content is hosted on those sites to let the sites know that you would prefer not to be tracked. For more info, see Do Not Track.
Browsers store some info—like your search history—to help improve your experience on the web. When you use InPrivate Browsing, info like passwords, search history, and page history is deleted once you close the tab.
To open an InPrivate Browsing session, right–click the Internet Explorer icon on the taskbar, and select Start InPrivate Browsing.
To turn off add-ons in InPrivate Browsing sessions
Open the desktop, and then select the Internet Explorer icon on the taskbar.
Select the Tools button , and then select Internet options.
On the Privacy tab, select the Disable toolbars and extensions when InPrivate Browsing starts check box, and select OK.
Location Services lets sites ask for your physical location to improve your experience. For example, a mapping site can request your physical location to center the map for you. Internet Explorer will let you know when a site wants to use your location. When this happens, select Allow once to let a site use your location just one time. If you want the site to use your location each time you visit, select Always allow.
To turn off location sharing
If you don’t want sites to ask for your physical location, you can turn off location sharing. Here’s how:
Open Internet Explorer by selecting the Internet Explorer icon on the taskbar.
Click the Tools button , and then select Internet options.
On the Privacy tab, under Location, select the Never allow websites to request your physical location check box.
Pop-up Blocker limits or blocks pop-ups on sites that you visit. You can choose the level of blocking you prefer, turn on or off notifications when pop-ups are blocked, or create a list of sites that you don’t want to block pop-ups on. Pop-up Blocker settings only apply to Internet Explorer.
To turn Pop-up Blocker on or off
Open Internet Explorer, select the Tools button , and then select Internet options.
On the Privacy tab, under Pop-up Blocker, select or clear the Turn on Pop-up Blocker check box, and then select OK.
Block all pop-ups
Open Internet Explorer, select the Tools button , and then select Internet options.
On the Privacy tab, under Pop-up Blocker, select Settings.
In the Pop-up Blocker settings dialog box, under Blocking level, set the blocking level to High: Block all pop-ups (Ctrl + Alt to override).
Select Close, and then select OK.
Turn off notifications when pop-ups are blocked
Open Internet Explorer, select the Tools button , and then select Internet options.
On the Privacy tab, under Pop-up Blocker, select Settings.
In the Pop-up Blocker settings dialog box, clear the Show Notification bar when a pop-up is blocked check box.
Select Close, and then select OK.
Tracking Protection helps prevent information about your browsing from being sent to third-party content providers on sites you visit. Think of a Tracking Protection Lists as a “do not call” list. Internet Explorer blocks any third-party content from sites on the list, and limits the info that those third-party sites can collect about you.
Security zones
By changing the security settings, you can customize how Internet Explorer helps protect your PC from potentially harmful or malicious web content. Internet Explorer automatically assigns all websites to a security zone: Internet, Local intranet, Trusted sites, or Restricted sites. Each zone has a different default security level that determines what kind of content can be blocked for that site. Depending on the security level of a site, some content can be blocked until you choose to allow it, ActiveX controls might not run automatically, or you might see warning prompts on certain sites. You can customize the settings for each zone to decide how much protection you do or don’t want.
Open Internet Explorer, select the Tools button , and then select Internet options.
Select the Security tab and customize your security zone settings in these ways:
To change settings for any security zone, select the zone icon, and then move the slider to the security level that you want.
To create your own security settings for a zone, select the zone icon, and then select Custom level and choose the settings that you want.
To restore all security levels to their original settings, select the Reset all zones to default level button.
Open Internet Explorer, select the Tools button , and then select Internet options.
Select the Security tab, choose one of the security zone icons ( Local intranet, Trusted sites, or Restricted sites), and then select Sites. You can add sites to the zone you chose, or delete sites that you no longer want in this zone.
If you chose Local intranet in the previous step, select Advanced, and then do one of the following:
Add a site. Enter a URL into the Add this website to the zone box, and then select Add.
Remove a site. Under Websites, select the URL you want to remove, and then select Remove.
Enhanced Protected Mode makes it harder for malware to run in Internet Explorer.
To turn on or off Enhanced Protected Mode
Open Internet Explorer, select the Tools button, and then select Internet Options.
On the Advanced tab, under Security, select (or clear) the Enable Enhanced Protected Mode check box, and then select OK. You’ll need to restart your PC before this setting takes effect.


